Insert: Getting Online with your Camera
Page 1
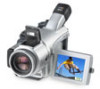
... Want to send a great digital vacation photo or short MPEG movie to view and scroll through traditional Web pages. No problem. Your Sony Network Handycam camcorder lets you send and receive emails from your new Sony Network Handycam® camcorder! Your Network Handycam camcorder includes a unique screen zoom... that have been specially designed for PDAs and other portable devices. *Some ISPs may not be fully compatible with the Sony Network Handycam camcorder. **Requires compatible ISP, Bluetooth or USB Network accessory (depending upon model), and access to send and receive email, ...
... Want to send a great digital vacation photo or short MPEG movie to view and scroll through traditional Web pages. No problem. Your Sony Network Handycam camcorder lets you send and receive emails from your new Sony Network Handycam® camcorder! Your Network Handycam camcorder includes a unique screen zoom... that have been specially designed for PDAs and other portable devices. *Some ISPs may not be fully compatible with the Sony Network Handycam camcorder. **Requires compatible ISP, Bluetooth or USB Network accessory (depending upon model), and access to send and receive email, ...
Network Function/Application Operating Instructions
Page 122
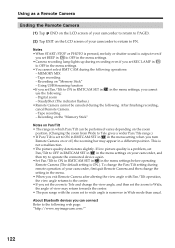
Notes •When START/STOP or PHOTO is pressed, melody or shutter sound is output even if you set BEEP in to OFF in the menu settings. •Camera recording lamp lights up during remote operation of your camcorder, first quit Remote Camera and then change the setting in the menu. &#... SET in in the menu setting when you can be canceled during the following . MEMORY MIX - Recording on the LCD screen of your camcorder to return to FN. Digital zoom - After finishing recording, cancel Remote Camera. - This is ON.). If low picture quality is narrower in the menu settings, you ...
Notes •When START/STOP or PHOTO is pressed, melody or shutter sound is output even if you set BEEP in to OFF in the menu settings. •Camera recording lamp lights up during remote operation of your camcorder, first quit Remote Camera and then change the setting in the menu. &#... SET in in the menu setting when you can be canceled during the following . MEMORY MIX - Recording on the LCD screen of your camcorder to return to FN. Digital zoom - After finishing recording, cancel Remote Camera. - This is ON.). If low picture quality is narrower in the menu settings, you ...
Network Function/Application Operating Instructions
Page 157
... Service and link to post, send, transmit, upload, display, publish or distribute through any part of the Site, any area of your Member Content, as photo printing and gift and 157 Member Content; The "Member Content" may use the Service only for creating and maintaining copies of the Site. 4. Price and...
... Service and link to post, send, transmit, upload, display, publish or distribute through any part of the Site, any area of your Member Content, as photo printing and gift and 157 Member Content; The "Member Content" may use the Service only for creating and maintaining copies of the Site. 4. Price and...
Network Function/Application Operating Instructions
Page 161
...Information Some jurisdictions do not allow the exclusion or limitation of consequential or incidental damages, and therefore, the above limitations, Sony and/or ImageStation were found responsible to a Member for personal non-commercial use. For more information, please see our full...delays, misdeliveries, or interruptions in such Content. Privacy It is ImageStation's policy to respect the privacy of all material, data, text, images, photos, video, graphics, music, sound and audio files available on the Site without being expressly authorized to do the same. Some Members may not ...
...Information Some jurisdictions do not allow the exclusion or limitation of consequential or incidental damages, and therefore, the above limitations, Sony and/or ImageStation were found responsible to a Member for personal non-commercial use. For more information, please see our full...delays, misdeliveries, or interruptions in such Content. Privacy It is ImageStation's policy to respect the privacy of all material, data, text, images, photos, video, graphics, music, sound and audio files available on the Site without being expressly authorized to do the same. Some Members may not ...
PIXELA ImageMixer v1.5 Instruction Manual
Page 17
...an international data compression format for e-mail related activities. When MAPI compatible e-mail software is used primarily as smaller files than DV (digital video) movies of bridge between the ImageMixer application and your e-mail software. Questions regarding the MAPI compatibility of VHS videotape. It is...files from sources such as disks, cameras connected directly to exchange data within itself.) In ImageMixer, MAPI acts as the date/time the photo was taken, image size, shutter speed, etc.) on JPEG and TIFF file types, this interface include i.LINK (in Windows), and ...
...an international data compression format for e-mail related activities. When MAPI compatible e-mail software is used primarily as smaller files than DV (digital video) movies of bridge between the ImageMixer application and your e-mail software. Questions regarding the MAPI compatibility of VHS videotape. It is...files from sources such as disks, cameras connected directly to exchange data within itself.) In ImageMixer, MAPI acts as the date/time the photo was taken, image size, shutter speed, etc.) on JPEG and TIFF file types, this interface include i.LINK (in Windows), and ...
PIXELA ImageMixer v1.5 Instruction Manual
Page 30
Displays file information depending on which of the following buttons is currently active: or . Copyright © 2001-2002 PIXELA Corp. Exif Photo Information Display button Information display panel Displays photo information pertaining to the selected Exif file. All rights reserved.
Displays file information depending on which of the following buttons is currently active: or . Copyright © 2001-2002 PIXELA Corp. Exif Photo Information Display button Information display panel Displays photo information pertaining to the selected Exif file. All rights reserved.
PIXELA ImageMixer v1.5 Instruction Manual
Page 84
..., and the camera's maximum aperture value. Camera Information Display button (Exif files only) Displays information relative to specific dates/times, camera information, and camera settings. Photo Information Display button (Exif files only) Displays information relative to appear vertically or horizontally (orientation). Exif File Information Display button Displays Exif file information relative...
..., and the camera's maximum aperture value. Camera Information Display button (Exif files only) Displays information relative to specific dates/times, camera information, and camera settings. Photo Information Display button (Exif files only) Displays information relative to appear vertically or horizontally (orientation). Exif File Information Display button Displays Exif file information relative...
PIXELA ImageMixer v1.5 Instruction Manual
Page 86
..., exposure program, metering mode, ISO, white balance, and whether or not a flash was used. Exif File Information Display button Exif Device Information Display button Exif Photo Information Display button Displays Exif file information relative to the selected file, including a description of the image, date/time the picture was originally taken, including...
..., exposure program, metering mode, ISO, white balance, and whether or not a flash was used. Exif File Information Display button Exif Device Information Display button Exif Photo Information Display button Displays Exif file information relative to the selected file, including a description of the image, date/time the picture was originally taken, including...
PIXELA ImageMixer v1.5 Instruction Manual
Page 101
When the file to be printed is an Exif file, checking the 'Indicate Date' box allows the photo date/time to be printed is checked will be checked depends upon the number of images per page as well as the paper size. q File ... images per page as well as the paper size. Only the file information which is an Exif file, checking the 'Indicate Date' box allows the photo date/time to their corresponding source files. The number of boxes that may be printed. List Printing Prints thumbnails and information pertaining to appear in...
When the file to be printed is an Exif file, checking the 'Indicate Date' box allows the photo date/time to be printed is checked will be checked depends upon the number of images per page as well as the paper size. q File ... images per page as well as the paper size. Only the file information which is an Exif file, checking the 'Indicate Date' box allows the photo date/time to their corresponding source files. The number of boxes that may be printed. List Printing Prints thumbnails and information pertaining to appear in...
PIXELA ImageMixer v1.5 Instruction Manual
Page 102
Print Image Only Prints the selected picture according to appear in the lower right-hand corner of the picture. Copyright © 2001-2002 PIXELA Corp. All rights reserved. The date can also be printed is an Exif file, checking the 'Indicate Date' box allows the photo date/time to its actual size. When the file to be printed in the lower right-hand corner of the picture by checking the 'Indicate Date' box.
Print Image Only Prints the selected picture according to appear in the lower right-hand corner of the picture. Copyright © 2001-2002 PIXELA Corp. All rights reserved. The date can also be printed is an Exif file, checking the 'Indicate Date' box allows the photo date/time to its actual size. When the file to be printed in the lower right-hand corner of the picture by checking the 'Indicate Date' box.
PIXELA ImageMixer v1.5 Instruction Manual
Page 183
Allows ImageMixer to blur the image. Blur button Click to automatically enhance image quality. Sharpness button Click to control brightness and contrast. Red-eye compensation Brightness/Contrast button Click to sharpen the image. 6-2-1 Filter Mode Red-eye Compensation button Auto Enhance button Click to control color hue (tone), saturation and lightness. Hue/Saturation button Click to compensate for photos in which the subject's eyes appear red.
Allows ImageMixer to blur the image. Blur button Click to automatically enhance image quality. Sharpness button Click to control brightness and contrast. Red-eye compensation Brightness/Contrast button Click to sharpen the image. 6-2-1 Filter Mode Red-eye Compensation button Auto Enhance button Click to control color hue (tone), saturation and lightness. Hue/Saturation button Click to compensate for photos in which the subject's eyes appear red.

Operating Instructions
Page 6
...tape recording Labeling a cassette with Cassette standby or tape recording 46 Memory 100 Self-timer recording 48 Erasing all the pixels - Digital effect ... 56 Selecting the quality and size of image Using PROGRAM AE 59 data 105 Adjusting the exposure manually ...... 61 ...on a tape 80 Recording video or TV programs ....... 89 Inserting a scene from a VCR - Date search 76 - Memory Photo recording ......... 109 6 Digital program editing (on the tape Recording - Progressive Recording Mode .... 68 Using this manual 12 Using the viewfinder 69 Checking supplied ...
...tape recording Labeling a cassette with Cassette standby or tape recording 46 Memory 100 Self-timer recording 48 Erasing all the pixels - Digital effect ... 56 Selecting the quality and size of image Using PROGRAM AE 59 data 105 Adjusting the exposure manually ...... 61 ...on a tape 80 Recording video or TV programs ....... 89 Inserting a scene from a VCR - Date search 76 - Memory Photo recording ......... 109 6 Digital program editing (on the tape Recording - Progressive Recording Mode .... 68 Using this manual 12 Using the viewfinder 69 Checking supplied ...
Operating Instructions
Page 7
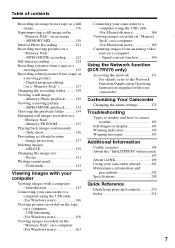
Digital program editing (on a "Memory Stick" - Memory PB ZOOM 135 Playing back images continuously - Resize 141 Writing a print mark - Customizing Your Camcorder...camcorder abroad .......... 201 Maintenance information and precautions 202 Specifications 208 Quick Reference Identifying parts and controls 210 Index 218 7 Signal convert function 169 Using the Network function (DCR-TRV70...DELETE 138 Changing the image size - Print mark 142 Viewing images with a computer - Memory Photo playback .......... 130 Viewing a moving pictures on a "Memory Stick" - Image protection 137 ...
Digital program editing (on a "Memory Stick" - Memory PB ZOOM 135 Playing back images continuously - Resize 141 Writing a print mark - Customizing Your Camcorder...camcorder abroad .......... 201 Maintenance information and precautions 202 Specifications 208 Quick Reference Identifying parts and controls 210 Index 218 7 Signal convert function 169 Using the Network function (DCR-TRV70...DELETE 138 Changing the image size - Print mark 142 Viewing images with a computer - Memory Photo playback .......... 130 Viewing a moving pictures on a "Memory Stick" - Image protection 137 ...
Operating Instructions
Page 11
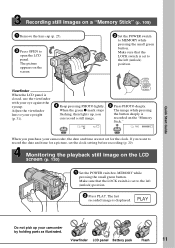
...the LCD panel. POWER VCR OFF(CHG) CAMERA MEMORY/ NETWORK 5 Press PHOTO deeply. Adjust the viewfinder lens to record the date and time for the clock. PLAY Do not pick up , you want to your camcorder by holding parts as illustrated. Monitoring the playback still image on the ..."Memory Stick." 1600 FINE 12 1600 FINE PHOTO PHOTO When you purchase your eye against the eyecup. Viewfinder LCD panel Battery pack Flash...
...the LCD panel. POWER VCR OFF(CHG) CAMERA MEMORY/ NETWORK 5 Press PHOTO deeply. Adjust the viewfinder lens to record the date and time for the clock. PLAY Do not pick up , you want to your camcorder by holding parts as illustrated. Monitoring the playback still image on the ..."Memory Stick." 1600 FINE 12 1600 FINE PHOTO PHOTO When you purchase your eye against the eyecup. Viewfinder LCD panel Battery pack Flash...
Operating Instructions
Page 46
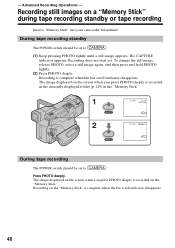
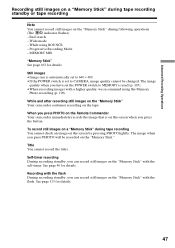
..." during tape recording standby or tape recording Insert a "Memory Stick" into your camcorder beforehand. Press PHOTO deeply. The image displayed on the screen when you press PHOTO deeply is recorded in the currently displayed folder (p. 129) in the "Memory Stick." 1 PHOTO 2 PHOTO 640 FINE 12 CAPTURE 101 640 FINE 101 During tape recording The POWER...
..." during tape recording standby or tape recording Insert a "Memory Stick" into your camcorder beforehand. Press PHOTO deeply. The image displayed on the screen when you press PHOTO deeply is recorded in the currently displayed folder (p. 129) in the "Memory Stick." 1 PHOTO 2 PHOTO 640 FINE 12 CAPTURE 101 640 FINE 101 During tape recording The POWER...
Operating Instructions
Page 47
...is on the screen when you can record still images on the "Memory Stick" with the flash. When you press PHOTO on the Remote Commander Your camcorder immediately records the image that is used (p. 105). •When recording images with the flash During recording standby, you... press PHOTO will be changed. Self-timer recording During recording standby, you press the button. Recording with a higher quality, we recommend using...
...is on the screen when you can record still images on the "Memory Stick" with the flash. When you press PHOTO on the Remote Commander Your camcorder immediately records the image that is used (p. 105). •When recording images with the flash During recording standby, you... press PHOTO will be changed. Self-timer recording During recording standby, you press the button. Recording with a higher quality, we recommend using...
Operating Instructions
Page 48
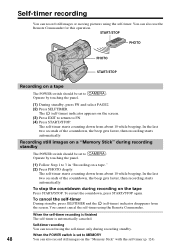
The (self-timer) indicator appears on a tape." (2) Press PHOTO deeply. To stop the countdown during recording standby The POWER switch should be set to . You cannot cancel the self-timer using the self-timer. ... seconds of the countdown, the beep gets faster, then recording starts automatically. You can record using the self-timer only during recording standby. START/STOP PHOTO PHOTO START/STOP Recording on a tape The POWER switch should be set to FN. (4) Press START/STOP. Operate by touching the panel. (1) During standby, press FN...
The (self-timer) indicator appears on a tape." (2) Press PHOTO deeply. To stop the countdown during recording standby The POWER switch should be set to . You cannot cancel the self-timer using the self-timer. ... seconds of the countdown, the beep gets faster, then recording starts automatically. You can record using the self-timer only during recording standby. START/STOP PHOTO PHOTO START/STOP Recording on a tape The POWER switch should be set to FN. (4) Press START/STOP. Operate by touching the panel. (1) During standby, press FN...
Operating Instructions
Page 109
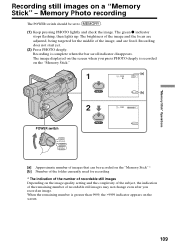
...for recording * The indication of the number of images that can be set to . (1) Keep pressing PHOTO lightly and check the image. Recording does not start yet. (2) Press PHOTO deeply. When the remaining number is greater than 9999, the >9999 indicator appears on the image quality .... The image displayed on the screen when you record an image. "Memory Stick" Operations Recording still images on a "Memory Stick" - Memory Photo recording The POWER switch should be recorded on the "Memory Stick" * [b] Number of the folder currently used for the middle of recordable still ...
...for recording * The indication of the number of images that can be set to . (1) Keep pressing PHOTO lightly and check the image. Recording does not start yet. (2) Press PHOTO deeply. When the remaining number is greater than 9999, the >9999 indicator appears on the image quality .... The image displayed on the screen when you record an image. "Memory Stick" Operations Recording still images on a "Memory Stick" - Memory Photo recording The POWER switch should be recorded on the "Memory Stick" * [b] Number of the folder currently used for the middle of recordable still ...
Operating Instructions
Page 110
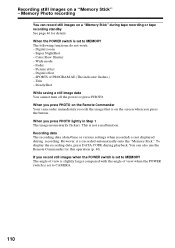
Color Slow Shutter - If you press PHOTO on a "Memory Stick" during playback. Digital zoom - Recording still images on the screen when you press PHOTO lightly in Step 1 The image momentarily flickers. Digital effect - SPORTS of view when the POWER switch is not displayed during recording. When ...to CAMERA. 110 You can record still images on the Remote Commander Your camcorder immediately records the image that is set to MEMORY The following functions do not work: - Memory Photo recording You can also use the Remote Commander for details. Fader - SteadyShot...
Color Slow Shutter - If you press PHOTO on a "Memory Stick" during playback. Digital zoom - Recording still images on the screen when you press PHOTO lightly in Step 1 The image momentarily flickers. Digital effect - SPORTS of view when the POWER switch is not displayed during recording. When ...to CAMERA. 110 You can record still images on the Remote Commander Your camcorder immediately records the image that is set to MEMORY The following functions do not work: - Memory Photo recording You can also use the Remote Commander for details. Fader - SteadyShot...

Operating Instructions
Page 111
HIGH SPEED [a] ( ) Your camcorder shoots up to four still images in 1600 × 1200 size or 25 still images in 640 × 480 size at about 0.5 sec intervals at ... up to . Operate by touching the panel. (1) Press FN to make the menu display disappear. (7) Press PHOTO deeply. 111 EXP BRKTG [b] ( ) Your camcorder automatically shoots three images at about 0.07 sec intervals. Memory Photo recording Recording images continuously You can record still images continuously. Before recording, select one of the three modes described...
HIGH SPEED [a] ( ) Your camcorder shoots up to four still images in 1600 × 1200 size or 25 still images in 640 × 480 size at about 0.5 sec intervals at ... up to . Operate by touching the panel. (1) Press FN to make the menu display disappear. (7) Press PHOTO deeply. 111 EXP BRKTG [b] ( ) Your camcorder automatically shoots three images at about 0.07 sec intervals. Memory Photo recording Recording images continuously You can record still images continuously. Before recording, select one of the three modes described...


