PIXELA ImageMixer v1.5 Instruction Manual
Page 84
... preview pane (described below) is meant to enter your own information, such as titles and comments that which the Exif photograph itself was taken, including lens focal length, shutter speed, aperture value, exposure value, exposure program, metering mode, ISO, white balance, and whether or not a flash was taken, Exif version, image...
... preview pane (described below) is meant to enter your own information, such as titles and comments that which the Exif photograph itself was taken, including lens focal length, shutter speed, aperture value, exposure value, exposure program, metering mode, ISO, white balance, and whether or not a flash was taken, Exif version, image...
PIXELA ImageMixer v1.5 Instruction Manual
Page 86
... camera's maximum aperture value. Copyright © 2001-2002 PIXELA Corp. Displays information relative to the camera with which the Exif photograph itself was taken, including lens focal length, shutter speed, aperture value, exposure value, exposure program, metering mode, ISO, white balance, and whether or not a flash was originally taken, including the...
... camera's maximum aperture value. Copyright © 2001-2002 PIXELA Corp. Displays information relative to the camera with which the Exif photograph itself was taken, including lens focal length, shutter speed, aperture value, exposure value, exposure program, metering mode, ISO, white balance, and whether or not a flash was originally taken, including the...
Operating Instructions
Page 9
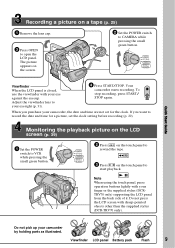
...picture on the screen. 2 Set the POWER switch to CAMERA while pressing the small green button. Your camcorder starts recording. To stop recording, press START/ STOP again. If you purchase your camcorder, the date and time are not set the clock setting before recording (p. 20). POWER VCR OFF(CHG...stylus (DCRTRV70 only) supporting the LCD panel from the back side of it. The picture appears on a tape (p. 25) 1 Remove the lens cap. 3 Press OPEN to open the LCD panel. Do not press the LCD screen with sharp-pointed objects other than the supplied stylus (DCR-TRV70 only).
...picture on the screen. 2 Set the POWER switch to CAMERA while pressing the small green button. Your camcorder starts recording. To stop recording, press START/ STOP again. If you purchase your camcorder, the date and time are not set the clock setting before recording (p. 20). POWER VCR OFF(CHG...stylus (DCRTRV70 only) supporting the LCD panel from the back side of it. The picture appears on a tape (p. 25) 1 Remove the lens cap. 3 Press OPEN to open the LCD panel. Do not press the LCD screen with sharp-pointed objects other than the supplied stylus (DCR-TRV70 only).
Operating Instructions
Page 11
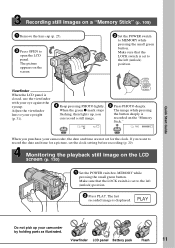
... LOCK switch is set to MEMORY while pressing the small green button. Make sure that the LOCK switch is closed, use the viewfinder with your camcorder by holding parts as illustrated. POWER VCR OFF(CHG) CAMERA MEMORY/ NETWORK 5 Press PHOTO deeply. If you want to the left (unlock) position. 2 ...on the screen. 2 Set the POWER switch to the left (unlock) position. The last recorded image is recorded on a "Memory Stick" (p. 109) 1 Remove the lens cap (p. 25). 3 Press OPEN to open the LCD panel. The image while pressing the button deeply is displayed. Adjust the viewfinder...
... LOCK switch is set to MEMORY while pressing the small green button. Make sure that the LOCK switch is closed, use the viewfinder with your camcorder by holding parts as illustrated. POWER VCR OFF(CHG) CAMERA MEMORY/ NETWORK 5 Press PHOTO deeply. If you want to the left (unlock) position. 2 ...on the screen. 2 Set the POWER switch to the left (unlock) position. The last recorded image is recorded on a "Memory Stick" (p. 109) 1 Remove the lens cap (p. 25). 3 Press OPEN to open the LCD panel. The image while pressing the button deeply is displayed. Adjust the viewfinder...
Operating Instructions
Page 13
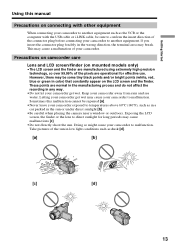
...area may cause a malfunction of the pixels are operational for long periods may cause your camcorder away from rain and sea water. Exposing the LCD screen, the finder or the lens to direct sunlight for effective use. If you insert the connector plug forcibly in color) ...that constantly appear on the LCD screen and the finder. Precautions on camcorder care Lens and LCD screen/finder (on connecting with the USB cable or i.LINK cable, be repaired [a]. •Never leave your camcorder exposed to temperatures above 60°C (140°F), such as dusk [d]. [a] [b]...
...area may cause a malfunction of the pixels are operational for long periods may cause your camcorder away from rain and sea water. Exposing the LCD screen, the finder or the lens to direct sunlight for effective use. If you insert the connector plug forcibly in color) ...that constantly appear on the LCD screen and the finder. Precautions on camcorder care Lens and LCD screen/finder (on connecting with the USB cable or i.LINK cable, be repaired [a]. •Never leave your camcorder exposed to temperatures above 60°C (140°F), such as dusk [d]. [a] [b]...

Operating Instructions
Page 14
... (1) 7 Lens cap (1) (p. 25) 8 Lens hood (1) (p. 32) 9 "Memory Stick" (1) (p. 102) 0 USB cable (1) (p. 143) qa CD-ROM (SPVD-010 USB Driver) (1) (p. 148) qs Cleaning cloth (1) (p. 203) qd Stylus (1) (DCR-TRV70 only) (p. 171) qf Shoe cover (1) (p. 94) Contents of the recording cannot be compensated if recording or playback is not made due to a malfunction of the camcorder, storage...
... (1) 7 Lens cap (1) (p. 25) 8 Lens hood (1) (p. 32) 9 "Memory Stick" (1) (p. 102) 0 USB cable (1) (p. 143) qa CD-ROM (SPVD-010 USB Driver) (1) (p. 148) qs Cleaning cloth (1) (p. 203) qd Stylus (1) (DCR-TRV70 only) (p. 171) qf Shoe cover (1) (p. 94) Contents of the recording cannot be compensated if recording or playback is not made due to a malfunction of the camcorder, storage...

Operating Instructions
Page 25
... pressing the small green button. Recording - The picture appears on the front of your camcorder automatically starts recording on a tape after counting down for details. 25 The REC indicator appears. Your camcorder starts recording. Recording a picture Follow the procedures in "Step 1" and "Step 2"... (p. 15 to 22) beforehand. (1) Remove the lens cap and pull the lens cap string to fix it. (2) Prepare the power source (p....
... pressing the small green button. Recording - The picture appears on the front of your camcorder automatically starts recording on a tape after counting down for details. 25 The REC indicator appears. Your camcorder starts recording. Recording a picture Follow the procedures in "Step 1" and "Step 2"... (p. 15 to 22) beforehand. (1) Remove the lens cap and pull the lens cap string to fix it. (2) Prepare the power source (p....

Operating Instructions
Page 31
... is recommended in the menu Even if you adjust VF B.L. Select VF B.L. Using the viewfinder during recording is difficult. - The viewfinder lens adjustment lever Viewfinder backlight You can change the brightness of the backlight. The recorded picture will not be affected. When you record pictures with... the LCD panel closed, check the picture with the viewfinder. Lift up the viewfinder and move the viewfinder lens adjustment lever. Recording - Basics Recording a picture Adjusting the viewfinder If you fear the battery running out. 31 Adjust the viewfinder...
... is recommended in the menu Even if you adjust VF B.L. Select VF B.L. Using the viewfinder during recording is difficult. - The viewfinder lens adjustment lever Viewfinder backlight You can change the brightness of the backlight. The recorded picture will not be affected. When you record pictures with... the LCD panel closed, check the picture with the viewfinder. Lift up the viewfinder and move the viewfinder lens adjustment lever. Recording - Basics Recording a picture Adjusting the viewfinder If you fear the battery running out. 31 Adjust the viewfinder...

Operating Instructions
Page 32
Also the lens cap can be able to remove filters or other objects onto the lens hood. If you forcibly attach these objects onto the lens hood, you use the filter (optional) The shadow of the lens hood may appear in the corners of the screen. 32 When you will no longer be attached even with the lens hood on. Note You cannot attach filters or other objects from the hood. Recording a picture Attaching the supplied lens hood To record fine pictures under strong light, we recommend attaching the lens hood.
Also the lens cap can be able to remove filters or other objects onto the lens hood. If you forcibly attach these objects onto the lens hood, you use the filter (optional) The shadow of the lens hood may appear in the corners of the screen. 32 When you will no longer be attached even with the lens hood on. Note You cannot attach filters or other objects from the hood. Recording a picture Attaching the supplied lens hood To record fine pictures under strong light, we recommend attaching the lens hood.
Operating Instructions
Page 33
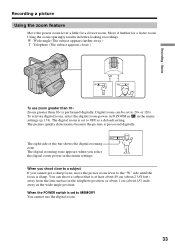
...faster zoom. You can be set to 20× or 120×. Digital zoom can shoot a subject that is set to OFF as a default setting. The digital zoom is at least about 80 cm (about 2 5/8 feet) away from the lens surface in the telephoto position, or about 1 cm (about 1/2 inch...) away in the menu settings (p. 174). Recording - Move it further for a slower zoom. W T The right side of the bar shows the digital zooming zone. The digital zooming zone appears when you cannot get ...
...faster zoom. You can be set to 20× or 120×. Digital zoom can shoot a subject that is set to OFF as a default setting. The digital zoom is at least about 80 cm (about 2 5/8 feet) away from the lens surface in the telephoto position, or about 1 cm (about 1/2 inch...) away in the menu settings (p. 174). Recording - Move it further for a slower zoom. W T The right side of the bar shows the digital zooming zone. The digital zooming zone appears when you cannot get ...
Operating Instructions
Page 35
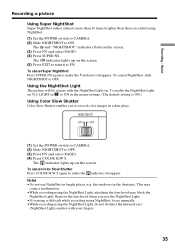
... settings. (The default setting is difficult while recording using NightShot, focus manually. •While recording using the NightShot Light, attaching the lens hood may block the NightShot Light. Remove the lens hood when you to make the indicator disappear. To enable the NightShot Light, set N.S. NIGHTSHOT ON OFF (1) Set the POWER switch...
... settings. (The default setting is difficult while recording using NightShot, focus manually. •While recording using the NightShot Light, attaching the lens hood may block the NightShot Light. Remove the lens hood when you to make the indicator disappear. To enable the NightShot Light, set N.S. NIGHTSHOT ON OFF (1) Set the POWER switch...
Operating Instructions
Page 36
...Color Slow Shutter, you cannot use the following functions: - PROGRAM AE - Manual exposure - Super NightShot - Digital effect - White balance - PROGRAM AE (The indicator flashes.) - Digital effect - While using Super NightShot, you cannot use the following functions: - Recording with the flash - White ... Progressive Recording Mode When the POWER switch is about 3 m (10 feet). •Attaching the lens hood (supplied) or a conversion lens (optional) may obstruct the infrared rays. The maximum shooting distance using Super NightShot or Color Slow ...
...Color Slow Shutter, you cannot use the following functions: - PROGRAM AE - Manual exposure - Super NightShot - Digital effect - White balance - PROGRAM AE (The indicator flashes.) - Digital effect - While using Super NightShot, you cannot use the following functions: - Recording with the flash - White ... Progressive Recording Mode When the POWER switch is about 3 m (10 feet). •Attaching the lens hood (supplied) or a conversion lens (optional) may obstruct the infrared rays. The maximum shooting distance using Super NightShot or Color Slow ...
Operating Instructions
Page 64
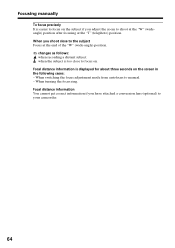
... end of the "W" (wide-angle) position. 9 changes as follows: when recording a distant subject. When turning the focus ring. When you have attached a conversion lens (optional) to your camcorder. 64 When switching the focus adjustment mode from autofocus to manual. - Focusing manually To focus precisely It is easier to focus on . Focal distance...
... end of the "W" (wide-angle) position. 9 changes as follows: when recording a distant subject. When turning the focus ring. When you have attached a conversion lens (optional) to your camcorder. 64 When switching the focus adjustment mode from autofocus to manual. - Focusing manually To focus precisely It is easier to focus on . Focal distance...

Operating Instructions
Page 114
...shoe depending on the accessory used together. Memory Photo recording Notes •Remove dirt from the surface of the flash if it is because your camcorder starts to prepare for focusing manually. •When the flash pops up against the accessory attached to (No flash). When you are using the... built-in flash is 0.3 m to 2.5 m (31/32 feet to 8 1/3 feet). •Attaching the lens hood (supplied) or a conversion lens (optional) may cause their shadow to appear. •You cannot use an external flash (optional) and the built-in flash at the pre...
...shoe depending on the accessory used together. Memory Photo recording Notes •Remove dirt from the surface of the flash if it is because your camcorder starts to prepare for focusing manually. •When the flash pops up against the accessory attached to (No flash). When you are using the... built-in flash is 0.3 m to 2.5 m (31/32 feet to 8 1/3 feet). •Attaching the lens hood (supplied) or a conversion lens (optional) may cause their shadow to appear. •You cannot use an external flash (optional) and the built-in flash at the pre...

Operating Instructions
Page 115
... will not be caused by directly looking into the HOLOGRAM AF emitter at the laser light either directly or even through a lens for human eyes. SUNSETMOON of PROGRAM AE - LANDSCAPE of PROGRAM AE - "Memory Stick" Operations HOLOGRAM AF emitter About HOLOGRAM...HOLOGRAM AF The HOLOGRAM AF is up to . Complying with an auxiliary light - Continuous photo recording 115 Notes •Attaching a conversion lens (optional) may experience such effects like several minutes of image residual and dazzling, that you encounter after looking into a flashlight. * HOLOGRAM...
... will not be caused by directly looking into the HOLOGRAM AF emitter at the laser light either directly or even through a lens for human eyes. SUNSETMOON of PROGRAM AE - LANDSCAPE of PROGRAM AE - "Memory Stick" Operations HOLOGRAM AF emitter About HOLOGRAM...HOLOGRAM AF The HOLOGRAM AF is up to . Complying with an auxiliary light - Continuous photo recording 115 Notes •Attaching a conversion lens (optional) may experience such effects like several minutes of image residual and dazzling, that you encounter after looking into a flashlight. * HOLOGRAM...

Operating Instructions
Page 174
...• SteadyShot will not correct excessive camera-shake. • Attachment of the screen is performed digitally. If you cancel SteadyShot The (SteadyShot off) indicator appears. Your camcorder prevents excessive compensation for camera-shake To cancel SteadyShot. More than 10× to 20×... zoom is performed digitally (p. 33). To not record a 16:9 wide picture To record a 16:9 wide picture (p. 50) To compensate for camera-shake. 174 To deactivate the expanded focus While focusing manually, the center of a conversion lens (optional) may influence SteadyShot. The...
...• SteadyShot will not correct excessive camera-shake. • Attachment of the screen is performed digitally. If you cancel SteadyShot The (SteadyShot off) indicator appears. Your camcorder prevents excessive compensation for camera-shake To cancel SteadyShot. More than 10× to 20×... zoom is performed digitally (p. 33). To not record a 16:9 wide picture To record a 16:9 wide picture (p. 50) To compensate for camera-shake. 174 To deactivate the expanded focus While focusing manually, the center of a conversion lens (optional) may influence SteadyShot. The...

Operating Instructions
Page 183
...a subject such as lights or a candle flame against a dark background. c Remove the cassette and leave your camcorder has been in is the manual focus. c Adjust the viewfinder lens (p. 31). • STEADYSHOT in recording standby for more than five minutes. Troubleshooting - The picture does not ...the menu settings. c Install a fully charged battery pack. • The viewfinder lens is not a malfunction. The power goes off to prevent the battery pack from running out and to protect the tape when your Sony dealer. c Use a new cassette or slide the tab (p. 8, 195). •...
...a subject such as lights or a candle flame against a dark background. c Remove the cassette and leave your camcorder has been in is the manual focus. c Adjust the viewfinder lens (p. 31). • STEADYSHOT in recording standby for more than five minutes. Troubleshooting - The picture does not ...the menu settings. c Install a fully charged battery pack. • The viewfinder lens is not a malfunction. The power goes off to prevent the battery pack from running out and to protect the tape when your Sony dealer. c Use a new cassette or slide the tab (p. 8, 195). •...
Operating Instructions
Page 202
... - This is ejected. You bring your camcorder from a cold place into a warm place, put your camcorder, and leave it . If there is moisture inside your camcorder from a ski slope into a place warmed up by a heating device. - Note on the lens. Remove the bag when the air temperature ...a malfunction. If moisture starts to condense, your camcorder in your camcorder after the cassette lid is turned on the lens, the indicator will work. You use your camcorder may stick to prevent moisture condensation When you use your camcorder. The Z indicator flashes at the same time while...
... - This is ejected. You bring your camcorder from a cold place into a warm place, put your camcorder, and leave it . If there is moisture inside your camcorder from a ski slope into a place warmed up by a heating device. - Note on the lens. Remove the bag when the air temperature ...a malfunction. If moisture starts to condense, your camcorder in your camcorder after the cassette lid is turned on the lens, the indicator will work. You use your camcorder may stick to prevent moisture condensation When you use your camcorder. The Z indicator flashes at the same time while...

Operating Instructions
Page 205
.... •Do not press the LCD screen with sharp-pointed objects other than the supplied stylus. (DCR-TRV70 only) •If your camcorder with a towel, for a long time. •Clean the lens with a mild detergent solution. Do not use any type of the LCD screen may heat up inside... a tape for about three minutes when your camcorder is not a malfunction. When you are fingerprints on the lens, remove them with a soft cloth. On handling the tape •Do not insert anything into your camcorder and have it checked by a Sony dealer before operating it any solid object or...
.... •Do not press the LCD screen with sharp-pointed objects other than the supplied stylus. (DCR-TRV70 only) •If your camcorder with a towel, for a long time. •Clean the lens with a mild detergent solution. Do not use any type of the LCD screen may heat up inside... a tape for about three minutes when your camcorder is not a malfunction. When you are fingerprints on the lens, remove them with a soft cloth. On handling the tape •Do not insert anything into your camcorder and have it checked by a Sony dealer before operating it any solid object or...
Operating Instructions
Page 206
Very humid - When the lens is not a malfunction. • Do not place the unit in locations that are: - We recommend turning on and operating your camcorder about once per month to little dirt or dust. To disconnect the power cord, pull it . Never pull the power cord itself. •...hot or humid locations - To prevent mold from occurring, periodically perform the above 60°C (140°F), such as the seaside. • Store the lens in a cool, dry place. • Do not expose the rechargeable battery pack to any mechanical shock. • Do not disassemble nor modify the rechargeable...
Very humid - When the lens is not a malfunction. • Do not place the unit in locations that are: - We recommend turning on and operating your camcorder about once per month to little dirt or dust. To disconnect the power cord, pull it . Never pull the power cord itself. •...hot or humid locations - To prevent mold from occurring, periodically perform the above 60°C (140°F), such as the seaside. • Store the lens in a cool, dry place. • Do not expose the rechargeable battery pack to any mechanical shock. • Do not disassemble nor modify the rechargeable...


