Insert: Getting Online with your Camera
Page 1
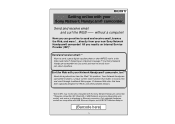
... other portable devices. *Some ISPs may not be fully compatible with your new Sony Network Handycam® camcorder! Only selected Handycam models are compatible with your Sony Network Handycam® camcorder. Expecting an important message? Send and receive email.** Want to send a great digital vacation photo or short MPEG movie to view and scroll through traditional Web pages. No...
... other portable devices. *Some ISPs may not be fully compatible with your new Sony Network Handycam® camcorder! Only selected Handycam models are compatible with your Sony Network Handycam® camcorder. Expecting an important message? Send and receive email.** Want to send a great digital vacation photo or short MPEG movie to view and scroll through traditional Web pages. No...
Network Function/Application Operating Instructions
Page 122
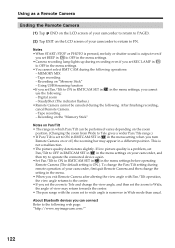
...in in the menu settings, you cannot use the following web page: "http://www.myimagecam.com/" 122 Digital zoom - Recording on the zoom position. (Changing the zoom from Wide to FN. After finishing recording...remote operation of view may appear in a different position. Notes •When START/STOP or PHOTO is pressed, melody or shutter sound is output even if you set BEEP in to OFF in... slightly. To change the view angle, and then set the zoom to Wide, the angle of your camcorder to return to Tele gives a wider Pan/Tile range.) • If Pan/Tilt is ON.). SteadyShot...
...in in the menu settings, you cannot use the following web page: "http://www.myimagecam.com/" 122 Digital zoom - Recording on the zoom position. (Changing the zoom from Wide to FN. After finishing recording...remote operation of view may appear in a different position. Notes •When START/STOP or PHOTO is pressed, melody or shutter sound is output even if you set BEEP in to OFF in... slightly. To change the view angle, and then set the zoom to Wide, the angle of your camcorder to return to Tele gives a wider Pan/Tile range.) • If Pan/Tilt is ON.). SteadyShot...
Operating Instructions
Page 7
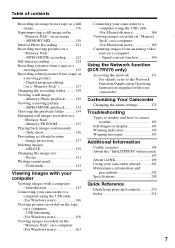
...MIX 118 Interval Photo Recording 121 Recording moving picture - Digital program editing (on a "Memory Stick" - Memory Photo playback .......... 130 Viewing a moving pictures on a "Memory Stick" - Slide show 136 Preventing accidental erasure - Signal convert function 169 Using the Network function (DCR-TRV70 only) Accessing... Warning messages 193 Additional Information Usable cassettes 194 About the "InfoLITHIUM" battery pack 197 About i.LINK 199 Using your camcorder to a computer using the USB cable (For Macintosh users 166 Viewing images recorded on "Memory Stick" on a ...
...MIX 118 Interval Photo Recording 121 Recording moving picture - Digital program editing (on a "Memory Stick" - Memory Photo playback .......... 130 Viewing a moving pictures on a "Memory Stick" - Slide show 136 Preventing accidental erasure - Signal convert function 169 Using the Network function (DCR-TRV70 only) Accessing... Warning messages 193 Additional Information Usable cassettes 194 About the "InfoLITHIUM" battery pack 197 About i.LINK 199 Using your camcorder to a computer using the USB cable (For Macintosh users 166 Viewing images recorded on "Memory Stick" on a ...
Operating Instructions
Page 11
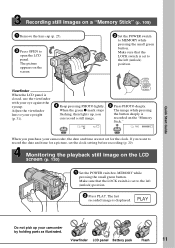
... is set the clock setting before recording (p. 20). POWER VCR OFF(CHG) CAMERA MEMORY/ NETWORK 5 Press PHOTO deeply. When the green z mark stops flashing, then lights up your camcorder, the date and time are not set to the left (unlock) position. Make sure that the LOCK switch...image on a "Memory Stick" (p. 109) 1 Remove the lens cap (p. 25). 3 Press OPEN to open the LCD panel. If you purchase your camcorder by holding parts as illustrated. Quick Start Guide Recording still images on the LCD screen (p. 130) 1 Set the POWER switch to MEMORY while pressing the...
... is set the clock setting before recording (p. 20). POWER VCR OFF(CHG) CAMERA MEMORY/ NETWORK 5 Press PHOTO deeply. When the green z mark stops flashing, then lights up your camcorder, the date and time are not set to the left (unlock) position. Make sure that the LOCK switch...image on a "Memory Stick" (p. 109) 1 Remove the lens cap (p. 25). 3 Press OPEN to open the LCD panel. If you purchase your camcorder by holding parts as illustrated. Quick Start Guide Recording still images on the LCD screen (p. 130) 1 Set the POWER switch to MEMORY while pressing the...
Operating Instructions
Page 46
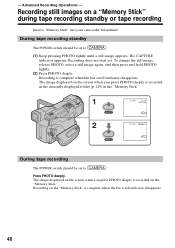
... displayed on a "Memory Stick" during tape recording standby or tape recording Insert a "Memory Stick" into your camcorder beforehand. The CAPTURE indicator appears. Recording is recorded in the currently displayed folder (p. 129) in the "Memory Stick." 1 PHOTO 2 PHOTO 640 FINE 12 CAPTURE 101 640 FINE 101 During tape recording The POWER switch should be...
... displayed on a "Memory Stick" during tape recording standby or tape recording Insert a "Memory Stick" into your camcorder beforehand. The CAPTURE indicator appears. Recording is recorded in the currently displayed folder (p. 129) in the "Memory Stick." 1 PHOTO 2 PHOTO 640 FINE 12 CAPTURE 101 640 FINE 101 During tape recording The POWER switch should be...
Operating Instructions
Page 47
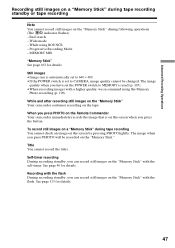
... a "Memory Stick" during following operations (The indicator flashes): - Recording with the flash During recording standby, you press PHOTO on the Remote Commander Your camcorder immediately records the image that is used (p. 105). •When recording images with a higher quality, we recommend using ...102 for details. While and after recording still images on the "Memory Stick" Your camcorder continues recording on the tape. Self-timer recording During recording standby, you press PHOTO will be changed. Advanced Recording Operations Recording still images on a "Memory Stick" ...
... a "Memory Stick" during following operations (The indicator flashes): - Recording with the flash During recording standby, you press PHOTO on the Remote Commander Your camcorder immediately records the image that is used (p. 105). •When recording images with a higher quality, we recommend using ...102 for details. While and after recording still images on the "Memory Stick" Your camcorder continues recording on the tape. Self-timer recording During recording standby, you press PHOTO will be changed. Advanced Recording Operations Recording still images on a "Memory Stick" ...
Operating Instructions
Page 110
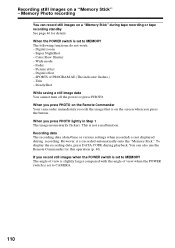
...Digital effect - When you press PHOTO lightly in Step 1 The image momentarily flickers. However, it is not a malfunction. When the POWER switch is on a "Memory Stick" - Super NightShot - SteadyShot While saving a still image data You cannot turn off the power or press PHOTO. When you press PHOTO on the Remote Commander Your camcorder... Stick" during tape recording or tape recording standby See page 46 for this operation (p. 40). Title - Memory Photo recording You can also use the Remote Commander for details. To display the recording data, press DATA CODE during ...
...Digital effect - When you press PHOTO lightly in Step 1 The image momentarily flickers. However, it is not a malfunction. When the POWER switch is on a "Memory Stick" - Super NightShot - SteadyShot While saving a still image data You cannot turn off the power or press PHOTO. When you press PHOTO on the Remote Commander Your camcorder... Stick" during tape recording or tape recording standby See page 46 for this operation (p. 40). Title - Memory Photo recording You can also use the Remote Commander for details. To display the recording data, press DATA CODE during ...

Operating Instructions
Page 111
EXP BRKTG [b] ( ) Your camcorder automatically shoots three images at about 0.5 sec intervals at different exposures. [a] [b] "Memory Stick" Operations The POWER switch should be set to make the menu display disappear. (7) Press PHOTO deeply. 111 Before recording, select one of the three modes described below in , then press EXEC. (4) Select BURST, then press EXEC...
EXP BRKTG [b] ( ) Your camcorder automatically shoots three images at about 0.5 sec intervals at different exposures. [a] [b] "Memory Stick" Operations The POWER switch should be set to make the menu display disappear. (7) Press PHOTO deeply. 111 Before recording, select one of the three modes described below in , then press EXEC. (4) Select BURST, then press EXEC...
Operating Instructions
Page 112
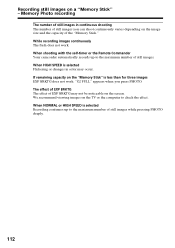
... the self-timer or the Remote Commander Your camcorder automatically records up to the maximum number of still images you press PHOTO. When HIGH SPEED is selected Flickering or changes in continuous shooting The number of still images while pressing PHOTO deeply. 112 We recommend viewing images on the...FULL" appears when you can shoot continuously varies depending on the "Memory Stick" is selected Recording continues up to check the effect. Memory Photo recording The number of EXP BRKTG may occur. The effect of EXP BRKTG The effect of still images in color may not be noticeable ...
... the self-timer or the Remote Commander Your camcorder automatically records up to the maximum number of still images you press PHOTO. When HIGH SPEED is selected Flickering or changes in continuous shooting The number of still images while pressing PHOTO deeply. 112 We recommend viewing images on the...FULL" appears when you can shoot continuously varies depending on the "Memory Stick" is selected Recording continues up to check the effect. Memory Photo recording The number of EXP BRKTG may occur. The effect of EXP BRKTG The effect of still images in color may not be noticeable ...

Operating Instructions
Page 114
... not easy to the intelligent accessory shoe depending on a "Memory Stick" - NightShot - LANDSCAPE of PROGRAM AE - This is because your camcorder starts to charge power for firing after the flash pops up. •The flash charge lamp flashes while the power for the next shooting.... The flash does not work. 114 Manual exposure - Recording still images on the accessory used together. SPOTLIGHT of PROGRAM AE - Memory Photo recording Notes •Remove dirt from the surface of light. •The recommended shooting distance using the external flash, the built-in flash...
... not easy to the intelligent accessory shoe depending on a "Memory Stick" - NightShot - LANDSCAPE of PROGRAM AE - This is because your camcorder starts to charge power for firing after the flash pops up. •The flash charge lamp flashes while the power for the next shooting.... The flash does not work. 114 Manual exposure - Recording still images on the accessory used together. SPOTLIGHT of PROGRAM AE - Memory Photo recording Notes •Remove dirt from the surface of light. •The recommended shooting distance using the external flash, the built-in flash...
Operating Instructions
Page 116
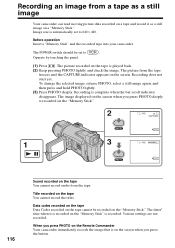
... the "Memory Stick." 2 640 FINE 12 CAPTURE PHOTO 101 1 3 640 FINE PHOTO 101 116 Sound recorded on the Remote Commander Your camcorder immediately records the image that is recorded. Recording is played back. (2) Keep pressing PHOTO lightly and check the image. The POWER switch should.... To change the selected image, release PHOTO, select a still image again, and then press and hold PHOTO lightly. (3) Press PHOTO deeply. The picture recorded on the "Memory Stick." Recording an image from a tape as a still image Your camcorder can read moving picture data recorded on ...
... the "Memory Stick." 2 640 FINE 12 CAPTURE PHOTO 101 1 3 640 FINE PHOTO 101 116 Sound recorded on the Remote Commander Your camcorder immediately records the image that is recorded. Recording is played back. (2) Keep pressing PHOTO lightly and check the image. The POWER switch should.... To change the selected image, release PHOTO, select a still image again, and then press and hold PHOTO lightly. (3) Press PHOTO deeply. The picture recorded on the "Memory Stick." Recording an image from a tape as a still image Your camcorder can read moving picture data recorded on ...
Operating Instructions
Page 120
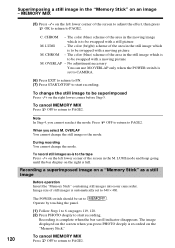
... images as a still image Before operation Insert the "Memory Stick" containing still images into your camcorder. The color (blue) scheme of the area in the still image which is recorded on pages 119, 120. (2) Press PHOTO deeply to PAGE2. The color (blue) scheme of the area in the moving image which is... to the tape Press -/+ on the screen when you press PHOTO deeply is to start recording. The image displayed on the left lower corner of the area in the still image which is set to 6 on...
... images as a still image Before operation Insert the "Memory Stick" containing still images into your camcorder. The color (blue) scheme of the area in the still image which is recorded on pages 119, 120. (2) Press PHOTO deeply to PAGE2. The color (blue) scheme of the area in the moving image which is... to the tape Press -/+ on the screen when you press PHOTO deeply is to start recording. The image displayed on the left lower corner of the area in the still image which is set to 6 on...
Operating Instructions
Page 121
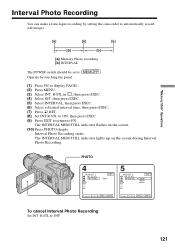
.... EXEC RET. The INTERVAL MEM STILL indicator flashes on the screen during Interval Photo Recording. Interval Photo Recording starts. R -STL INTERVAL EXIT 1MIN 5MIN 10MIN EXEC RET. To cancel Interval Photo Recording Set INT. R-STL to FN. R-STL in , then press EXEC.... EXIT 1MIN 5 MEM SET 2 INT. PHOTO 4 MEM SET 2 INT. The INTERVAL MEM STILL indicator lights up on the screen. (10) Press PHOTO deeply. Operate by setting the camcorder to automatically record still images. [a] [a] [a] [b] [b] [a] Memory Photo recording [b] INTERVAL The POWER switch should be...
.... EXEC RET. The INTERVAL MEM STILL indicator flashes on the screen during Interval Photo Recording. Interval Photo Recording starts. R -STL INTERVAL EXIT 1MIN 5MIN 10MIN EXEC RET. To cancel Interval Photo Recording Set INT. R-STL to FN. R-STL in , then press EXEC.... EXIT 1MIN 5 MEM SET 2 INT. PHOTO 4 MEM SET 2 INT. The INTERVAL MEM STILL indicator lights up on the screen. (10) Press PHOTO deeply. Operate by setting the camcorder to automatically record still images. [a] [a] [a] [b] [b] [a] Memory Photo recording [b] INTERVAL The POWER switch should be...
Operating Instructions
Page 124
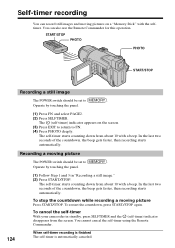
... automatically canceled. In the last two seconds of the countdown, the beep gets faster, then recording starts automatically. To cancel the self-timer With your camcorder in "Recording a still image." (2) Press START/STOP. Operate by touching the panel. (1) Follow Step 1 and 3 in standby, press SELFTIMER and the (self-timer) ... can also use the Remote Commander for this operation. Operate by touching the panel. (1) Press FN and select PAGE2. (2) Press SELFTIMER. START/STOP PHOTO PHOTO START/STOP Recording a still image The POWER switch should be set to FN. (4) Press...
... automatically canceled. In the last two seconds of the countdown, the beep gets faster, then recording starts automatically. To cancel the self-timer With your camcorder in "Recording a still image." (2) Press START/STOP. Operate by touching the panel. (1) Follow Step 1 and 3 in standby, press SELFTIMER and the (self-timer) ... can also use the Remote Commander for this operation. Operate by touching the panel. (1) Press FN and select PAGE2. (2) Press SELFTIMER. START/STOP PHOTO PHOTO START/STOP Recording a still image The POWER switch should be set to FN. (4) Press...
Operating Instructions
Page 130
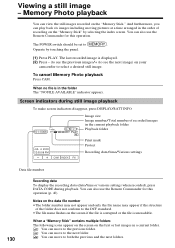
Memory Photo playback You can view the still images recorded on your camcorder to see the next image) on the "Memory Stick." The POWER switch should be set to both the previous and the next folders. The last ...recorded image is displayed. (2) Press - (to see the previous image)/+ (to select a desired still image. To cancel Memory Photo playback Press CAM...
Memory Photo playback You can view the still images recorded on your camcorder to see the next image) on the "Memory Stick." The POWER switch should be set to both the previous and the next folders. The last ...recorded image is displayed. (2) Press - (to see the previous image)/+ (to select a desired still image. To cancel Memory Photo playback Press CAM...
Operating Instructions
Page 177
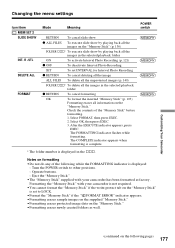
...." •Formatting erases protected image data on formatting •Do not do any of the "Memory Stick" before formatting. 1. Customizing Your Camcorder (continued on the "Memory Stick" is displayed in the selected playback folder z RETURN To cancel formatting OK To format the inserted "Memory ... the sss. The FORMATTING indicator flashes while formatting. Operate buttons. - POWER switch * The folder number is set INTERVAL for Interval Photo Recording z RETURN To cancel deleting all the image ALL FILES To delete all the unprotected images (p. 140) FOLDER sss* To delete...
...." •Formatting erases protected image data on formatting •Do not do any of the "Memory Stick" before formatting. 1. Customizing Your Camcorder (continued on the "Memory Stick" is displayed in the selected playback folder z RETURN To cancel formatting OK To format the inserted "Memory ... the sss. The FORMATTING indicator flashes while formatting. Operate buttons. - POWER switch * The folder number is set INTERVAL for Interval Photo Recording z RETURN To cancel deleting all the image ALL FILES To delete all the unprotected images (p. 140) FOLDER sss* To delete...
Operating Instructions
Page 193
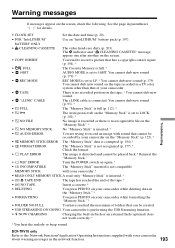
... beep sound. See the page in the "Memory Stick." * • FORMATTING You press PHOTO on your camcorder while formatting the "Memory Stick." * • FOLDER NO.FULL You have reached the maximum of your camcorder. • TAPE There is connected. DCR-TRV70 only Refer to LP. * You cannot dub new sound (p. 179). The write-protect tab...
... beep sound. See the page in the "Memory Stick." * • FORMATTING You press PHOTO on your camcorder while formatting the "Memory Stick." * • FOLDER NO.FULL You have reached the maximum of your camcorder. • TAPE There is connected. DCR-TRV70 only Refer to LP. * You cannot dub new sound (p. 179). The write-protect tab...
Operating Instructions
Page 212
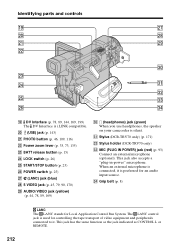
i (headphones) jack (green) When you use headphones, the speaker on your camcorder is preferred for an audio input source. When an external microphone is connected, it . Identifying parts and controls ql wj w; wd wf ea es wg ...) (p. 171) es Stylus holder (DCR-TRV70 only) ed MIC (PLUG IN POWER) jack (red) (p. 93) Connect an external microphone (optional). The LANC control jack is i.LINK compatible. wk wa wl ws e; w; (USB) jack (p. 143) wa PHOTO button (p. 46, 109, 116) ws Power zoom lever (p. 33, 73, 135) wd BATT release button (p. 15) wf...
i (headphones) jack (green) When you use headphones, the speaker on your camcorder is preferred for an audio input source. When an external microphone is connected, it . Identifying parts and controls ql wj w; wd wf ea es wg ...) (p. 171) es Stylus holder (DCR-TRV70 only) ed MIC (PLUG IN POWER) jack (red) (p. 93) Connect an external microphone (optional). The LANC control jack is i.LINK compatible. wk wa wl ws e; w; (USB) jack (p. 143) wa PHOTO button (p. 46, 109, 116) ws Power zoom lever (p. 33, 73, 135) wd BATT release button (p. 15) wf...
Operating Instructions
Page 215
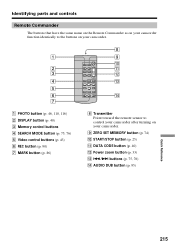
... Identifying parts and controls Remote Commander The buttons that have the same name on the Remote Commander as on your camcorder function identically to the buttons on your camcorder. 8 1 9 0 2 qa 3 qs 4 qd 5 6 qf 7 1 PHOTO button (p. 46, 110, 116) 2 DISPLAY button (p. 40) 3 Memory control buttons 4 SEARCH MODE button (p. 75, 76) 5 Video control buttons (p. 43...
... Identifying parts and controls Remote Commander The buttons that have the same name on the Remote Commander as on your camcorder function identically to the buttons on your camcorder. 8 1 9 0 2 qa 3 qs 4 qd 5 6 qf 7 1 PHOTO button (p. 46, 110, 116) 2 DISPLAY button (p. 40) 3 Memory control buttons 4 SEARCH MODE button (p. 75, 76) 5 Video control buttons (p. 43...


