PIXELA ImageMixer v1.5 Instruction Manual
Page 84
... to enter your own information, such as titles and comments that which relates to the camera with which the Exif photograph itself was taken, including lens focal length, shutter speed, aperture value, exposure value, exposure program, metering mode, ISO, white balance, and whether or not a flash was taken, Exif version, image...
... to enter your own information, such as titles and comments that which relates to the camera with which the Exif photograph itself was taken, including lens focal length, shutter speed, aperture value, exposure value, exposure program, metering mode, ISO, white balance, and whether or not a flash was taken, Exif version, image...
PIXELA ImageMixer v1.5 Instruction Manual
Page 86
... used. All rights reserved. Copyright © 2001-2002 PIXELA Corp. Displays information relative to the camera with which the Exif photograph itself was taken, including lens focal length, shutter speed, aperture value, exposure value, exposure program, metering mode, ISO, white balance, and whether or not a flash was originally taken, including the...
... used. All rights reserved. Copyright © 2001-2002 PIXELA Corp. Displays information relative to the camera with which the Exif photograph itself was taken, including lens focal length, shutter speed, aperture value, exposure value, exposure program, metering mode, ISO, white balance, and whether or not a flash was originally taken, including the...
Operating Instructions
Page 9
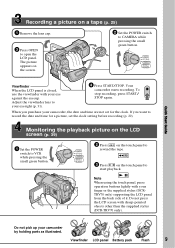
The picture appears on the screen. 2 Set the POWER switch to VCR while pressing the small green button. Adjust the viewfinder lens to record the date and time for a picture, set for the clock. Viewfinder LCD panel Battery pack Flash 9 Note When using the touch panel, press ...-pointed objects other than the supplied stylus (DCR-TRV70 only). When you want to your finger or the supplied stylus (DCRTRV70 only) supporting the LCD panel from the back side of it. Do not pick up your eye against the eyecup. If you purchase your camcorder, the date and time are not set...
The picture appears on the screen. 2 Set the POWER switch to VCR while pressing the small green button. Adjust the viewfinder lens to record the date and time for a picture, set for the clock. Viewfinder LCD panel Battery pack Flash 9 Note When using the touch panel, press ...-pointed objects other than the supplied stylus (DCR-TRV70 only). When you want to your finger or the supplied stylus (DCRTRV70 only) supporting the LCD panel from the back side of it. Do not pick up your eye against the eyecup. If you purchase your camcorder, the date and time are not set...
Operating Instructions
Page 11
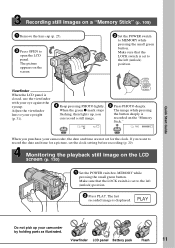
...deeply. Viewfinder When the LCD panel is set to the left (unlock) position. 2 Press PLAY. PLAY Do not pick up , you purchase your camcorder by holding parts as illustrated. Viewfinder LCD panel Battery pack Flash 11 The picture appears on a "Memory Stick" (p. 109) 1 Remove the... lens cap (p. 25). 3 Press OPEN to open the LCD panel. Adjust the viewfinder lens to your eye against the eyecup. Quick Start Guide Recording still images on the screen. 2 Set the POWER switch...
...deeply. Viewfinder When the LCD panel is set to the left (unlock) position. 2 Press PLAY. PLAY Do not pick up , you purchase your camcorder by holding parts as illustrated. Viewfinder LCD panel Battery pack Flash 11 The picture appears on a "Memory Stick" (p. 109) 1 Remove the... lens cap (p. 25). 3 Press OPEN to open the LCD panel. Adjust the viewfinder lens to your eye against the eyecup. Quick Start Guide Recording still images on the screen. 2 Set the POWER switch...
Operating Instructions
Page 13
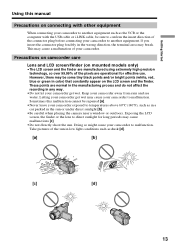
... such as in a car parked in the wrong direction, the terminal area may cause malfunctions [c]. •Do not directly shoot the sun. Precautions on camcorder care Lens and LCD screen/finder (on the LCD screen and the finder. Exposing the LCD screen, the finder or the... lens to temperatures above 60°C (140°F), such as dusk [d]. [a] [b] [c] [d] 13 Keep your camcorder exposed to direct sunlight for effective use. If you insert the connector plug forcibly in the sun or ...
... such as in a car parked in the wrong direction, the terminal area may cause malfunctions [c]. •Do not directly shoot the sun. Precautions on camcorder care Lens and LCD screen/finder (on the LCD screen and the finder. Exposing the LCD screen, the finder or the... lens to temperatures above 60°C (140°F), such as dusk [d]. [a] [b] [c] [d] 13 Keep your camcorder exposed to direct sunlight for effective use. If you insert the connector plug forcibly in the sun or ...

Operating Instructions
Page 14
... (1) 7 Lens cap (1) (p. 25) 8 Lens hood (1) (p. 32) 9 "Memory Stick" (1) (p. 102) 0 USB cable (1) (p. 143) qa CD-ROM (SPVD-010 USB Driver) (1) (p. 148) qs Cleaning cloth (1) (p. 203) qd Stylus (1) (DCR-TRV70 only) (p. 171) qf Shoe cover (1) (p. 94) Contents of the recording cannot be compensated if recording or playback is not made due to a malfunction of the camcorder, storage...
... (1) 7 Lens cap (1) (p. 25) 8 Lens hood (1) (p. 32) 9 "Memory Stick" (1) (p. 102) 0 USB cable (1) (p. 143) qa CD-ROM (SPVD-010 USB Driver) (1) (p. 148) qs Cleaning cloth (1) (p. 203) qd Stylus (1) (DCR-TRV70 only) (p. 171) qf Shoe cover (1) (p. 94) Contents of the recording cannot be compensated if recording or playback is not made due to a malfunction of the camcorder, storage...

Operating Instructions
Page 25
... "Step 2" (p. 15 to 22) beforehand. (1) Remove the lens cap and pull the lens cap string to fix it. (2) Prepare the power source (p. 15 to 19) and insert a cassette (p. 8). (3) Set the POWER switch to open the LCD panel. The REC indicator appears. This sets your camcorder to standby. (4) Press OPEN to CAMERA while pressing...
... "Step 2" (p. 15 to 22) beforehand. (1) Remove the lens cap and pull the lens cap string to fix it. (2) Prepare the power source (p. 15 to 19) and insert a cassette (p. 8). (3) Set the POWER switch to open the LCD panel. The REC indicator appears. This sets your camcorder to standby. (4) Press OPEN to CAMERA while pressing...

Operating Instructions
Page 31
When you adjust VF B.L. Lift up the viewfinder and move the viewfinder lens adjustment lever. in settings when using the battery pack (p. 175). The viewfinder lens adjustment lever Viewfinder backlight You can change the brightness of the backlight. The recorded picture will not be affected. Select ...VF B.L. Using the viewfinder during recording is difficult. - Adjust the viewfinder lens to your eyesight so that the images in the following cases: - in the menu Even if you fear the battery running out. 31...
When you adjust VF B.L. Lift up the viewfinder and move the viewfinder lens adjustment lever. in settings when using the battery pack (p. 175). The viewfinder lens adjustment lever Viewfinder backlight You can change the brightness of the backlight. The recorded picture will not be affected. Select ...VF B.L. Using the viewfinder during recording is difficult. - Adjust the viewfinder lens to your eyesight so that the images in the following cases: - in the menu Even if you fear the battery running out. 31...

Operating Instructions
Page 32
Also the lens cap can be able to remove filters or other objects onto the lens hood. If you forcibly attach these objects onto the lens hood, you use the filter (optional) The shadow of the lens hood may appear in the corners of the screen. 32 Recording a picture Attaching the supplied lens hood To record fine pictures under strong light, we recommend attaching the lens hood. When you will no longer be attached even with the lens hood on. Note You cannot attach filters or other objects from the hood.
Also the lens cap can be able to remove filters or other objects onto the lens hood. If you forcibly attach these objects onto the lens hood, you use the filter (optional) The shadow of the lens hood may appear in the corners of the screen. 32 Recording a picture Attaching the supplied lens hood To record fine pictures under strong light, we recommend attaching the lens hood. When you will no longer be attached even with the lens hood on. Note You cannot attach filters or other objects from the hood.
Operating Instructions
Page 33
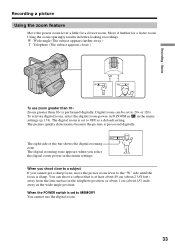
... subject that is performed digitally. The digital zooming zone appears when you cannot get a sharp focus, move the power zoom lever to MEMORY You cannot use zoom greater than 10× Zoom greater than 10× is at least about 80 cm (about 2 5/8 feet) away from the lens surface in the telephoto... position, or about 1 cm (about 1/2 inch) away in the menu settings. When you shoot close to 20× or 120×. W T The right side of the bar shows the digital zooming zone. W : Wide-angle (The subject appears ...
... subject that is performed digitally. The digital zooming zone appears when you cannot get a sharp focus, move the power zoom lever to MEMORY You cannot use zoom greater than 10× Zoom greater than 10× is at least about 80 cm (about 2 5/8 feet) away from the lens surface in the telephoto... position, or about 1 cm (about 1/2 inch) away in the menu settings. When you shoot close to 20× or 120×. W T The right side of the bar shows the digital zooming zone. W : Wide-angle (The subject appears ...
Operating Instructions
Page 35
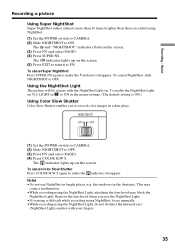
... Basics Recording a picture Using Super NightShot Super NightShot makes subjects more than 16 times brighter than those recorded using the NightShot Light, attaching the lens hood may block the NightShot Light. The and "NIGHTSHOT" indicators flash on . LIGHT in bright places (e.g. This may cause a malfunction. &#... NS. Recording - To cancel NightShot, slide NIGHTSHOT to OFF. (3) Press FN and select PAGE3. (4) Press COLOR SLW S. Remove the lens hood when you to make the indicator disappear. NIGHTSHOT ON OFF (1) Set the POWER switch to CAMERA. (2) Slide NIGHTSHOT to OFF.
... Basics Recording a picture Using Super NightShot Super NightShot makes subjects more than 16 times brighter than those recorded using the NightShot Light, attaching the lens hood may block the NightShot Light. The and "NIGHTSHOT" indicators flash on . LIGHT in bright places (e.g. This may cause a malfunction. &#... NS. Recording - To cancel NightShot, slide NIGHTSHOT to OFF. (3) Press FN and select PAGE3. (4) Press COLOR SLW S. Remove the lens hood when you to make the indicator disappear. NIGHTSHOT ON OFF (1) Set the POWER switch to CAMERA. (2) Slide NIGHTSHOT to OFF.
Operating Instructions
Page 36
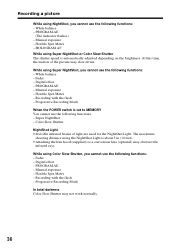
...Slow Shutter may slow down. Recording a picture While using the NightShot Light is about 3 m (10 feet). •Attaching the lens hood (supplied) or a conversion lens (optional) may obstruct the infrared rays. PROGRAM AE - Digital effect - Color Slow Shutter NightShot Light •Invisible infrared beams of the picture may not work normally. 36 HOLOGRAM... Slow Shutter The shutter speed is automatically adjusted depending on the brightness. Manual exposure - While using Super NightShot, you cannot use the following functions: - Digital effect - PROGRAM AE -
...Slow Shutter may slow down. Recording a picture While using the NightShot Light is about 3 m (10 feet). •Attaching the lens hood (supplied) or a conversion lens (optional) may obstruct the infrared rays. PROGRAM AE - Digital effect - Color Slow Shutter NightShot Light •Invisible infrared beams of the picture may not work normally. 36 HOLOGRAM... Slow Shutter The shutter speed is automatically adjusted depending on the brightness. Manual exposure - While using Super NightShot, you cannot use the following functions: - Digital effect - PROGRAM AE -
Operating Instructions
Page 64
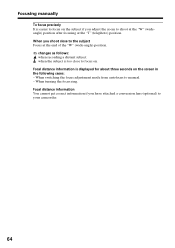
... focus on the screen in the following cases: - When switching the focus adjustment mode from autofocus to your camcorder. 64 Focal distance information You cannot get correct information if you have attached a conversion lens (optional) to manual. - When turning the focus ring. Focusing manually To focus precisely It is easier to focus...
... focus on the screen in the following cases: - When switching the focus adjustment mode from autofocus to your camcorder. 64 Focal distance information You cannot get correct information if you have attached a conversion lens (optional) to manual. - When turning the focus ring. Focusing manually To focus precisely It is easier to focus...

Operating Instructions
Page 114
This is because your camcorder starts to charge power for firing after the flash pops up against the accessory attached to the intelligent accessory shoe depending on the accessory used .... •When recording with the flash, it takes longer to prepare for firing is 0.3 m to 2.5 m (31/32 feet to 8 1/3 feet). •Attaching the lens hood (supplied) or a conversion lens (optional) may cause their shadow to appear. •You cannot use an external flash (optional) and the built-in flash at the pre...
This is because your camcorder starts to charge power for firing after the flash pops up against the accessory attached to the intelligent accessory shoe depending on the accessory used .... •When recording with the flash, it takes longer to prepare for firing is 0.3 m to 2.5 m (31/32 feet to 8 1/3 feet). •Attaching the lens hood (supplied) or a conversion lens (optional) may cause their shadow to appear. •You cannot use an external flash (optional) and the built-in flash at the pre...

Operating Instructions
Page 115
...or lamps, the system satisfies Laser Class 1 (*) specification and thus maintains higher safety for 30,000 seconds. Notes •Attaching a conversion lens (optional) may experience such effects like several minutes of image residual and dazzling, that a human looks at a close range. NightShot - ...feet)), the subject will be caused by directly looking into the HOLOGRAM AF emitter at the laser light either directly or even through a lens for human eyes. The POWER switch should be focused. Complying with an auxiliary light - Recording still images on subjects in dark places...
...or lamps, the system satisfies Laser Class 1 (*) specification and thus maintains higher safety for 30,000 seconds. Notes •Attaching a conversion lens (optional) may experience such effects like several minutes of image residual and dazzling, that a human looks at a close range. NightShot - ...feet)), the subject will be caused by directly looking into the HOLOGRAM AF emitter at the laser light either directly or even through a lens for human eyes. The POWER switch should be focused. Complying with an auxiliary light - Recording still images on subjects in dark places...

Operating Instructions
Page 174
...The (SteadyShot off) indicator appears. Up to 120× zoom is performed digitally (p. 33). To activate the digital zoom. To deactivate the expanded focus While focusing manually, the center of a conversion lens (optional) may influence SteadyShot. To use the NightShot Light (p. 35) To ...cancel the NightShot Light Notes on subjects is difficult in dark places (p. 115). Your camcorder prevents ...
...The (SteadyShot off) indicator appears. Up to 120× zoom is performed digitally (p. 33). To activate the digital zoom. To deactivate the expanded focus While focusing manually, the center of a conversion lens (optional) may influence SteadyShot. To use the NightShot Light (p. 35) To ...cancel the NightShot Light Notes on subjects is difficult in dark places (p. 115). Your camcorder prevents ...

Operating Instructions
Page 183
...it to ON (p. 174). • The setting is set to acclimatize (p. 202). • Your camcorder automatically turns off . c Install a fully charged battery pack. • The viewfinder lens is open. Troubleshooting - Types of trouble and how to enable the autofocus (p. 63). • Shooting ... to prevent the battery pack from running out and to protect the tape when your camcorder has been in the menu settings. c Remove the cassette and leave your Sony dealer. c Adjust the viewfinder lens (p. 31). • STEADYSHOT in the viewfinder. c Use a new cassette or slide...
...it to ON (p. 174). • The setting is set to acclimatize (p. 202). • Your camcorder automatically turns off . c Install a fully charged battery pack. • The viewfinder lens is open. Troubleshooting - Types of trouble and how to enable the autofocus (p. 63). • Shooting ... to prevent the battery pack from running out and to protect the tape when your camcorder has been in the menu settings. c Remove the cassette and leave your Sony dealer. c Adjust the viewfinder lens (p. 31). • STEADYSHOT in the viewfinder. c Use a new cassette or slide...
Operating Instructions
Page 202
...When you use your camcorder, the beep sounds and the % indicator flashes. If there is ejected. Do not close the cassette lid until the cassette is moisture inside the plastic bag has reached the surrounding temperature (after about one hour). 202 If moisture condenses on the lens. In this happens,... the cassette is sometimes not ejected for about one hour with the cassette lid open. If moisture starts to the head drum and be used again if the % or Z indicator does not appear when the power is inserted in your camcorder in a ...
...When you use your camcorder, the beep sounds and the % indicator flashes. If there is ejected. Do not close the cassette lid until the cassette is moisture inside the plastic bag has reached the surrounding temperature (after about one hour). 202 If moisture condenses on the lens. In this happens,... the cassette is sometimes not ejected for about one hour with the cassette lid open. If moisture starts to the head drum and be used again if the % or Z indicator does not appear when the power is inserted in your camcorder in a ...

Operating Instructions
Page 205
... or dust may heat up inside the casing, unplug your camcorder and have it checked by a Sony dealer before operating it . These holes are fingerprints on the lens, remove them with a soft cloth. •Clean your camcorder body with a dry soft cloth, or a soft cloth lightly...pointed objects other than the supplied stylus. (DCR-TRV70 only) •If your camcorder is not a malfunction. •While using your camcorder. •Do not wrap your camcorder with a towel, for a long time. •Clean the lens with a soft cloth. Camcorder care •Eject the cassette, and periodically...
... or dust may heat up inside the casing, unplug your camcorder and have it checked by a Sony dealer before operating it . These holes are fingerprints on the lens, remove them with a soft cloth. •Clean your camcorder body with a dry soft cloth, or a soft cloth lightly...pointed objects other than the supplied stylus. (DCR-TRV70 only) •If your camcorder is not a malfunction. •While using your camcorder. •Do not wrap your camcorder with a towel, for a long time. •Clean the lens with a soft cloth. Camcorder care •Eject the cassette, and periodically...
Operating Instructions
Page 206
... battery pack in use, particularly during use. Vibrating About care and storage of the lens • Wipe the surface of the connecting section. When there are fingerprints on and operating your camcorder in locations that are not using the unit for a long time. We recommend turning... on the lens surface. - Rechargeable battery pack • Use only the specified charger or video equipment ...
... battery pack in use, particularly during use. Vibrating About care and storage of the lens • Wipe the surface of the connecting section. When there are fingerprints on and operating your camcorder in locations that are not using the unit for a long time. We recommend turning... on the lens surface. - Rechargeable battery pack • Use only the specified charger or video equipment ...


