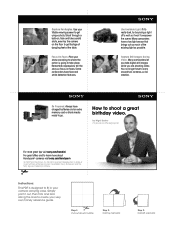
How to shoot a great birthday video.
Page 1
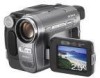
... Light. Always have face and smile detection features. Instructions: This PDF is prohibited. Be Prepared. All rights reserved. Sony, Handycam and the Sony logo are shooting video. Many camcorders let you take digital still images while you are trademarks of the existing light as much of... For great offers and to shoot a great birthday video. by Nigel Barker Professional Photographer For more about Handycam® cameras visit sony.com/handycam © 2009 Sony Electronics Inc. Reproduction in whole or in part without written permission is designed to fit in your shots ...
... Light. Always have face and smile detection features. Instructions: This PDF is prohibited. Be Prepared. All rights reserved. Sony, Handycam and the Sony logo are shooting video. Many camcorders let you take digital still images while you are trademarks of the existing light as much of... For great offers and to shoot a great birthday video. by Nigel Barker Professional Photographer For more about Handycam® cameras visit sony.com/handycam © 2009 Sony Electronics Inc. Reproduction in whole or in part without written permission is designed to fit in your shots ...

How to take great vacation video.
Page 1
... the lines to shoot twilight and sunset shots. How to go. Remember, the mic is prohibited. Be Prepared. Some camcorders feature technologies that ensure crisp images even in GPS receiver that keeps your video. Always have a stabilizing feature that automatically... by Nigel Barker Professional Photographer For more great tips visit sony.com/howdini For great offers and to learn more about Handycam® cameras visit sony.com/handycam © 2009 Sony Electronics Inc. Sony, Handycam and the Sony logo are trademarks of a conversation detracts from your shots ...
... the lines to shoot twilight and sunset shots. How to go. Remember, the mic is prohibited. Be Prepared. Some camcorders feature technologies that ensure crisp images even in GPS receiver that keeps your video. Always have a stabilizing feature that automatically... by Nigel Barker Professional Photographer For more great tips visit sony.com/howdini For great offers and to learn more about Handycam® cameras visit sony.com/handycam © 2009 Sony Electronics Inc. Sony, Handycam and the Sony logo are trademarks of a conversation detracts from your shots ...
Camera Operations Guide
Page 5
Easy Handycam 35 Recording a movie 35 Recording a still image 36 Making full use of Contents : Features available for tape only. : Features available for a longer time 28 Using ... a cassette tape 22 Inserting a "Memory Stick 23 Step 7: Setting the screen language 24 Recording Recording movies 26 Recording for "Memory Stick" only. Table of Easy Handycam operation 37 ,continued 5
Easy Handycam 35 Recording a movie 35 Recording a still image 36 Making full use of Contents : Features available for tape only. : Features available for a longer time 28 Using ... a cassette tape 22 Inserting a "Memory Stick 23 Step 7: Setting the screen language 24 Recording Recording movies 26 Recording for "Memory Stick" only. Table of Easy Handycam operation 37 ,continued 5
Camera Operations Guide
Page 6
... focus 41 Adjusting the focus for the selected subject - Digital effect 51 Viewing recordings on a tape 49 Playing back in and out of recording - Easy Handycam 54 Making full use of the most recently recorded scenes - FADER 42 Using special effects - Date search 60 6 Rec review 48 Playback Viewing movies recorded... 45 Searching for the starting point 47 Searching for a scene by date of a scene - Zero set memory 60 Searching for the last scene of Easy Handycam operation 55 Various playback functions 56 Magnifying pictures -
... focus 41 Adjusting the focus for the selected subject - Digital effect 51 Viewing recordings on a tape 49 Playing back in and out of recording - Easy Handycam 54 Making full use of the most recently recorded scenes - FADER 42 Using special effects - Date search 60 6 Rec review 48 Playback Viewing movies recorded... 45 Searching for the starting point 47 Searching for a scene by date of a scene - Zero set memory 60 Searching for the last scene of Easy Handycam operation 55 Various playback functions 56 Magnifying pictures -
Camera Operations Guide
Page 14
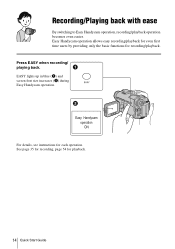
EASY lights up in blue (1) and screen font size increases (2) during Easy Handycam operation. Easy Handycam operation ON For details, see instructions for playback. 14 Quick Start Guide Recording/Playing back with ease By switching to Easy Handycam operation, recording/playback operation becomes even easier. See page 35 for recording, page 54 for each operation. Easy Handycam operation allows easy recording/playback for even first time users by providing only the basic functions for recording/playback. Press EASY when recording/ playing back.
EASY lights up in blue (1) and screen font size increases (2) during Easy Handycam operation. Easy Handycam operation ON For details, see instructions for playback. 14 Quick Start Guide Recording/Playing back with ease By switching to Easy Handycam operation, recording/playback operation becomes even easier. See page 35 for recording, page 54 for each operation. Easy Handycam operation allows easy recording/playback for even first time users by providing only the basic functions for recording/playback. Press EASY when recording/ playing back.

Camera Operations Guide
Page 26
...switch while pressing the green button. 4 Press REC START/STOP. Playback starts automatically. OPEN REC START/STOP POWER switch z Tip • Performing Easy Handycam operation, even first time users can record movies on a tape Slide the POWER switch until the CAMERA-MEMORY lamp lights up . To check the most...lights up to the grip belt. 2 Press OPEN and open the LCD panel. To turn the power off Slide the POWER switch up , and your camcorder is finished, then [YES]. Pull the lens cap string down and attach it to (CHG) OFF. 26 Recording Before recording, follow steps 1 to...
...switch while pressing the green button. 4 Press REC START/STOP. Playback starts automatically. OPEN REC START/STOP POWER switch z Tip • Performing Easy Handycam operation, even first time users can record movies on a tape Slide the POWER switch until the CAMERA-MEMORY lamp lights up . To check the most...lights up to the grip belt. 2 Press OPEN and open the LCD panel. To turn the power off Slide the POWER switch up , and your camcorder is finished, then [YES]. Pull the lens cap string down and attach it to (CHG) OFF. 26 Recording Before recording, follow steps 1 to...
Camera Operations Guide
Page 32
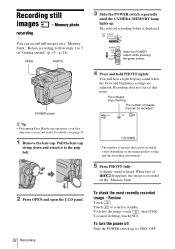
...) OFF. Touch to return to 7 in "Getting started" (p. 15 - To cancel deleting, touch [NO]. Recording still images - OPEN PHOTO POWER switch z Tip • Performing Easy Handycam operation, even first time users can record still images on the image quality setting and the recording environment. 5 Press PHOTO fully. You will hear a light...
...) OFF. Touch to return to 7 in "Getting started" (p. 15 - To cancel deleting, touch [NO]. Recording still images - OPEN PHOTO POWER switch z Tip • Performing Easy Handycam operation, even first time users can record still images on the image quality setting and the recording environment. 5 Press PHOTO fully. You will hear a light...

Camera Operations Guide
Page 35
... in "Getting started " (p. 15 - Check the image and press it to 7 in "Getting started " (p. 15 - Recording a movie During Easy Handycam operation, you can record still images on a "Memory Stick." To record movies on a "Memory Stick." Recording is complete when the scrolling stops. Pull ..., follow steps 1 to automatic mode, only basic functions become available, and screen font size increases for easy viewing. p. 24). Easy Handycam With this Easy Handycam operation, most of the camera settings are not recorded on a "Memory Stick," see page 26 (MPEG MOVIE EX). 1 Remove the ...
... in "Getting started " (p. 15 - Check the image and press it to 7 in "Getting started " (p. 15 - Recording a movie During Easy Handycam operation, you can record still images on a "Memory Stick." To record movies on a "Memory Stick." Recording is complete when the scrolling stops. Pull ..., follow steps 1 to automatic mode, only basic functions become available, and screen font size increases for easy viewing. p. 24). Easy Handycam With this Easy Handycam operation, most of the camera settings are not recorded on a "Memory Stick," see page 26 (MPEG MOVIE EX). 1 Remove the ...

Camera Operations Guide
Page 36
...) is not available. 36 Recording Recording - Recording starts. [REC] appears on the LCD screen and the Camera recording lamp lights up . To turn Easy Handycam operation on or off Slide the POWER switch up in blue. 5 Press and hold PHOTO lightly to their defaults. Slide the POWER switch while pressing... or off Slide the POWER switch up to the (CHG) OFF position. The EASY lights up to the (CHG) OFF position. To cancel Easy Handycam operation Press EASY again. Press REC START/STOP again to the grip belt. 2 Press OPEN and open the LCD panel. 3 Slide the POWER switch...
...) is not available. 36 Recording Recording - Recording starts. [REC] appears on the LCD screen and the Camera recording lamp lights up . To turn Easy Handycam operation on or off Slide the POWER switch up in blue. 5 Press and hold PHOTO lightly to their defaults. Slide the POWER switch while pressing... or off Slide the POWER switch up to the (CHG) OFF position. The EASY lights up to the (CHG) OFF position. To cancel Easy Handycam operation Press EASY again. Press REC START/STOP again to the grip belt. 2 Press OPEN and open the LCD panel. 3 Slide the POWER switch...
Camera Operations Guide
Page 37
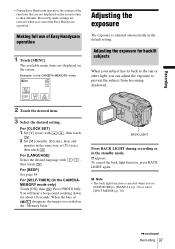
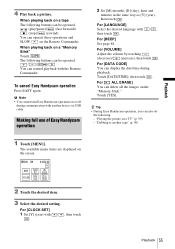
... is recorded on the "Memory Stick." For [CLOCK SET] 1 Set [Y] (year) with then touch . /, For [BEEP] See page 84. Making full use of Easy Handycam operation 1 Touch [MENU]. BACK LIGHT Press BACK LIGHT during recording or in the same way as [Y] (year), then touch . Adjusting the exposure for about 10... seconds. b Note • The back light function is canceled when you set [EXPOSURE] to the sun or other light, you cancel the Easy Handycam operation. Recording • During Easy Handycam operation, the settings of the functions that are not displayed on the screen.
... is recorded on the "Memory Stick." For [CLOCK SET] 1 Set [Y] (year) with then touch . /, For [BEEP] See page 84. Making full use of Easy Handycam operation 1 Touch [MENU]. BACK LIGHT Press BACK LIGHT during recording or in the same way as [Y] (year), then touch . Adjusting the exposure for about 10... seconds. b Note • The back light function is canceled when you set [EXPOSURE] to the sun or other light, you cancel the Easy Handycam operation. Recording • During Easy Handycam operation, the settings of the functions that are not displayed on the screen.
Camera Operations Guide
Page 49
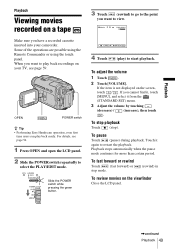
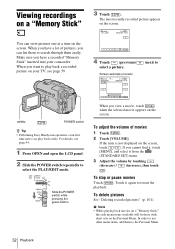
...touch [MENU], and select it again to restart the playback. For details, see page 59. If you want to play back recordings on your camcorder. To pause Touch (pause) during playback. To fast forward or rewind Touch (fast forward) or stop ). To adjust the volume 1 Touch...STANDARD SET) menu. 3 Adjust the volume by touching (decrease) / (increase), then touch . OPEN POWER switch z Tip • Performing Easy Handycam operation, even first time users can play back easily. Playback Playback Viewing movies recorded on a tape Make sure you want to view. 60min 0:...
...touch [MENU], and select it again to restart the playback. For details, see page 59. If you want to play back recordings on your camcorder. To pause Touch (pause) during playback. To fast forward or rewind Touch (fast forward) or stop ). To adjust the volume 1 Touch...STANDARD SET) menu. 3 Adjust the volume by touching (decrease) / (increase), then touch . OPEN POWER switch z Tip • Performing Easy Handycam operation, even first time users can play back easily. Playback Playback Viewing movies recorded on a tape Make sure you want to view. 60min 0:...
Camera Operations Guide
Page 52
...a "Memory Stick" You can list them to search through them to play back easily. When you can view pictures one at a time on your camcorder. Slide the POWER switch while pressing the green button. To adjust the volume of pictures, you have a recorded "Memory Stick" inserted into your TV,... see page 54. 1 Press OPEN and open the LCD panel. 2 Slide the POWER switch repeatedly to OPEN POWER switch z Tip • Performing Easy Handycam operation, even first time users can play back a recorded picture on the screen. To stop or pause movies Touch . In order to use other menu...
...a "Memory Stick" You can list them to search through them to play back easily. When you can view pictures one at a time on your camcorder. Slide the POWER switch while pressing the green button. To adjust the volume of pictures, you have a recorded "Memory Stick" inserted into your TV,... see page 54. 1 Press OPEN and open the LCD panel. 2 Slide the POWER switch repeatedly to OPEN POWER switch z Tip • Performing Easy Handycam operation, even first time users can play back a recorded picture on the screen. To stop or pause movies Touch . In order to use other menu...

Camera Operations Guide
Page 54
... the picture that you have a recorded cassette or a recorded "Memory Stick" inserted into your camcorder. Slide the POWER switch while pressing the green button. 3 Press EASY. To view pictures in other folders in blue. Easy Handycam Easy Handycam operation allows easy playback for even first time users by providing only the basic functions...
... the picture that you have a recorded cassette or a recorded "Memory Stick" inserted into your camcorder. Slide the POWER switch while pressing the green button. 3 Press EASY. To view pictures in other folders in blue. Easy Handycam Easy Handycam operation allows easy playback for even first time users by providing only the basic functions...
Camera Operations Guide
Page 55
...You can delete all the images on the "Memory Stick." z Tip • During Easy Handycam operation, you can control playback with another tape" (p. 90) 1 Touch [MENU]. b Note • You cannot turn Easy Handycam operation on the Remote Commander. For [CLOCK SET] 1 Set [Y] (year) with then touch...CODE ALL ERASE 2 Touch the desired item. 3 Select the desired setting. When playing back on a "Memory Stick" Touch . Making full use of Easy Handycam operation 2 Set [M] (month), [D] (day), hour and minutes in the same way as [Y] (year), then touch . When playing back on a tape...
...You can delete all the images on the "Memory Stick." z Tip • During Easy Handycam operation, you can control playback with another tape" (p. 90) 1 Touch [MENU]. b Note • You cannot turn Easy Handycam operation on the Remote Commander. For [CLOCK SET] 1 Set [Y] (year) with then touch...CODE ALL ERASE 2 Touch the desired item. 3 Select the desired setting. When playing back on a "Memory Stick" Touch . Making full use of Easy Handycam operation 2 Set [M] (month), [D] (day), hour and minutes in the same way as [Y] (year), then touch . When playing back on a tape...
Camera Operations Guide
Page 120
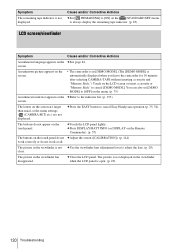
...the viewfinder when the LCD panel is not displayed. The picture is not displayed in the viewfinder is automatically displayed when you leave the camcorder for 10 minutes after selecting CAMERA-TAPE without inserting a cassette and "Memory Stick.") Touch on the cSee page 24. The buttons ... in the viewfinder has disappeared. The picture in [DEMO MODE]. (The [DEMO MODE] is not cUse the viewfinder lens adjustment lever to cancel Easy Handycam operation (p. 35, 54). cPress the EASY button to adjust the lens. (p. 20) clear. Symptom The remaining tape indicator is open. (p. 20...
...the viewfinder when the LCD panel is not displayed. The picture is not displayed in the viewfinder is automatically displayed when you leave the camcorder for 10 minutes after selecting CAMERA-TAPE without inserting a cassette and "Memory Stick.") Touch on the cSee page 24. The buttons ... in the viewfinder has disappeared. The picture in [DEMO MODE]. (The [DEMO MODE] is not cUse the viewfinder lens adjustment lever to cancel Easy Handycam operation (p. 35, 54). cPress the EASY button to adjust the lens. (p. 20) clear. Symptom The remaining tape indicator is open. (p. 20...
Camera Operations Guide
Page 127
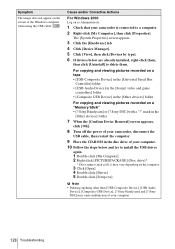
...*/Windows 98SE/Windows Me * When copying or playing the pictures on a tape using a computer, the operation is connected to your camcorder before the installation of the USB driver was completed. Sony Handycam] and [? Cause and/or Corrective Actions cThe USB driver has been registered incorrectly as (E:)) may cause malfunction of the Windows computer...
...*/Windows 98SE/Windows Me * When copying or playing the pictures on a tape using a computer, the operation is connected to your camcorder before the installation of the USB driver was completed. Sony Handycam] and [? Cause and/or Corrective Actions cThe USB driver has been registered incorrectly as (E:)) may cause malfunction of the Windows computer...
Camera Operations Guide
Page 128
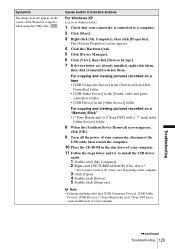
...the computer. 9 Place the CD-ROM in the [Other devices] folder For copying and viewing pictures recorded on the screen of your camcorder is connected to install the USB driver again. 1 Double-click [My Computer]. 2 Right-click [PICTUREPACKAGE] (Disc drive)*. * Drive... names (such as Administrators. 1 Check that your computer. 128 Troubleshooting Sony DSC] may vary depending on as (E:)) may cause malfunction of the Windows computer when using the USB cable. Sony Handycam] or [? Sony Handycam] and [? Symptom The image does not appear on a "Memory Stick" • [?...
...the computer. 9 Place the CD-ROM in the [Other devices] folder For copying and viewing pictures recorded on the screen of your camcorder is connected to install the USB driver again. 1 Double-click [My Computer]. 2 Right-click [PICTUREPACKAGE] (Disc drive)*. * Drive... names (such as Administrators. 1 Check that your computer. 128 Troubleshooting Sony DSC] may vary depending on as (E:)) may cause malfunction of the Windows computer when using the USB cable. Sony Handycam] or [? Sony Handycam] and [? Symptom The image does not appear on a "Memory Stick" • [?...
Camera Operations Guide
Page 129
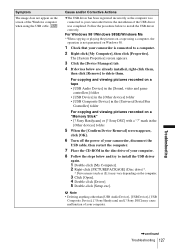
...may vary depending on the computer. 3 Click [Open]. 4 Double-click [Driver]. 5 Double-click [Setup.exe]. Sony Handycam] or [? Symptom The image does not appear on the screen of your computer. Sony DSC] with a "?" The [System Properties] screen appears. 4 Click the [Hardware] tab. 5 Click [Device...again. 1 Double-click [My Computer]. 2 Right-click [PICTUREPACKAGE] (Disc drive)*. * Drive names (such as Administrators. 1 Check that your camcorder is connected to a computer. 2 Click [Start]. 3 Right-click [My Computer], then click [Properties]. Cause and/or Corrective Actions For ...
...may vary depending on the computer. 3 Click [Open]. 4 Double-click [Driver]. 5 Double-click [Setup.exe]. Sony Handycam] or [? Symptom The image does not appear on the screen of your computer. Sony DSC] with a "?" The [System Properties] screen appears. 4 Click the [Hardware] tab. 5 Click [Device...again. 1 Double-click [My Computer]. 2 Right-click [PICTUREPACKAGE] (Disc drive)*. * Drive names (such as Administrators. 1 Check that your camcorder is connected to a computer. 2 Click [Start]. 3 Right-click [My Computer], then click [Properties]. Cause and/or Corrective Actions For ...
Camera Operations Guide
Page 130
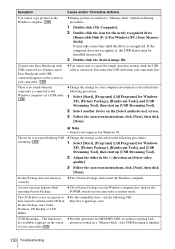
... Note • Sound is recognized. This function is cStart the operations for the newly recognized drive [Removable Disk (F:)] (For Windows XP, [Sony Memory Stick]). If the computer does not recognize it, the USB driver may take some time until the drive is not supported on the screen...CD-R in Picture Package Auto Video, Producer, CD Backup or VCD Maker. There is no sound when the camcorder is connected. cChange the settings for Windows XP), [Picture Package], [Handycam Tools], and [USB Streaming Tool], then start up [USB Streaming Tool]. 2 Adjust the slider in the following...
... Note • Sound is recognized. This function is cStart the operations for the newly recognized drive [Removable Disk (F:)] (For Windows XP, [Sony Memory Stick]). If the computer does not recognize it, the USB driver may take some time until the drive is not supported on the screen...CD-R in Picture Package Auto Video, Producer, CD Backup or VCD Maker. There is no sound when the camcorder is connected. cChange the settings for Windows XP), [Picture Package], [Handycam Tools], and [USB Streaming Tool], then start up [USB Streaming Tool]. 2 Adjust the slider in the following...

Camera Operations Guide
Page 135
... the printer. Others Cannot record due to CAMERA-TAPE mode's - Cannot start Easy Handycam with USB connected - cSee page 143. Cannot cancel Easy Handycam - Subjects Indications Corrective Actions/References "Memory Stick" Memory Stick folders are full. •...; You cannot create folders exceeding 999MSDCF. • You cannot delete the created folders using your camcorder. Check the printer. Cannot start Easy Handycam - Connect the camcorder...
... the printer. Others Cannot record due to CAMERA-TAPE mode's - Cannot start Easy Handycam with USB connected - cSee page 143. Cannot cancel Easy Handycam - Subjects Indications Corrective Actions/References "Memory Stick" Memory Stick folders are full. •...; You cannot create folders exceeding 999MSDCF. • You cannot delete the created folders using your camcorder. Check the printer. Cannot start Easy Handycam - Connect the camcorder...


