User Manual
Page 2
... on use Note on a cassette tape You can use standard 8 mm and Hi8 , Digital8 video cassettes on a TV, you need to be replaced, a fuse of this product. Notes on the country/ region. Unauthorized recording of such materials may influence the picture and sound of the same rating as household waste. Refer servicing to the copyright laws. Instead it for DCR-TRV270E/TRV285E The electromagnetic...
... on use Note on a cassette tape You can use standard 8 mm and Hi8 , Digital8 video cassettes on a TV, you need to be replaced, a fuse of this product. Notes on the country/ region. Unauthorized recording of such materials may influence the picture and sound of the same rating as household waste. Refer servicing to the copyright laws. Instead it for DCR-TRV270E/TRV285E The electromagnetic...
User Manual
Page 3
... on the model DCR-TRV285E. • The screens shown in the following parts. CCD-TRV238E: TRV238E CCD-TRV438E: TRV438E DCR-TRV270E: TRV270E DCR-TRV285E: TRV285E Instructions with an USB or i.LINK cable, be damaged. Change the screen language before using this instruction manual, each local language are used on this manual are captured using the camcorder • Hold your camcorder if necessary (p. 19). • The illustrations used in the wrong direction, the terminal may appear different from a Windows XP computer...
... on the model DCR-TRV285E. • The screens shown in the following parts. CCD-TRV238E: TRV238E CCD-TRV438E: TRV438E DCR-TRV270E: TRV270E DCR-TRV285E: TRV285E Instructions with an USB or i.LINK cable, be damaged. Change the screen language before using this instruction manual, each local language are used on this manual are captured using the camcorder • Hold your camcorder if necessary (p. 19). • The illustrations used in the wrong direction, the terminal may appear different from a Windows XP computer...
User Manual
Page 6
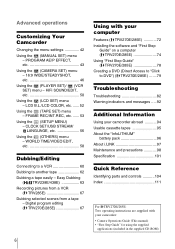
... LCD B.L./LCD COLOR, etc. ...... 52 Using the (TAPE SET) menu - Advanced operations Customizing Your Camcorder Changing the menu settings 42 Using the (MANUAL SET) menu - WORLD TIME/VIDEO EDIT, etc 58 Dubbing/Editing Connecting to a VCR 60 Dubbing to DVD") ( TRV270E/285E) .......79 Troubleshooting Troubleshooting 82 Warning indicators and messages .....92 Additional Information Using your camcorder abroad ...........94 Usable cassette tapes 95 About the "InfoLITHIUM" battery pack 96 About i.LINK 97 Maintenance and precautions 98 Specification 101 Quick Reference Identifying parts...
... LCD B.L./LCD COLOR, etc. ...... 52 Using the (TAPE SET) menu - Advanced operations Customizing Your Camcorder Changing the menu settings 42 Using the (MANUAL SET) menu - WORLD TIME/VIDEO EDIT, etc 58 Dubbing/Editing Connecting to a VCR 60 Dubbing to DVD") ( TRV270E/285E) .......79 Troubleshooting Troubleshooting 82 Warning indicators and messages .....92 Additional Information Using your camcorder abroad ...........94 Usable cassette tapes 95 About the "InfoLITHIUM" battery pack 96 About i.LINK 97 Maintenance and precautions 98 Specification 101 Quick Reference Identifying parts...
User Manual
Page 13
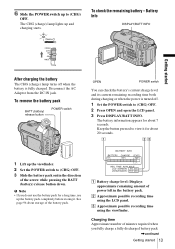
... 13 BATTERY INFO BATTERY CHARGE LEVEL 0% 50% 100% REC TIME AVAILABLE LCD SCREEN: 81 min VIEWFINDER: 112 min A Battery charge level: Displays approximate remaining amount of power left in the direction of the arrow while pressing the BATT (battery) release button down. Disconnect the AC Adaptor from the DC IN jack. Charging time Approximate number of the battery pack. 6 Slide the POWER switch up and charging starts. B Approximate possible recording time using the viewfinder. Keep the button...
... 13 BATTERY INFO BATTERY CHARGE LEVEL 0% 50% 100% REC TIME AVAILABLE LCD SCREEN: 81 min VIEWFINDER: 112 min A Battery charge level: Displays approximate remaining amount of power left in the direction of the arrow while pressing the BATT (battery) release button down. Disconnect the AC Adaptor from the DC IN jack. Charging time Approximate number of the battery pack. 6 Slide the POWER switch up and charging starts. B Approximate possible recording time using the viewfinder. Keep the button...
User Manual
Page 22
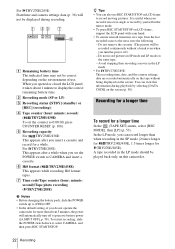
... recording a movie in the LP mode should be correct depending on the screen (p. 58). G Time code/Tape counter (hour: minute: second)/Tape photo recording ( TRV270E/285E) b Notes • Before changing the battery pack, slide the POWER switch up to record moving pictures. In the LP mode, you do not operate the camcorder for a while. Recording for a longer time To record for TRV270E/285E). For TRV270E/285E: Date/time and camera settings data (p. 36) will not be displayed during recording...
... recording a movie in the LP mode should be correct depending on the screen (p. 58). G Time code/Tape counter (hour: minute: second)/Tape photo recording ( TRV270E/285E) b Notes • Before changing the battery pack, slide the POWER switch up to record moving pictures. In the LP mode, you do not operate the camcorder for a while. Recording for a longer time To record for TRV270E/285E). For TRV270E/285E: Date/time and camera settings data (p. 36) will not be displayed during recording...
User Manual
Page 23
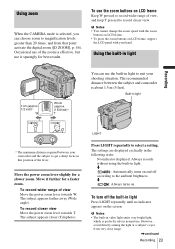
... normal use. m : Always turns on LCD frame, support the LCD panel with the zoom buttons on LCD frame. • To press the zoom buttons on . To use the zoom buttons on the screen. The subject appears farther away (Wide angle). The settings are displayed cyclically in light to get a sharp focus in light. Using the built-in light 1 cm (approx. 1/2 inch)* 80 cm (approx. 2 5/8 feet)* You can choose zoom to record closer view. b Notes...
... normal use. m : Always turns on LCD frame, support the LCD panel with the zoom buttons on LCD frame. • To press the zoom buttons on . To use the zoom buttons on the screen. The subject appears farther away (Wide angle). The settings are displayed cyclically in light to get a sharp focus in light. Using the built-in light 1 cm (approx. 1/2 inch)* 80 cm (approx. 2 5/8 feet)* You can choose zoom to record closer view. b Notes...
User Manual
Page 56
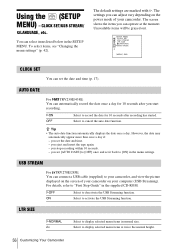
... auto date function automatically displays the date once a day. you stop recording within 10 seconds. - USB STREAM For TRV270E/285E: You can set the date and time (p. 17). SETUP MENU CLOCK SET USB STREAM LTR SIZE LANGUAGE DEMO MODE [MENU] : END CLOCK SET You can connect a USB cable (supplied) to your camcorder, and view the picture displayed on the screen of your camcorder on the power mode of your computer (USB Streaming). GON OFF Select to deactivate the USB Streaming function. you eject and insert the tape...
... auto date function automatically displays the date once a day. you stop recording within 10 seconds. - USB STREAM For TRV270E/285E: You can set the date and time (p. 17). SETUP MENU CLOCK SET USB STREAM LTR SIZE LANGUAGE DEMO MODE [MENU] : END CLOCK SET You can connect a USB cable (supplied) to your camcorder, and view the picture displayed on the screen of your camcorder on the power mode of your computer (USB Streaming). GON OFF Select to deactivate the USB Streaming function. you eject and insert the tape...
User Manual
Page 58
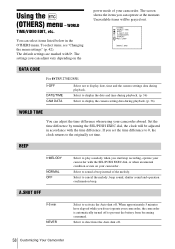
.../stop recording, operate your camcorder with G. To select items, see "Changing the menu settings" (p. 42). SHUT OFF COMMANDER DISPLAY REC LAMP [MENU] : END DATA CODE For TRV270E/285E: GOFF DATE/TIME CAM DATA Select not to display date, time and the camera settings data during playback. (p. 36) WORLD TIME You can adjust vary depending on your camcorder. The settings you can adjust the time difference when using your camcorder, the camcorder is automatically turned off to play a melody when you do not operate your camcorder abroad. Set...
.../stop recording, operate your camcorder with G. To select items, see "Changing the menu settings" (p. 42). SHUT OFF COMMANDER DISPLAY REC LAMP [MENU] : END DATA CODE For TRV270E/285E: GOFF DATE/TIME CAM DATA Select not to display date, time and the camera settings data during playback. (p. 36) WORLD TIME You can adjust vary depending on your camcorder. The settings you can adjust the time difference when using your camcorder, the camcorder is automatically turned off to play a melody when you do not operate your camcorder abroad. Set...
User Manual
Page 70
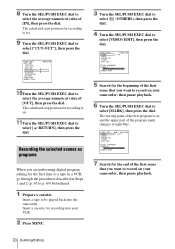
... digital program editing for the beginning of the first scene that you want to record on your camcorder, then pause playback. 6 Turn the SEL/PUSH EXEC dial to select [MARK], then press the dial. VIDEO EDIT MARK UNDO ERASE ALL START EDIT SET 0:08:55:06 1 IN TOTAL 0:00:00:00 SCENE 0 [MENU] : END 5 Search for the first time to a tape in a VCR...
... digital program editing for the beginning of the first scene that you want to record on your camcorder, then pause playback. 6 Turn the SEL/PUSH EXEC dial to select [MARK], then press the dial. VIDEO EDIT MARK UNDO ERASE ALL START EDIT SET 0:08:55:06 1 IN TOTAL 0:00:00:00 SCENE 0 [MENU] : END 5 Search for the first time to a tape in a VCR...
User Manual
Page 71
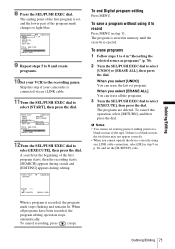
... save a program without using an i.LINK cable connection, select [IR] in step 11. To erase programs 1 Follow steps 1 to 4 in memory until the cassette is recorded, the program mark stops flashing and remains lit. VIDEO EDIT MARK UNDO ERASE ALL START EDIT SET 0:09:07:06 2 IN TOTAL 0:00:12:00 SCENE 1 [MENU] : END 9 Repeat steps 5 to 8 and create programs. 10Set your camcorder is connected via...
... save a program without using an i.LINK cable connection, select [IR] in step 11. To erase programs 1 Follow steps 1 to 4 in memory until the cassette is recorded, the program mark stops flashing and remains lit. VIDEO EDIT MARK UNDO ERASE ALL START EDIT SET 0:09:07:06 2 IN TOTAL 0:00:12:00 SCENE 1 [MENU] : END 9 Repeat steps 5 to 8 and create programs. 10Set your camcorder is connected via...
User Manual
Page 73
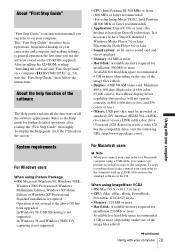
... connect via an i.LINK cable), disc drive (You need a CD-R drive to create a video CD. To copy recordings from initial hookup of your camcorder and computer and making settings, to general operation the first time you cannot copy pictures recorded on a tape to the computer. In Windows 98 and Windows 98SE, DV capturing is not supported. • CPU: Intel Pentium III 500 MHz or faster (800 MHz or faster recommended) (For using Picture...
... connect via an i.LINK cable), disc drive (You need a CD-R drive to create a video CD. To copy recordings from initial hookup of your camcorder and computer and making settings, to general operation the first time you cannot copy pictures recorded on a tape to the computer. In Windows 98 and Windows 98SE, DV capturing is not supported. • CPU: Intel Pentium III 500 MHz or faster (800 MHz or faster recommended) (For using Picture...
User Manual
Page 85
... the tape. The built-in color occurs. cClean the head using the cleaning cassette (optional). (p. 99) • For TRV238E/438E: The television's video channel is not a malfunction. cThis occurs when recording pictures under a fluorescent lamp, sodium lamp, or mercury lamp in the (VCR SET) menu for TRV285E, adjust [AUDIO MIX] from the [ST2] side until the sound is being played. • The data code on a tape with the recording date displayed on the picture.
... the tape. The built-in color occurs. cClean the head using the cleaning cassette (optional). (p. 99) • For TRV238E/438E: The television's video channel is not a malfunction. cThis occurs when recording pictures under a fluorescent lamp, sodium lamp, or mercury lamp in the (VCR SET) menu for TRV285E, adjust [AUDIO MIX] from the [ST2] side until the sound is being played. • The data code on a tape with the recording date displayed on the picture.
User Manual
Page 88
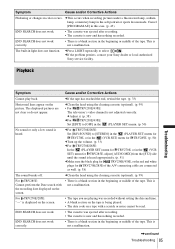
... connected to your camcorder before the installation of the USB driver was completed. The [System Properties] screen appears. 3 Click the [Device Manager] tab. 4 If devices below are already installed, right-click them, then click [Remove] to install the USB driver correctly. For copying and viewing pictures recorded on the computer. 3 Click [Open]. 4 Double-click [Driver]. 5 Double-click [Setup.exe]. For Windows 98*/Windows 98SE/Windows Me * When copying or playing the pictures on a tape using the USB cable. b Note • Deleting...
... connected to your camcorder before the installation of the USB driver was completed. The [System Properties] screen appears. 3 Click the [Device Manager] tab. 4 If devices below are already installed, right-click them, then click [Remove] to install the USB driver correctly. For copying and viewing pictures recorded on the computer. 3 Click [Open]. 4 Double-click [Driver]. 5 Double-click [Setup.exe]. For Windows 98*/Windows 98SE/Windows Me * When copying or playing the pictures on a tape using the USB cable. b Note • Deleting...
User Manual
Page 89
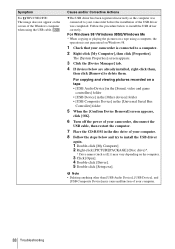
For copying and viewing pictures recorded on a tape • [USB Composite Device] in the [Universal Serial Bus Controller] folder • [USB Audio Device] in the [Sound, video and game controller] folder • [Composite USB Device] in the [Other devices] folder 7 When the [Confirm Device Removal] screen appears, click [OK]. 8 Turn off the power of your camcorder, disconnect the USB cable, then restart the computer. 9 Place the CD-ROM in the disc drive of your computer. 10 Follow the steps below...
For copying and viewing pictures recorded on a tape • [USB Composite Device] in the [Universal Serial Bus Controller] folder • [USB Audio Device] in the [Sound, video and game controller] folder • [Composite USB Device] in the [Other devices] folder 7 When the [Confirm Device Removal] screen appears, click [OK]. 8 Turn off the power of your camcorder, disconnect the USB cable, then restart the computer. 9 Place the CD-ROM in the disc drive of your computer. 10 Follow the steps below...
User Manual
Page 90
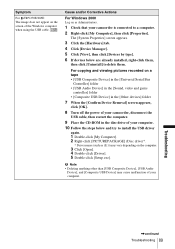
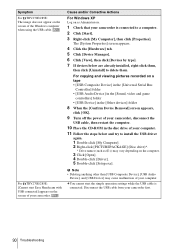
... simple operation settings while the USB cable is connected to install the USB driver again. 1 Double-click [My Computer]. 2 Right-click [PICTUREPACKAGE] (Disc drive)*. * Drive names (such as Administrators. 1 Check that your camcorder first. 90 Troubleshooting For copying and viewing pictures recorded on a tape • [USB Composite Device] in the [Universal Serial Bus Controller] folder • [USB Audio Device] in the [Sound, video and game controllers] folder • [USB Device] in the [Other devices] folder 8 When the [Confirm Device Removal] screen appears, click [OK]. 9 Turn off...
... simple operation settings while the USB cable is connected to install the USB driver again. 1 Double-click [My Computer]. 2 Right-click [PICTUREPACKAGE] (Disc drive)*. * Drive names (such as Administrators. 1 Check that your camcorder first. 90 Troubleshooting For copying and viewing pictures recorded on a tape • [USB Composite Device] in the [Universal Serial Bus Controller] folder • [USB Audio Device] in the [Sound, video and game controllers] folder • [USB Device] in the [Other devices] folder 8 When the [Confirm Device Removal] screen appears, click [OK]. 9 Turn off...
User Manual
Page 100
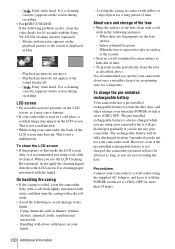
... problem occurs, clean the video heads for more than 24 hours. To charge the pre-installed rechargeable battery Your camcorder has a pre-installed rechargeable battery to the finish. - Use cleaning paper moistened with a dry soft cloth. • Avoid the following instances: - It is used in the following to avoid damage to retain the date, time, and other settings even when the POWER switch is not a malfunction. Procedures Connect your camcorder...
... problem occurs, clean the video heads for more than 24 hours. To charge the pre-installed rechargeable battery Your camcorder has a pre-installed rechargeable battery to the finish. - Use cleaning paper moistened with a dry soft cloth. • Avoid the following instances: - It is used in the following to avoid damage to retain the date, time, and other settings even when the POWER switch is not a malfunction. Procedures Connect your camcorder...
User Manual
Page 101
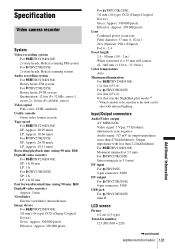
... minijack (ø 3.5 mm) DV input For TRV285E: 4-pin connector, S100 DV output For TRV270E/285E: 4-pin connector, S100 USB jack For TRV270E/285E: mini-B LCD screen Picture 6.2 cm (2.5 type) Total dot number 123 200 (560 × 220) ,continued Additional Information 101 Additional Information Hi8/ Digital8 video cassette) Approx. 5 min Viewfinder Electric viewfinder (monochrome) Image device For TRV238E/438E: 3.0 mm (1/6 type) CCD (Charge Coupled Device) Gross: Approx. 380 000...
... minijack (ø 3.5 mm) DV input For TRV285E: 4-pin connector, S100 DV output For TRV270E/285E: 4-pin connector, S100 USB jack For TRV270E/285E: mini-B LCD screen Picture 6.2 cm (2.5 type) Total dot number 123 200 (560 × 220) ,continued Additional Information 101 Additional Information Hi8/ Digital8 video cassette) Approx. 5 min Viewfinder Electric viewfinder (monochrome) Image device For TRV238E/438E: 3.0 mm (1/6 type) CCD (Charge Coupled Device) Gross: Approx. 380 000...
User Manual
Page 110
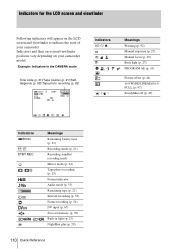
... camcorder model. Example: Indicators in the CAMERA mode Time code (p. 21)/Tape counter (p. 21)/Selfdiagnosis (p. 92)/Tape photo recording (p. 25) 60min STBY 0:00:00 Indicators Q E Z 9 . () Meanings Warning (p. 92) Manual exposure (p. 27) Manual focus (p. 29) Back light (p. 27) PROGRAM AE (p. 43) Picture effect (p. 44) 16:9 WIDE/CINEMA/16:9 FULL (p. 47) SteadyShot off (p. 49) Indicators y60min SP LP STBY REC Meanings Remaining battery time (p. 21) Recording mode (p. 21) Recording standby/ recording mode Mirror mode (p. 24) Tape photo recording (p. 25) Format...
... camcorder model. Example: Indicators in the CAMERA mode Time code (p. 21)/Tape counter (p. 21)/Selfdiagnosis (p. 92)/Tape photo recording (p. 25) 60min STBY 0:00:00 Indicators Q E Z 9 . () Meanings Warning (p. 92) Manual exposure (p. 27) Manual focus (p. 29) Back light (p. 27) PROGRAM AE (p. 43) Picture effect (p. 44) 16:9 WIDE/CINEMA/16:9 FULL (p. 47) SteadyShot off (p. 49) Indicators y60min SP LP STBY REC Meanings Remaining battery time (p. 21) Recording mode (p. 21) Recording standby/ recording mode Mirror mode (p. 24) Tape photo recording (p. 25) Format...
User Manual
Page 111
..., 106 Button-type battery Remote Commander 108 C Camera settings data display 36 Cassette 18, 95 CD-ROM 72 Charging the battery Battery Pack 12 Pre-installed rechargeable battery 100 Cleaning cassette 100 Clock set (CLOCK SET) ......17, 56 COMMANDER 59 D Data code (DATA CODE)..... 36, 58 Date search 40 Date/time 36 DEMO MODE 57 Digital program editing (VIDEO EDIT 67 Digital zoom (D ZOOM)... 46 Digital8 system 95 Direct Access to "Click to DVD 79 DirectX 9.0c 76 Display DISPLAY 59 Display indicator....... 110 DNR 51 Dual sound track tape ........ 50...
..., 106 Button-type battery Remote Commander 108 C Camera settings data display 36 Cassette 18, 95 CD-ROM 72 Charging the battery Battery Pack 12 Pre-installed rechargeable battery 100 Cleaning cassette 100 Clock set (CLOCK SET) ......17, 56 COMMANDER 59 D Data code (DATA CODE)..... 36, 58 Date search 40 Date/time 36 DEMO MODE 57 Digital program editing (VIDEO EDIT 67 Digital zoom (D ZOOM)... 46 Digital8 system 95 Direct Access to "Click to DVD 79 DirectX 9.0c 76 Display DISPLAY 59 Display indicator....... 110 DNR 51 Dual sound track tape ........ 50...
User Manual
Page 112
... Setting the date and time ... 17 Skip scan 34 SP (Standard Play) See Recording mode (REC MODE) STEADYSHOT 49 Stereo 21, 39 STRIPE FADER 30 Sub sound See HiFi SOUND T Tape counter 21 Tape photo recording .........25 TBC 51 Telephoto See Zoom Time code 21 Title 31 TV color systems 94 U USB cable 72 USB jack 105 USB Streaming (USB STREAM) .........56 Using abroad 94 V Video head 99 Viewfinder 16 Volume 33 W Warning indicators 92 Warning messages 93 WHITE...
... Setting the date and time ... 17 Skip scan 34 SP (Standard Play) See Recording mode (REC MODE) STEADYSHOT 49 Stereo 21, 39 STRIPE FADER 30 Sub sound See HiFi SOUND T Tape counter 21 Tape photo recording .........25 TBC 51 Telephoto See Zoom Time code 21 Title 31 TV color systems 94 U USB cable 72 USB jack 105 USB Streaming (USB STREAM) .........56 Using abroad 94 V Video head 99 Viewfinder 16 Volume 33 W Warning indicators 92 Warning messages 93 WHITE...


