
Handycam® Handbook
Page 5
..., or subject the camcorder to country/region. About images, illustrations, and screen displays of this manual The example images used in specification of this manual for understandability. In this manual when there is a difference in this manual, the internal memory (DCRSX65/SX85) of your camcorder and memory card are called "recording media...
..., or subject the camcorder to country/region. About images, illustrations, and screen displays of this manual The example images used in specification of this manual for understandability. In this manual when there is a difference in this manual, the internal memory (DCRSX65/SX85) of your camcorder and memory card are called "recording media...
Handycam® Handbook
Page 10
... Dividing a movie 38 Capturing a photo from a movie 39 Dubbing/copying movies and photos from the internal recording media to memory card (DCR-SX65/SX85 40 Dubbing movies 40 Copying photos 41 Using the Playlist of movies 42 Creating the Playlist 42 Playing the Playlist 43 Saving movies and...recorder, etc 54 Customizing your camcorder Using menus 57 Operating menus 57 Using MY MENU 58 Using the OPTION MENU 59 Menu lists 60 MANUAL SETTINGS (Items to adjust for scene condition 62 SHOOTING SET (Items for customized shooting 66 PHOTO SETTINGS (Items for recording photos 68 PLAYBACK ...
... Dividing a movie 38 Capturing a photo from a movie 39 Dubbing/copying movies and photos from the internal recording media to memory card (DCR-SX65/SX85 40 Dubbing movies 40 Copying photos 41 Using the Playlist of movies 42 Creating the Playlist 42 Playing the Playlist 43 Saving movies and...recorder, etc 54 Customizing your camcorder Using menus 57 Operating menus 57 Using MY MENU 58 Using the OPTION MENU 59 Menu lists 60 MANUAL SETTINGS (Items to adjust for scene condition 62 SHOOTING SET (Items for customized shooting 66 PHOTO SETTINGS (Items for recording photos 68 PLAYBACK ...
Handycam® Handbook
Page 18
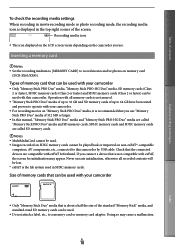
...on the camcorder you use . Size of memory cards that can be used with your camcorder. For recording movies on memory card (DCR-SX65/SX85). Table of contents Useful recording techniques To check the recording media settings When recording in movie recording mode or photo recording mode, the ... cards of the screen. Doing so may appear. Inserting a memory card Notes Set the recording medium to [MEMORY CARD] to this manual, "Memory Stick PRO Duo" media and "Memory Stick PRO-HG Duo" media are called "Memory Stick PRO Duo" media and SD memory cards, SDHC...
...on the camcorder you use . Size of memory cards that can be used with your camcorder. For recording movies on memory card (DCR-SX65/SX85). Table of contents Useful recording techniques To check the recording media settings When recording in movie recording mode or photo recording mode, the ... cards of the screen. Doing so may appear. Inserting a memory card Notes Set the recording medium to [MEMORY CARD] to this manual, "Memory Stick PRO Duo" media and "Memory Stick PRO-HG Duo" media are called "Memory Stick PRO Duo" media and SD memory cards, SDHC...
Handycam® Handbook
Page 33
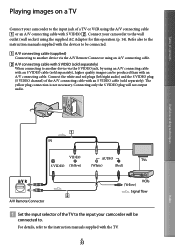
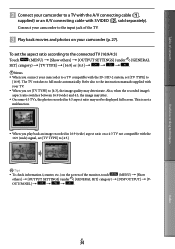
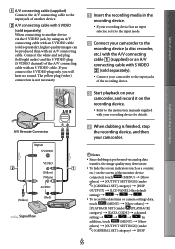
...audio) and the S VIDEO plug (S VIDEO channel) of the A/V connecting cable with an S VIDEO cable (sold separately) When connecting to the instruction manuals supplied with an A/V connecting cable. Connecting only the S VIDEO plug will be connected. A/V connecting cable (supplied) Connecting to another device via ...can be produced than with the TV. US 33 Index The yellow plug connection is not necessary. Refer also to the instruction manuals supplied with the devices to be connected to. Table of contents Playing images on a TV Connect your camcorder will not output ...
...audio) and the S VIDEO plug (S VIDEO channel) of the A/V connecting cable with an S VIDEO cable (sold separately) When connecting to the instruction manuals supplied with an A/V connecting cable. Connecting only the S VIDEO plug will be connected. A/V connecting cable (supplied) Connecting to another device via ...can be produced than with the TV. US 33 Index The yellow plug connection is not necessary. Refer also to the instruction manuals supplied with the devices to be connected to. Table of contents Playing images on a TV Connect your camcorder will not output ...
Handycam® Handbook
Page 34
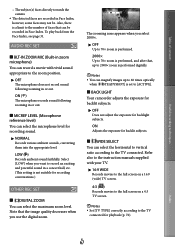
... check information (counter, etc.) on your TV. When you play back an image recorded in 4:3 aspect ratio may deteriorate. Refer also to the instruction manuals supplied with the ID-1/ID-2 system, set [TV TYPE] to the connected TV (16:9/4:3) Touch (MENU) [Show others ] [OUTPUT SETTINGS] (under [GENERAL SET...
... check information (counter, etc.) on your TV. When you play back an image recorded in 4:3 aspect ratio may deteriorate. Refer also to the instruction manuals supplied with the ID-1/ID-2 system, set [TV TYPE] to the connected TV (16:9/4:3) Touch (MENU) [Show others ] [OUTPUT SETTINGS] (under [GENERAL SET...
Handycam® Handbook
Page 49
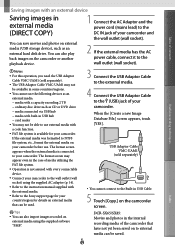
... external media. 4 Connect the USB Adaptor Cable to the (USB) jack of your camcorder and the wall outlet (wall socket). DCR-SX65/SX85: Movies and photos in the internal recording media of the camcorder that can also import images recorded on external media (USB storage device), ... save movies and photos on external media using the supplied AC adaptor (p. 14). Refer to the instruction manual supplied with the external media. Refer to the Sony support page for your country/region for your camcorder before use external media with a code function. FAT ...
... external media. 4 Connect the USB Adaptor Cable to the (USB) jack of your camcorder and the wall outlet (wall socket). DCR-SX65/SX85: Movies and photos in the internal recording media of the camcorder that can also import images recorded on external media (USB storage device), ... save movies and photos on external media using the supplied AC adaptor (p. 14). Refer to the instruction manual supplied with the external media. Refer to the Sony support page for your country/region for your camcorder before use external media with a code function. FAT ...
Handycam® Handbook
Page 52
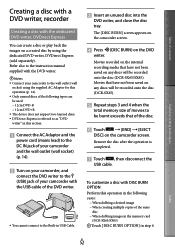
Refer also to the instruction manual supplied with the DVD writer. Notes Connect your camcorder with the USB cable of the DVD writer. You cannot connect to the ... the following cases: When dubbing a desired image When creating multiple copies of the same disc When dubbing images in the memory card (DCR-SX65/SX85) Touch [DISC BURN OPTION] in USB Cable. Insert an unused disc into the DVD writer, and close the disc tray.
Refer also to the instruction manual supplied with the DVD writer. Notes Connect your camcorder with the USB cable of the DVD writer. You cannot connect to the ... the following cases: When dubbing a desired image When creating multiple copies of the same disc When dubbing images in the memory card (DCR-SX65/SX85) Touch [DISC BURN OPTION] in USB Cable. Insert an unused disc into the DVD writer, and close the disc tray.
Handycam® Handbook
Page 54
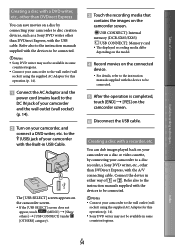
... memory (DCR-SX65/SX85) [ USB CONNECT]: Memory card The displayed recording media differ depending on the model. Record movies on the connected device. For details, refer to the instruction manuals supplied with the devices to be connected. Notes Sony DVD writer... using the supplied AC Adaptor for this operation (p. 14). Sony DVD writer may not be available in some countries/regions. Connect the device in USB Cable. Refer also to the instruction manuals supplied with the device to be connected. After the operation...
... memory (DCR-SX65/SX85) [ USB CONNECT]: Memory card The displayed recording media differ depending on the model. Record movies on the connected device. For details, refer to the instruction manuals supplied with the devices to be connected. Notes Sony DVD writer... using the supplied AC Adaptor for this operation (p. 14). Sony DVD writer may not be available in some countries/regions. Connect the device in USB Cable. Refer also to the instruction manuals supplied with the device to be connected. After the operation...
Handycam® Handbook
Page 55
... jacks of the recording device. Start playback on your camcorder, and record it to the input mode. Connect your camcorder to the instruction manuals supplied with your recording device for details. When dubbing is finished, stop the recording device, and then your camcorder. Notes Since dubbing...
... jacks of the recording device. Start playback on your camcorder, and record it to the input mode. Connect your camcorder to the instruction manuals supplied with your recording device for details. When dubbing is finished, stop the recording device, and then your camcorder. Notes Since dubbing...

Handycam® Handbook
Page 57
MANUAL SETTINGS (Items to adjust for scene condition) p. 62 SHOOTING SET (Items for customized shooting) p. 66 PHOTO SETTINGS (Items for recording photos) p. 68 ...
MANUAL SETTINGS (Items to adjust for scene condition) p. 62 SHOOTING SET (Items for customized shooting) p. 66 PHOTO SETTINGS (Items for recording photos) p. 68 ...
Handycam® Handbook
Page 58
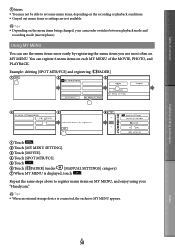
.../FCS] and registering [ FADER] Touch . Touch [MY MENU SETTING]. Touch [MOVIE]. Touch [SPOT MTR/FCS]. Touch . Touch [ FADER] (under [MANUAL SETTINGS] category). When MY MENU is connected, the exclusive MY MENU appears.
.../FCS] and registering [ FADER] Touch . Touch [MY MENU SETTING]. Touch [MOVIE]. Touch [SPOT MTR/FCS]. Touch . Touch [ FADER] (under [MANUAL SETTINGS] category). When MY MENU is connected, the exclusive MY MENU appears.
Handycam® Handbook
Page 60
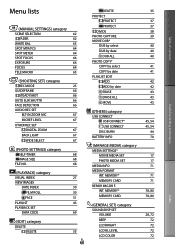
INT. Menu lists (MANUAL SETTINGS) category SCENE SELECTION 62 FADER 62 WHITE BAL. 63 SPOT MTR/FCS 64 SPOT METER 64 SPOT FOCUS 64 EXPOSURE 64 FOCUS 64 TELE ...
INT. Menu lists (MANUAL SETTINGS) category SCENE SELECTION 62 FADER 62 WHITE BAL. 63 SPOT MTR/FCS 64 SPOT METER 64 SPOT FOCUS 64 EXPOSURE 64 FOCUS 64 TELE ...

Handycam® Handbook
Page 62
...* ( ) Maintains the darkening atmosphere of scenes such as people or flowers while creating a soft background. CANDLE ( ) Maintains the dim atmosphere of contents Useful recording techniques MANUAL SETTINGS (Items to adjust for scene condition) See "Using menus" (p. 57) on glass or metal mesh in twilight scenes.
...* ( ) Maintains the darkening atmosphere of scenes such as people or flowers while creating a soft background. CANDLE ( ) Maintains the dim atmosphere of contents Useful recording techniques MANUAL SETTINGS (Items to adjust for scene condition) See "Using menus" (p. 57) on glass or metal mesh in twilight scenes.
Handycam® Handbook
Page 64
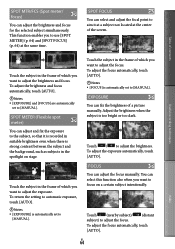
... touch [AUTO]. Notes [EXPOSURE] is automatically set to [MANUAL]. To adjust the focus automatically, touch [AUTO]. Notes [FOCUS] is automatically set to [MANUAL]. FOCUS You can adjust the brightness and focus for the selected subject simultaneously. You...the screen. To adjust the focus automatically, touch [AUTO]. Touch (nearby subject)/ (distant subject) to [MANUAL]. SPOT MTR/FCS (Spot meter/ focus) You can adjust the focus manually. To adjust the brightness and focus automatically, touch [AUTO]. Notes [EXPOSURE] and...
... touch [AUTO]. Notes [EXPOSURE] is automatically set to [MANUAL]. To adjust the focus automatically, touch [AUTO]. Notes [FOCUS] is automatically set to [MANUAL]. FOCUS You can adjust the brightness and focus for the selected subject simultaneously. You...the screen. To adjust the focus automatically, touch [AUTO]. Touch (nearby subject)/ (distant subject) to [MANUAL]. SPOT MTR/FCS (Spot meter/ focus) You can adjust the focus manually. To adjust the brightness and focus automatically, touch [AUTO]. Notes [EXPOSURE] and...

Handycam® Handbook
Page 65
...is difficult) appears for a few seconds in the following cases. When the focus mode is switched from automatic to manual When you set focus manually TELE MACRO This is useful to shoot small subjects, such as flowers or insects. Index US 65 When you move the ...W side.) ON ( ) The zoom (p. 24) moves to the top of contents Useful recording techniques Notes When you set [FOCUS] to [MANUAL], appears. The minimum possible distance between camcorder and subject while maintaining sharp focus is about 1 cm (about 13/32 in.) for wide angle...
...is difficult) appears for a few seconds in the following cases. When the focus mode is switched from automatic to manual When you set focus manually TELE MACRO This is useful to shoot small subjects, such as flowers or insects. Index US 65 When you move the ...W side.) ON ( ) The zoom (p. 24) moves to the top of contents Useful recording techniques Notes When you set [FOCUS] to [MANUAL], appears. The minimum possible distance between camcorder and subject while maintaining sharp focus is about 1 cm (about 13/32 in.) for wide angle...
Handycam® Handbook
Page 67
... after that, up to 2000× zoom is performed digitally. Notes You can select the maximum zoom level. Refer also to the instruction manuals supplied with vivid sound appropriate to the zoom position. OFF The microphone does not record sound following zooming in or out. MICREF LEVEL...
... after that, up to 2000× zoom is performed digitally. Notes You can select the maximum zoom level. Refer also to the instruction manuals supplied with vivid sound appropriate to the zoom position. OFF The microphone does not record sound following zooming in or out. MICREF LEVEL...

Handycam® Handbook
Page 77
... on the index screen at one time is recording the scene you have just shot on the recording media. This is displayed. Adjust the focus manually (p. 64). Images stored on the memory card cannot be deleted. The maximum number of contents Useful recording techniques Memory card Operations using the memory...
... on the index screen at one time is recording the scene you have just shot on the recording media. This is displayed. Adjust the focus manually (p. 64). Images stored on the memory card cannot be deleted. The maximum number of contents Useful recording techniques Memory card Operations using the memory...
Handycam® Handbook
Page 79
... following list shows examples of unworkable combinations of functions and menu items. Cannot use BACK LIGHT Because of following settings [SPOT MTR/FCS], [SPOT METER], [MANUAL] in the Playlist. Dubbing/Connecting to other than 99 movies to your TV (p. 72). Make sure to connect the cable to your camcorder. When...
... following list shows examples of unworkable combinations of functions and menu items. Cannot use BACK LIGHT Because of following settings [SPOT MTR/FCS], [SPOT METER], [MANUAL] in the Playlist. Dubbing/Connecting to other than 99 movies to your TV (p. 72). Make sure to connect the cable to your camcorder. When...
Handycam® Handbook
Page 93
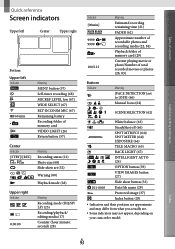
... (29) Current playing movie or photo/Number of total recorded movies or photos (28, 83) Bottom Indicator Meaning [FACE DETECTION] set to [OFF] (66) Manual focus (64) SCENE SELECTION (62) White balance (63) SteadyShot off (66) SPOT MTR/FCS (64)/ SPOT METER (64)/ EXPOSURE (64) TELE MACRO...
... (29) Current playing movie or photo/Number of total recorded movies or photos (28, 83) Bottom Indicator Meaning [FACE DETECTION] set to [OFF] (66) Manual focus (64) SCENE SELECTION (62) White balance (63) SteadyShot off (66) SPOT MTR/FCS (64)/ SPOT METER (64)/ EXPOSURE (64) TELE MACRO...

Handycam® Handbook
Page 96
... L LANDSCAPE 62 LANGUAGE SET 16, 73 LCD BL LEVEL 72 LCD BRIGHT 72 LCD COLOR 72 US 96 LP 25 M Maintenance 87 MANAGE MEDIA 71 MANUAL SETTINGS 62 MEDIA FORMAT 71 MEDIA INFO 71 MEDIA SETTINGS 17 Memory card 18 "Memory Stick" media 87 "Memory Stick PRO-HG Duo" media 87...
... L LANDSCAPE 62 LANGUAGE SET 16, 73 LCD BL LEVEL 72 LCD BRIGHT 72 LCD COLOR 72 US 96 LP 25 M Maintenance 87 MANAGE MEDIA 71 MANUAL SETTINGS 62 MEDIA FORMAT 71 MEDIA INFO 71 MEDIA SETTINGS 17 Memory card 18 "Memory Stick" media 87 "Memory Stick PRO-HG Duo" media 87...


