
Operation Guide
Page 2
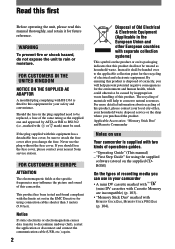
... camcorder. Never use Your camcorder is supplied with BS1363 is disposed of correctly, you change the fuse. Notice If static electricity or electromagnetism causes data transfer to discontinue midway (fail), restart the application or disconnect and connect the communication cable (USB, etc.) again. 2 Disposal of Old Electrical & Electronic Equipment (Applicable in the EMC Directive for using the supplied software (stored on use the plug...
... camcorder. Never use Your camcorder is supplied with BS1363 is disposed of correctly, you change the fuse. Notice If static electricity or electromagnetism causes data transfer to discontinue midway (fail), restart the application or disconnect and connect the communication cable (USB, etc.) again. 2 Disposal of Old Electrical & Electronic Equipment (Applicable in the EMC Directive for using the supplied software (stored on use the plug...
Operation Guide
Page 3
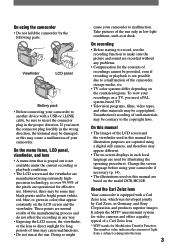
... model DCR-HC42E. Unauthorized recording of the LCD screen and the viewfinder used on the countries/regions. However, there may be some tiny black points and/or bright points (white, red, blue, or green in color) that is grayed out is equipped with a USB or i.LINK cable, be copyrighted. On recording • Before starting to record, test the recording function to make sure the picture and sound...
... model DCR-HC42E. Unauthorized recording of the LCD screen and the viewfinder used on the countries/regions. However, there may be some tiny black points and/or bright points (white, red, blue, or green in color) that is grayed out is equipped with a USB or i.LINK cable, be copyrighted. On recording • Before starting to record, test the recording function to make sure the picture and sound...

Operation Guide
Page 23
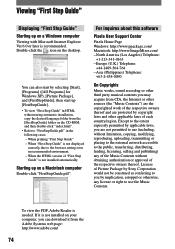
... appears on page 40. Recording/Playback To adjust the exposure for backlit subjects To adjust the exposure for backlit subjects, press BACK LIGHT to the lens side (). 2 1 Playback To play back the images in mirror mode Open the LCD panel 90 degrees to the camcorder (), then rotate it 180 degrees to display . To cancel the back light function, press BACK LIGHT again.
... appears on page 40. Recording/Playback To adjust the exposure for backlit subjects To adjust the exposure for backlit subjects, press BACK LIGHT to the lens side (). 2 1 Playback To play back the images in mirror mode Open the LCD panel 90 degrees to the camcorder (), then rotate it 180 degrees to display . To cancel the back light function, press BACK LIGHT again.

Operation Guide
Page 26
.../Rec review display switch button (29) Personal Menu button (34) On a "Memory Stick Duo" A B C D E Recording folder (45) Recording capacity (approx.) Movie size (44) Recording start indicator (appears for about 5 seconds) Review button (20) P-MENU qs 7 Recording folder (45) Image size (20 , 43) Quality ([FINE] or [STD]) (43) "Memory Stick Duo" indicator and the number of images that can check them as [DATA CODE] during playback The date/time data and the camera setting data...
.../Rec review display switch button (29) Personal Menu button (34) On a "Memory Stick Duo" A B C D E Recording folder (45) Recording capacity (approx.) Movie size (44) Recording start indicator (appears for about 5 seconds) Review button (20) P-MENU qs 7 Recording folder (45) Image size (20 , 43) Quality ([FINE] or [STD]) (43) "Memory Stick Duo" indicator and the number of images that can check them as [DATA CODE] during playback The date/time data and the camera setting data...

Operation Guide
Page 41
... normal setting, set [COLOR SLOW S] to [ON], you set the NIGHTSHOT PLUS switch to OFF. • Do not use the self-timer with your fingers or other objects. • Adjust the focus manually ([FOCUS], p. 40) when it is hard to focus automatically. COLOR SLOW S (Color Slow Shutter) When you can make the image color deeper this time. • Adjust the focus manually ([FOCUS], p. 40) when it is hard to focus automatically. • The shutter speed of your camcorder changes depending...
... normal setting, set [COLOR SLOW S] to [ON], you set the NIGHTSHOT PLUS switch to OFF. • Do not use the self-timer with your fingers or other objects. • Adjust the focus manually ([FOCUS], p. 40) when it is hard to focus automatically. COLOR SLOW S (Color Slow Shutter) When you can make the image color deeper this time. • Adjust the focus manually ([FOCUS], p. 40) when it is hard to focus automatically. • The shutter speed of your camcorder changes depending...

Operation Guide
Page 48
... output playback pictures edited with strong contrast. 48 PASTEL Pictures appear as an illustration with digital effects via the DV Interface. • You can save pictures edited using special effects on another tape (p. 58). REC (Smooth interval tape recording) (DCR-HC39E/HC42E/HC43E) Your camcorder will shoot 1 frame of daylight. Connect your camcorder. • You cannot add effects to externally input pictures. SEPIA Pictures appear in step . This function is selected. ([FOCUS...
... output playback pictures edited with strong contrast. 48 PASTEL Pictures appear as an illustration with digital effects via the DV Interface. • You can save pictures edited using special effects on another tape (p. 58). REC (Smooth interval tape recording) (DCR-HC39E/HC42E/HC43E) Your camcorder will shoot 1 frame of daylight. Connect your camcorder. • You cannot add effects to externally input pictures. SEPIA Pictures appear in step . This function is selected. ([FOCUS...

Operation Guide
Page 51
... MIC (External surround microphone) (DCR-HC39E/HC42E/HC43E) WIDE STEREO ( ) Records 2 channel sound with high quality). VOLUME See page 21. LCD/VF SET The recorded picture will not be interrupted when you play back, but cannot record a dual sound track cassette on your camcorder for details on a cassette. STEREO Records the stereo sound normally. • You need a compatible accessory such as the ECM-HQP1 microphone (optional) to play back audio recorded using other devices with dual sound...
... MIC (External surround microphone) (DCR-HC39E/HC42E/HC43E) WIDE STEREO ( ) Records 2 channel sound with high quality). VOLUME See page 21. LCD/VF SET The recorded picture will not be interrupted when you play back, but cannot record a dual sound track cassette on your camcorder for details on a cassette. STEREO Records the stereo sound normally. • You need a compatible accessory such as the ECM-HQP1 microphone (optional) to play back audio recorded using other devices with dual sound...

Operation Guide
Page 53
... light up during tape playback. • Camera setting data does not appear when movies on a "Memory Stick Duo" are played back. • The exposure adjustment value (0EV), a shutter speed, and the aperture value appear when still images on the "Memory Stick Duo." DATA CODE Displays information recorded automatically (data code) during recording. OFF Data code is [ON].) Continued 53 Using the Menu REMOTE CTRL (Remote control) The default setting is [ON], allowing you set this when you view pictures stored in your camcorder...
... light up during tape playback. • Camera setting data does not appear when movies on a "Memory Stick Duo" are played back. • The exposure adjustment value (0EV), a shutter speed, and the aperture value appear when still images on the "Memory Stick Duo." DATA CODE Displays information recorded automatically (data code) during recording. OFF Data code is [ON].) Continued 53 Using the Menu REMOTE CTRL (Remote control) The default setting is [ON], allowing you set this when you view pictures stored in your camcorder...

Operation Guide
Page 59
.... 4 Operate your camcorder to record movies. EFFECT] (p. 48), [D. When recording on a "Memory Stick Duo." Titles that are recording from a VCR, insert a cassette. 3 Slide the POWER switch down to turn on other devices via the DV interface: - Recording pictures from a VCR or TV (DCR-HC32E/HC33E/HC42E/ HC43E) You can record pictures or TV programs from a PAL source. Recording movies 1 Connect your camcorder and other camcorder. • To record the date/time and camera settings data, display them on the screen (p. 53). • When connected using an...
.... 4 Operate your camcorder to record movies. EFFECT] (p. 48), [D. When recording on a "Memory Stick Duo." Titles that are recording from a VCR, insert a cassette. 3 Slide the POWER switch down to turn on other devices via the DV interface: - Recording pictures from a VCR or TV (DCR-HC32E/HC33E/HC42E/ HC43E) You can record pictures or TV programs from a PAL source. Recording movies 1 Connect your camcorder and other camcorder. • To record the date/time and camera settings data, display them on the screen (p. 53). • When connected using an...

Operation Guide
Page 62
... connecting your camcorder and the Handycam Station at the same time. Check the picture on the LCD screen or the viewfinder. • For DCR-HC39E/HC42E/HC43E: When you attach an external microphone (optional) to stop recording. To dub on the PLAY/EDIT lamp. 2 Touch (Play/Pause) to play back the tape, then touch it again at the point where you want to start recording the sound. 3 Touch [MENU...
... connecting your camcorder and the Handycam Station at the same time. Check the picture on the LCD screen or the viewfinder. • For DCR-HC39E/HC42E/HC43E: When you attach an external microphone (optional) to stop recording. To dub on the PLAY/EDIT lamp. 2 Touch (Play/Pause) to play back the tape, then touch it again at the point where you want to start recording the sound. 3 Touch [MENU...

Operation Guide
Page 67
... the operating instructions supplied with an external flash (optional) connected to the accessory shoe, turn off the power of the external flash to prevent charging noise being recorded. For DCR-HC32E/HC33E/HC42E/ HC43E: A/V (audio/video) jack (p. 32, 57, 78) For DCR-HC39E: A/V (audio/video) OUT jack (p. 32, 57, 78) LANC jack (blue) • The LANC control jack is used for controlling the tape transport of video devices...
... the operating instructions supplied with an external flash (optional) connected to the accessory shoe, turn off the power of the external flash to prevent charging noise being recorded. For DCR-HC32E/HC33E/HC42E/ HC43E: A/V (audio/video) jack (p. 32, 57, 78) For DCR-HC39E: A/V (audio/video) OUT jack (p. 32, 57, 78) LANC jack (blue) • The LANC control jack is used for controlling the tape transport of video devices...
Operation Guide
Page 74
....pdf". You can download it is not displayed correctly due to the public, transferring, distributing, lending, licensing, selling and publishing) any of "First Step Guide" is not installed automatically. Starting up [FirstStepGuide]. • To view "First Step Guide" in HTML without obtaining authorization or approval of each country/region. For inquires about this software Pixela User Support Center Pixela Home Page Windows...
....pdf". You can download it is not displayed correctly due to the public, transferring, distributing, lending, licensing, selling and publishing) any of "First Step Guide" is not installed automatically. Starting up [FirstStepGuide]. • To view "First Step Guide" in HTML without obtaining authorization or approval of each country/region. For inquires about this software Pixela User Support Center Pixela Home Page Windows...

Operation Guide
Page 88
... battery. Noises appear and is displayed on a tape with a 4ch microphone (4CH MIC REC). The sound breaks off. • Clean the head using an S VIDEO plug, make sure the red and white plugs of the A/V connecting cable are connected as direct sunlight or overhead lighting. is displayed on the screen. • The tape you are playing was recorded without setting the date and time. • A blank section on the tape is being played. • The data code on the screen. • The tape was recorded...
... battery. Noises appear and is displayed on a tape with a 4ch microphone (4CH MIC REC). The sound breaks off. • Clean the head using an S VIDEO plug, make sure the red and white plugs of the A/V connecting cable are connected as direct sunlight or overhead lighting. is displayed on the screen. • The tape you are playing was recorded without setting the date and time. • A blank section on the tape is being played. • The data code on the screen. • The tape was recorded...
Operation Guide
Page 93
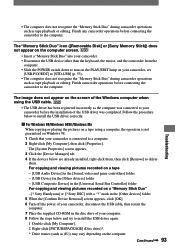
... installed, right-click them, then click [Remove] to install the USB driver correctly. For Windows 98/Windows 98SE/Windows Me When copying or playing the pictures on a tape using the USB cable. • The USB driver has been registered incorrectly as tape playback or editing. The [System Properties] screen appears. 3 Click the [Device Manager] tab. 4 If the devices below to delete them. Sony Handycam] or [? Troubleshooting • The computer does not recognize the "Memory Stick Duo" during camcorder operations...
... installed, right-click them, then click [Remove] to install the USB driver correctly. For Windows 98/Windows 98SE/Windows Me When copying or playing the pictures on a tape using the USB cable. • The USB driver has been registered incorrectly as tape playback or editing. The [System Properties] screen appears. 3 Click the [Device Manager] tab. 4 If the devices below to delete them. Sony Handycam] or [? Troubleshooting • The computer does not recognize the "Memory Stick Duo" during camcorder operations...
Operation Guide
Page 94
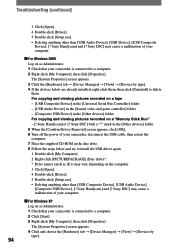
... computer. For Windows 2000 Log on a "Memory Stick Duo" - [? Troubleshooting (continued) 3 Click [Open]. 4 Double-click [Driver]. 5 Double-click [Setup.exe]. • Deleting anything other than [USB Composite Device], [USB Audio Device], [Composite USB Device], [? Sony Handycam] or [? Sony DSC] may cause a malfunction of your camcorder, disconnect the USB cable, then restart the computer. 7 Place the supplied CD-ROM in the [Other devices] folder For copying and viewing pictures recorded on as Administrator. 1 Check that your computer. ...
... computer. For Windows 2000 Log on a "Memory Stick Duo" - [? Troubleshooting (continued) 3 Click [Open]. 4 Double-click [Driver]. 5 Double-click [Setup.exe]. • Deleting anything other than [USB Composite Device], [USB Audio Device], [Composite USB Device], [? Sony Handycam] or [? Sony DSC] may cause a malfunction of your camcorder, disconnect the USB cable, then restart the computer. 7 Place the supplied CD-ROM in the [Other devices] folder For copying and viewing pictures recorded on as Administrator. 1 Check that your computer. ...
Operation Guide
Page 95
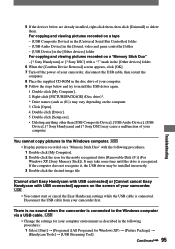
... drive [Removable Disk (F:)] (For Windows XP, [Sony Memory Stick]). Sony Handycam] and [? It may cause a malfunction of your camcorder first. Continued 95 There is no sound when the camcorder is connected to the Windows computer via a USB cable. • Change the settings for your computer. Sony DSC] may take some time until the drive is connected. For copying and viewing pictures recorded on a tape - [USB Composite Device] in the [Universal Serial Bus Controller] folder - [USB Audio Device] in the [Sound, video and game controller] folder - [USB Device...
... drive [Removable Disk (F:)] (For Windows XP, [Sony Memory Stick]). Sony Handycam] and [? It may cause a malfunction of your camcorder first. Continued 95 There is no sound when the camcorder is connected to the Windows computer via a USB cable. • Change the settings for your computer. Sony DSC] may take some time until the drive is connected. For copying and viewing pictures recorded on a tape - [USB Composite Device] in the [Universal Serial Bus Controller] folder - [USB Audio Device] in the [Sound, video and game controller] folder - [USB Device...
Operation Guide
Page 103
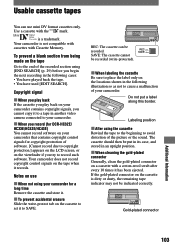
... connector on use mini DV format cassettes only. To prevent a blank section from being made on your camcorder contains copyright signals, you begin the next recording in another video camera connected to record such software. REC: The cassette can use When not using your camcorder. REC SAVE SAVE: The cassette cannot be recorded (write-protected). When labeling the cassette Be sure to the end of the picture or the sound. The cassette should...
... connector on use mini DV format cassettes only. To prevent a blank section from being made on your camcorder contains copyright signals, you begin the next recording in another video camera connected to record such software. REC: The cassette can use When not using your camcorder. REC SAVE SAVE: The cassette cannot be recorded (write-protected). When labeling the cassette Be sure to the end of the picture or the sound. The cassette should...

Operation Guide
Page 104
... "Memory Stick Duo," turn the power off on your camcorder, or remove the battery pack for replacement while your camcorder. • Still image format: Your camcorder compresses and records image data in its case. • Do not touch, or allow metallic objects to the write-protect position. Compensation for damaged image data will not be recorded or played on the screen of "Memory Stick" that support high speed data transfer. Types of the "Memory Stick" and "Memory Stick" compliant product you use Image data...
... "Memory Stick Duo," turn the power off on your camcorder, or remove the battery pack for replacement while your camcorder. • Still image format: Your camcorder compresses and records image data in its case. • Do not touch, or allow metallic objects to the write-protect position. Compensation for damaged image data will not be recorded or played on the screen of "Memory Stick" that support high speed data transfer. Types of the "Memory Stick" and "Memory Stick" compliant product you use Image data...

Operation Guide
Page 109
... use your camcorder in a humid place as shown below. • When you cannot record pictures normally, or distorted picture or sound is played back. • If the following problem occurs, clean the video heads for about one hour). Use a cleaning cassette.] appears on and let it for 10 seconds with the cassette lid open. Eject the cassette, turn it on the screen during playback. This is displayed in blue. - Use a cleaning cassette.] appears on the lens...
... use your camcorder in a humid place as shown below. • When you cannot record pictures normally, or distorted picture or sound is played back. • If the following problem occurs, clean the video heads for about one hour). Use a cleaning cassette.] appears on and let it for 10 seconds with the cassette lid open. Eject the cassette, turn it on the screen during playback. This is displayed in blue. - Use a cleaning cassette.] appears on the lens...

Operation Guide
Page 118
... Delete 55 Reset 56 Personal Menu button .......... 26 PHOTO button 20, 30 PictBridge 65 Picture Package 70 Picture Search 21 PICT.APPLI. menu (Picture Application menu 46 PICT. See Personal Menu R Rechargeable battery pack See Battery Recording 20 Recording capacity 26 Cassette 26 Memory Stick 26 Recording time 10, 44 REC CTRL (Recording control 59 REC FOLDER (Recording folder 45 REC LAMP 53 REC lamp (Recording lamp 24 REC MODE (Recording mode 51 Rec review 29 REC START/STOP 20 REMAINING 53 Remaining battery 26 Remote Commander 30 REMOTE CTRL (Remote control...
... Delete 55 Reset 56 Personal Menu button .......... 26 PHOTO button 20, 30 PictBridge 65 Picture Package 70 Picture Search 21 PICT.APPLI. menu (Picture Application menu 46 PICT. See Personal Menu R Rechargeable battery pack See Battery Recording 20 Recording capacity 26 Cassette 26 Memory Stick 26 Recording time 10, 44 REC CTRL (Recording control 59 REC FOLDER (Recording folder 45 REC LAMP 53 REC lamp (Recording lamp 24 REC MODE (Recording mode 51 Rec review 29 REC START/STOP 20 REMAINING 53 Remaining battery 26 Remote Commander 30 REMOTE CTRL (Remote control...


