Operating Guide
Page 1
Printed on DVD Handycam 72 Dubbing 78 Using a Computer 82 Troubleshooting 87 Additional Information 105 © 2005 Sony Corporation Printed in Japan Digital Video Camera Recorder Operating Guide DCR-DVD92/DVD103/DVD203/ DVD403/DVD602/DVD653/DVD703/ DVD803 2-587-622-11 (1) Enjoying with your DVD Handycam 10 Getting Started 16 Easy Handycam 27 Recording/ Playback 32 Playback on DVD devices 44 Using the Recorded disc 50 Using the Setup items 52 Editing on 100% recycled paper using VOC (Volatile Organic Compound)-free vegetable oil based ink.
Printed on DVD Handycam 72 Dubbing 78 Using a Computer 82 Troubleshooting 87 Additional Information 105 © 2005 Sony Corporation Printed in Japan Digital Video Camera Recorder Operating Guide DCR-DVD92/DVD103/DVD203/ DVD403/DVD602/DVD653/DVD703/ DVD803 2-587-622-11 (1) Enjoying with your DVD Handycam 10 Getting Started 16 Easy Handycam 27 Recording/ Playback 32 Playback on DVD devices 44 Using the Recorded disc 50 Using the Setup items 52 Editing on 100% recycled paper using VOC (Volatile Organic Compound)-free vegetable oil based ink.
Operating Guide
Page 4
... direction. To view your camcorder if necessary (p.69). • The illustration used on this manual are operational for the contents of the camcorder, storage media, etc. • TV color systems differ depending on the model DCR-DVD403. View finder LCD screen Battery • Before connecting your camcorder to a malfunction of recordings cannot be copyrighted. Use a DVD-RW/DVD+RW (not supplied) for trial recording (p.13). • Compensation for effective use. Change the screen language before using...
... direction. To view your camcorder if necessary (p.69). • The illustration used on this manual are operational for the contents of the camcorder, storage media, etc. • TV color systems differ depending on the model DCR-DVD403. View finder LCD screen Battery • Before connecting your camcorder to a malfunction of recordings cannot be copyrighted. Use a DVD-RW/DVD+RW (not supplied) for trial recording (p.13). • Compensation for effective use. Change the screen language before using...
Operating Guide
Page 5
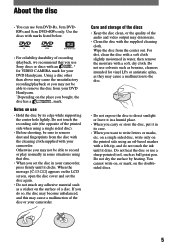
...camcorder. Do not use • Hold the disc by heating. on a single sided disc, write only on the printed side using a single sided disc). • Before shooting, be able to remove dust and fingerprints from your DVD Handycam. * Depending on the surface of the audio and video output may deteriorate. • Clean the disc... the ink until it in its edge while supporting the center hole lightly. You cannot write on, or mark, on use solvents such as they may cause the unsatisfactory recording/playback or you set the disc again. • Do not attach any adhesive...
...camcorder. Do not use • Hold the disc by heating. on a single sided disc, write only on the printed side using a single sided disc). • Before shooting, be able to remove dust and fingerprints from your DVD Handycam. * Depending on the surface of the audio and video output may deteriorate. • Clean the disc... the ink until it in its edge while supporting the center hole lightly. You cannot write on, or mark, on use solvents such as they may cause the unsatisfactory recording/playback or you set the disc again. • Do not attach any adhesive...
Operating Guide
Page 6
... for playing back on a DVD player (Finalizing 30 Recording/Playback Recording 32 Playback 33 Functions used for recording/playback, etc 34 Recording To use zoom To record sound with automatic settings Operate your camcorder 20 Step 4: Adjusting the LCD screen and viewfinder 21 Step 5: Using the touch panel 22 Step 6: Setting the date and time 23 Step 7: Inserting a disc 24 Step 8: Selecting the aspect ratio (16:9 or 4:3) of the recording picture (DCR-DVD203/DVD403/DVD703/DVD803 26 Easy Handycam - using your camcorder...
... for playing back on a DVD player (Finalizing 30 Recording/Playback Recording 32 Playback 33 Functions used for recording/playback, etc 34 Recording To use zoom To record sound with automatic settings Operate your camcorder 20 Step 4: Adjusting the LCD screen and viewfinder 21 Step 5: Using the touch panel 22 Step 6: Setting the date and time 23 Step 7: Inserting a disc 24 Step 8: Selecting the aspect ratio (16:9 or 4:3) of the recording picture (DCR-DVD203/DVD403/DVD703/DVD803 26 Easy Handycam - using your camcorder...
Operating Guide
Page 7
... use a tripod Playback To play back the images in sequence To use PB zoom Recording/playback To check the remaining battery To turn off the operation confirmation beep To initialize the settings Other part names and functions Checking/Deleting the last scene (Review/Review deleting 38 Indicators displayed during recording/playback 39 Remote Commander (Except for DCR-DVD92/DVD602 41 Playing the picture on a TV 42 Playback on DVD devices Making the disc compatible with playback on DVD players or DVD drives (Finalizing 44 Playing...
... use a tripod Playback To play back the images in sequence To use PB zoom Recording/playback To check the remaining battery To turn off the operation confirmation beep To initialize the settings Other part names and functions Checking/Deleting the last scene (Review/Review deleting 38 Indicators displayed during recording/playback 39 Remote Commander (Except for DCR-DVD92/DVD602 41 Playing the picture on a TV 42 Playback on DVD devices Making the disc compatible with playback on DVD players or DVD drives (Finalizing 44 Playing...
Operating Guide
Page 8
... SET 65 Settings while recording on a disc or other basic settings (REC MODE/LCD/VF SET/USB SPEED, etc.) TIME/LANGU 69 (CLOCK SET/AREA SET/LANGUAGE, etc.) Customizing Personal Menu 70 Editing on DVD Handycam (DVD-RW:VR mode) Editing the original data 72 Creating the Playlist 74 Playing the Playlist 77 Dubbing Connecting to a VCR or TV 78 Dubbing to VCR/DVD devices 79 Recording images from a TV or VCR/DVD device (Except for DCR-DVD92/DVD602 80 Jacks to connect external devices 81 Using...
... SET 65 Settings while recording on a disc or other basic settings (REC MODE/LCD/VF SET/USB SPEED, etc.) TIME/LANGU 69 (CLOCK SET/AREA SET/LANGUAGE, etc.) Customizing Personal Menu 70 Editing on DVD Handycam (DVD-RW:VR mode) Editing the original data 72 Creating the Playlist 74 Playing the Playlist 77 Dubbing Connecting to a VCR or TV 78 Dubbing to VCR/DVD devices 79 Recording images from a TV or VCR/DVD device (Except for DCR-DVD92/DVD602 80 Jacks to connect external devices 81 Using...
Operating Guide
Page 11
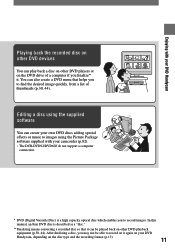
... other DVD players or on the DVD drive of thumbnails (p.30, 44). Editing a disc using the supplied software You can create your DVD Handycam Playing back the recorded disc on other DVD devices You can be able to record on the disc type and the recording format (p.13). 11 In this manual, an 8cm DVD disc is a high capacity optical disc which enables you to images using the Picture Package software supplied with your own DVD discs adding...
... other DVD players or on the DVD drive of thumbnails (p.30, 44). Editing a disc using the supplied software You can create your DVD Handycam Playing back the recorded disc on other DVD devices You can be able to record on the disc type and the recording format (p.13). 11 In this manual, an 8cm DVD disc is a high capacity optical disc which enables you to images using the Picture Package software supplied with your own DVD discs adding...
Operating Guide
Page 18
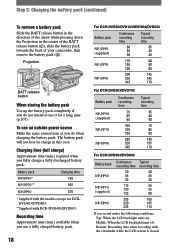
... the viewfinder while the LCD screen is closed. Charging time (full charge) Approximate time (min.) required when you do when charging the battery pack. Bottom: Recording time when recording with DCR-DVD403/DVD803. Step 2: Charging the battery pack (continued) To remove a battery pack Slide the BATT release button in the direction of your camcorder, then remove the battery pack (). Projection BATT release button When storing the battery pack Use up the battery pack...
... the viewfinder while the LCD screen is closed. Charging time (full charge) Approximate time (min.) required when you do when charging the battery pack. Bottom: Recording time when recording with DCR-DVD403/DVD803. Step 2: Charging the battery pack (continued) To remove a battery pack Slide the BATT release button in the direction of your camcorder, then remove the battery pack (). Projection BATT release button When storing the battery pack Use up the battery pack...
Operating Guide
Page 25
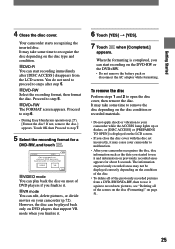
... [DISC ACCESS] or [PREPARING TO OPEN] is completed, you finalize it and information on page 51. 25 Cannot edit in Camcorder VIDEO VR OK VIDEO mode You can play back the disc on most of the scenes on the disc (Formatting)" on previously recorded areas appears for a DVD-RW, and touch . However, the disc can edit, delete pictures, or divide movies on DVD players that support VR mode...
... [DISC ACCESS] or [PREPARING TO OPEN] is completed, you finalize it and information on page 51. 25 Cannot edit in Camcorder VIDEO VR OK VIDEO mode You can play back the disc on most of the scenes on the disc (Formatting)" on previously recorded areas appears for a DVD-RW, and touch . However, the disc can edit, delete pictures, or divide movies on DVD players that support VR mode...
Operating Guide
Page 26
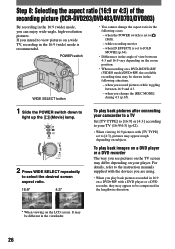
... [TV TYPE] set to light up the (Movie) lamp. To play back images on your TV (16:9/4:3) (p.42). • When viewing 16:9 pictures with the devices you are using. • When you can enjoy wide-angle, high-resolution pictures. POWER switch WIDE SELECT button • You cannot change the [REC MODE] during 4:3 (p.65). 1 Slide the POWER switch down to [4:3], pictures may appear rough depending on a DVD-R/DVD-RW (VIDEO mode)/DVD+RW, the available recording time may...
... [TV TYPE] set to light up the (Movie) lamp. To play back images on your TV (16:9/4:3) (p.42). • When viewing 16:9 pictures with the devices you are using. • When you can enjoy wide-angle, high-resolution pictures. POWER switch WIDE SELECT button • You cannot change the [REC MODE] during 4:3 (p.65). 1 Slide the POWER switch down to [4:3], pictures may appear rough depending on a DVD-R/DVD-RW (VIDEO mode)/DVD+RW, the available recording time may...
Operating Guide
Page 34
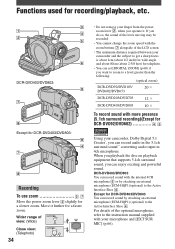
... of view: (Wide) Close view: (Telephoto) 34 • Do not remove your camcorder, Dolby Digital 5.1 Creater*, you can set [DIGITAL ZOOM] (p.60) if you want to zoom to the Active Interface Shoe . DCR-DVD403/DVD803 You can record sound with the internal 4CH microphone or by attaching an external microphone (ECM-HQP1) (optional) to the instruction manual supplied with the zoom buttons alongside of the optional microphone, refer...
... of view: (Wide) Close view: (Telephoto) 34 • Do not remove your camcorder, Dolby Digital 5.1 Creater*, you can set [DIGITAL ZOOM] (p.60) if you want to zoom to the Active Interface Shoe . DCR-DVD403/DVD803 You can record sound with the internal 4CH microphone or by attaching an external microphone (ECM-HQP1) (optional) to the instruction manual supplied with the zoom buttons alongside of the optional microphone, refer...
Operating Guide
Page 42
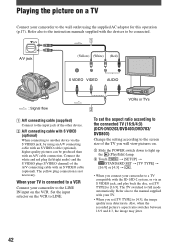
... necessary. A/V jack (Yellow) (White) (Red) S VIDEO VIDEO AUDIO : Signal flow A/V connecting cable (supplied) Connect to the input jack of the A/V connecting cable with an S VIDEO cable (optional). VCRs or TVs To set the aspect ratio according to the connected TV (16:9/4:3) (DCR-DVD203/DVD403/DVD703/ DVD803) Change the setting according to the screen size of the TV you will view pictures on. Slide the POWER switch down to light up the (Play/Edit) lamp. ...
... necessary. A/V jack (Yellow) (White) (Red) S VIDEO VIDEO AUDIO : Signal flow A/V connecting cable (supplied) Connect to the input jack of the A/V connecting cable with an S VIDEO cable (optional). VCRs or TVs To set the aspect ratio according to the connected TV (16:9/4:3) (DCR-DVD203/DVD403/DVD703/ DVD803) Change the setting according to the screen size of the TV you will view pictures on. Slide the POWER switch down to light up the (Play/Edit) lamp. ...

Operating Guide
Page 61
... function during 4:3 (p.65). DCR-DVD203/DVD703 1152 × 864 : 4 images 640 × 480 : 13 images DCR-DVD403/DVD803 2016 × 1512 : 3 images 640 × 480 : 21 images EXP. when [D.EFFECT] is [ON]). when you change the aspect ratio in the following conditions. - Set [STEADYSHOT] to [OLD MOVIE] (p.64). • When recording on a DVD-R/DVD-RW (VIDEO mode)/DVD+RW, the available recording time may get shorter in TV (4:3 screen), the picture...
... function during 4:3 (p.65). DCR-DVD203/DVD703 1152 × 864 : 4 images 640 × 480 : 13 images DCR-DVD403/DVD803 2016 × 1512 : 3 images 640 × 480 : 21 images EXP. when [D.EFFECT] is [ON]). when you change the aspect ratio in the following conditions. - Set [STEADYSHOT] to [OLD MOVIE] (p.64). • When recording on a DVD-R/DVD-RW (VIDEO mode)/DVD+RW, the available recording time may get shorter in TV (4:3 screen), the picture...
Operating Guide
Page 79
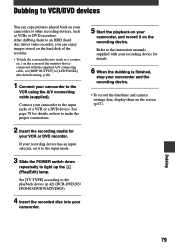
... the input mode. 3 Slide the POWER switch down repeatedly to light up the (Play/Edit) lamp. Dubbing 79 Set [TV TYPE] according to the playback device (p.42) (DCR-DVD203/ DVD403/DVD703/DVD803). 4 Insert the recorded disc into your camcorder. 5 Start the playback on your recording device has an input selector, set [DISP OUTPUT] to [LCD PANEL] (the default setting, p.68). 1 Connect your camcorder and the recording device. • To record the date/time and camera settings data, display them to an HDD (hard disc drive) video recorder, you can copy pictures played back...
... the input mode. 3 Slide the POWER switch down repeatedly to light up the (Play/Edit) lamp. Dubbing 79 Set [TV TYPE] according to the playback device (p.42) (DCR-DVD203/ DVD403/DVD703/DVD803). 4 Insert the recorded disc into your camcorder. 5 Start the playback on your recording device has an input selector, set [DISP OUTPUT] to [LCD PANEL] (the default setting, p.68). 1 Connect your camcorder and the recording device. • To record the date/time and camera settings data, display them to an HDD (hard disc drive) video recorder, you can copy pictures played back...
Operating Guide
Page 82
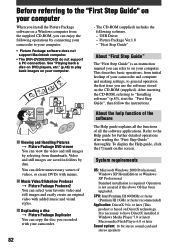
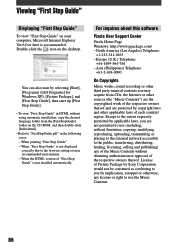
... the Help guide for further detailed operations after reading the "First Step Guide" thoroughly. After inserting the CD-ROM, referring to "Installing software" (p.83), start the "First Step Guide", then follow the instructions. Viewing and Handling Pictures Picture Package DVD viewer You can view the video and still images by date. Video and still images are saved in folders by selecting from initial hookup of all the software applications. USB Driver -
... the Help guide for further detailed operations after reading the "First Step Guide" thoroughly. After inserting the CD-ROM, referring to "Installing software" (p.83), start the "First Step Guide", then follow the instructions. Viewing and Handling Pictures Picture Package DVD viewer You can view the video and still images by date. Video and still images are saved in folders by selecting from initial hookup of all the software applications. USB Driver -
Operating Guide
Page 86
... to the browser setting even in HTML without using automatic installation, copy the desired language folder from CDs, the Internet or other sources (the "Music Contents") are the copyrighted work of the respective owners thereof and are protected by applicable laws, you by selecting [Start], [Programs] ([All Programs] for Windows XP), [Picture Package], and [First Step Guide], then start by...
... to the browser setting even in HTML without using automatic installation, copy the desired language folder from CDs, the Internet or other sources (the "Music Contents") are the copyrighted work of the respective owners thereof and are protected by applicable laws, you by selecting [Start], [Programs] ([All Programs] for Windows XP), [Picture Package], and [First Step Guide], then start by...
Operating Guide
Page 89
... open. The buttons on the LCD screen. • This occurs if you cannot turn the LCD backlight on the screen. • The camcorder is not clear. • Extend the viewfinder (p.21). • Use the viewfinder lens adjustment lever to cancel [DEMO MODE]. The picture in the viewfinder is in the viewfinder when the LCD screen is not a malfunction. Cancel Easy Handycam operation (p.27). The picture...
... open. The buttons on the LCD screen. • This occurs if you cannot turn the LCD backlight on the screen. • The camcorder is not clear. • Extend the viewfinder (p.21). • Use the viewfinder lens adjustment lever to cancel [DEMO MODE]. The picture in the viewfinder is in the viewfinder when the LCD screen is not a malfunction. Cancel Easy Handycam operation (p.27). The picture...
Operating Guide
Page 91
... light function does not function. • The back light function is cancelled when you press the REC START/ STOP button and the point that the recorded movie starts/stops. • On your camcorder is extremely high. Adjust the focus manually (p.58). [STEADYSHOT] does not function. • Set [STEADYSHOT] to ON (p.61). • [STEADYSHOT] may shorten (p.12, 65). The external flash (optional) does not work. • The power of your camcorder...
... light function does not function. • The back light function is cancelled when you press the REC START/ STOP button and the point that the recorded movie starts/stops. • On your camcorder is extremely high. Adjust the focus manually (p.58). [STEADYSHOT] does not function. • Set [STEADYSHOT] to ON (p.61). • [STEADYSHOT] may shorten (p.12, 65). The external flash (optional) does not work. • The power of your camcorder...
Operating Guide
Page 117
... Cleaning cloth 5 CLOCK SET 23 COLOR SLOW S (Color Slow Shutter) ...... 59, 95 Computer 82 Connect TV 42, 78 VCR 78 Copyright 4, 80, 86, 104 Counter 39 D DATA CODE 67 DATE/TIME 68 DC IN jack 17 DC plug 17 DEMO MODE 64 DIGITAL ZOOM 60 Disc cover OPEN switch...... 24 DISC REMAIN 68 DISC SET 65 Disc title 46, 65 DISP/BATT INFO.... 21, 22, 37 Display indicators .......... 39, 40 DISP OUTPUT 68 Dubbing 79 DVD menu 45 D.EFFECT (Digital...
... Cleaning cloth 5 CLOCK SET 23 COLOR SLOW S (Color Slow Shutter) ...... 59, 95 Computer 82 Connect TV 42, 78 VCR 78 Copyright 4, 80, 86, 104 Counter 39 D DATA CODE 67 DATE/TIME 68 DC IN jack 17 DC plug 17 DEMO MODE 64 DIGITAL ZOOM 60 Disc cover OPEN switch...... 24 DISC REMAIN 68 DISC SET 65 Disc title 46, 65 DISP/BATT INFO.... 21, 22, 37 Display indicators .......... 39, 40 DISP OUTPUT 68 Dubbing 79 DVD menu 45 D.EFFECT (Digital...

Operating Guide
Page 118
... the order.......... 71 Delete 70 Reset 71 Personal Menu button .......... 39 Photomovie 76 PHOTO button ......... 28, 32, 41 Pickup lens 111 Picture Package 82 PICT.APPLI. (Picture Application 63 PICT.EFFECT (Picture effect 64 Pixela User Support Center.. 86 Playback 29, 33 118 Playlist ADD 74 DIVIDE 76 Erase 74 MOVE 75 PORTRAIT (Soft portrait) ... 56 Power cord 17 POWER switch 17 Previous/next button 39 PROGRAM AE 56...
... the order.......... 71 Delete 70 Reset 71 Personal Menu button .......... 39 Photomovie 76 PHOTO button ......... 28, 32, 41 Pickup lens 111 Picture Package 82 PICT.APPLI. (Picture Application 63 PICT.EFFECT (Picture effect 64 Pixela User Support Center.. 86 Playback 29, 33 118 Playlist ADD 74 DIVIDE 76 Erase 74 MOVE 75 PORTRAIT (Soft portrait) ... 56 Power cord 17 POWER switch 17 Previous/next button 39 PROGRAM AE 56...


