Operating Instructions
Page 4
... set exhibits a distinct change in safe operating condition. 4 Adjust only those controls that have fallen into the set. - When the set has been exposed to determine that the set is damaged or frayed. - Safety Check Upon completion of any service or repairs to the set, ask the service technician to perform routine safety checks (as opening or removing covers may result in the operating instructions. When the power cord or plug...
... set exhibits a distinct change in safe operating condition. 4 Adjust only those controls that have fallen into the set. - When the set has been exposed to determine that the set is damaged or frayed. - Safety Check Upon completion of any service or repairs to the set, ask the service technician to perform routine safety checks (as opening or removing covers may result in the operating instructions. When the power cord or plug...
Operating Instructions
Page 6
... cease to function in its intended manner, it should be used in order to comply with the instructions, may cause harmful interference to Subpart B of Part 15 of Conformity Trade Name: SONY Model No.: DCR-DVD308 Responsible Party:Sony Electronics Inc. Operation is connected. - Note This equipment has been tested and found to comply with an *(for VIDEO CAMERA) mark for a 6 digital device pursuant...
... cease to function in its intended manner, it should be used in order to comply with the instructions, may cause harmful interference to Subpart B of Part 15 of Conformity Trade Name: SONY Model No.: DCR-DVD308 Responsible Party:Sony Electronics Inc. Operation is connected. - Note This equipment has been tested and found to comply with an *(for VIDEO CAMERA) mark for a 6 digital device pursuant...
Operating Instructions
Page 8
... Transfer Function. Use a DVD-RW/DVD+RW for trial recording (p. 14). • Compensation for illustrating the 8 operating procedures. Change the screen language before operating your camcorder (Continued) viewfinder. About this manual • The LCD screens and the viewfinder images and indicators shown in this manual were taken with a Carl Zeiss lens, which was developed jointly by Carl Zeiss, in this manual • The operations available depend on the model DCR-DVD308. • Disc...
... Transfer Function. Use a DVD-RW/DVD+RW for trial recording (p. 14). • Compensation for illustrating the 8 operating procedures. Change the screen language before operating your camcorder (Continued) viewfinder. About this manual • The LCD screens and the viewfinder images and indicators shown in this manual were taken with a Carl Zeiss lens, which was developed jointly by Carl Zeiss, in this manual • The operations available depend on the model DCR-DVD308. • Disc...
Operating Instructions
Page 10
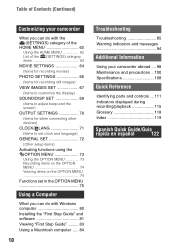
... (SETTINGS) category items 63 MOVIE SETTINGS 64 (Items for recording movies) PHOTO SETTINGS 66 (Items for recording still images) VIEW IMAGES SET 67 (Items to customize the display) SOUND/DISP SET 69 (Items to adjust beep and the screen) OUTPUT SETTINGS 70 (Items for when connecting other devices) CLOCK/ LANG 71 (Items to set clock and language) GENERAL SET 72 (Other setup items) Activating functions using the OPTION MENU 73 Using the OPTION MENU 73 Recording items on the OPTION MENU 74 Viewing...
... (SETTINGS) category items 63 MOVIE SETTINGS 64 (Items for recording movies) PHOTO SETTINGS 66 (Items for recording still images) VIEW IMAGES SET 67 (Items to customize the display) SOUND/DISP SET 69 (Items to adjust beep and the screen) OUTPUT SETTINGS 70 (Items for when connecting other devices) CLOCK/ LANG 71 (Items to set clock and language) GENERAL SET 72 (Other setup items) Activating functions using the OPTION MENU 73 Using the OPTION MENU 73 Recording items on the OPTION MENU 74 Viewing...
Operating Instructions
Page 12
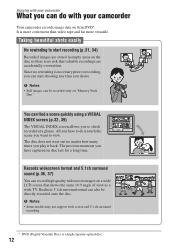
... also be recorded only on "Memory Stick Duo." All you have captured on disc last for a long time. b Notes • Some models may not support wide screen and 5.1 ch surround recording. * DVD (Digital Versatile Disc) is more convenient than video tape and far more versatile. Since no rewinding is necessary prior to view. The precious moments you have to do with your camcorder What you play it back...
... also be recorded only on "Memory Stick Duo." All you have captured on disc last for a long time. b Notes • Some models may not support wide screen and 5.1 ch surround recording. * DVD (Digital Versatile Disc) is more convenient than video tape and far more versatile. Since no rewinding is necessary prior to view. The precious moments you have to do with your camcorder What you play it back...
Operating Instructions
Page 24
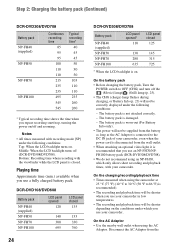
... CHG (charge) lamp flashes during charging, or Battery Info (p. 23) will be shorter depending on . Playing time Approximate time (min.) available when you use your camcorder. The battery pack is worn-out (For Battery Info only). • The power will not be correctly displayed under the following conditions: Top: When the LCD backlight turns on the conditions under which only allows short recording and playback times, with recording mode [SP...
... CHG (charge) lamp flashes during charging, or Battery Info (p. 23) will be shorter depending on . Playing time Approximate time (min.) available when you use your camcorder. The battery pack is worn-out (For Battery Info only). • The power will not be correctly displayed under the following conditions: Top: When the LCD backlight turns on the conditions under which only allows short recording and playback times, with recording mode [SP...
Operating Instructions
Page 26
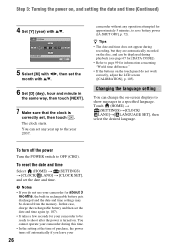
..., the power turns off the power Turn the POWER switch to the year 2037. To turn off automatically if you do not work correctly, adjust the LCD screen ([CALIBRATION], p. 105). b Notes • If you leave your camcorder for approximately 5 minutes, to show messages in a specified language. Changing the language setting You can set the date and time. Touch (HOME) t (SETTINGS)t[CLOCK/ LANG]t[ LANGUAGE SET], then select the desired language. You can change the on-screen displays to save battery power...
..., the power turns off the power Turn the POWER switch to the year 2037. To turn off automatically if you do not work correctly, adjust the LCD screen ([CALIBRATION], p. 105). b Notes • If you leave your camcorder for approximately 5 minutes, to show messages in a specified language. Changing the language setting You can set the date and time. Touch (HOME) t (SETTINGS)t[CLOCK/ LANG]t[ LANGUAGE SET], then select the desired language. You can change the on-screen displays to save battery power...
Operating Instructions
Page 31
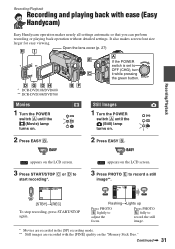
Open the lens cover (p. 27) * DCR-DVD108/DVD608 ** DCR-DVD308/DVD708 R Movies 1 Turn the POWER switch A until the (Still) lamp turns on . 2 Press EASY B. Still Images 1 Turn the POWER switch A until the (Movie) lamp turns on . 2 Press EASY B. Recording/Playback appears on the LCD screen. 3 Press PHOTO E to record a still image**. 6 [STBY]t[REC] To stop recording, press START/STOP again. Continued , 31 FlashingtLights up Press PHOTO E lightly to OFF (CHG), turn it while pressing the green button. Recording/Playback Recording and playing back with the [FINE...
Open the lens cover (p. 27) * DCR-DVD108/DVD608 ** DCR-DVD308/DVD708 R Movies 1 Turn the POWER switch A until the (Still) lamp turns on . 2 Press EASY B. Still Images 1 Turn the POWER switch A until the (Movie) lamp turns on . 2 Press EASY B. Recording/Playback appears on the LCD screen. 3 Press PHOTO E to record a still image**. 6 [STBY]t[REC] To stop recording, press START/STOP again. Continued , 31 FlashingtLights up Press PHOTO E lightly to OFF (CHG), turn it while pressing the green button. Recording/Playback Recording and playing back with the [FINE...

Operating Instructions
Page 42
... this operation (p.22). Device without S VIDEO jack IN Device with S VIDEO jack IN S VIDEO VIDEO (Yellow) 1 (White) AUDIO (Red) VIDEO (White) AUDIO (Red) A/V OUT jack 2 : Signal flow VCRs or TVs 1 A/V connecting cable (supplied) Connect to the input jack of TV or VCR using A/V connecting cable 1 or A/V connecting cable with the ID-1/ID-2 system and play back the disc, set [TV TYPE] to [16:9]. b Notes • When you will not output audio. Connect your camcorder to the input jack of the other device. 2 A/V connecting cable with an A/V connecting cable. Playing the picture...
... this operation (p.22). Device without S VIDEO jack IN Device with S VIDEO jack IN S VIDEO VIDEO (Yellow) 1 (White) AUDIO (Red) VIDEO (White) AUDIO (Red) A/V OUT jack 2 : Signal flow VCRs or TVs 1 A/V connecting cable (supplied) Connect to the input jack of TV or VCR using A/V connecting cable 1 or A/V connecting cable with the ID-1/ID-2 system and play back the disc, set [TV TYPE] to [16:9]. b Notes • When you will not output audio. Connect your camcorder to the input jack of the other device. 2 A/V connecting cable with an A/V connecting cable. Playing the picture...
Operating Instructions
Page 54
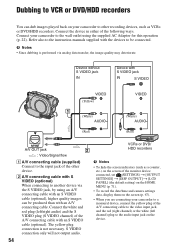
... (White) AUDIO (Red) VIDEO (White) AUDIO (Red) A/V OUT jack 2 : Video/Signal flow VCRs or DVD/ HDD recorders A A/V connecting cable (supplied) Connect to the input jack of the other recording devices, such as a counter, etc.) on the screen of the monitor device connected, set (SETTINGS) t [OUTPUT SETTINGS] t [DISP OUTPUT] t [LCD PANEL] (the default setting) on the HOME MENU (p. 71). • To record the date/time and camera settings data, display them on your camcorder to the video input jack, and the red (right channel) or the white (left /right audio) and the S VIDEO plug (S VIDEO...
... (White) AUDIO (Red) VIDEO (White) AUDIO (Red) A/V OUT jack 2 : Video/Signal flow VCRs or DVD/ HDD recorders A A/V connecting cable (supplied) Connect to the input jack of the other recording devices, such as a counter, etc.) on the screen of the monitor device connected, set (SETTINGS) t [OUTPUT SETTINGS] t [DISP OUTPUT] t [LCD PANEL] (the default setting) on the HOME MENU (p. 71). • To record the date/time and camera settings data, display them on your camcorder to the video input jack, and the red (right channel) or the white (left /right audio) and the S VIDEO plug (S VIDEO...
Operating Instructions
Page 56
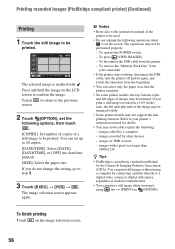
The selected image is marked with a pixel size larger than 2848×2136 z Tips • PictBridge is on the screen. The operations may not be able to print the following: - To remove the "Memory Stick Duo" from your printer's instruction manual for details. • You may not support the date printing function. Refer to your camcorder • If the printer stops working, disconnect the USB cable, turn the printer...
The selected image is marked with a pixel size larger than 2848×2136 z Tips • PictBridge is on the screen. The operations may not be able to print the following: - To remove the "Memory Stick Duo" from your printer's instruction manual for details. • You may not support the date printing function. Refer to your camcorder • If the printer stops working, disconnect the USB cable, turn the printer...
Operating Instructions
Page 64
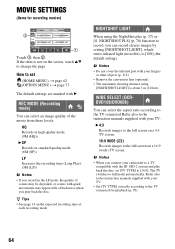
... a 16:9 (wide) TV screen. NIGHTSHOT PLS] (p. 78) function to [ON] (the default setting). The TV switches to the full screen on the expected recording time of the movie from three levels. REC MODE (Recording mode) You can record clearer images by setting [NIGHTSHOT LIGHT], which emits infrared light (invisible), to record, you connect your fingers or other objects (p. 112). • Remove the conversion lens (optional). • The maximum shooting distance using the NightShot plus...
... a 16:9 (wide) TV screen. NIGHTSHOT PLS] (p. 78) function to [ON] (the default setting). The TV switches to the full screen on the expected recording time of the movie from three levels. REC MODE (Recording mode) You can record clearer images by setting [NIGHTSHOT LIGHT], which emits infrared light (invisible), to record, you connect your fingers or other objects (p. 112). • Remove the conversion lens (optional). • The maximum shooting distance using the NightShot plus...
Operating Instructions
Page 65
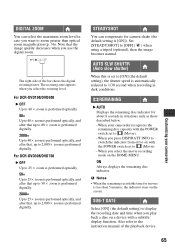
... shutter speed is performed digitally. REMAINING B AUTO Displays the remaining disc indicator for movies is performed optically, and after that the image quality decreases when you play back a disc on with the POWER switch set to 2,000 × zoom is [ON]). When you select the zooming level. ON Always displays the remaining disc indicator. The zooming zone appears when you select the movie recording mode on the screen. b Notes • When the remaining recordable time...
... shutter speed is performed digitally. REMAINING B AUTO Displays the remaining disc indicator for movies is performed optically, and after that the image quality decreases when you play back a disc on with the POWER switch set to 2,000 × zoom is [ON]). When you select the zooming level. ON Always displays the remaining disc indicator. The zooming zone appears when you select the movie recording mode on the screen. b Notes • When the remaining recordable time...
Operating Instructions
Page 85
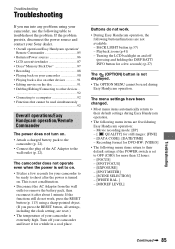
... turned on . • Attach a charged battery pack to the camcorder (p. 22). • Connect the plug of the AC Adaptor to troubleshoot the problem. Recording format for a while in a cool place. If the functions still do not work , press the RESET button (p. 113) using a sharp-pointed object. (If you run into any problems using your camcorder to shoot after about 1 minute. Troubleshooting Troubleshooting If you press the RESET button, all settings, including the clock setting, are fixed...
... turned on . • Attach a charged battery pack to the camcorder (p. 22). • Connect the plug of the AC Adaptor to troubleshoot the problem. Recording format for a while in a cool place. If the functions still do not work , press the RESET button (p. 113) using a sharp-pointed object. (If you run into any problems using your camcorder to shoot after about 1 minute. Troubleshooting Troubleshooting If you press the RESET button, all settings, including the clock setting, are fixed...
Operating Instructions
Page 87
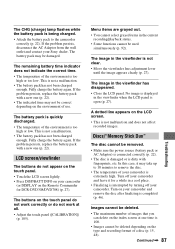
... the LCD screen lightly. • Press DISP/BATT INFO on your camcorder (or DISPLAY on the type and recording format of a disc (p. 15, 48). The image in the viewfinder when the LCD panel is open (p. 27). No image is displayed in the viewfinder is not clear. • Move the viewfinder lens adjustment lever until the image appears clearly (p. 27). Discs/"Memory Stick Duo" The disc cannot be damaged. Images cannot be used simultaneously...
... the LCD screen lightly. • Press DISP/BATT INFO on your camcorder (or DISPLAY on the type and recording format of a disc (p. 15, 48). The image in the viewfinder when the LCD panel is open (p. 27). No image is displayed in the viewfinder is not clear. • Move the viewfinder lens adjustment lever until the image appears clearly (p. 27). Discs/"Memory Stick Duo" The disc cannot be damaged. Images cannot be used simultaneously...
Operating Instructions
Page 89
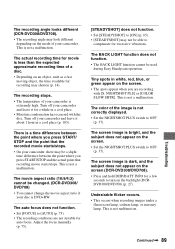
... function. • Set [FOCUS] to [AUTO] (p. 75). • The recording conditions are recording with the disc. The actual recording time for excessive vibrations. Adjust the focus manually (p. 75). [STEADYSHOT] does not function. • Set [STEADYSHOT] to compensate for movie is DVD+RW. This is not a malfunction. The recording stops. • The temperature of the image is extremely high. Turn off your camcorder and leave it for a few seconds to turn on the screen...
... function. • Set [FOCUS] to [AUTO] (p. 75). • The recording conditions are recording with the disc. The actual recording time for excessive vibrations. Adjust the focus manually (p. 75). [STEADYSHOT] does not function. • Set [STEADYSHOT] to compensate for movie is DVD+RW. This is not a malfunction. The recording stops. • The temperature of the image is extremely high. Turn off your camcorder and leave it for a few seconds to turn on the screen...
Operating Instructions
Page 102
... image data compatibility • Image data files recorded on a "Memory Stick Duo" by your camcorder conform to the "Design rule for replacement while your camcorder is reading or writing image files on a "Memory Stick Duo" or a Memory Stick Duo adaptor. • When you slide the write-protect tab on the combination of the unit. It is recommended you eject the "Memory Stick Duo," turn the power off on your camcorder, or remove the battery pack for Camera File...
... image data compatibility • Image data files recorded on a "Memory Stick Duo" by your camcorder conform to the "Design rule for replacement while your camcorder is reading or writing image files on a "Memory Stick Duo" or a Memory Stick Duo adaptor. • When you slide the write-protect tab on the combination of the unit. It is recommended you eject the "Memory Stick Duo," turn the power off on your camcorder, or remove the battery pack for Camera File...

Operating Instructions
Page 108
... Digital 5.1 Creator Video signal NTSC color, EIA standards Usable discs 8 cm DVD-RW/DVD+RW/DVD-R/ DVD+R DL Recording format Movie DVD-RW: DVD-VIDEO (VIDEO mode), DVD-Video Recording (VR mode) DVD+RW: DVD+RW Video DVD-R/DVD+R DL: DVD-VIDEO Still image Exif* Ver.2.2 Recording time DVD-RW/DVD+RW/DVD-R HQ: Approx. 20 min SP: Approx. 30 min LP: Approx. 60 min DVD+R DL HQ: Approx. 35 min SP: Approx. 55 min LP: Approx. 110 min Viewfinder Electric viewfinder (color) Image device DCR-DVD108/DVD608 3 mm (1/6 type) CCD (Charge Coupled Device...
... Digital 5.1 Creator Video signal NTSC color, EIA standards Usable discs 8 cm DVD-RW/DVD+RW/DVD-R/ DVD+R DL Recording format Movie DVD-RW: DVD-VIDEO (VIDEO mode), DVD-Video Recording (VR mode) DVD+RW: DVD+RW Video DVD-R/DVD+R DL: DVD-VIDEO Still image Exif* Ver.2.2 Recording time DVD-RW/DVD+RW/DVD-R HQ: Approx. 20 min SP: Approx. 30 min LP: Approx. 60 min DVD+R DL HQ: Approx. 35 min SP: Approx. 55 min LP: Approx. 110 min Viewfinder Electric viewfinder (color) Image device DCR-DVD108/DVD608 3 mm (1/6 type) CCD (Charge Coupled Device...
Operating Instructions
Page 114
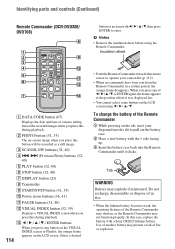
... to operate your fingernail into the Remote Commander until it was displayed last. • You cannot select some buttons on the LCD screen using the Remote Commander. Tab WARNING Battery may explode if mistreated. In this during playback. Insulation sheet A DATA CODE button (67) Displays the date and time or camera setting data of another battery may not function properly. C SCAN/SLOW buttons (32, 40) D . > (Previous/Next) buttons (32, 40) E PLAY button (32, 40) F STOP button (32, 40) G DISPLAY button...
... to operate your fingernail into the Remote Commander until it was displayed last. • You cannot select some buttons on the LCD screen using the Remote Commander. Tab WARNING Battery may explode if mistreated. In this during playback. Insulation sheet A DATA CODE button (67) Displays the date and time or camera setting data of another battery may not function properly. C SCAN/SLOW buttons (32, 40) D . > (Previous/Next) buttons (32, 40) E PLAY button (32, 40) F STOP button (32, 40) G DISPLAY button...
Operating Instructions
Page 119
... Button-type lithium battery 114 B&W 79 C CALIBRATION 105 CAMERA DATA 67 CANDLE 76 CD-ROM 80 Charging time 23 CLOCK SET 25 CLOCK/LANG 71 COLOR SLOW SHTR (Color Slow Shutter 78, 93 Computer 80 Copyright 8, 110 D DATA CODE 67, 117 DATE/TIME .......... 26, 67, 117 DC IN jack 22 DC plug 22 DELETE Disc 48 "Memory Stick Duo" .... 49 DEMO MODE 72 DIGITAL ZOOM 65 Disc 28, 100 Disc cover OPEN switch...... 28 DISC INFO 57 Disc remaining 65 DISC SELECT GUIDE ....... 58 DISP OUTPUT...
... Button-type lithium battery 114 B&W 79 C CALIBRATION 105 CAMERA DATA 67 CANDLE 76 CD-ROM 80 Charging time 23 CLOCK SET 25 CLOCK/LANG 71 COLOR SLOW SHTR (Color Slow Shutter 78, 93 Computer 80 Copyright 8, 110 D DATA CODE 67, 117 DATE/TIME .......... 26, 67, 117 DC IN jack 22 DC plug 22 DELETE Disc 48 "Memory Stick Duo" .... 49 DEMO MODE 72 DIGITAL ZOOM 65 Disc 28, 100 Disc cover OPEN switch...... 28 DISC INFO 57 Disc remaining 65 DISC SELECT GUIDE ....... 58 DISP OUTPUT...


