Operating Instructions
Page 4
.... - Service Damage Requiring Service Unplug the set has been exposed to normal operation. - If the set from the wall outlet and disconnect the antenna or cable system.
.... - Service Damage Requiring Service Unplug the set has been exposed to normal operation. - If the set from the wall outlet and disconnect the antenna or cable system.
Operating Instructions
Page 6
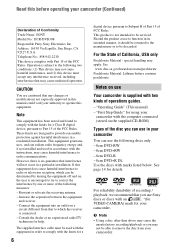
...manner, it should be returned to the manufacturer or to be determined by one or more of Conformity Trade Name: SONY Model No.: DCR-DVD308 Responsible Party:Sony Electronics Inc. See page 14 for a 6 digital device pursuant to radio communications. b Note • Using a...If this equipment does cause harmful interference to provide reasonable protection against harmful interference in this manual could void your camcorder. The supplied interface cable must accept any changes or modifications not expressly approved in a residential installation. This equipment generates, uses, and ...
...manner, it should be returned to the manufacturer or to be determined by one or more of Conformity Trade Name: SONY Model No.: DCR-DVD308 Responsible Party:Sony Electronics Inc. See page 14 for a 6 digital device pursuant to radio communications. b Note • Using a...If this equipment does cause harmful interference to provide reasonable protection against harmful interference in this manual could void your camcorder. The supplied interface cable must accept any changes or modifications not expressly approved in a residential installation. This equipment generates, uses, and ...
Operating Instructions
Page 7
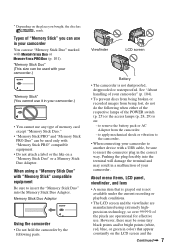
... be used with "Memory Stick" compatible equipment Be sure to remove the battery pack or AC Adaptor from being broken or recorded images from the camcorder. - About menu items, LCD panel, viewfinder, and lens • A menu item that appear constantly on a "Memory Stick Duo" or a Memory... Stick Duo Adaptor. However, there may result in your camcorder to another device with a USB cable, be used only with or (p. 101). When using extremely highprecision technology, so over 99.99% of the POWER switch (p. 25) or...
... be used with "Memory Stick" compatible equipment Be sure to remove the battery pack or AC Adaptor from being broken or recorded images from the camcorder. - About menu items, LCD panel, viewfinder, and lens • A menu item that appear constantly on a "Memory Stick Duo" or a Memory... Stick Duo Adaptor. However, there may result in your camcorder to another device with a USB cable, be used only with or (p. 101). When using extremely highprecision technology, so over 99.99% of the POWER switch (p. 25) or...
Operating Instructions
Page 21
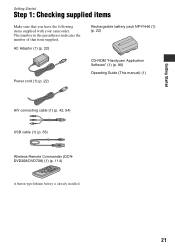
The number in the parentheses indicates the number of that you have the following items supplied with your camcorder. Getting Started Getting Started Step 1: Checking supplied items Make sure that item supplied. AC Adaptor (1) (p. 22) Rechargeable battery pack NP-FH40 (1) (p. 22) Power cord (1) (p. 22) CD-ROM "Handycam Application Software" (1) (p. 80) Operating Guide (This manual) (1) A/V connecting cable (1) (p. 42, 54) USB cable (1) (p. 55) Wireless Remote Commander (DCRDVD308/DVD708) (1) (p. 114) A button-type lithium battery is already installed. 21
The number in the parentheses indicates the number of that you have the following items supplied with your camcorder. Getting Started Getting Started Step 1: Checking supplied items Make sure that item supplied. AC Adaptor (1) (p. 22) Rechargeable battery pack NP-FH40 (1) (p. 22) Power cord (1) (p. 22) CD-ROM "Handycam Application Software" (1) (p. 80) Operating Guide (This manual) (1) A/V connecting cable (1) (p. 42, 54) USB cable (1) (p. 55) Wireless Remote Commander (DCRDVD308/DVD708) (1) (p. 114) A button-type lithium battery is already installed. 21

Operating Instructions
Page 42
...and the S VIDEO plug (S VIDEO channel) of the other device. 2 A/V connecting cable with S VIDEO (optional) When connecting to another device via the S VIDEO jack, by using A/V connecting cable 1 or A/V connecting cable with S VIDEO 2. b Notes • When you connect your camcorder. 2 Touch (HOME) t (SETTINGS) t [OUTPUT SETTINGS] t [TV TYPE] ...S VIDEO connection only will view pictures on. 1 Turn the POWER switch to turn on your camcorder to a TV compatible with an A/V connecting cable. Connect your camcorder to the LINE IN input on the VCR. Set the input selector on the VCR to full...
...and the S VIDEO plug (S VIDEO channel) of the other device. 2 A/V connecting cable with S VIDEO (optional) When connecting to another device via the S VIDEO jack, by using A/V connecting cable 1 or A/V connecting cable with S VIDEO 2. b Notes • When you connect your camcorder. 2 Touch (HOME) t (SETTINGS) t [OUTPUT SETTINGS] t [TV TYPE] ...S VIDEO connection only will view pictures on. 1 Turn the POWER switch to turn on your camcorder to a TV compatible with an A/V connecting cable. Connect your camcorder to the LINE IN input on the VCR. Set the input selector on the VCR to full...
Operating Instructions
Page 43
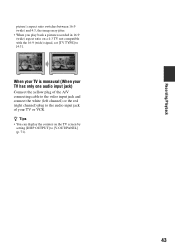
...; You can display the counter on a 4:3 TV not compatible with the 16:9 (wide) signal, set [TV TYPE] to the audio input jack of the A/V connecting cable to the video input jack and connect the white (left channel) or the red (right channel) plug to [4:3].
...; You can display the counter on a 4:3 TV not compatible with the 16:9 (wide) signal, set [TV TYPE] to the audio input jack of the A/V connecting cable to the video input jack and connect the white (left channel) or the red (right channel) plug to [4:3].
Operating Instructions
Page 54
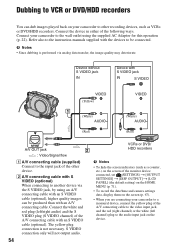
Connect your camcorder to other device. B A/V connecting cable with S VIDEO (optional) When connecting to another device via ... b Notes • Since dubbing is not necessary. Refer also to the instruction manuals supplied with an A/V connecting cable. S VIDEO connection only will not output audio. b Notes • To hide the screen indicators (such as VCRs... display them on the screen (p. 67). • When you are connecting your camcorder to a monaural device, connect the yellow plug of the A/V connecting cable to the video input jack, and the red (right channel) or the white ...
Connect your camcorder to other device. B A/V connecting cable with S VIDEO (optional) When connecting to another device via ... b Notes • Since dubbing is not necessary. Refer also to the instruction manuals supplied with an A/V connecting cable. S VIDEO connection only will not output audio. b Notes • To hide the screen indicators (such as VCRs... display them on the screen (p. 67). • When you are connecting your camcorder to a monaural device, connect the yellow plug of the A/V connecting cable to the video input jack, and the red (right channel) or the white ...
Operating Instructions
Page 55
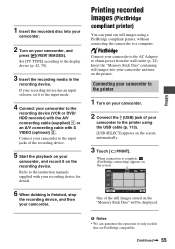
... TYPE] according to the recording device (VCR or DVD/ HDD recorder) with the A/V connecting cable (supplied) 1 or an A/V connecting cable with your camcorder. Refer to the instruction manuals supplied with S VIDEO (optional) 2. Connecting your camcorder to the printer 1 Turn on your camcorder. 2 Connect the (USB) jack of the recording device. 5 Start the playback on your...
... TYPE] according to the recording device (VCR or DVD/ HDD recorder) with the A/V connecting cable (supplied) 1 or an A/V connecting cable with your camcorder. Refer to the instruction manuals supplied with S VIDEO (optional) 2. Connecting your camcorder to the printer 1 Turn on your camcorder. 2 Connect the (USB) jack of the recording device. 5 Start the playback on your...
Operating Instructions
Page 56
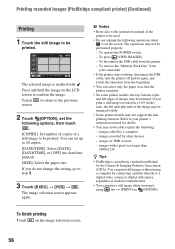
...connecting a printer directly to a digital video camera or digital still camera, regardless of the printer to your camcorder • If the printer stops working, disconnect the USB cable, turn the printer off and on again, and restart the operation from the beginning. • You ... Imaging Products Association (CIPA). To remove the "Memory Stick Duo" from the printer. - images recorded by a computer - To disconnect the USB cable from your printer's instruction manual for details. • You may be printed. The selected image is marked with a pixel size larger than 2848...
...connecting a printer directly to a digital video camera or digital still camera, regardless of the printer to your camcorder • If the printer stops working, disconnect the USB cable, turn the printer off and on again, and restart the operation from the beginning. • You ... Imaging Products Association (CIPA). To remove the "Memory Stick Duo" from the printer. - images recorded by a computer - To disconnect the USB cable from your printer's instruction manual for details. • You may be printed. The selected image is marked with a pixel size larger than 2848...
Operating Instructions
Page 81
... PRO Duo" and your computer is not assured if the above OS has been upgraded. Operation is not compatible with it, connect your camcorder with the USB cable instead of your computer. CPU: MMX Pentium 200 MHz or faster Others: USB port (this must be provided as standard) b Note...16 bit color) Others: USB port (this must be provided as standard, Hi-Speed USB (USB 2.0 compatible) is recommended), Disc drive that your camcorder is required only for installation. • Close all the recommended environments. Contents to the computer. • When using the Memory Stick slot on the...
... PRO Duo" and your computer is not assured if the above OS has been upgraded. Operation is not compatible with it, connect your camcorder with the USB cable instead of your computer. CPU: MMX Pentium 200 MHz or faster Others: USB port (this must be provided as standard) b Note...16 bit color) Others: USB port (this must be provided as standard, Hi-Speed USB (USB 2.0 compatible) is recommended), Disc drive that your camcorder is required only for installation. • Close all the recommended environments. Contents to the computer. • When using the Memory Stick slot on the...

Operating Instructions
Page 82
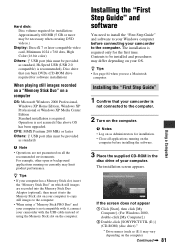
..."" (p. 81). 2 Click [Install]. 3 Select the language for your selected country/region. 5 Read [License Agreement], select [I accept the terms of your camcorder from the pull-down menu. 6 Click [FirstStepGuide(HTML)]. The software is complete] appears, click [OK] to finish the installation. 4 Check your area and...]. 5 Select the desired language and the model name of the license agreement] when you agree, then click [Next]. 6 Connect your camcorder to your computer via a USB cable, then click [Next] on the computer, you do not need to install third party software (shown below).
..."" (p. 81). 2 Click [Install]. 3 Select the language for your selected country/region. 5 Read [License Agreement], select [I accept the terms of your camcorder from the pull-down menu. 6 Click [FirstStepGuide(HTML)]. The software is complete] appears, click [OK] to finish the installation. 4 Check your area and...]. 5 Select the desired language and the model name of the license agreement] when you agree, then click [Next]. 6 Connect your camcorder to your computer via a USB cable, then click [Next] on the computer, you do not need to install third party software (shown below).
Operating Instructions
Page 83
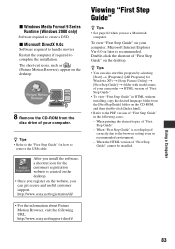
... on the CD-ROM, and then double-click [Index.html]. • Refer to remove the USB cable. When the HTML version of "First Step Guide" in the following URL: http://www.sony.net/support-disoft/ Viewing "First Step Guide" z Tips • See page 84 when you can ...also start this program by selecting [Start] t [Programs] ([All Programs] for Windows XP) t [Sony Picture Utility] t [First Step Guide] t folder with model name of your camcorder t HTML version of "First Step Guide." • To view "First Step Guide" in recommended environment. - x Windows Media Format...
... on the CD-ROM, and then double-click [Index.html]. • Refer to remove the USB cable. When the HTML version of "First Step Guide" in the following URL: http://www.sony.net/support-disoft/ Viewing "First Step Guide" z Tips • See page 84 when you can ...also start this program by selecting [Start] t [Programs] ([All Programs] for Windows XP) t [Sony Picture Utility] t [First Step Guide] t folder with model name of your camcorder t HTML version of "First Step Guide." • To view "First Step Guide" in recommended environment. - x Windows Media Format...
Operating Instructions
Page 92
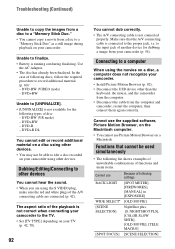
...RW Unable to [UNFINALIZE]. • [UNFINALIZE] is running out during playback on your camcorder using other than the keyboard, the mouse, and the camcorder from the computer. • Disconnect the cable from your camcorder to the TV. • Set [TV TYPE] depending on the Macintosh computer. &#... record additional material (p. 60): - DVD+RW - The aspect ratio of the playback is not correct when connecting your camcorder (p. 54). Functions that the A/V connecting cable is not connected properly. Make sure that cannot be able to edit a disc recorded on your TV (p. 42, 70...
...RW Unable to [UNFINALIZE]. • [UNFINALIZE] is running out during playback on your camcorder using other than the keyboard, the mouse, and the camcorder from the computer. • Disconnect the cable from your camcorder to the TV. • Set [TV TYPE] depending on the Macintosh computer. &#... record additional material (p. 60): - DVD+RW - The aspect ratio of the playback is not correct when connecting your camcorder (p. 54). Functions that the A/V connecting cable is not connected properly. Make sure that cannot be able to edit a disc recorded on your TV (p. 42, 70...
Operating Instructions
Page 96
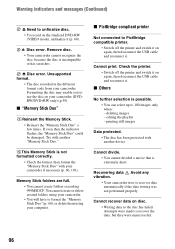
... printer. • Switch off the printer and switch it on again, then disconnect the USB cable and reconnect it. Recovering data Avoid any vibration. • Your camcorder tries to recover the data, but they were unsuccessful. 96 Attempts were made to recover data ...properly. Warning indicators and messages (Continued) Z Need to unfinalize disc. • To record on again, then disconnect the USB cable and reconnect it. Try with your camcorder (DVDRW/DVD+RW only) (p.59). Cannot divide. • You cannot divided a movie that is incompatible or has scratches. ...
... printer. • Switch off the printer and switch it on again, then disconnect the USB cable and reconnect it. Recovering data Avoid any vibration. • Your camcorder tries to recover the data, but they were unsuccessful. 96 Attempts were made to recover data ...properly. Warning indicators and messages (Continued) Z Need to unfinalize disc. • To record on again, then disconnect the USB cable and reconnect it. Try with your camcorder (DVDRW/DVD+RW only) (p.59). Cannot divide. • You cannot divided a movie that is incompatible or has scratches. ...
Operating Instructions
Page 103
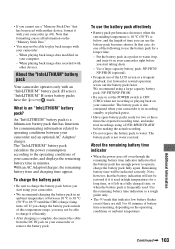
..., that the battery indication will be restored if it efficiently. • After charging is complete, disconnect the cable from the DC IN jack on your camcorder or remove the battery pack. When playing back image data modified on the operating conditions or ambient temperature. We...pack: NP-FH70/ NP-FH100 (optional). • Frequent use of between your computer. - Note that formatting erases all information on your camcorder. When playing back image data recorded with an "InfoLITHIUM" battery pack (H series). To use the battery pack effectively • Battery pack performance...
..., that the battery indication will be restored if it efficiently. • After charging is complete, disconnect the cable from the DC IN jack on your camcorder or remove the battery pack. When playing back image data modified on the operating conditions or ambient temperature. We...pack: NP-FH70/ NP-FH100 (optional). • Frequent use of between your computer. - Note that formatting erases all information on your camcorder. When playing back image data recorded with an "InfoLITHIUM" battery pack (H series). To use the battery pack effectively • Battery pack performance...
Operating Instructions
Page 119
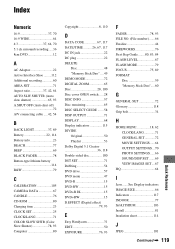
... recording 60 AREA SET 71 Aspect ratio 37, 42, 64 AUTO SLW SHUTTR (Auto slow shutter 65, 93 A.SHUT OFF (Auto shut off 72 A/V connecting cable .....42, 54 B BACK LIGHT 37, 89 Battery 22, 114 Battery info 23 BEACH 77 BEEP 69 BLACK FADER 78 Button-type lithium battery 114 B&W 79... Dubbing 54 DVD drive 57 DVD menu 47 DVD-R 15 DVD-RW 15 DVD+R DL 15 DVD+RW 15 D.EFFECT (Digital effect 79, 93 E Easy Handycam 31 EDIT 50 EXPOSURE 76, 93 F FADER 78, 93 FILE NO. (File number).......66 Finalize 44 FIREWORKS 76 First Step Guide ........80, 83, 84 FLASH...
... recording 60 AREA SET 71 Aspect ratio 37, 42, 64 AUTO SLW SHUTTR (Auto slow shutter 65, 93 A.SHUT OFF (Auto shut off 72 A/V connecting cable .....42, 54 B BACK LIGHT 37, 89 Battery 22, 114 Battery info 23 BEACH 77 BEEP 69 BLACK FADER 78 Button-type lithium battery 114 B&W 79... Dubbing 54 DVD drive 57 DVD menu 47 DVD-R 15 DVD-RW 15 DVD+R DL 15 DVD+RW 15 D.EFFECT (Digital effect 79, 93 E Easy Handycam 31 EDIT 50 EXPOSURE 76, 93 F FADER 78, 93 FILE NO. (File number).......66 Finalize 44 FIREWORKS 76 First Step Guide ........80, 83, 84 FLASH...


