Operating Instructions
Page 3
... to be walked on a bed, sofa, rug, or other sources, refer to operate from overheating, these safety instructions completely before cleaning or polishing it from battery power, or other similar surface. - Installation Water and Moisture Do not use power-line operated sets near or over a radiator or heat register, or where...
... to be walked on a bed, sofa, rug, or other sources, refer to operate from overheating, these safety instructions completely before cleaning or polishing it from battery power, or other similar surface. - Installation Water and Moisture Do not use power-line operated sets near or over a radiator or heat register, or where...
Operating Instructions
Page 5
... U.S.A. and CANADA RECYCLING LITHIUM-ION BATTERIES Lithium-Ion batteries are located on the bottom. Battery pack This device complies with Part 15 of optical instruments with Part 15 of Conformity Trade Name: SONY Model No.: DCR-DVD108 Responsible Party:Sony Electronics Inc. Refer to the following... before operating your camcorder Before operating the unit, please read this manual thoroughly, and retain it for the FCC related matters only. Regulatory Information Declaration of the FCC Rules. Operation is for future reference. Replace the battery with Canadian ICES-...
... U.S.A. and CANADA RECYCLING LITHIUM-ION BATTERIES Lithium-Ion batteries are located on the bottom. Battery pack This device complies with Part 15 of optical instruments with Part 15 of Conformity Trade Name: SONY Model No.: DCR-DVD108 Responsible Party:Sony Electronics Inc. Refer to the following... before operating your camcorder Before operating the unit, please read this manual thoroughly, and retain it for the FCC related matters only. Regulatory Information Declaration of the FCC Rules. Operation is for future reference. Replace the battery with Canadian ICES-...
Operating Instructions
Page 6
...your camcorder (...B digital device, pursuant to Part 15 of Conformity Trade Name: SONY Model No.: DCR-DVD308 Responsible Party:Sony Electronics Inc. Reorient or relocate the receiving antenna. - Should the...can use Sony discs or discs with an *(for VIDEO CAMERA) mark for using your camcorder. Notes on use Your camcorder is supplied...order to comply with the equipment in your camcorder. If this device must be used in ... Connect the equipment into an outlet on a circuit different from your camcorder with marks listed below. CAUTION You are designed to the following two ...
...your camcorder (...B digital device, pursuant to Part 15 of Conformity Trade Name: SONY Model No.: DCR-DVD308 Responsible Party:Sony Electronics Inc. Reorient or relocate the receiving antenna. - Should the...can use Sony discs or discs with an *(for VIDEO CAMERA) mark for using your camcorder. Notes on use Your camcorder is supplied...order to comply with the equipment in your camcorder. If this device must be used in ... Connect the equipment into an outlet on a circuit different from your camcorder with marks listed below. CAUTION You are designed to the following two ...
Operating Instructions
Page 7
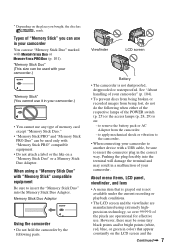
..." compatible equipment. • Do not attach a label or the like on a "Memory Stick Duo" or a Memory Stick Duo Adaptor. to remove the battery pack or AC Adaptor from being broken or recorded images from the camcorder. - Pushing the plug forcibly into the Memory Stick Duo Adaptor. Memory Stick Duo Adaptor Using the...
..." compatible equipment. • Do not attach a label or the like on a "Memory Stick Duo" or a Memory Stick Duo Adaptor. to remove the battery pack or AC Adaptor from being broken or recorded images from the camcorder. - Pushing the plug forcibly into the Memory Stick Duo Adaptor. Memory Stick Duo Adaptor Using the...
Operating Instructions
Page 9
...Started Step 1: Checking supplied items 21 Step 2: Charging the battery pack 22 Step 3: Turning the power on the disc ...on a TV ........42 Making the disc compatible with your camcorder 12 Choosing a disc 14 Using your camcorder What you can do with playback on other devices or DVD... "Memory Stick Duo 28 Recording/Playback Recording and playing back with ease (Easy Handycam 31 Recording 34 Zooming 36 Recording sound with more presence (5.1ch surround recording) ...Selecting the aspect ratio (16:9 or 4:3) (DCR-DVD308/DVD708 37 Playback 39 Using PB zoom 41 Playing back a series of...
...Started Step 1: Checking supplied items 21 Step 2: Charging the battery pack 22 Step 3: Turning the power on the disc ...on a TV ........42 Making the disc compatible with your camcorder 12 Choosing a disc 14 Using your camcorder What you can do with playback on other devices or DVD... "Memory Stick Duo 28 Recording/Playback Recording and playing back with ease (Easy Handycam 31 Recording 34 Zooming 36 Recording sound with more presence (5.1ch surround recording) ...Selecting the aspect ratio (16:9 or 4:3) (DCR-DVD308/DVD708 37 Playback 39 Using PB zoom 41 Playing back a series of...
Operating Instructions
Page 21
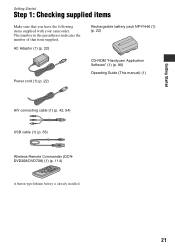
AC Adaptor (1) (p. 22) Rechargeable battery pack NP-FH40 (1) (p. 22) Power cord (1) (p. 22) CD-ROM "Handycam Application Software" (1) (p. 80) Operating Guide (This manual) (1) A/V connecting cable (1) (p. 42, 54) USB cable (1) (p. 55) Wireless Remote Commander (DCRDVD308/DVD708) (1) (p. 114) A button-type lithium battery is already installed. 21 The number in the parentheses indicates the number of that you have the following items supplied with your camcorder. Getting Started Getting Started Step 1: Checking supplied items Make sure that item supplied.
AC Adaptor (1) (p. 22) Rechargeable battery pack NP-FH40 (1) (p. 22) Power cord (1) (p. 22) CD-ROM "Handycam Application Software" (1) (p. 80) Operating Guide (This manual) (1) A/V connecting cable (1) (p. 42, 54) USB cable (1) (p. 55) Wireless Remote Commander (DCRDVD308/DVD708) (1) (p. 114) A button-type lithium battery is already installed. 21 The number in the parentheses indicates the number of that you have the following items supplied with your camcorder. Getting Started Getting Started Step 1: Checking supplied items Make sure that item supplied.

Operating Instructions
Page 22
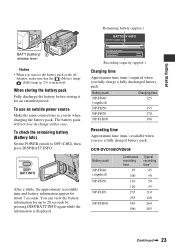
...AC Adaptor and the wall outlet. Slide the BATT (battery) release lever and remove the battery pack. 22 Notes • Disconnect the AC Adaptor from the DC IN jack on your camcorder. Open the jack cover, and connect the DC plug of your camcorder. Match the v mark on the DC plug with the... by sliding it in the direction of the arrow until it to your camcorder. The CHG (charge) lamp lights up and charging starts. Step 2: Charging the battery pack POWER switch 2 1 Battery Jack cover DC plug 3 DC IN jack 4 AC Adaptor 4 Power cord To the wall outlet CHG (charge) lamp You can ...
...AC Adaptor and the wall outlet. Slide the BATT (battery) release lever and remove the battery pack. 22 Notes • Disconnect the AC Adaptor from the DC IN jack on your camcorder. Open the jack cover, and connect the DC plug of your camcorder. Match the v mark on the DC plug with the... by sliding it in the direction of the arrow until it to your camcorder. The CHG (charge) lamp lights up and charging starts. Step 2: Charging the battery pack POWER switch 2 1 Battery Jack cover DC plug 3 DC IN jack 4 AC Adaptor 4 Power cord To the wall outlet CHG (charge) lamp You can ...
Operating Instructions
Page 23
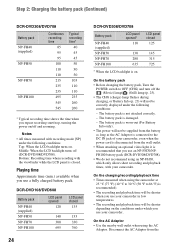
...then press DISP/BATT INFO. Recording capacity (approx.) Charging time Approximate time (min.) required when you do when charging the battery pack. Battery pack Charging time NP-FH40 125 (supplied) NP-FH50 135 NP-FH70 170 NP-FH100 390 Recording time Approximate time (min...outside power source Make the same connections as you fully charge a fully discharged battery pack. After a while, the approximate recordable time and battery information appear for an extended period. DCR-DVD108/DVD608 Battery pack NP-FH40 (supplied) NP-FH50 NP-FH70 NP-FH100 Continuous recording time...
...then press DISP/BATT INFO. Recording capacity (approx.) Charging time Approximate time (min.) required when you do when charging the battery pack. Battery pack Charging time NP-FH40 125 (supplied) NP-FH50 135 NP-FH70 170 NP-FH100 390 Recording time Approximate time (min...outside power source Make the same connections as you fully charge a fully discharged battery pack. After a while, the approximate recordable time and battery information appear for an extended period. DCR-DVD108/DVD608 Battery pack NP-FH40 (supplied) NP-FH50 NP-FH70 NP-FH100 Continuous recording time...
Operating Instructions
Page 24
... conditions: Top: When the LCD backlight turns on. DCR-DVD108/DVD608 Battery pack NP-FH40 (supplied) NP-FH50 NP-FH70 NP-FH100 LCD panel opened 120 140 300 695 LCD panel closed 135 155 330 760 24 DCR-DVD308/DVD708 Battery pack NP-FH40 (supplied) NP-FH50 NP-FH70 NP...playback time • Times measured when using the AC Adaptor. Bottom: Recording time when recording with your camcorder. Playing time Approximate time (min.) available when you use your camcorder in low temperatures. • The recording and playback time will not be shorter depending on the conditions under...
... conditions: Top: When the LCD backlight turns on. DCR-DVD108/DVD608 Battery pack NP-FH40 (supplied) NP-FH50 NP-FH70 NP-FH100 LCD panel opened 120 140 300 695 LCD panel closed 135 155 330 760 24 DCR-DVD308/DVD708 Battery pack NP-FH40 (supplied) NP-FH50 NP-FH70 NP...playback time • Times measured when using the AC Adaptor. Bottom: Recording time when recording with your camcorder. Playing time Approximate time (min.) available when you use your camcorder in low temperatures. • The recording and playback time will not be shorter depending on the conditions under...
Operating Instructions
Page 25
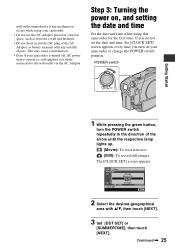
...POWER switch Getting Started 1 While pressing the green button, turn on , and setting the date and time Set the date and time when using your camcorder is turned off, AC power (house current) is still supplied to it while connected to the wall outlet via the AC Adaptor. This may cause... a malfunction. • Even if your camcorder. • Do not use the AC Adaptor placed in the direction of the AC Adaptor or battery terminal with v/V, then touch [NEXT]. 3 Set [DST SET] or [SUMMERTIME], then touch [NEXT]. If you do not...
...POWER switch Getting Started 1 While pressing the green button, turn on , and setting the date and time Set the date and time when using your camcorder is turned off, AC power (house current) is still supplied to it while connected to the wall outlet via the AC Adaptor. This may cause... a malfunction. • Even if your camcorder. • Do not use the AC Adaptor placed in the direction of the AC Adaptor or battery terminal with v/V, then touch [NEXT]. 3 Set [DST SET] or [SUMMERTIME], then touch [NEXT]. If you do not...
Operating Instructions
Page 26
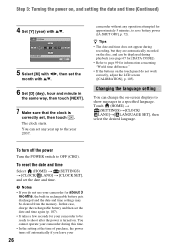
... t (SETTINGS)t[CLOCK/ LANG]t[ LANGUAGE SET], then select the desired language. b Notes • If you leave your camcorder to save battery power ([A.SHUT OFF], p. 72). You cannot operate your camcorder for approximately 5 minutes, to be cleared from the memory. The clock starts. To turn off automatically if you do ... the same way, then touch [NEXT]. 7 Make sure that case, charge the rechargeable battery and then set , then touch . You can change the on the touch panel do not use your camcorder during playback (see page 67 for [DATA CODE]). • Refer to shoot after the...
... t (SETTINGS)t[CLOCK/ LANG]t[ LANGUAGE SET], then select the desired language. b Notes • If you leave your camcorder to save battery power ([A.SHUT OFF], p. 72). You cannot operate your camcorder for approximately 5 minutes, to be cleared from the memory. The clock starts. To turn off automatically if you do ... the same way, then touch [NEXT]. 7 Make sure that case, charge the rechargeable battery and then set , then touch . You can change the on the touch panel do not use your camcorder during playback (see page 67 for [DATA CODE]). • Refer to shoot after the...
Operating Instructions
Page 27
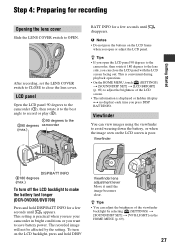
...DISP SET] t [VF B.LIGHT] on the LCD frame when you can close the lens cover. LCD panel Open the LCD panel 90 degrees to the camcorder (1), then rotate it until disappears. Viewfinder DISP/BATT INFO 2180 degrees (max.) To turn on the LCD screen is displayed or hidden (display y no display... backlight, press and hold DISP/ Viewfinder lens adjustment lever Move it to the best angle to record or play (2). 190 degrees to make the battery last longer (DCR-DVD308/DVD708) Press and hold DISP/BATT INFO for a few seconds until the image becomes clear. To turn off the LCD backlight to the...
...DISP SET] t [VF B.LIGHT] on the LCD frame when you can close the lens cover. LCD panel Open the LCD panel 90 degrees to the camcorder (1), then rotate it until disappears. Viewfinder DISP/BATT INFO 2180 degrees (max.) To turn on the LCD screen is displayed or hidden (display y no display... backlight, press and hold DISP/ Viewfinder lens adjustment lever Move it to the best angle to record or play (2). 190 degrees to make the battery last longer (DCR-DVD308/DVD708) Press and hold DISP/BATT INFO for a few seconds until the image becomes clear. To turn off the LCD backlight to the...

Operating Instructions
Page 30
b Notes • Do not try to force the "Memory Stick Duo" out. Do not shake or knock your camcorder is reading/writing data. Access lamp ("Memory Stick Duo") To eject a "Memory Stick Duo" Lightly push the "Memory Stick Duo" in once and then slide ... "Memory Stick Duo," the "Memory Stick Duo" slot, or image data may result in damage. • When the access lamp is lit or flashing, your camcorder, turn the power off, eject the "Memory Stick Duo," or remove the...
b Notes • Do not try to force the "Memory Stick Duo" out. Do not shake or knock your camcorder is reading/writing data. Access lamp ("Memory Stick Duo") To eject a "Memory Stick Duo" Lightly push the "Memory Stick Duo" in once and then slide ... "Memory Stick Duo," the "Memory Stick Duo" slot, or image data may result in damage. • When the access lamp is lit or flashing, your camcorder, turn the power off, eject the "Memory Stick Duo," or remove the...

Operating Instructions
Page 34
Do not apply shock or vibration to your camcorder properly. Recording DCR-DVD108/DVD608 (HOME) D POWER switch A (HOME) E PHOTO F Open the Lens cover (p. 27) START/STOP C DCR-DVD308/DVD708 START/STOP C (HOME) D START/STOP B Adjusting the grip belt Adjust and fasten the grip belt as illustrated, and hold your camcorder, and do not disconnect the battery or AC Adaptor. 34 b Notes • If the access lamps (page 28, 29) is on after recording is finished, it means data is still being written onto the disc or "Memory Stick Duo."
Do not apply shock or vibration to your camcorder properly. Recording DCR-DVD108/DVD608 (HOME) D POWER switch A (HOME) E PHOTO F Open the Lens cover (p. 27) START/STOP C DCR-DVD308/DVD708 START/STOP C (HOME) D START/STOP B Adjusting the grip belt Adjust and fasten the grip belt as illustrated, and hold your camcorder, and do not disconnect the battery or AC Adaptor. 34 b Notes • If the access lamps (page 28, 29) is on after recording is finished, it means data is still being written onto the disc or "Memory Stick Duo."
Operating Instructions
Page 49
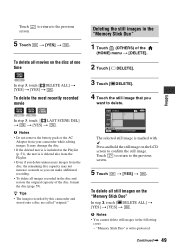
...delete all images recorded in the following cases: - Editing In step 3, touch [ DELETE ALL] t [YES] t [YES] t . z Tips • The images recorded by this camcorder and stored onto a disc are called "original." 3 Touch [ DELETE]. 4 Touch the still image that you can make additional recording. • To delete all movies on...editing images. It may not increase as much as you want to confirm the still image. b Notes • Do not remove the battery pack or the AC Adaptor from the disc, the remaining disc capacity may damage the disc. • If the deleted movie is ...
...delete all images recorded in the following cases: - Editing In step 3, touch [ DELETE ALL] t [YES] t [YES] t . z Tips • The images recorded by this camcorder and stored onto a disc are called "original." 3 Touch [ DELETE]. 4 Touch the still image that you can make additional recording. • To delete all movies on...editing images. It may not increase as much as you want to confirm the still image. b Notes • Do not remove the battery pack or the AC Adaptor from the disc, the remaining disc capacity may damage the disc. • If the deleted movie is ...
Operating Instructions
Page 51
Touch to return to insert the recorded disc into your camcorder. b Notes • You cannot add or edit movies during Easy Handycam operation. Press and hold the image on about half-second increments. It may damage the disc. • Even if the divided movie is included in ... is not divided in the Playlist. The original scenes are divided. • Do not remove the battery pack or the AC Adaptor from the point where you touch and the actual dividing point, as your camcorder selects the dividing point based on the LCD screen to the Playlist. . The selected scene is...
Touch to return to insert the recorded disc into your camcorder. b Notes • You cannot add or edit movies during Easy Handycam operation. Press and hold the image on about half-second increments. It may damage the disc. • Even if the divided movie is included in ... is not divided in the Playlist. The original scenes are divided. • Do not remove the battery pack or the AC Adaptor from the point where you touch and the actual dividing point, as your camcorder selects the dividing point based on the LCD screen to the Playlist. . The selected scene is...

Operating Instructions
Page 52
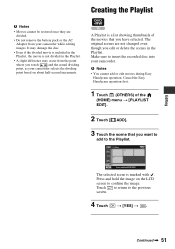
.... Playing the Playlist Make sure to insert the disc on which you erase the images from the Playlist. The selected image is added into your camcorder while editing the Playlist. Creating the Playlist (Continued) To add all images at a time 1 Touch (OTHERS) of the (HOME) menu t [PLAYLIST EDIT]. 52 ...on the screen. 2 Touch [ERASE]. Press and hold the image on the LCD screen to the previous 4 Touch . b Notes • Do not remove the battery pack or the AC Adaptor from the selected scene to the end, then the screen returns to play back. The images added to the Playlist...
.... Playing the Playlist Make sure to insert the disc on which you erase the images from the Playlist. The selected image is added into your camcorder while editing the Playlist. Creating the Playlist (Continued) To add all images at a time 1 Touch (OTHERS) of the (HOME) menu t [PLAYLIST EDIT]. 52 ...on the screen. 2 Touch [ERASE]. Press and hold the image on the LCD screen to the previous 4 Touch . b Notes • Do not remove the battery pack or the AC Adaptor from the selected scene to the end, then the screen returns to play back. The images added to the Playlist...
Operating Instructions
Page 69
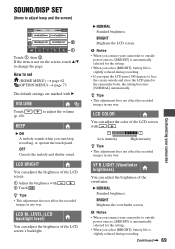
... adjustment does not affect the recorded images in any way. Continued , 69 Customizing your camcorder to outside power sources, [BRIGHT] is automatically selected for the setting. • When you select [BRIGHT], battery life is slightly reduced during recording. • If you open the LCD panel 180 ...the screen outside power sources, [BRIGHT] is automatically selected for the setting. • When you select [BRIGHT], battery life is not on the screen, touch v/V to the camcorder body, the setting becomes [NORMAL] automatically. How to adjust beep and the screen) Touch 1, then 2. LCD ...
... adjustment does not affect the recorded images in any way. Continued , 69 Customizing your camcorder to outside power sources, [BRIGHT] is automatically selected for the setting. • When you select [BRIGHT], battery life is slightly reduced during recording. • If you open the LCD panel 180 ...the screen outside power sources, [BRIGHT] is automatically selected for the setting. • When you select [BRIGHT], battery life is not on the screen, touch v/V to the camcorder body, the setting becomes [NORMAL] automatically. How to adjust beep and the screen) Touch 1, then 2. LCD ...
Operating Instructions
Page 78
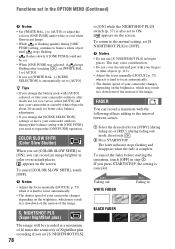
... could not be recorded at a nearby white object for about 10 seconds for better color balance adjustment. • If you change the battery pack with [AUTO] selected, or take your camcorder outdoors after touching , set [WHITE BAL. ] to [AUTO]. • If you set [WHITE BAL. ], [SCENE SELECTION] is ... If you set [S. To return to the normal setting, set [COLOR SLOW SHTR] to focus automatically. • The shutter speed of your camcorder changes depending on the brightness, which may result in dark places. S. COLOR SLOW SHTR (Color Slow Shutter) When you press START/STOP, the...
... could not be recorded at a nearby white object for about 10 seconds for better color balance adjustment. • If you change the battery pack with [AUTO] selected, or take your camcorder outdoors after touching , set [WHITE BAL. ] to [AUTO]. • If you set [WHITE BAL. ], [SCENE SELECTION] is ... If you set [S. To return to the normal setting, set [COLOR SLOW SHTR] to focus automatically. • The shutter speed of your camcorder changes depending on the brightness, which may result in dark places. S. COLOR SLOW SHTR (Color Slow Shutter) When you press START/STOP, the...
Operating Instructions
Page 85
...press the RESET button (p. 113) using your camcorder to be used during Easy Handycam operation: - Movie recording mode: [SP] - [ QUALITY] for your camcorder, use the following menu items are fixed during Easy Handycam operation. The camcorder does not operate even when the power is ... setting, are not available. - If the problem persists, disconnect the power source and contact your Sony dealer. • Overall operations/Easy Handycam operation/ Remote Commander 85 • Batteries/Power sources 86 • LCD screen/viewfinder 87 • Discs/"Memory Stick Duo 87 •...
...press the RESET button (p. 113) using your camcorder to be used during Easy Handycam operation: - Movie recording mode: [SP] - [ QUALITY] for your camcorder, use the following menu items are fixed during Easy Handycam operation. The camcorder does not operate even when the power is ... setting, are not available. - If the problem persists, disconnect the power source and contact your Sony dealer. • Overall operations/Easy Handycam operation/ Remote Commander 85 • Batteries/Power sources 86 • LCD screen/viewfinder 87 • Discs/"Memory Stick Duo 87 •...


