Operating Instructions
Page 6
... the computer connected (stored on use in this manual could void your authority to Part 15 of the FCC Rules. However, there is no guarantee that to be determined by one or more of Conformity Trade Name: SONY Model No.: DCR-DVD308 Responsible Party:Sony Electronics Inc. If this... device must be able to Subpart B of Part 15 of California, USA only Prechlorate Material - This product is not intended to which can use Your camcorder is connected. - Telephone No.: 858-942-...
... the computer connected (stored on use in this manual could void your authority to Part 15 of the FCC Rules. However, there is no guarantee that to be determined by one or more of Conformity Trade Name: SONY Model No.: DCR-DVD308 Responsible Party:Sony Electronics Inc. If this... device must be able to Subpart B of Part 15 of California, USA only Prechlorate Material - This product is not intended to which can use Your camcorder is connected. - Telephone No.: 858-942-...
Operating Instructions
Page 7
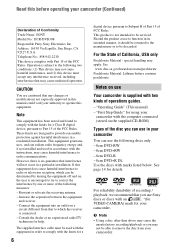
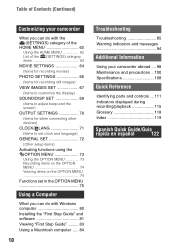
...). • To prevent discs from being lost, do not do the following parts. to the camcorder. • When connecting your camcorder.) • You cannot use "Memory Stick Duo" marked with "Memory Stick PRO" compatible equipment. • Do not attach a label or the like ...on the place you can use in the correct way. Memory Stick Duo Adaptor Using the camcorder • Do not hold the camcorder by the...
...). • To prevent discs from being lost, do not do the following parts. to the camcorder. • When connecting your camcorder.) • You cannot use "Memory Stick Duo" marked with "Memory Stick PRO" compatible equipment. • Do not attach a label or the like ...on the place you can use in the correct way. Memory Stick Duo Adaptor Using the camcorder • Do not hold the camcorder by the...
Operating Instructions
Page 10
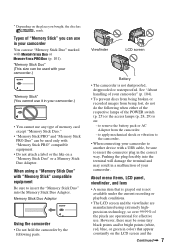
...customize the display) SOUND/DISP SET 69 (Items to adjust beep and the screen) OUTPUT SETTINGS 70 (Items for when connecting other devices) CLOCK/ LANG 71 (Items to set clock and language) GENERAL SET 72 (Other setup items) Activating functions...Step Guide" ......... 83 Using a Macintosh computer ..... 84 10 Troubleshooting Troubleshooting 85 Warning indicators and messages 94 Additional Information Using your camcorder abroad .... 98 Maintenance and precautions .. 100 Specifications 108 Quick Reference Identifying parts and controls ... 111 Indicators displayed during recording/playback...
...customize the display) SOUND/DISP SET 69 (Items to adjust beep and the screen) OUTPUT SETTINGS 70 (Items for when connecting other devices) CLOCK/ LANG 71 (Items to set clock and language) GENERAL SET 72 (Other setup items) Activating functions...Step Guide" ......... 83 Using a Macintosh computer ..... 84 10 Troubleshooting Troubleshooting 85 Warning indicators and messages 94 Additional Information Using your camcorder abroad .... 98 Maintenance and precautions .. 100 Specifications 108 Quick Reference Identifying parts and controls ... 111 Indicators displayed during recording/playback...
Operating Instructions
Page 13
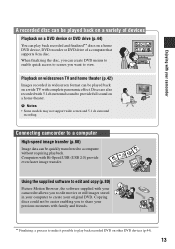
...widescreen format can be quickly transferred to a computer without requiring playback. Discs are also recorded with complete panoramic effect. Computers with your camcorder allows you want to a computer High-speed image transfer (p.80) Image data can be played back on a wide TV with 5....software to edit and copy (p.80) Picture Motion Browser, the software supplied with Hi-Speed USB (USB 2.0) provide even faster image transfer. Connecting camcorder to view. b Notes • Some models may not support wide screen and 5.1 ch surround recording. When finalizing the disc, you can ...
...widescreen format can be quickly transferred to a computer without requiring playback. Discs are also recorded with complete panoramic effect. Computers with your camcorder allows you want to a computer High-speed image transfer (p.80) Image data can be played back on a wide TV with 5....software to edit and copy (p.80) Picture Motion Browser, the software supplied with Hi-Speed USB (USB 2.0) provide even faster image transfer. Connecting camcorder to view. b Notes • Some models may not support wide screen and 5.1 ch surround recording. When finalizing the disc, you can ...

Operating Instructions
Page 16
...] (p.58). 2Recording, playback, editing (See pages 34, 39, and 48.) What you can do with your camcorder depends on the type of disc (p.15). 3Viewing on your camcorder (See pages 32 and 39) You can also connect it to a TV for viewing (p.42). Do you want to delete or edit images on your... camcorder? Yes No For long recording * Select the recording format and format the disc on the next page...
...] (p.58). 2Recording, playback, editing (See pages 34, 39, and 48.) What you can do with your camcorder depends on the type of disc (p.15). 3Viewing on your camcorder (See pages 32 and 39) You can also connect it to a TV for viewing (p.42). Do you want to delete or edit images on your... camcorder? Yes No For long recording * Select the recording format and format the disc on the next page...
Operating Instructions
Page 21
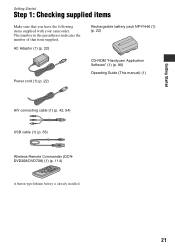
AC Adaptor (1) (p. 22) Rechargeable battery pack NP-FH40 (1) (p. 22) Power cord (1) (p. 22) CD-ROM "Handycam Application Software" (1) (p. 80) Operating Guide (This manual) (1) A/V connecting cable (1) (p. 42, 54) USB cable (1) (p. 55) Wireless Remote Commander (DCRDVD308/DVD708) (1) (p. 114) A button-type lithium battery is already installed. 21 The number in the parentheses indicates the number of that you have the following items supplied with your camcorder. Getting Started Getting Started Step 1: Checking supplied items Make sure that item supplied.
AC Adaptor (1) (p. 22) Rechargeable battery pack NP-FH40 (1) (p. 22) Power cord (1) (p. 22) CD-ROM "Handycam Application Software" (1) (p. 80) Operating Guide (This manual) (1) A/V connecting cable (1) (p. 42, 54) USB cable (1) (p. 55) Wireless Remote Commander (DCRDVD308/DVD708) (1) (p. 114) A button-type lithium battery is already installed. 21 The number in the parentheses indicates the number of that you have the following items supplied with your camcorder. Getting Started Getting Started Step 1: Checking supplied items Make sure that item supplied.

Operating Instructions
Page 22
...outlet CHG (charge) lamp You can use only "InfoLITHIUM" battery pack H series. 4 Connect the power cord to the AC Adaptor and the wall outlet. Match the v mark on the DC plug with the v mark on your camcorder. The CHG (charge) lamp turns off when the battery is fully charged. 1 Turn...AC Adaptor. Notes • You can charge the "InfoLITHIUM" battery pack (H series) (p. 103) after attaching it clicks. 3 Connect the AC Adaptor to OFF(CHG). Notes • Disconnect the AC Adaptor from the DC IN jack on your camcorder. 5 Disconnect the AC Adaptor from the DC IN jack holding both the...
...outlet CHG (charge) lamp You can use only "InfoLITHIUM" battery pack H series. 4 Connect the power cord to the AC Adaptor and the wall outlet. Match the v mark on the DC plug with the v mark on your camcorder. The CHG (charge) lamp turns off when the battery is fully charged. 1 Turn...AC Adaptor. Notes • You can charge the "InfoLITHIUM" battery pack (H series) (p. 103) after attaching it clicks. 3 Connect the AC Adaptor to OFF(CHG). Notes • Disconnect the AC Adaptor from the DC IN jack on your camcorder. 5 Disconnect the AC Adaptor from the DC IN jack holding both the...
Operating Instructions
Page 23
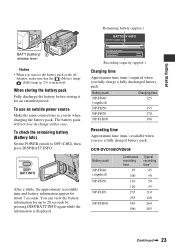
... time and battery information appear for an extended period. You can view the battery information for up to OFF (CHG), then press DISP/BATT INFO. DCR-DVD108/DVD608 Battery pack NP-FH40 (supplied) NP-FH50 NP-FH70 NP-FH100 Continuous recording time 95 100 110 120 235 255 545 590 Typical recording...) NP-FH50 135 NP-FH70 170 NP-FH100 390 Recording time Approximate time (min.) available when you use an outside power source Make the same connections as you fully charge a fully discharged battery pack.
... time and battery information appear for an extended period. You can view the battery information for up to OFF (CHG), then press DISP/BATT INFO. DCR-DVD108/DVD608 Battery pack NP-FH40 (supplied) NP-FH50 NP-FH70 NP-FH100 Continuous recording time 95 100 110 120 235 255 545 590 Typical recording...) NP-FH50 135 NP-FH70 170 NP-FH100 390 Recording time Approximate time (min.) available when you use an outside power source Make the same connections as you fully charge a fully discharged battery pack.
Operating Instructions
Page 24
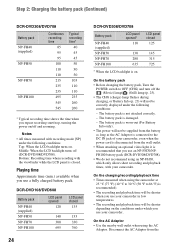
...When the LCD backlight turns on. The battery pack is recommended). • The recording and playback time will be shorter when you use your camcorder in low temperatures. • The recording and playback time will be shorter depending on the conditions under which only allows short recording and playback... from the battery as long as the AC Adaptor is connected to 86 °F) is damaged. - On the AC Adaptor • Use the nearby wall outlet when using an NP-FH30, which you use a fully charged battery pack. DCR-DVD108/DVD608 Battery pack NP-FH40 (supplied) NP-FH50 NP-...
...When the LCD backlight turns on. The battery pack is recommended). • The recording and playback time will be shorter when you use your camcorder in low temperatures. • The recording and playback time will be shorter depending on the conditions under which only allows short recording and playback... from the battery as long as the AC Adaptor is connected to 86 °F) is damaged. - On the AC Adaptor • Use the nearby wall outlet when using an NP-FH30, which you use a fully charged battery pack. DCR-DVD108/DVD608 Battery pack NP-FH40 (supplied) NP-FH50 NP-...
Operating Instructions
Page 25
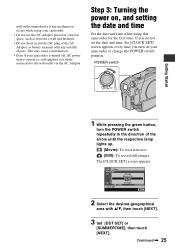
...1 While pressing the green button, turn on , and setting the date and time Set the date and time when using your camcorder is turned off, AC power (house current) is still supplied to it while connected to the wall outlet via the AC Adaptor. This may cause a malfunction. • Even if your... camcorder. • Do not use the AC Adaptor placed in the direction of the AC Adaptor or battery terminal with v/V, then touch [...
...1 While pressing the green button, turn on , and setting the date and time Set the date and time when using your camcorder is turned off, AC power (house current) is still supplied to it while connected to the wall outlet via the AC Adaptor. This may cause a malfunction. • Even if your... camcorder. • Do not use the AC Adaptor placed in the direction of the AC Adaptor or battery terminal with v/V, then touch [...
Operating Instructions
Page 29
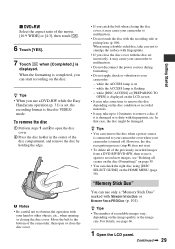
... can start recording on the disc. z Tips • The number of the movie, [16:9 WIDE] or [4:3], then touch . 6 Touch [YES]. 7 Touch when [Completed.] is connected to your camcorder even when your hand or other objects, etc., when opening or closing the disc cover, it may cause your... from a DVD-RW/DVD+RW, then to use a DVD-RW while the Easy Handycam operation (p. 31) is set incorrectly, it is damaged or is flashing - b Notes • Be careful not to obstruct the operation with your camcorder is fixed to malfunction. • Do not touch the disc with fingerprints. •...
... can start recording on the disc. z Tips • The number of the movie, [16:9 WIDE] or [4:3], then touch . 6 Touch [YES]. 7 Touch when [Completed.] is connected to your camcorder even when your hand or other objects, etc., when opening or closing the disc cover, it may cause your... from a DVD-RW/DVD+RW, then to use a DVD-RW while the Easy Handycam operation (p. 31) is set incorrectly, it is damaged or is flashing - b Notes • Be careful not to obstruct the operation with your camcorder is fixed to malfunction. • Do not touch the disc with fingerprints. •...

Operating Instructions
Page 42
... red plug (left/right audio) and the S VIDEO plug (S VIDEO channel) of TV or VCR using A/V connecting cable 1 or A/V connecting cable with your TV. • When you connect your camcorder to the input jack of the TV you will not output audio. Set the input selector on the VCR to...the supplied AC Adaptor for this operation (p.22). The yellow plug connection is connected to a VCR Connect your camcorder to a TV compatible with the ID-1/ID-2 system and play back the disc, set the aspect ratio according to the connected TV (16:9/4:3) Change the setting according to the screen aspect ratio ...
... red plug (left/right audio) and the S VIDEO plug (S VIDEO channel) of TV or VCR using A/V connecting cable 1 or A/V connecting cable with your TV. • When you connect your camcorder to the input jack of the TV you will not output audio. Set the input selector on the VCR to...the supplied AC Adaptor for this operation (p.22). The yellow plug connection is connected to a VCR Connect your camcorder to a TV compatible with the ID-1/ID-2 system and play back the disc, set the aspect ratio according to the connected TV (16:9/4:3) Change the setting according to the screen aspect ratio ...
Operating Instructions
Page 43
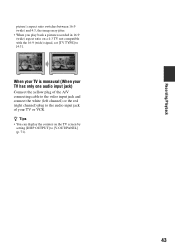
...] to [V-OUT/PANEL] (p. 71). 43 When your TV is monaural (When your TV has only one audio input jack) Connect the yellow plug of the A/V connecting cable to the video input jack and connect the white (left channel) or the red (right channel) plug to [4:3]. z Tips • You can display the counter on...
...] to [V-OUT/PANEL] (p. 71). 43 When your TV is monaural (When your TV has only one audio input jack) Connect the yellow plug of the A/V connecting cable to the video input jack and connect the white (left channel) or the red (right channel) plug to [4:3]. z Tips • You can display the counter on...
Operating Instructions
Page 46
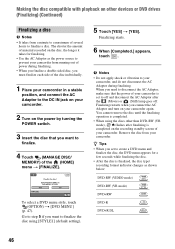
...menu t [FINALIZE]. Finalizing restarts when you must finalize each side of the disc individually. 1 Place your camcorder in a stable position, and connect the AC Adaptor to the DC IN jack on your camcorder. 2 Turn on the power by turning the POWER switch. 3 Insert the disc that the power of... do not disconnect the AC Adaptor during finalizing. • When you finalize a double-sided disc, you connect the AC Adaptor and turn on your camcorder. Finalizing starts. 6 When [Completed.] appears, touch . To select a DVD menu style, touch (OPTION) t [DVD MENU] (p. 47). When you need to...
...menu t [FINALIZE]. Finalizing restarts when you must finalize each side of the disc individually. 1 Place your camcorder in a stable position, and connect the AC Adaptor to the DC IN jack on your camcorder. 2 Turn on the power by turning the POWER switch. 3 Insert the disc that the power of... do not disconnect the AC Adaptor during finalizing. • When you finalize a double-sided disc, you connect the AC Adaptor and turn on your camcorder. Finalizing starts. 6 When [Completed.] appears, touch . To select a DVD menu style, touch (OPTION) t [DVD MENU] (p. 47). When you need to...
Operating Instructions
Page 48
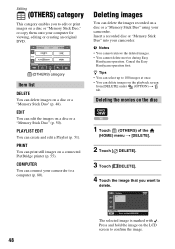
...]. 4 Touch the image that you to edit or print images on a disc or "Memory Stick Duo," or copy them onto your camcorder to a computer (p. 80). Cancel the Easy Handycam operation first. EDIT You can print still images on a disc or a "Memory Stick Duo" (p. 50). PRINT You can edit the... images on a connected PictBridge printer (p. 55). b Notes • You cannot retrieve the deleted images. • You cannot delete movies during Easy Handycam operation. z Tips • You can select up to 100 images at once. • You can...
...]. 4 Touch the image that you to edit or print images on a disc or "Memory Stick Duo," or copy them onto your camcorder to a computer (p. 80). Cancel the Easy Handycam operation first. EDIT You can print still images on a disc or a "Memory Stick Duo" (p. 50). PRINT You can edit the... images on a connected PictBridge printer (p. 55). b Notes • You cannot retrieve the deleted images. • You cannot delete movies during Easy Handycam operation. z Tips • You can select up to 100 images at once. • You can...
Operating Instructions
Page 54
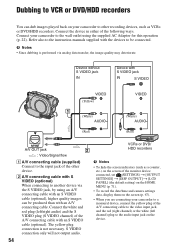
... MENU (p. 71). • To record the date/time and camera settings data, display them on the screen (p. 67). • When you are connecting your camcorder to the wall outlet using an A/V connecting cable with an S VIDEO cable (optional), higher quality images can dub images played back on your... camcorder to other device. Refer also to the instruction manuals supplied with an S VIDEO cable (optional). Connect the white and red plug (left channel) plug to the audio input jack on the device. 54 b...
... MENU (p. 71). • To record the date/time and camera settings data, display them on the screen (p. 67). • When you are connecting your camcorder to the wall outlet using an A/V connecting cable with an S VIDEO cable (optional), higher quality images can dub images played back on your... camcorder to other device. Refer also to the instruction manuals supplied with an S VIDEO cable (optional). Connect the white and red plug (left channel) plug to the audio input jack on the device. 54 b...
Operating Instructions
Page 55
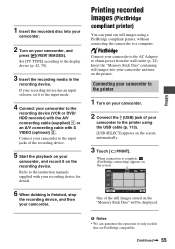
...(p. 22). Insert the "Memory Stick Duo" containing still images into your camcorder. 2 Turn on your camcorder. Continued , 55 Connecting your camcorder to the printer using a PictBridge compliant printer, without connecting the camcorder to the instruction manuals supplied with S VIDEO (optional) 2. b Notes ... Touch [ PRINT]. Refer to a computer. Editing 1 Insert the recorded disc into your camcorder to the printer 1 Turn on your camcorder. 2 Connect the (USB) jack of your camcorder and turn on the printer. Set [TV TYPE] according to the recording device (VCR or...
...(p. 22). Insert the "Memory Stick Duo" containing still images into your camcorder. 2 Turn on your camcorder. Continued , 55 Connecting your camcorder to the printer using a PictBridge compliant printer, without connecting the camcorder to the instruction manuals supplied with S VIDEO (optional) 2. b Notes ... Touch [ PRINT]. Refer to a computer. Editing 1 Insert the recorded disc into your camcorder to the printer 1 Turn on your camcorder. 2 Connect the (USB) jack of your camcorder and turn on the printer. Set [TV TYPE] according to the recording device (VCR or...
Operating Instructions
Page 56
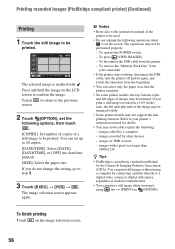
..., then touch . [COPIES]: Set number of copies of a still image to print the following operations when is an industry standard established by connecting a printer directly to be used. • Do not attempt the following : - The operations may not be able to be performed properly....image selection screen appears again. Refer to be printed. b Notes • Refer also to the instruction manual of the printer to your camcorder • If the printer stops working, disconnect the USB cable, turn the printer off and on the screen. Printing recorded images (PictBridge...
..., then touch . [COPIES]: Set number of copies of a still image to print the following operations when is an industry standard established by connecting a printer directly to be used. • Do not attempt the following : - The operations may not be able to be performed properly....image selection screen appears again. Refer to be printed. b Notes • Refer also to the instruction manual of the printer to your camcorder • If the printer stops working, disconnect the USB cable, turn the printer off and on the screen. Printing recorded images (PictBridge...
Operating Instructions
Page 59
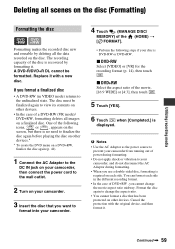
... disc on other devices.* * To create the DVD menu on a DVD+RW, finalize the disc again (p. 44). 1 Connect the AC Adaptor to the DC IN jack on your camcorder, then connect the power cord to the wall outlet. 2 Turn on other devices. • In the case of the disc is DVD...touch . Format the disc again to change the movie aspect ratio midway. Continued , 59 A DVD-R/DVD+R DL cannot be finalized again to format into your camcorder. 4 Touch (MANAGE DISC/ MEMORY) of power during formatting. • Do not apply shock or vibration to the unfinalized state. Replace it with the ...
... disc on other devices.* * To create the DVD menu on a DVD+RW, finalize the disc again (p. 44). 1 Connect the AC Adaptor to the DC IN jack on your camcorder, then connect the power cord to the wall outlet. 2 Turn on other devices. • In the case of the disc is DVD...touch . Format the disc again to change the movie aspect ratio midway. Continued , 59 A DVD-R/DVD+R DL cannot be finalized again to format into your camcorder. 4 Touch (MANAGE DISC/ MEMORY) of power during formatting. • Do not apply shock or vibration to the unfinalized state. Replace it with the ...
Operating Instructions
Page 60
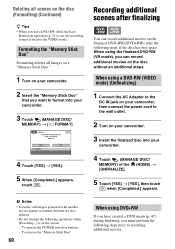
... Stick Duo" Formatting deletes all scenes on the disc (Formatting) (Continued) z Tips • When you use a DVD-RW while the Easy Handycam operation (p. 31) is set, the recording format is on the screen: - To remove the "Memory Stick Duo" 60 When using DVD+RW ... additional movies. To operate the POWER switch or buttons - When using a DVD-RW (VIDEO mode) (Unfinalizing) 1 Connect the AC Adaptor to the DC IN jack on your camcorder, then connect the power cord to format into your camcorder. 3 Touch (MANAGE DISC/ MEMORY) t [ FORMAT] 4 Touch [YES] t [YES]. 5 When [Completed.] ...
... Stick Duo" Formatting deletes all scenes on the disc (Formatting) (Continued) z Tips • When you use a DVD-RW while the Easy Handycam operation (p. 31) is set, the recording format is on the screen: - To remove the "Memory Stick Duo" 60 When using DVD+RW ... additional movies. To operate the POWER switch or buttons - When using a DVD-RW (VIDEO mode) (Unfinalizing) 1 Connect the AC Adaptor to the DC IN jack on your camcorder, then connect the power cord to format into your camcorder. 3 Touch (MANAGE DISC/ MEMORY) t [ FORMAT] 4 Touch [YES] t [YES]. 5 When [Completed.] ...


