User Manual
Page 4
NightShot plus 28 Adjusting the focus manually 29 4 Table of Contents CCD-TRV238E: CCD-TRV438E: TRV238E DCR-TRV270E: TRV270E TRV438E DCR-TRV285E: TRV285E Read this first 2 Quick Start Guide Recording movies 8 Recording/Playing back with ease - Easy Handycam... the LCD panel and viewfinder 16 Adjusting the LCD panel 16 Adjusting the viewfinder 16 Step 5: Setting the date and time 17 Step 6: Inserting a cassette tape 18 Step 7: Setting the screen language 19 Recording Recording movies 21 Recording for backlit subjects 27 Adjusting the exposure manually 27 Recording in ...
NightShot plus 28 Adjusting the focus manually 29 4 Table of Contents CCD-TRV238E: CCD-TRV438E: TRV238E DCR-TRV270E: TRV270E TRV438E DCR-TRV285E: TRV285E Read this first 2 Quick Start Guide Recording movies 8 Recording/Playing back with ease - Easy Handycam... the LCD panel and viewfinder 16 Adjusting the LCD panel 16 Adjusting the viewfinder 16 Step 5: Setting the date and time 17 Step 6: Inserting a cassette tape 18 Step 7: Setting the screen language 19 Recording Recording movies 21 Recording for backlit subjects 27 Adjusting the exposure manually 27 Recording in ...
User Manual
Page 8
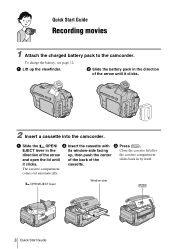
...b Slide the battery pack in the direction of the the cassette compartment slides back in the its window-side facing Close the cassette lid after direction of the arrow and open the lid until it clicks. it clicks. 2 Insert a cassette into the camcorder. To charge the battery, see page 12.... OPEN/EJECT lever Window-side 8 Quick Start Guide a Slide the OPEN/ b Insert the cassette with c Press . a Lift up , then push the center of the ...
...b Slide the battery pack in the direction of the the cassette compartment slides back in the its window-side facing Close the cassette lid after direction of the arrow and open the lid until it clicks. it clicks. 2 Insert a cassette into the camcorder. To charge the battery, see page 12.... OPEN/EJECT lever Window-side 8 Quick Start Guide a Slide the OPEN/ b Insert the cassette with c Press . a Lift up , then push the center of the ...
User Manual
Page 18
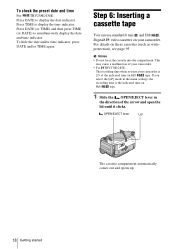
...8 mm and Hi8 , Digital8 video cassettes on Hi8 tape. To check the preset date and time For TRV238E/438E: Press DATE to display the date indicator. b Notes • Do not force the cassette into the compartment. Step 6: Inserting a cassette tape You can use your camcorder is... the indicated time on these cassettes (such as writeprotection), see page 95...
...8 mm and Hi8 , Digital8 video cassettes on Hi8 tape. To check the preset date and time For TRV238E/438E: Press DATE to display the date indicator. b Notes • Do not force the cassette into the compartment. Step 6: Inserting a cassette tape You can use your camcorder is... the indicated time on these cassettes (such as writeprotection), see page 95...
User Manual
Page 19
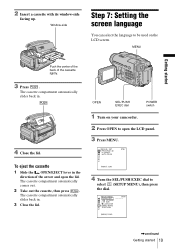
...Press . OPEN SEL/PUSH EXEC dial POWER switch 1 Turn on the LCD screen. The cassette compartment automatically slides back in . 4 Close the lid. The cassette compartment automatically comes out. 2 Take out the cassette, then press . MANUAL SET PROGRAM AE P EFFECT AUTO SHTR STBY [MENU] : END ... Getting started Push the center of the back of the arrow and open the LCD panel. 3 Press MENU. 2 Insert a cassette with its window-side facing up. The cassette compartment automatically slides back in . 3 Close the lid. Window-side Step 7: Setting the screen language You can select...
...Press . OPEN SEL/PUSH EXEC dial POWER switch 1 Turn on the LCD screen. The cassette compartment automatically slides back in . 4 Close the lid. The cassette compartment automatically comes out. 2 Take out the cassette, then press . MANUAL SET PROGRAM AE P EFFECT AUTO SHTR STBY [MENU] : END ... Getting started Push the center of the back of the arrow and open the LCD panel. 3 Press MENU. 2 Insert a cassette with its window-side facing up. The cassette compartment automatically slides back in . 3 Close the lid. Window-side Step 7: Setting the screen language You can select...
User Manual
Page 22
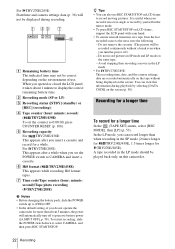
B Recording mode (SP or LP) C Recording status ([STBY] (standby) or [REC] (recording)) D Tape counter (hour: minute: second) ( TRV238E/438E) To set the POWER switch to CAMERA and insert a cassette. Do not record pictures in SP mode and LP mode on a tape from a low-angle or record by selecting [DATA CODE] on the screen. Recording...
B Recording mode (SP or LP) C Recording status ([STBY] (standby) or [REC] (recording)) D Tape counter (hour: minute: second) ( TRV238E/438E) To set the POWER switch to CAMERA and insert a cassette. Do not record pictures in SP mode and LP mode on a tape from a low-angle or record by selecting [DATA CODE] on the screen. Recording...
User Manual
Page 33
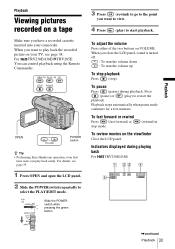
Playback Playback Viewing pictures recorded on the viewfinder Close the LCD panel. For TRV238E/438E/ TRV285E: You can play back easily. Slide the POWER switch while pressing the green button. 3 Press (rewind) to go to the point you close ... two buttons on your camcorder. For details, see page 38. To pause Press (pause) during playing back For TRV238E/438E: 60min 0:00:00 ,continued Playback 33 Indicators displayed during playback. When you have a recorded cassette inserted into your TV, see page 35. 1 Press OPEN and open the LCD panel. 2 Slide the POWER switch...
Playback Playback Viewing pictures recorded on the viewfinder Close the LCD panel. For TRV238E/438E/ TRV285E: You can play back easily. Slide the POWER switch while pressing the green button. 3 Press (rewind) to go to the point you close ... two buttons on your camcorder. For details, see page 38. To pause Press (pause) during playing back For TRV238E/438E: 60min 0:00:00 ,continued Playback 33 Indicators displayed during playback. When you have a recorded cassette inserted into your TV, see page 35. 1 Press OPEN and open the LCD panel. 2 Slide the POWER switch...
User Manual
Page 35
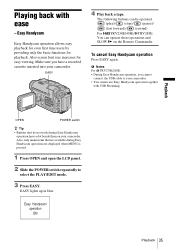
..., you have a dot beside them on the Remote Commander. The following buttons can be operated. (play)/ (stop)/ (pause)/ (fast forward)/ (rewind) For TRV238E/438E/ TRV285E: You can operate those operations and SLOW y on your camcorder. To cancel Easy Handycam operation Press EASY again. Make sure you cannot connect... 4 Play back a tape. Also, only menu items that do not work during Easy Handycam operation are available during Easy Handycam operation have a recorded cassette inserted into your camcorder. • You cannot use Easy Handycam operation together with ease -
..., you have a dot beside them on the Remote Commander. The following buttons can be operated. (play)/ (stop)/ (pause)/ (fast forward)/ (rewind) For TRV238E/438E/ TRV285E: You can operate those operations and SLOW y on your camcorder. To cancel Easy Handycam operation Press EASY again. Make sure you cannot connect... 4 Play back a tape. Also, only menu items that do not work during Easy Handycam operation are available during Easy Handycam operation have a recorded cassette inserted into your camcorder. • You cannot use Easy Handycam operation together with ease -
User Manual
Page 54
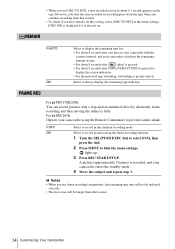
... ON] is displayed if it is already set. lights up. 3 Press REC START/STOP. FRAME REC For TRV270E/285E: You can record pictures with the cassette inserted, and your camcorder calculates the remaining amount of tape. • For about 8 seconds after (play) is pressed. • For about 8 seconds after you turn on...
... ON] is displayed if it is already set. lights up. 3 Press REC START/STOP. FRAME REC For TRV270E/285E: You can record pictures with the cassette inserted, and your camcorder calculates the remaining amount of tape. • For about 8 seconds after (play) is pressed. • For about 8 seconds after you turn on...
User Manual
Page 57
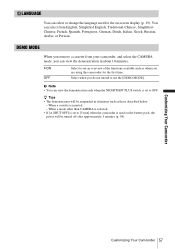
...] when the camcorder is used for the first time. When a cassette is set to see an overview of the functions available such as those described below. - b Note • You can view the demonstration only when the NIGHTSHOT PLUS switch is inserted. - Customizing Your Camcorder Customizing Your Camcorder 57 Select when you are...
...] when the camcorder is used for the first time. When a cassette is set to see an overview of the functions available such as those described below. - b Note • You can view the demonstration only when the NIGHTSHOT PLUS switch is inserted. - Customizing Your Camcorder Customizing Your Camcorder 57 Select when you are...
User Manual
Page 62
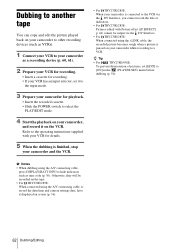
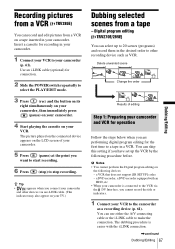
... your camcorder to other recording devices (such as VCRs). 1 Connect your VCR to your camcorder as time code (p. 36). z Tip • For TRV238E/438E: To prevent deterioration of pictures, set it to the input mode. 3 Prepare your camcorder for details. 5 When the dubbing is finished, stop ... it displayed on your camcorder while recording to hide indicators such as a recording device (p. 60, 61). 2 Prepare your VCR for recording. • Insert a cassette for recording. • If your VCR has an input selector, set [EDIT] to record the date/time and camera settings data, have it on ...
... your camcorder to other recording devices (such as VCRs). 1 Connect your VCR to your camcorder as time code (p. 36). z Tip • For TRV238E/438E: To prevent deterioration of pictures, set it to the input mode. 3 Prepare your camcorder for details. 5 When the dubbing is finished, stop ... it displayed on your camcorder while recording to hide indicators such as a recording device (p. 60, 61). 2 Prepare your VCR for recording. • Insert a cassette for recording. • If your VCR has an input selector, set [EDIT] to record the date/time and camera settings data, have it on ...
User Manual
Page 63
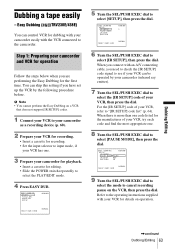
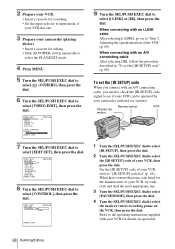
...dial. Easy Dubbing ( TRV238E/438E) You can skip this setting if you need to check the [IR SETUP] code signal to select the PLAY/EDIT mode. 4 Press EASY DUB. When there is more than one . 3 Prepare your camcorder for playback. • Insert a cassette for dubbing with your camcorder... support [IR SETUP] codes. 1 Connect your VCR to your camcorder as a recording device (p. 60). 2 Prepare your VCR for recording. • Insert a cassette for recording. • Set the input selector to input mode, if your VCR has one code listed for the manufacturer of your camcorder (infrared ray...
...dial. Easy Dubbing ( TRV238E/438E) You can skip this setting if you need to check the [IR SETUP] code signal to select the PLAY/EDIT mode. 4 Press EASY DUB. When there is more than one . 3 Prepare your camcorder for playback. • Insert a cassette for dubbing with your camcorder... support [IR SETUP] codes. 1 Connect your VCR to your camcorder as a recording device (p. 60). 2 Prepare your VCR for recording. • Insert a cassette for recording. • Set the input selector to input mode, if your VCR has one code listed for the manufacturer of your camcorder (infrared ray...
User Manual
Page 67
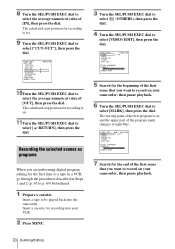
... Press (rec) and the button on its right simultaneously on your camcorder, then immediately press (pause) on your camcorder. 4 Start playing the cassette on your camcorder (p. 61). You can skip this setting if you want to start recording. 6 Press (stop recording. Recording pictures from a VCR...your camcorder. 5 Press (pause) at the point you have set up to 20 scenes (programs) and record them in a VCR. Insert a cassette for connection. 2 Slide the POWER switch repeatedly to the camcorder as VCR. Use an i.LINK cable (optional) for recording in your ...
... Press (rec) and the button on its right simultaneously on your camcorder, then immediately press (pause) on your camcorder. 4 Start playing the cassette on your camcorder (p. 61). You can skip this setting if you want to start recording. 6 Press (stop recording. Recording pictures from a VCR...your camcorder. 5 Press (pause) at the point you have set up to 20 scenes (programs) and record them in a VCR. Insert a cassette for connection. 2 Slide the POWER switch repeatedly to the camcorder as VCR. Use an i.LINK cable (optional) for recording in your ...
User Manual
Page 68
...connecting with your VCR, refer to see if your VCR can be operated by your VCR, then press the dial. 2 Prepare your VCR. • Insert a cassette for recording. • Set the input selector to input mode, if your VCR has one . 3 Turn the SEL/PUSH EXEC dial to select [... listed for the manufacturer of your VCR, try each code and find the most appropriate one . 3 Prepare your camcorder (playing device). • Insert a cassette for details on operation. 68 Dubbing/Editing For the [IR SETUP] code of your camcorder (infrared ray emitter). VIDEO EDIT EDIT SET CONTROL 0:08...
...connecting with your VCR, refer to see if your VCR can be operated by your VCR, then press the dial. 2 Prepare your VCR. • Insert a cassette for recording. • Set the input selector to input mode, if your VCR has one . 3 Turn the SEL/PUSH EXEC dial to select [... listed for the manufacturer of your VCR, try each code and find the most appropriate one . 3 Prepare your camcorder (playing device). • Insert a cassette for details on operation. 68 Dubbing/Editing For the [IR SETUP] code of your camcorder (infrared ray emitter). VIDEO EDIT EDIT SET CONTROL 0:08...
User Manual
Page 69
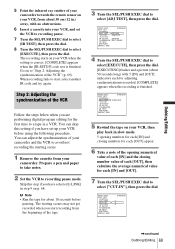
... can adjust the synchronization of your camcorder and the VCR to a tape in .) away, with no obstructions. 6 Insert a cassette into your VCR, and set up your VCR before pausing. The starting scene. 1 Remove the cassette from your camcorder. Go on to "Step 2: Adjusting the synchronization of the tape. 3 Turn the SEL/PUSH EXEC...
... can adjust the synchronization of your camcorder and the VCR to a tape in .) away, with no obstructions. 6 Insert a cassette into your VCR, and set up your VCR before pausing. The starting scene. 1 Remove the cassette from your camcorder. Go on to "Step 2: Adjusting the synchronization of the tape. 3 Turn the SEL/PUSH EXEC...
User Manual
Page 70
... Turn the SEL/PUSH EXEC dial to select ["CUT-OUT"], then press the dial. The starting point of the program mark changes to light blue. Insert a tape to be played back into your camcorder, then pause playback. 6 Turn the SEL/PUSH EXEC dial to select [MARK], then press the ...in Steps 1 and 2 (p. 67 to p. 69) beforehand. 1 Prepare a cassette. 8 Turn the SEL/PUSH EXEC dial to select the average numerical value of [OUT], then press the dial. The calculated start position for recording into the camcorder. Insert a cassette for recording is set . 11Turn the SEL/PUSH EXEC dial to select...
... Turn the SEL/PUSH EXEC dial to select ["CUT-OUT"], then press the dial. The starting point of the program mark changes to light blue. Insert a tape to be played back into your camcorder, then pause playback. 6 Turn the SEL/PUSH EXEC dial to select [MARK], then press the ...in Steps 1 and 2 (p. 67 to p. 69) beforehand. 1 Prepare a cassette. 8 Turn the SEL/PUSH EXEC dial to select the average numerical value of [OUT], then press the dial. The calculated start position for recording into the camcorder. Insert a cassette for recording is set . 11Turn the SEL/PUSH EXEC dial to select...
User Manual
Page 80
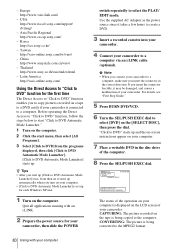
... converted to a computer. Asia Pacific Regional http://www.css.ap.sony.com/ - Latin America http://vaio-online.sony.com/ Using the Direct Access to "Click to DVD" function for each Windows XP user. 1 Turn on it takes a few hours to create a DVD. 3 Insert a recorded cassette into your camcorder. 4 Connect your camcorder. z Tips • After...
... converted to a computer. Asia Pacific Regional http://www.css.ap.sony.com/ - Latin America http://vaio-online.sony.com/ Using the Direct Access to "Click to DVD" function for each Windows XP user. 1 Turn on it takes a few hours to create a DVD. 3 Insert a recorded cassette into your camcorder. 4 Connect your camcorder. z Tips • After...
User Manual
Page 83
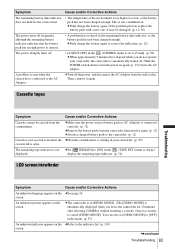
...the problem persists, replace the battery pack with a new one. cFully charge the battery again to the camcorder. (p. 12) Cassette is not ejected even when the cMoisture condensation is automatically turned off. display the remaining tape indicator. (p. 54) LCD screen/viewfinder... [5 min]. (p. 58) cWhen approximately 5 minutes have elapsed while you leave the camcorder for 10 minutes after selecting CAMERA without inserting a cassette.) Insert a cassette to operate. • A problem has occurred in your camcorder, the camcorder is starting in the remaining battery time indicator, or...
...the problem persists, replace the battery pack with a new one. cFully charge the battery again to the camcorder. (p. 12) Cassette is not ejected even when the cMoisture condensation is automatically turned off. display the remaining tape indicator. (p. 54) LCD screen/viewfinder... [5 min]. (p. 58) cWhen approximately 5 minutes have elapsed while you leave the camcorder for 10 minutes after selecting CAMERA without inserting a cassette.) Insert a cassette to operate. • A problem has occurred in your camcorder, the camcorder is starting in the remaining battery time indicator, or...

User Manual
Page 84
...This is called the smear effect. cSet [BEEP] to enable auto focus. (p. 29) cThe recording conditions are not suitable for at least 1 hour, then re-insert the cassette. (p. 99) The power abruptly turns off . cSet [STEADYSHOT] to [ON] in the (CAMERA SET) menu. (p. 49) cSet [16:9 WIDE] to ... auto focus does not function. The picture is not displayed in the viewfinder when the LCD panel is not a malfunction. Rewind it, or insert a new cassette. This is open. (p. 16) Recording Symptom Cause and/or Corrective Actions The tape does not start when you record a TV screen or ...
...This is called the smear effect. cSet [BEEP] to enable auto focus. (p. 29) cThe recording conditions are not suitable for at least 1 hour, then re-insert the cassette. (p. 99) The power abruptly turns off . cSet [STEADYSHOT] to [ON] in the (CAMERA SET) menu. (p. 49) cSet [16:9 WIDE] to ... auto focus does not function. The picture is not displayed in the viewfinder when the LCD panel is not a malfunction. Rewind it, or insert a new cassette. This is open. (p. 16) Recording Symptom Cause and/or Corrective Actions The tape does not start when you record a TV screen or ...
User Manual
Page 92
..." battery pack is set to condense. (p. 99) cRemove the power source. E:61:ss / E:62:ss cContact your Sony dealer or local authorized Sony service facility. Remove the cassette and leave your camcorder again. Remove and insert the cassette, then operate your camcorder again. cPress the RESET button and operate your camcorder again. Indication Cause and...
..." battery pack is set to condense. (p. 99) cRemove the power source. E:61:ss / E:62:ss cContact your Sony dealer or local authorized Sony service facility. Remove the cassette and leave your camcorder again. Remove and insert the cassette, then operate your camcorder again. cPress the RESET button and operate your camcorder again. Indication Cause and...
User Manual
Page 93
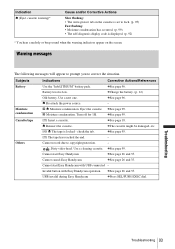
cSee page 96. Eject the cassette cSee page 99. % Moisture condensation. Q Insert a cassette. check the tab. Q The tape has reached the end. - Dirty video head. Troubleshooting Troubleshooting 93 Subjects Battery Moisture condensation Cassette/tape Others Indications Corrective Actions/References Use the "...Turn off for 1H. cSee page 18. Cannot start Easy Handycam with Easy Handycam operation cSee page 26 and 35. Z Reinsert the cassette. Cannot record due to lock. (p. 95) Fast flashing: • Moisture condensation has occurred. (p. 99) • The self-...
cSee page 96. Eject the cassette cSee page 99. % Moisture condensation. Q Insert a cassette. check the tab. Q The tape has reached the end. - Dirty video head. Troubleshooting Troubleshooting 93 Subjects Battery Moisture condensation Cassette/tape Others Indications Corrective Actions/References Use the "...Turn off for 1H. cSee page 18. Cannot start Easy Handycam with Easy Handycam operation cSee page 26 and 35. Z Reinsert the cassette. Cannot record due to lock. (p. 95) Fast flashing: • Moisture condensation has occurred. (p. 99) • The self-...


