User Manual
Page 2
...: Remote Commander. Notes on recording • Before starting to record, test the recording function to the copyright laws. To view your camcorder. WARNING To prevent fire or shock hazard, do not open the cabinet. This product has been tested and found compliant with this equipment... the contents of recordings cannot be provided, even if recording or playback is disposed of this camcorder. Never use the plug without any problems. • Compensation for your nearest Sony service station. If you purchased the product. Refer servicing to be replaced, a fuse of...
...: Remote Commander. Notes on recording • Before starting to record, test the recording function to the copyright laws. To view your camcorder. WARNING To prevent fire or shock hazard, do not open the cabinet. This product has been tested and found compliant with this equipment... the contents of recordings cannot be provided, even if recording or playback is disposed of this camcorder. Never use the plug without any problems. • Compensation for your nearest Sony service station. If you purchased the product. Refer servicing to be replaced, a fuse of...
User Manual
Page 3
...necessary (p. 19). • The illustrations used in the wrong direction, the terminal may cause a malfunction of your camcorder. CCD-TRV238E: TRV238E CCD-TRV438E: TRV438E DCR-TRV270E: TRV270E DCR-TRV285E: TRV285E Instructions with specific model names are from what you insert the connector...careful when placing the camera near a window or outdoors. • Do not aim at dusk. Change the screen language before using the camcorder • Hold your camcorder to decide. 3 or bright points (white, red, blue, or green in each model is indicated as a VCR or a computer with...
...necessary (p. 19). • The illustrations used in the wrong direction, the terminal may cause a malfunction of your camcorder. CCD-TRV238E: TRV238E CCD-TRV438E: TRV438E DCR-TRV270E: TRV270E DCR-TRV285E: TRV285E Instructions with specific model names are from what you insert the connector...careful when placing the camera near a window or outdoors. • Do not aim at dusk. Change the screen language before using the camcorder • Hold your camcorder to decide. 3 or bright points (white, red, blue, or green in each model is indicated as a VCR or a computer with...
User Manual
Page 6
... 43 Using the (CAMERA SET) menu - 16:9 WIDE/STEADYSHOT, etc 46 Using the (PLAYER SET)/ (VCR SET) menu - Easy Dubbing ( TRV238E/438E 63 Recording pictures from a VCR ( TRV285E 67 Dubbing selected scenes from a tape - HiFi SOUND/EDIT, etc 50 Using the (LCD SET)... VCR 60 Dubbing to DVD") ( TRV270E/285E) .......79 Troubleshooting Troubleshooting 82 Warning indicators and messages .....92 Additional Information Using your camcorder abroad ...........94 Usable cassette tapes 95 About the "InfoLITHIUM" battery pack 96 About i.LINK 97 Maintenance and precautions 98 Specification 101 Quick...
... 43 Using the (CAMERA SET) menu - 16:9 WIDE/STEADYSHOT, etc 46 Using the (PLAYER SET)/ (VCR SET) menu - Easy Dubbing ( TRV238E/438E 63 Recording pictures from a VCR ( TRV285E 67 Dubbing selected scenes from a tape - HiFi SOUND/EDIT, etc 50 Using the (LCD SET)... VCR 60 Dubbing to DVD") ( TRV270E/285E) .......79 Troubleshooting Troubleshooting 82 Warning indicators and messages .....92 Additional Information Using your camcorder abroad ...........94 Usable cassette tapes 95 About the "InfoLITHIUM" battery pack 96 About i.LINK 97 Maintenance and precautions 98 Specification 101 Quick...
User Manual
Page 8
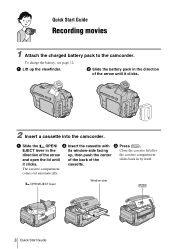
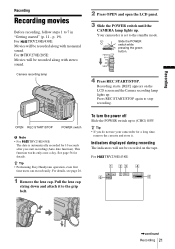
it clicks. 2 Insert a cassette into the camcorder. To charge the battery, see page 12. b Slide the battery pack in the direction of the arrow and open the lid until it clicks. a Lift ... with c Press . EJECT lever in by itself. The cassette compartment comes out automatically. Quick Start Guide Recording movies 1 Attach the charged battery pack to the camcorder.
it clicks. 2 Insert a cassette into the camcorder. To charge the battery, see page 12. b Slide the battery pack in the direction of the arrow and open the lid until it clicks. a Lift ... with c Press . EJECT lever in by itself. The cassette compartment comes out automatically. Quick Start Guide Recording movies 1 Attach the charged battery pack to the camcorder.
User Manual
Page 9
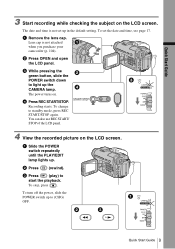
The date and time is not attached when you purchase your camcorder (p. 104). START/STOP 4 View the recorded picture on . c Press (play) to standby mode, press REC START/STOP again. Quick Start Guide 9 To change to start ...
The date and time is not attached when you purchase your camcorder (p. 104). START/STOP 4 View the recorded picture on . c Press (play) to standby mode, press REC START/STOP again. Quick Start Guide 9 To change to start ...
User Manual
Page 11
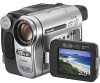
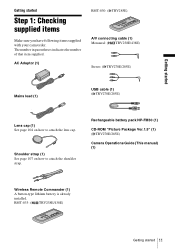
... cable (1) ( TRV270E/285E) Lens cap (1) See page 104 on how to attach the lens cap. RMT-833: ( TRV238E/438E) Getting started Step 1: Checking supplied items Make sure you have following items supplied with your camcorder. Getting started Getting started 11 Rechargeable battery pack NP-FM30 (1) CD-ROM "Picture Package Ver.1.5" (1) ( TRV270E/285E...
... cable (1) ( TRV270E/285E) Lens cap (1) See page 104 on how to attach the lens cap. RMT-833: ( TRV238E/438E) Getting started Step 1: Checking supplied items Make sure you have following items supplied with your camcorder. Getting started Getting started 11 Rechargeable battery pack NP-FM30 (1) CD-ROM "Picture Package Ver.1.5" (1) ( TRV270E/285E...
User Manual
Page 12
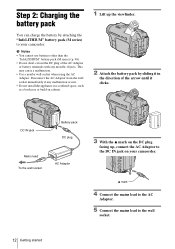
... the arrow until it clicks. DC IN jack Battery pack DC plug Mains lead To the wall socket AC Adaptor 3 With the v mark on your camcorder. Disconnect the AC Adaptor from the wall socket immediately if any metallic objects. v mark 4 Connect the mains lead to the AC Adaptor. 5 Connect...the DC IN jack on the DC plug facing up the viewfinder. 2 Attach the battery pack by attaching the "InfoLITHIUM" battery pack (M series) to your camcorder. This may cause a malfunction. • Use a nearby wall socket when using the AC Adaptor. Step 2: Charging the battery pack You can charge the ...
... the arrow until it clicks. DC IN jack Battery pack DC plug Mains lead To the wall socket AC Adaptor 3 With the v mark on your camcorder. Disconnect the AC Adaptor from the wall socket immediately if any metallic objects. v mark 4 Connect the mains lead to the AC Adaptor. 5 Connect...the DC IN jack on the DC plug facing up the viewfinder. 2 Attach the battery pack by attaching the "InfoLITHIUM" battery pack (M series) to your camcorder. This may cause a malfunction. • Use a nearby wall socket when using the AC Adaptor. Step 2: Charging the battery pack You can charge the ...
User Manual
Page 15
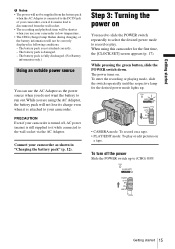
...pack is not attached correctly. - To turn off , AC power (mains) is still supplied to it is connected to the DC IN jack of your camcorder, even if its charge even when it while connected to run out. The battery pack is damaged. - Getting started b Notes • The power ... or playing mode, slide the switch repeatedly until the respective lamp for the first time, the [CLOCK SET] screen appears (p. 17). PRECAUTION Even if your camcorder. The power turns on a tape. • PLAY/EDIT mode: To play . The battery pack is turned off the power Slide the POWER switch up ....
...pack is not attached correctly. - To turn off , AC power (mains) is still supplied to it is connected to the DC IN jack of your camcorder, even if its charge even when it while connected to run out. The battery pack is damaged. - Getting started b Notes • The power ... or playing mode, slide the switch repeatedly until the respective lamp for the first time, the [CLOCK SET] screen appears (p. 17). PRECAUTION Even if your camcorder. The power turns on a tape. • PLAY/EDIT mode: To play . The battery pack is turned off the power Slide the POWER switch up ....
User Manual
Page 16
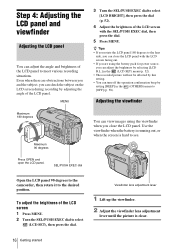
SEL/PUSH EXEC dial Open the LCD panel 90 degrees to the camcorder, then rotate it to select (LCD SET), then press the dial. Step 4: Adjusting the LCD panel and viewfinder Adjusting the LCD panel You can view ...
SEL/PUSH EXEC dial Open the LCD panel 90 degrees to the camcorder, then rotate it to select (LCD SET), then press the dial. Step 4: Adjusting the LCD panel and viewfinder Adjusting the LCD panel You can view ...
User Manual
Page 17
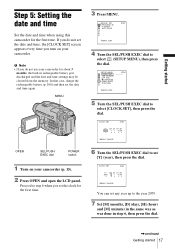
...SET STBY Y MD HM 2005 1 1 0 : 0 0 [MENU] : CANCEL You can set the date and time, the [CLOCK SET] screen appears every time you turn on your camcorder. Proceed to the year 2079. 7 Set [M] (month), [D] (day), [H] (hour) and [M] (minute) in the same way as was done in step 6, then press the dial.... ,continued Getting started Step 5: Setting the date and time Set the date and time when using this camcorder for about 3 months, the built-in rechargeable battery gets discharged and the date and time settings may be cleared from the memory. Getting started ...
...SET STBY Y MD HM 2005 1 1 0 : 0 0 [MENU] : CANCEL You can set the date and time, the [CLOCK SET] screen appears every time you turn on your camcorder. Proceed to the year 2079. 7 Set [M] (month), [D] (day), [H] (hour) and [M] (minute) in the same way as was done in step 6, then press the dial.... ,continued Getting started Step 5: Setting the date and time Set the date and time when using this camcorder for about 3 months, the built-in rechargeable battery gets discharged and the date and time settings may be cleared from the memory. Getting started ...
User Manual
Page 18
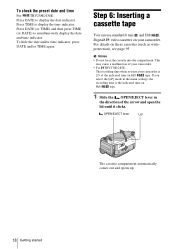
...open the lid until it clicks. To check the preset date and time For TRV238E/438E: Press DATE to simultaneously display the date and time indicator. This may cause a malfunction of the indicated time on your camcorder. Press TIME to display the time indicator. For details on Hi8 tape. ...1 Slide the OPEN/EJECT lever in the menu settings, the recording time is 2/3 of your camcorder is the indicated time on these cassettes (such as writeprotection), see page 95. b Notes • Do not force the cassette into the compartment....
...open the lid until it clicks. To check the preset date and time For TRV238E/438E: Press DATE to simultaneously display the date and time indicator. This may cause a malfunction of the indicated time on your camcorder. Press TIME to display the time indicator. For details on Hi8 tape. ...1 Slide the OPEN/EJECT lever in the menu settings, the recording time is 2/3 of your camcorder is the indicated time on these cassettes (such as writeprotection), see page 95. b Notes • Do not force the cassette into the compartment....
User Manual
Page 19
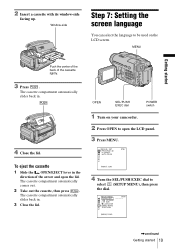
.... 2 Insert a cassette with its window-side facing up. Window-side Step 7: Setting the screen language You can select the language to be used on your camcorder. 2 Press OPEN to select (SETUP MENU), then press the dial. MENU Getting started 19
.... 2 Insert a cassette with its window-side facing up. Window-side Step 7: Setting the screen language You can select the language to be used on your camcorder. 2 Press OPEN to select (SETUP MENU), then press the dial. MENU Getting started 19
User Manual
Page 20
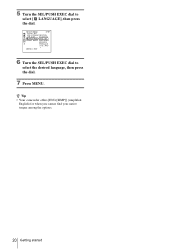
SETUP MENU STBY CLOCK SET USB STREAM DEUTSCH LTR SIZE LANGUAGE ENGL I SH DEMO MODE ENG [ S I MP ] ESPAÑOL FRANÇA I S I TAL I ANO [MENU] : END 6 Turn the SEL/PUSH EXEC dial to select [ LANGUAGE], then press the dial. 5 Turn the SEL/PUSH EXEC dial to select the desired language, then press the dial. 7 Press MENU. z Tip • Your camcorder offers [ENG [SIMP]] (simplified English) for when you cannot find your native tongue among the options. 20 Getting started
SETUP MENU STBY CLOCK SET USB STREAM DEUTSCH LTR SIZE LANGUAGE ENGL I SH DEMO MODE ENG [ S I MP ] ESPAÑOL FRANÇA I S I TAL I ANO [MENU] : END 6 Turn the SEL/PUSH EXEC dial to select [ LANGUAGE], then press the dial. 5 Turn the SEL/PUSH EXEC dial to select the desired language, then press the dial. 7 Press MENU. z Tip • Your camcorder offers [ENG [SIMP]] (simplified English) for when you cannot find your native tongue among the options. 20 Getting started
User Manual
Page 21
...For details, see page 26. 1 Remove the lens cap. Indicators displayed during recording The indicators will not be recorded along with stereo sound. For TRV238E/438E: 1 23 4 60min SP REC 0:00:00 6 5 ,continued Recording 21 For TRV270E/285E: Movies will be recorded along with monaural sound.... z Tip • If you do not use your camcorder for 10 seconds after you start recording (Auto date function). Slide the POWER switch while pressing the green button. 4 Press REC START/STOP...
...For details, see page 26. 1 Remove the lens cap. Indicators displayed during recording The indicators will not be recorded along with stereo sound. For TRV238E/438E: 1 23 4 60min SP REC 0:00:00 6 5 ,continued Recording 21 For TRV270E/285E: Movies will be recorded along with monaural sound.... z Tip • If you do not use your camcorder for 10 seconds after you start recording (Auto date function). Slide the POWER switch while pressing the green button. 4 Press REC START/STOP...
User Manual
Page 22
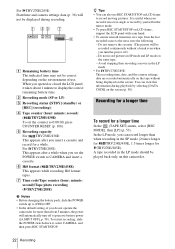
...longer time In the (TAPE SET) menu, select [REC MODE], then [LP] (p. 53). z Tips • You can view this camcorder. 22 Recording E Recording capacity For TRV238E/438E: This appears after a while when you set the counter to (CHG) OFF. • In the default setting, if you record ...from the last recorded scene to record moving pictures. Avoid stopping then recording a movie in the SP mode (2 times longer for TRV238E/438E, 1.5 times longer for a while. You can also use . Recording for a longer time To record for more than when recording in the...
...longer time In the (TAPE SET) menu, select [REC MODE], then [LP] (p. 53). z Tips • You can view this camcorder. 22 Recording E Recording capacity For TRV238E/438E: This appears after a while when you set the counter to (CHG) OFF. • In the default setting, if you record ...from the last recorded scene to record moving pictures. Avoid stopping then recording a movie in the SP mode (2 times longer for TRV238E/438E, 1.5 times longer for a while. You can also use . Recording for a longer time To record for more than when recording in the...
User Manual
Page 23
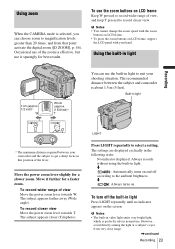
... the power zoom lever slightly for a faster zoom. Built-in light Recording * The minimum distance required between the subject and camcorder is perfectly safe in light Press LIGHT repeatedly until no indicator appears on LCD frame Keep W pressed to record closer view. The... eyes from that position of view Move the power zoom lever towards T. Move it sparingly for best results. The recommended distance between your camcorder and the subject to magnification levels greater than 20 times, and from very close range. ,continued Recording 23 m : Automatically turns on ...
... the power zoom lever slightly for a faster zoom. Built-in light Recording * The minimum distance required between the subject and camcorder is perfectly safe in light Press LIGHT repeatedly until no indicator appears on LCD frame Keep W pressed to record closer view. The... eyes from that position of view Move the power zoom lever towards T. Move it sparingly for best results. The recommended distance between your camcorder and the subject to magnification levels greater than 20 times, and from very close range. ,continued Recording 23 m : Automatically turns on ...
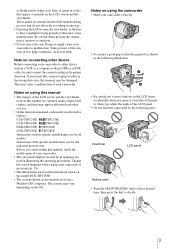
User Manual
Page 24
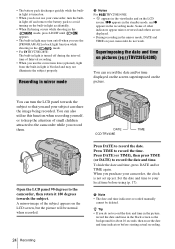
... the picture will be deleted. in light off and remove the battery pack to the camcorder while you and your camcorder, turn the LCD panel towards the subject. Recording in mirror mode b Notes For TRV238E/438E: • appears in the black screen as the background for about 10 seconds,... then erase the date and time indicators before using (p. 17). DATE TIME CCD-TRV438E Open the LCD...
... the picture will be deleted. in light off and remove the battery pack to the camcorder while you and your camcorder, turn the LCD panel towards the subject. Recording in mirror mode b Notes For TRV238E/438E: • appears in the black screen as the background for about 10 seconds,... then erase the date and time indicators before using (p. 17). DATE TIME CCD-TRV438E Open the LCD...

User Manual
Page 26
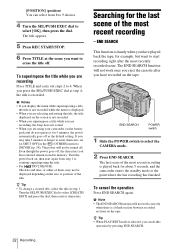
... START/STOP z Tip • Buttons that are available during Easy Handycam operation are restored when you cannot connect the USB cable to your camcorder. EASY lights up to (CHG) OFF. You can enjoy easy recording. Press REC START/STOP again to select the CAMERA mode. To... and the Camera recording lamp lights up. Easy Handycam operation ON 5 Press REC START/STOP. p. 19). Recording starts. [REC] appears on your camcorder. • For TRV270E/285E: You cannot use Easy Handycam operation together with ease - Recording with USB Streaming. • All the settings return to...
... START/STOP z Tip • Buttons that are available during Easy Handycam operation are restored when you cannot connect the USB cable to your camcorder. EASY lights up to (CHG) OFF. You can enjoy easy recording. Press REC START/STOP again to select the CAMERA mode. To... and the Camera recording lamp lights up. Easy Handycam operation ON 5 Press REC START/STOP. p. 19). Recording starts. [REC] appears on your camcorder. • For TRV270E/285E: You cannot use Easy Handycam operation together with ease - Recording with USB Streaming. • All the settings return to...

User Manual
Page 31
.../PUSH EXEC dial 1 Slide the POWER switch to select [O K], then press the dial. You can only select [SMALL] when you have been stored in your camcorder). To select alphabet and Russian characters: Select [ ]. 5 Turn the SEL/PUSH EXEC dial to select the next character, and enter the character in memory. 2 Turn...
.../PUSH EXEC dial 1 Slide the POWER switch to select [O K], then press the dial. You can only select [SMALL] when you have been stored in your camcorder). To select alphabet and Russian characters: Select [ ]. 5 Turn the SEL/PUSH EXEC dial to select the next character, and enter the character in memory. 2 Turn...
User Manual
Page 32
... do not operate it for 5 minutes, the power automatically goes off , the characters you are using your camcorder on the screen is played back for about 5 seconds, and the camcorder enters the standby mode at the scene you have recorded on the tape. To superimpose the title while you can... is recorded. Even though the power goes off as the default setting. Turn the SEL/PUSH EXEC dial to continue superimposing the title. • For TRV238E/438E: The date and time, or either of them, may take 5 minutes or longer to enter characters, set [A.SHUT OFF] in the (OTHERS)...
... do not operate it for 5 minutes, the power automatically goes off , the characters you are using your camcorder on the screen is played back for about 5 seconds, and the camcorder enters the standby mode at the scene you have recorded on the tape. To superimpose the title while you can... is recorded. Even though the power goes off as the default setting. Turn the SEL/PUSH EXEC dial to continue superimposing the title. • For TRV238E/438E: The date and time, or either of them, may take 5 minutes or longer to enter characters, set [A.SHUT OFF] in the (OTHERS)...


