User Manual
Page 2
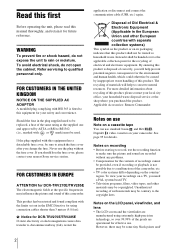
...UNITED KINGDOM NOTICE ON THE SUPPLIED AC ADAPTOR A moulded plug complying with separate collection systems) This symbol on the product or on your nearest Sony service station. Never use the plug without any problems. • Compensation for details. Disposal of Old Electrical & Electronic Equipment (Applicable in...be copyrighted. Notes on use Note on a cassette tape You can use . Read this first Before operating the unit, please read this manual thoroughly, and retain it shall be handed over 99.99% of the pixels are operational for your household waste disposal service or the ...
...UNITED KINGDOM NOTICE ON THE SUPPLIED AC ADAPTOR A moulded plug complying with separate collection systems) This symbol on the product or on your nearest Sony service station. Never use the plug without any problems. • Compensation for details. Disposal of Old Electrical & Electronic Equipment (Applicable in...be copyrighted. Notes on use Note on a cassette tape You can use . Read this first Before operating the unit, please read this manual thoroughly, and retain it shall be handed over 99.99% of the pixels are operational for your household waste disposal service or the ...
User Manual
Page 3
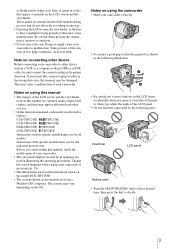
...digital still camera, and thus may appear different from what you start reading this instruction manual, each local language are used on this manual are from a Windows XP computer. CCD-TRV238E: TRV238E CCD-TRV438E: TRV438E DCR-TRV270E: TRV270E DCR-TRV285E: TRV285E Instructions with specific model names are...not hold the camcorder by the following parts. Take pictures of the manufacturing process and do not affect the recording in this manual are based on -screen displays in each model is indicated as follows. Change the screen language before using the camcorder &#...
...digital still camera, and thus may appear different from what you start reading this instruction manual, each local language are used on this manual are from a Windows XP computer. CCD-TRV238E: TRV238E CCD-TRV438E: TRV438E DCR-TRV270E: TRV270E DCR-TRV285E: TRV285E Instructions with specific model names are...not hold the camcorder by the following parts. Take pictures of the manufacturing process and do not affect the recording in this manual are based on -screen displays in each model is indicated as follows. Change the screen language before using the camcorder &#...
User Manual
Page 4
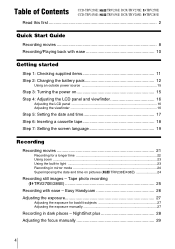
...longer time 22 Using zoom ...23 Using the built-in light 23 Recording in dark places - NightShot plus 28 Adjusting the focus manually 29 4 Tape photo recording ( TRV270E/285E 25 Recording with ease 10 Getting started Step 1: Checking supplied items 11 Step 2: Charging... movies 21 Recording for backlit subjects 27 Adjusting the exposure manually 27 Recording in mirror mode 24 Superimposing the date and time on pictures ( TRV238E/438E 24 Recording still images - Table of Contents CCD-TRV238E: CCD-TRV438E: TRV238E DCR-TRV270E: TRV270E TRV438E DCR-TRV285E: TRV285E Read this ...
...longer time 22 Using zoom ...23 Using the built-in light 23 Recording in dark places - NightShot plus 28 Adjusting the focus manually 29 4 Tape photo recording ( TRV270E/285E 25 Recording with ease 10 Getting started Step 1: Checking supplied items 11 Step 2: Charging... movies 21 Recording for backlit subjects 27 Adjusting the exposure manually 27 Recording in mirror mode 24 Superimposing the date and time on pictures ( TRV238E/438E 24 Recording still images - Table of Contents CCD-TRV238E: CCD-TRV438E: TRV238E DCR-TRV270E: TRV270E TRV438E DCR-TRV285E: TRV285E Read this ...
User Manual
Page 6
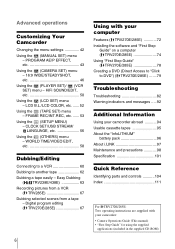
...MENU) - HiFi SOUND/EDIT, etc 50 Using the (LCD SET) menu - Advanced operations Customizing Your Camcorder Changing the menu settings 42 Using the (MANUAL SET) menu - PROGRAM AE/P EFFECT, etc 43 Using the (CAMERA SET) menu - 16:9 WIDE/STEADYSHOT, etc 46 Using the (PLAYER SET... editing ( TRV270E/285E 67 6 Using with your camcorder: • Camera Operations Guide (This manual) • "First Step Guide" for using the supplied applications (included in the supplied CD-ROM) Easy Dubbing ( TRV238E/438E 63 Recording pictures from a VCR ( TRV285E 67 Dubbing selected scenes from a tape - ...
...MENU) - HiFi SOUND/EDIT, etc 50 Using the (LCD SET) menu - Advanced operations Customizing Your Camcorder Changing the menu settings 42 Using the (MANUAL SET) menu - PROGRAM AE/P EFFECT, etc 43 Using the (CAMERA SET) menu - 16:9 WIDE/STEADYSHOT, etc 46 Using the (PLAYER SET... editing ( TRV270E/285E 67 6 Using with your camcorder: • Camera Operations Guide (This manual) • "First Step Guide" for using the supplied applications (included in the supplied CD-ROM) Easy Dubbing ( TRV238E/438E 63 Recording pictures from a VCR ( TRV285E 67 Dubbing selected scenes from a tape - ...
User Manual
Page 11
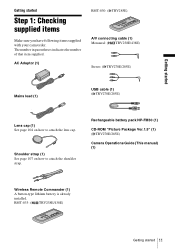
Getting started Getting started 11 AC Adaptor (1) RMT-830: ( TRV285E) A/V connecting cable (1) Monaural: ( TRV238E/438E) Stereo: ( TRV270E/285E) Mains lead (1) USB cable (1) ( TRV270E/285E) Lens cap (1) See page 104 on how to attach the ... battery pack NP-FM30 (1) CD-ROM "Picture Package Ver.1.5" (1) ( TRV270E/285E) Camera Operations Guide (This manual) (1) Wireless Remote Commander (1) A button-type lithium battery is already installed. RMT-833: ( TRV238E/438E) Getting started Step 1: Checking supplied items Make sure you have following items supplied with your camcorder.
Getting started Getting started 11 AC Adaptor (1) RMT-830: ( TRV285E) A/V connecting cable (1) Monaural: ( TRV238E/438E) Stereo: ( TRV270E/285E) Mains lead (1) USB cable (1) ( TRV270E/285E) Lens cap (1) See page 104 on how to attach the ... battery pack NP-FM30 (1) CD-ROM "Picture Package Ver.1.5" (1) ( TRV270E/285E) Camera Operations Guide (This manual) (1) Wireless Remote Commander (1) A button-type lithium battery is already installed. RMT-833: ( TRV238E/438E) Getting started Step 1: Checking supplied items Make sure you have following items supplied with your camcorder.
User Manual
Page 17
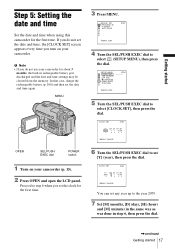
... this camcorder for the first time. 3 Press MENU. CLOCK SET STBY Y MD HM 2005 1 1 0 : 0 0 [MENU] : CANCEL You can set the clock for the first time. MANUAL SET PROGRAM AE P EFFECT AUTO SHTR STBY [MENU] : END 4 Turn the SEL/PUSH EXEC dial to select [CLOCK SET], then press the dial. SETUP MENU...
... this camcorder for the first time. 3 Press MENU. CLOCK SET STBY Y MD HM 2005 1 1 0 : 0 0 [MENU] : CANCEL You can set the clock for the first time. MANUAL SET PROGRAM AE P EFFECT AUTO SHTR STBY [MENU] : END 4 Turn the SEL/PUSH EXEC dial to select [CLOCK SET], then press the dial. SETUP MENU...
User Manual
Page 19
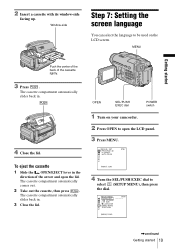
... cassette compartment automatically slides back in . 4 Close the lid. MENU Getting started 19 OPEN SEL/PUSH EXEC dial POWER switch 1 Turn on the LCD screen. MANUAL SET PROGRAM AE P EFFECT AUTO SHTR STBY [MENU] : END 4 Turn the SEL/PUSH EXEC dial to open the lid. The cassette compartment automatically slides back...
... cassette compartment automatically slides back in . 4 Close the lid. MENU Getting started 19 OPEN SEL/PUSH EXEC dial POWER switch 1 Turn on the LCD screen. MANUAL SET PROGRAM AE P EFFECT AUTO SHTR STBY [MENU] : END 4 Turn the SEL/PUSH EXEC dial to open the lid. The cassette compartment automatically slides back...
User Manual
Page 24
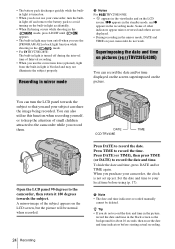
...recording. 24 Recording b Note • The date and time indicators recorded manually cannot be normal when recorded. • The battery pack discharges quickly while the built- Recording in mirror mode b Notes For TRV238E/438E: • appears in the viewfinder and on your camcorder, turn ... are not displayed. • During recording in the recording mode. DATE TIME CCD-TRV438E Open the LCD panel 90 degrees to record the time. Superimposing the date and time on pictures ( TRV238E/438E) You can share the image being recorded. Press DATE to avoid turning ...
...recording. 24 Recording b Note • The date and time indicators recorded manually cannot be normal when recorded. • The battery pack discharges quickly while the built- Recording in mirror mode b Notes For TRV238E/438E: • appears in the viewfinder and on your camcorder, turn ... are not displayed. • During recording in the recording mode. DATE TIME CCD-TRV438E Open the LCD panel 90 degrees to record the time. Superimposing the date and time on pictures ( TRV238E/438E) You can share the image being recorded. Press DATE to avoid turning ...
User Manual
Page 27
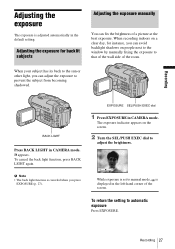
...back light function, press BACK LIGHT again. Adjusting the exposure for instance, you can avoid backlight shadows on people next to the window by manually fixing the exposure to adjust the brightness. When recording indoors on the screen. 2 Turn the SEL/PUSH EXEC dial to that of the ...exposure The exposure is canceled when you press EXPOSURE (p. 27). The exposure indicator appears on a clear day, for backlit subjects Adjusting the exposure manually You can adjust the exposure to the sun or other light, you can fix the brightness of the screen. While exposure is set to ...
...back light function, press BACK LIGHT again. Adjusting the exposure for instance, you can avoid backlight shadows on people next to the window by manually fixing the exposure to adjust the brightness. When recording indoors on the screen. 2 Turn the SEL/PUSH EXEC dial to that of the ...exposure The exposure is canceled when you press EXPOSURE (p. 27). The exposure indicator appears on a clear day, for backlit subjects Adjusting the exposure manually You can adjust the exposure to the sun or other light, you can fix the brightness of the screen. While exposure is set to ...
User Manual
Page 28
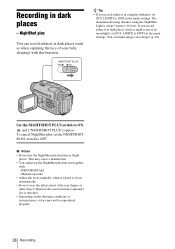
...; If you record subjects in dark places (such as when capturing the face of your baby sleeping) with your fingers or other objects. Manual exposure • Adjust the focus manually when it is about 3 meters (10 feet). NightShot plus function together with: - [PROGRAM AE] - LIGHT] to [ON] in moonlight), set [N.S. and ["NIGHTSHOT...
...; If you record subjects in dark places (such as when capturing the face of your baby sleeping) with your fingers or other objects. Manual exposure • Adjust the focus manually when it is about 3 meters (10 feet). NightShot plus function together with: - [PROGRAM AE] - LIGHT] to [ON] in moonlight), set [N.S. and ["NIGHTSHOT...
User Manual
Page 29
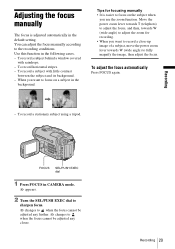
... a close-up image of a subject, move the power zoom lever towards W (wide angle) to adjust the zoom for focusing manually • It is adjusted automatically in the default setting. Adjusting the focus manually The focus is easier to when the focus cannot be adjusted any further. 9 changes to focus on a subject in... subject using a tripod. Use this function in the following cases. - When you use the zoom function. To record horizontal stripes. - You can adjust the focus manually according to the recording conditions.
... a close-up image of a subject, move the power zoom lever towards W (wide angle) to adjust the zoom for focusing manually • It is adjusted automatically in the default setting. Adjusting the focus manually The focus is easier to when the focus cannot be adjusted any further. 9 changes to focus on a subject in... subject using a tripod. Use this function in the following cases. - When you use the zoom function. To record horizontal stripes. - You can adjust the focus manually according to the recording conditions.
User Manual
Page 38
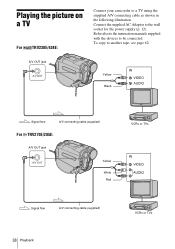
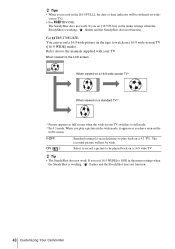
Playing the picture on a TV For TRV238E/438E: Connect your camcorder to the wall socket for the power supply (p. 12). Connect the supplied AC Adaptor to a TV using the supplied A/V connecting cable as shown in the following illustration. A/V OUT jack Yellow Black Signal flow A/V connecting cable (supplied) For TRV270E/285E: A/V OUT jack Yellow White Red VCRs or TVs Signal flow A/V connecting cable (supplied) 38 Playback VCRs or TVs To copy to be connected. Refer also to the instruction manuals supplied with the devices to another tape, see page 62.
Playing the picture on a TV For TRV238E/438E: Connect your camcorder to the wall socket for the power supply (p. 12). Connect the supplied AC Adaptor to a TV using the supplied A/V connecting cable as shown in the following illustration. A/V OUT jack Yellow Black Signal flow A/V connecting cable (supplied) For TRV270E/285E: A/V OUT jack Yellow White Red VCRs or TVs Signal flow A/V connecting cable (supplied) 38 Playback VCRs or TVs To copy to be connected. Refer also to the instruction manuals supplied with the devices to another tape, see page 62.
User Manual
Page 42
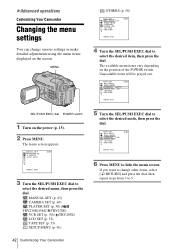
Unavailable items will be grayed out. TAPE SET REC MODE AUDIO MODE REMAIN AUTO FRAME REC ON I N T. MANUAL SET (p. 43) CAMERA SET (p. 46) PLAYER SET (p. 50) ( TRV238E/438E/ TRV270E) VCR SET (p. 50) ( TRV285E) LCD SET (p. 52) TAPE SET (p. 53) SETUP MENU (p. 56) 5 Turn the SEL/PUSH EXEC dial to hide the...: END 6 Press MENU to select the desired mode, then press the dial. The available menu items vary depending on the screen. The menu screen appears. MANUAL SET PROGRAM AE P EFFECT AUTO SHTR STBY [MENU] : END 3 Turn the SEL/PUSH EXEC dial to select the desired item, then press the dial....
Unavailable items will be grayed out. TAPE SET REC MODE AUDIO MODE REMAIN AUTO FRAME REC ON I N T. MANUAL SET (p. 43) CAMERA SET (p. 46) PLAYER SET (p. 50) ( TRV238E/438E/ TRV270E) VCR SET (p. 50) ( TRV285E) LCD SET (p. 52) TAPE SET (p. 53) SETUP MENU (p. 56) 5 Turn the SEL/PUSH EXEC dial to hide the...: END 6 Press MENU to select the desired mode, then press the dial. The available menu items vary depending on the screen. The menu screen appears. MANUAL SET PROGRAM AE P EFFECT AUTO SHTR STBY [MENU] : END 3 Turn the SEL/PUSH EXEC dial to select the desired item, then press the dial....
User Manual
Page 43
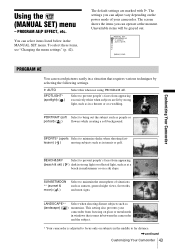
...such as in a theater or at a wedding. SUNSETMOON ** (sunset & moon) ( ) Select to far distance. ,continued Customizing Your Camcorder 43 MANUAL SET PROGRAM AE P EFFECT AUTO SHTR [MENU] : END PROGRAM AE You can adjust vary depending on glass or metal mesh in windows that requires... default settings are lit by selecting the following settings. The screen shows the items you can record pictures easily in a situation that comes in the MANUAL SET menu. G AUTO SPOTLIGHT* (spotlight) ( ) Select this when not using PROGRAM AE. lesson) ( ) moving subjects such as (landscape) ( ) ...
...such as in a theater or at a wedding. SUNSETMOON ** (sunset & moon) ( ) Select to far distance. ,continued Customizing Your Camcorder 43 MANUAL SET PROGRAM AE P EFFECT AUTO SHTR [MENU] : END PROGRAM AE You can adjust vary depending on glass or metal mesh in windows that requires... default settings are lit by selecting the following settings. The screen shows the items you can record pictures easily in a situation that comes in the MANUAL SET menu. G AUTO SPOTLIGHT* (spotlight) ( ) Select this when not using PROGRAM AE. lesson) ( ) moving subjects such as (landscape) ( ) ...
User Manual
Page 47
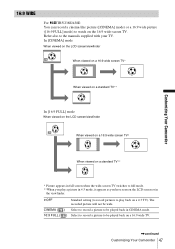
... in full screen when the wide-screen TV switches to full mode. **When you play back on the 16:9 wide-screen TV. 16:9 WIDE For TRV238E/438E: You can record a cinema-like picture ([CINEMA] mode) or a 16:9 wide picture ([16:9 FULL] mode) to the...
... in full screen when the wide-screen TV switches to full mode. **When you play back on the 16:9 wide-screen TV. 16:9 WIDE For TRV238E/438E: You can record a cinema-like picture ([CINEMA] mode) or a 16:9 wide picture ([16:9 FULL] mode) to the...
User Manual
Page 48
... in the menu settings when the SteadyShot is working , flashes and the SteadyShot does not function. GOFF ON ( ) Standard setting (to record pictures to the manuals supplied with your TV. For TRV270E/285E: You can record a 16:9 wide picture on the tape to be wide. screen TVs. • For TRV438E: The...
... in the menu settings when the SteadyShot is working , flashes and the SteadyShot does not function. GOFF ON ( ) Standard setting (to record pictures to the manuals supplied with your TV. For TRV270E/285E: You can record a 16:9 wide picture on the tape to be wide. screen TVs. • For TRV438E: The...

User Manual
Page 55
lights up to ± 5 frames from the selected time. To cancel recording, set to hide the menu settings. z Tips • If you adjust the focus manually, you may be able to record clear pictures even if the light changes (p. 29). • You can achieve excellent recordings of up during interval recording. b ...
lights up to ± 5 frames from the selected time. To cancel recording, set to hide the menu settings. z Tips • If you adjust the focus manually, you may be able to record clear pictures even if the light changes (p. 29). • You can achieve excellent recordings of up during interval recording. b ...
User Manual
Page 73
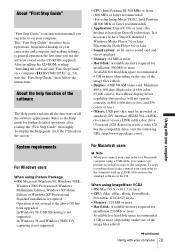
About "First Step Guide" "First Step Guide" is an instruction manual you can refer to the computer with your computer Refer to the Help guide for installation 250 MB or more Available free hard disk space ...
About "First Step Guide" "First Step Guide" is an instruction manual you can refer to the computer with your computer Refer to the Help guide for installation 250 MB or more Available free hard disk space ...
User Manual
Page 75
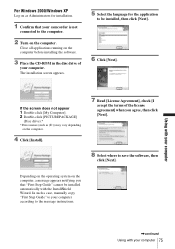
... vary depending on the computer, a message appears notifying you agree, then click [Next]. 8 Select where to save the software, then click [Next]. In such a case, manually copy "First Step Guide" to your camcorder is not connected to the computer. 2 Turn on the computer before installing the software. 3 Place the CD-ROM...
... vary depending on the computer, a message appears notifying you agree, then click [Next]. 8 Select where to save the software, then click [Next]. In such a case, manually copy "First Step Guide" to your camcorder is not connected to the computer. 2 Turn on the computer before installing the software. 3 Place the CD-ROM...
User Manual
Page 79
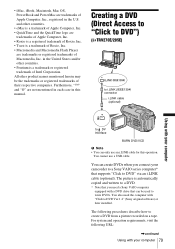
...trademarks of Macromedia, Inc. You cannot use an i.LINK cable for this manual. in the United States and/or other countries. • Pentium is a trademark of their respective companies. You also need a Sony VAIO computer equipped with "Click to DVD" via an i.LINK cable (...). The following URL: ,continued Using with your computer to i.LINK (IEEE1394) connector i.LINK cable (optional) Using with your camcorder to a Sony VAIO series computer* that can only use a USB cable. For system and operation requirements, visit the following procedures describe how to write DVDs...
...trademarks of Macromedia, Inc. You cannot use an i.LINK cable for this manual. in the United States and/or other countries. • Pentium is a trademark of their respective companies. You also need a Sony VAIO computer equipped with "Click to DVD" via an i.LINK cable (...). The following URL: ,continued Using with your computer to i.LINK (IEEE1394) connector i.LINK cable (optional) Using with your camcorder to a Sony VAIO series computer* that can only use a USB cable. For system and operation requirements, visit the following procedures describe how to write DVDs...


