User Manual
Page 1
2-515-260-14(1) Camera Operations Guide Read this first Video Camera Recorder/Digital Video Camera Recorder CCD-TRV238E/TRV438E DCR-TRV270E/TRV285E © 2005 Sony Corporation
2-515-260-14(1) Camera Operations Guide Read this first Video Camera Recorder/Digital Video Camera Recorder CCD-TRV238E/TRV438E DCR-TRV270E/TRV285E © 2005 Sony Corporation
User Manual
Page 3
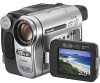
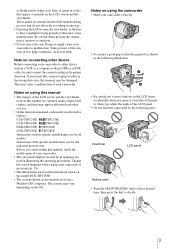
...; To ensure a good grip, fasten the grip belt as a VCR or a computer with an USB or i.LINK cable, be damaged. CCD-TRV238E: TRV238E CCD-TRV438E: TRV438E DCR-TRV270E: TRV270E DCR-TRV285E: TRV285E Instructions with specific model names are for all models. Notes on using this manual •... images of your camcorder. • The on connecting other device Before connecting your camcorder to decide. 3 Be careful when placing the camera near a window or outdoors. • Do not aim at dusk. Doing so might cause your camcorder to other device such as ...
...; To ensure a good grip, fasten the grip belt as a VCR or a computer with an USB or i.LINK cable, be damaged. CCD-TRV238E: TRV238E CCD-TRV438E: TRV438E DCR-TRV270E: TRV270E DCR-TRV285E: TRV285E Instructions with specific model names are for all models. Notes on using this manual •... images of your camcorder. • The on connecting other device Before connecting your camcorder to decide. 3 Be careful when placing the camera near a window or outdoors. • Do not aim at dusk. Doing so might cause your camcorder to other device such as ...
User Manual
Page 5
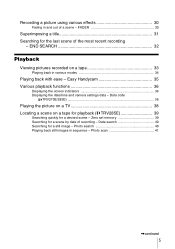
... Searching quickly for a scene by date of a scene - Easy Handycam 35 Various playback functions 36 Displaying the screen indicators 36 Displaying the date/time and camera settings data -
... Searching quickly for a scene by date of a scene - Easy Handycam 35 Various playback functions 36 Displaying the screen indicators 36 Displaying the date/time and camera settings data -
User Manual
Page 6
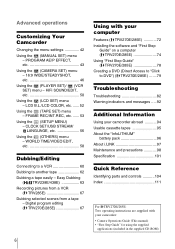
...Access to "Click to another tape 62 Dubbing a tape easily - Easy Dubbing ( TRV238E/438E 63 Recording pictures from a VCR ( TRV285E 67 Dubbing selected scenes from a tape - PROGRAM AE/P EFFECT, etc 43 Using the (CAMERA SET) menu - 16:9 WIDE/STEADYSHOT, etc 46 Using the (PLAYER SET)/ (VCR...FRAME REC/INT.REC, etc. ...... 53 Using the (SETUP MENU) - Digital program editing ( TRV270E/285E 67 6 Using with your camcorder: • Camera Operations Guide (This manual) • "First Step Guide" for using the supplied applications (included in the supplied CD-ROM) LCD B.L./LCD COLOR, etc...
...Access to "Click to another tape 62 Dubbing a tape easily - Easy Dubbing ( TRV238E/438E 63 Recording pictures from a VCR ( TRV285E 67 Dubbing selected scenes from a tape - PROGRAM AE/P EFFECT, etc 43 Using the (CAMERA SET) menu - 16:9 WIDE/STEADYSHOT, etc 46 Using the (PLAYER SET)/ (VCR...FRAME REC/INT.REC, etc. ...... 53 Using the (SETUP MENU) - Digital program editing ( TRV270E/285E 67 6 Using with your camcorder: • Camera Operations Guide (This manual) • "First Step Guide" for using the supplied applications (included in the supplied CD-ROM) LCD B.L./LCD COLOR, etc...
User Manual
Page 9
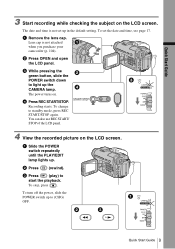
... button, slide the POWER switch down to light up to (CHG) OFF. b Press (rewind). To turn off the power, slide the POWER switch up the CAMERA lamp. The date and time is not attached when you purchase your camcorder (p. 104). d Press REC START/STOP. The power turns on. Recording starts. a Slide...
... button, slide the POWER switch down to light up to (CHG) OFF. b Press (rewind). To turn off the power, slide the POWER switch up the CAMERA lamp. The date and time is not attached when you purchase your camcorder (p. 104). d Press REC START/STOP. The power turns on. Recording starts. a Slide...
User Manual
Page 11
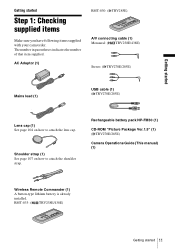
...how to attach the shoulder strap. The number in parentheses indicates the number of that item supplied. RMT-833: ( TRV238E/438E) Getting started Step 1: Checking supplied items Make sure you have following items supplied with your camcorder. Rechargeable battery ...pack NP-FM30 (1) CD-ROM "Picture Package Ver.1.5" (1) ( TRV270E/285E) Camera Operations Guide (This manual) (1) Wireless Remote Commander (1) A button-type lithium battery is already installed. Getting started Getting started 11 AC Adaptor...
...how to attach the shoulder strap. The number in parentheses indicates the number of that item supplied. RMT-833: ( TRV238E/438E) Getting started Step 1: Checking supplied items Make sure you have following items supplied with your camcorder. Rechargeable battery ...pack NP-FM30 (1) CD-ROM "Picture Package Ver.1.5" (1) ( TRV270E/285E) Camera Operations Guide (This manual) (1) Wireless Remote Commander (1) A button-type lithium battery is already installed. Getting started Getting started 11 AC Adaptor...
User Manual
Page 15
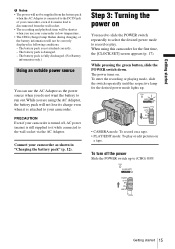
... button, slide the POWER switch down. The battery pack is still supplied to it is turned off the power Slide the POWER switch up . • CAMERA mode: To record on a tape. • PLAY/EDIT mode: To play or edit pictures on You need to slide the POWER switch repeatedly to select...
... button, slide the POWER switch down. The battery pack is still supplied to it is turned off the power Slide the POWER switch up . • CAMERA mode: To record on a tape. • PLAY/EDIT mode: To play or edit pictures on You need to slide the POWER switch repeatedly to select...
User Manual
Page 21
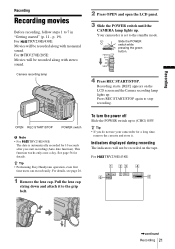
...recorded along with monaural sound. Recording starts. [REC] appears on the tape. Camera recording lamp 2 Press OPEN and open the LCD panel. 3 Slide the POWER switch until the CAMERA lamp lights up to 7 in "Getting started" (p. 11 - For TRV238E/438E: 1 23 4 60min SP REC 0:00:00 6 5 ,continued Recording...; Performing Easy Handycam operation, even first time users can record easily. OPEN REC START/STOP POWER switch b Note • For TRV238E/438E: The date is set to stop recording. Recording Recording Recording movies Before recording, follow steps 1 to (CHG) OFF. For...
...recorded along with monaural sound. Recording starts. [REC] appears on the tape. Camera recording lamp 2 Press OPEN and open the LCD panel. 3 Slide the POWER switch until the CAMERA lamp lights up to 7 in "Getting started" (p. 11 - For TRV238E/438E: 1 23 4 60min SP REC 0:00:00 6 5 ,continued Recording...; Performing Easy Handycam operation, even first time users can record easily. OPEN REC START/STOP POWER switch b Note • For TRV238E/438E: The date is set to stop recording. Recording Recording Recording movies Before recording, follow steps 1 to (CHG) OFF. For...
User Manual
Page 22
...). B Recording mode (SP or LP) C Recording status ([STBY] (standby) or [REC] (recording)) D Tape counter (hour: minute: second) ( TRV238E/438E) To set the POWER switch to select CAMERA, and then press REC START/STOP. Recording for a longer time To record for a while. A tape recorded in the SP mode (2 times... longer for TRV238E/438E, 1.5 times longer for more than when recording in the LP mode should be played back...
...). B Recording mode (SP or LP) C Recording status ([STBY] (standby) or [REC] (recording)) D Tape counter (hour: minute: second) ( TRV238E/438E) To set the POWER switch to select CAMERA, and then press REC START/STOP. Recording for a longer time To record for a while. A tape recorded in the SP mode (2 times... longer for TRV238E/438E, 1.5 times longer for more than when recording in the LP mode should be played back...
User Manual
Page 23
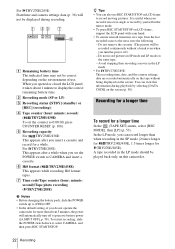
Using zoom When the CAMERA mode is about 1.5 m (5 feet). The recommended distance between your camcorder and the subject to suit your hand. To record wider range of the zoom is ...
Using zoom When the CAMERA mode is about 1.5 m (5 feet). The recommended distance between your camcorder and the subject to suit your hand. To record wider range of the zoom is ...
User Manual
Page 25
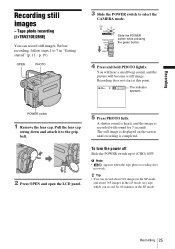
... will hear a small beep sound, and the picture will become a still image. To turn the power off Slide the POWER switch up to select the CAMERA mode. OPEN PHOTO 3 Slide the POWER switch to (CHG) OFF. A shutter sound is heard, and the image is displayed on a tape which can record for...
... will hear a small beep sound, and the picture will become a still image. To turn the power off Slide the POWER switch up to select the CAMERA mode. OPEN PHOTO 3 Slide the POWER switch to (CHG) OFF. A shutter sound is heard, and the image is displayed on a tape which can record for...

User Manual
Page 26
... first time users can record movies only. 4 Press EASY. Before recording, follow steps 1 to stop recording. You can enjoy easy recording. Camera recording lamp EASY POWER switch OPEN REC START/STOP z Tip • Buttons that are available during Easy Handycam operation. To cancel Easy Handycam... Handycam operation have a dot beside them on the LCD screen and the Camera recording lamp lights up to select the CAMERA mode. Easy Handycam With this Easy Handycam operation, most of the camera settings are set to their defaults during Easy Handycam operation are restored when...
... first time users can record movies only. 4 Press EASY. Before recording, follow steps 1 to stop recording. You can enjoy easy recording. Camera recording lamp EASY POWER switch OPEN REC START/STOP z Tip • Buttons that are available during Easy Handycam operation. To cancel Easy Handycam... Handycam operation have a dot beside them on the LCD screen and the Camera recording lamp lights up to select the CAMERA mode. Easy Handycam With this Easy Handycam operation, most of the camera settings are set to their defaults during Easy Handycam operation are restored when...
User Manual
Page 27
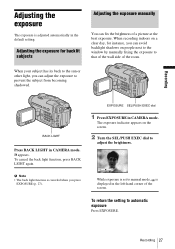
BACK LIGHT Press BACK LIGHT in CAMERA mode. appears. The exposure indicator appears on the screen. 2 Turn the SEL/PUSH EXEC dial to automatic exposure Press EXPOSURE. When recording indoors on people ... the window by manually fixing the exposure to the sun or other light, you press EXPOSURE (p. 27). EXPOSURE SEL/PUSH EXEC dial 1 Press EXPOSURE in CAMERA mode. . Adjusting the exposure for instance, you can adjust the exposure to prevent the subject from becoming shadowed. When your subject has its back to...
BACK LIGHT Press BACK LIGHT in CAMERA mode. appears. The exposure indicator appears on the screen. 2 Turn the SEL/PUSH EXEC dial to automatic exposure Press EXPOSURE. When recording indoors on people ... the window by manually fixing the exposure to the sun or other light, you press EXPOSURE (p. 27). EXPOSURE SEL/PUSH EXEC dial 1 Press EXPOSURE in CAMERA mode. . Adjusting the exposure for instance, you can adjust the exposure to prevent the subject from becoming shadowed. When your subject has its back to...
User Manual
Page 29
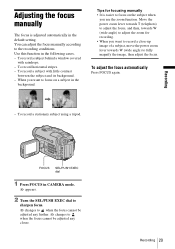
... raindrops. - To adjust the focus automatically Press FOCUS again. - Recording FOCUS SEL/PUSH EXEC dial 1 Press FOCUS in the following cases. - Use this function in CAMERA mode. 9 appears. 2 Turn the SEL/PUSH EXEC dial to sharpen focus. 9 changes to when the focus cannot be adjusted any further. 9 changes to the recording...
... raindrops. - To adjust the focus automatically Press FOCUS again. - Recording FOCUS SEL/PUSH EXEC dial 1 Press FOCUS in the following cases. - Use this function in CAMERA mode. 9 appears. 2 Turn the SEL/PUSH EXEC dial to sharpen focus. 9 changes to when the focus cannot be adjusted any further. 9 changes to the recording...
User Manual
Page 30
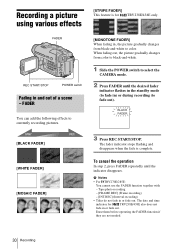
... recording pictures. [MONOTONE FADER] When fading in, the picture gradually changes from color to black-and-white. 1 Slide the POWER switch to select the CAMERA mode. 2 Press FADER until the indicator disappears. BLACK FADER [BLACK FADER] [WHITE FADER] [MOSAIC FADER] 3 Press REC START/STOP. The fader ...indicator stops flashing and disappears when the fade is for TRV238E/438E also does not fade in or fade out. The date and time indicator for TRV238E/438E only. FADER REC START/STOP POWER switch Fading in ) or during recording (to fade ...
... recording pictures. [MONOTONE FADER] When fading in, the picture gradually changes from color to black-and-white. 1 Slide the POWER switch to select the CAMERA mode. 2 Press FADER until the indicator disappears. BLACK FADER [BLACK FADER] [WHITE FADER] [MOSAIC FADER] 3 Press REC START/STOP. The fader ...indicator stops flashing and disappears when the fade is for TRV238E/438E also does not fade in or fade out. The date and time indicator for TRV238E/438E only. FADER REC START/STOP POWER switch Fading in ) or during recording (to fade ...

User Manual
Page 31
.../PUSH EXEC dial to select the next character, and enter the character in the following procedure. 1 Turn the SEL/PUSH EXEC dial to select the CAMERA mode, then press TITLE.
.../PUSH EXEC dial to select the next character, and enter the character in the following procedure. 1 Turn the SEL/PUSH EXEC dial to select the CAMERA mode, then press TITLE.
User Manual
Page 32
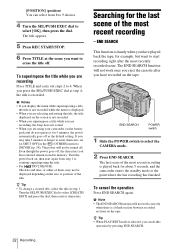
...has finished. When you press the SEL/PUSH EXEC dial at the scene you can select from step 1 to continue superimposing the title. • For TRV238E/438E: The date and time, or either of the most recently recorded scene. END SEARCH This function is recorded. b Note • The END ... you may not be turned off , the characters you are using your camcorder on the tape. Turn the SEL/PUSH EXEC dial to select the CAMERA mode. 2 Press END SEARCH. To cancel the operation Press END SEARCH again. b Notes • If you display the menu while superimposing a title, the...
...has finished. When you press the SEL/PUSH EXEC dial at the scene you can select from step 1 to continue superimposing the title. • For TRV238E/438E: The date and time, or either of the most recently recorded scene. END SEARCH This function is recorded. b Note • The END ... you may not be turned off , the characters you are using your camcorder on the tape. Turn the SEL/PUSH EXEC dial to select the CAMERA mode. 2 Press END SEARCH. To cancel the operation Press END SEARCH again. b Notes • If you display the menu while superimposing a title, the...
User Manual
Page 36
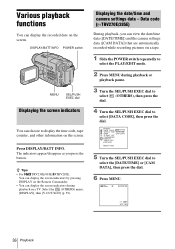
.../BATT INFO POWER switch MENU SEL/PUSH EXEC dial Displaying the screen indicators You can view the date/time data ([DATE/TIME]) and the camera settings data ([CAM DATA]) that are automatically recorded while recording pictures on a tape. 1 Slide the POWER switch repeatedly to select the PLAY... EXEC dial to select [DATA CODE], then press the dial. Displaying the date/time and camera settings data - OTHERS DATA CODE OFF WORLD TIME DATE/TIME BEEP CAM DATA A. z Tips • For TRV238E/438E/ TRV285E: You can display the screen indicators by pressing DISPLAY on the Remote Commander....
.../BATT INFO POWER switch MENU SEL/PUSH EXEC dial Displaying the screen indicators You can view the date/time data ([DATE/TIME]) and the camera settings data ([CAM DATA]) that are automatically recorded while recording pictures on a tape. 1 Slide the POWER switch repeatedly to select the PLAY... EXEC dial to select [DATA CODE], then press the dial. Displaying the date/time and camera settings data - OTHERS DATA CODE OFF WORLD TIME DATE/TIME BEEP CAM DATA A. z Tips • For TRV238E/438E/ TRV285E: You can display the screen indicators by pressing DISPLAY on the Remote Commander....
User Manual
Page 37
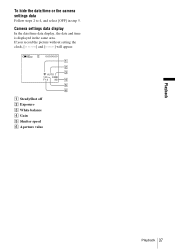
To hide the date/time or the camera settings data Follow steps 2 to 4, and select [OFF] in the same area. Camera settings data display In the date/time data display, the date and time is displayed in step 5. If you record the picture without setting the clock and [--:--:--] will appear. 60min 0:00:00:00 1 2 3 AUTO 100 AWB F1.6 9dB 4 5 6 A SteadyShot off B Exposure C White balance D Gain E Shutter speed F Aperture value Playback Playback 37
To hide the date/time or the camera settings data Follow steps 2 to 4, and select [OFF] in the same area. Camera settings data display In the date/time data display, the date and time is displayed in step 5. If you record the picture without setting the clock and [--:--:--] will appear. 60min 0:00:00:00 1 2 3 AUTO 100 AWB F1.6 9dB 4 5 6 A SteadyShot off B Exposure C White balance D Gain E Shutter speed F Aperture value Playback Playback 37
User Manual
Page 42
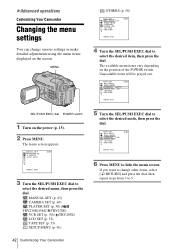
.... REC RETURN STBY [MENU] : END 4 Turn the SEL/PUSH EXEC dial to select the desired mode, then press the dial. MANUAL SET (p. 43) CAMERA SET (p. 46) PLAYER SET (p. 50) ( TRV238E/438E/ TRV270E) VCR SET (p. 50) ( TRV285E) LCD SET (p. 52) TAPE SET (p. 53) SETUP MENU (p. 56) 5 Turn the SEL/PUSH EXEC dial to...
.... REC RETURN STBY [MENU] : END 4 Turn the SEL/PUSH EXEC dial to select the desired mode, then press the dial. MANUAL SET (p. 43) CAMERA SET (p. 46) PLAYER SET (p. 50) ( TRV238E/438E/ TRV270E) VCR SET (p. 50) ( TRV285E) LCD SET (p. 52) TAPE SET (p. 53) SETUP MENU (p. 56) 5 Turn the SEL/PUSH EXEC dial to...


