User Manual
Page 2
.../TRV285E If static electricity or electromagnetism causes data transfer to attach the fuse cover after you should lose the fuse cover, please contact your camcorder. To view your household waste disposal service or the shop where you need a PAL system-based TV. • Television programs, films,...to be some tiny black points and/ 2 The recycling of the pixels are recorded without the fuse cover. Notes on your nearest Sony service station. FOR CUSTOMERS IN EUROPE ATTENTION for details. To avoid electrical shock, do not expose the unit to make sure the picture...
.../TRV285E If static electricity or electromagnetism causes data transfer to attach the fuse cover after you should lose the fuse cover, please contact your camcorder. To view your household waste disposal service or the shop where you need a PAL system-based TV. • Television programs, films,...to be some tiny black points and/ 2 The recycling of the pixels are recorded without the fuse cover. Notes on your nearest Sony service station. FOR CUSTOMERS IN EUROPE ATTENTION for details. To avoid electrical shock, do not expose the unit to make sure the picture...
User Manual
Page 3
... with an USB or i.LINK cable, be damaged. CCD-TRV238E: TRV238E CCD-TRV438E: TRV438E DCR-TRV270E: TRV270E DCR-TRV285E: TRV285E Instructions with specific model names are for all models. Change the screen language before using your camcorder to other device such as at the sun. Take ...the connector plug forcibly in color) that appear constantly on this instruction manual, each local language are captured using the camcorder • Hold your camcorder. • The on the OS. The screens may appear different from a Windows XP computer. Be careful when placing...
... with an USB or i.LINK cable, be damaged. CCD-TRV238E: TRV238E CCD-TRV438E: TRV438E DCR-TRV270E: TRV270E DCR-TRV285E: TRV285E Instructions with specific model names are for all models. Change the screen language before using your camcorder to other device such as at the sun. Take ...the connector plug forcibly in color) that appear constantly on this instruction manual, each local language are captured using the camcorder • Hold your camcorder. • The on the OS. The screens may appear different from a Windows XP computer. Be careful when placing...
User Manual
Page 6
...60 Dubbing to DVD") ( TRV270E/285E) .......79 Troubleshooting Troubleshooting 82 Warning indicators and messages .....92 Additional Information Using your camcorder abroad ...........94 Usable cassette tapes 95 About the "InfoLITHIUM" battery pack 96 About i.LINK 97 Maintenance and precautions 98 ...16:9 WIDE/STEADYSHOT, etc 46 Using the (PLAYER SET)/ (VCR SET) menu - Easy Dubbing ( TRV238E/438E 63 Recording pictures from a VCR ( TRV285E 67 Dubbing selected scenes from a tape - Advanced operations Customizing Your Camcorder Changing the menu settings 42 Using the (MANUAL SET) menu -
...60 Dubbing to DVD") ( TRV270E/285E) .......79 Troubleshooting Troubleshooting 82 Warning indicators and messages .....92 Additional Information Using your camcorder abroad ...........94 Usable cassette tapes 95 About the "InfoLITHIUM" battery pack 96 About i.LINK 97 Maintenance and precautions 98 ...16:9 WIDE/STEADYSHOT, etc 46 Using the (PLAYER SET)/ (VCR SET) menu - Easy Dubbing ( TRV238E/438E 63 Recording pictures from a VCR ( TRV285E 67 Dubbing selected scenes from a tape - Advanced operations Customizing Your Camcorder Changing the menu settings 42 Using the (MANUAL SET) menu -
User Manual
Page 8
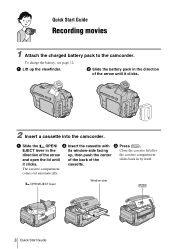
... and open the lid until it clicks. Quick Start Guide Recording movies 1 Attach the charged battery pack to the camcorder. The cassette compartment comes out automatically. it clicks. 2 Insert a cassette into the camcorder. a Lift up , then push the center of the back of the arrow until up the viewfinder. OPEN/EJECT lever...
... and open the lid until it clicks. Quick Start Guide Recording movies 1 Attach the charged battery pack to the camcorder. The cassette compartment comes out automatically. it clicks. 2 Insert a cassette into the camcorder. a Lift up , then push the center of the back of the arrow until up the viewfinder. OPEN/EJECT lever...
User Manual
Page 9
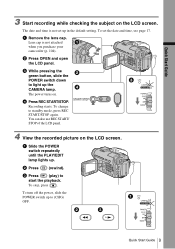
... the recorded picture on . c Press (play) to standby mode, press REC START/STOP again. The date and time is not attached when you purchase your camcorder (p. 104). c While pressing the green button, slide the POWER switch down to light up to (CHG) OFF. Quick Start Guide 9 To turn off the power...
... the recorded picture on . c Press (play) to standby mode, press REC START/STOP again. The date and time is not attached when you purchase your camcorder (p. 104). c While pressing the green button, slide the POWER switch down to light up to (CHG) OFF. Quick Start Guide 9 To turn off the power...
User Manual
Page 11
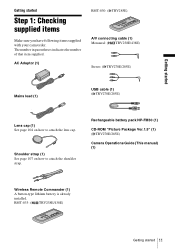
... how to attach the shoulder strap. Getting started Getting started 11 RMT-833: ( TRV238E/438E) Getting started Step 1: Checking supplied items Make sure you have following items supplied with your camcorder. AC Adaptor (1) RMT-830: ( TRV285E) A/V connecting cable (1) Monaural: ( TRV238E/438E) Stereo: ( TRV270E/285E) Mains lead (1) USB cable (1) ( TRV270E/285E) Lens cap (1) See...
... how to attach the shoulder strap. Getting started Getting started 11 RMT-833: ( TRV238E/438E) Getting started Step 1: Checking supplied items Make sure you have following items supplied with your camcorder. AC Adaptor (1) RMT-830: ( TRV285E) A/V connecting cable (1) Monaural: ( TRV238E/438E) Stereo: ( TRV270E/285E) Mains lead (1) USB cable (1) ( TRV270E/285E) Lens cap (1) See...
User Manual
Page 12
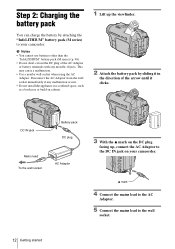
... Adaptor from the wall socket immediately if any metallic objects. v mark 4 Connect the mains lead to the AC Adaptor. 5 Connect the mains lead to your camcorder. DC IN jack Battery pack DC plug Mains lead To the wall socket AC Adaptor 3 With the v mark on your... camcorder. b Notes • You cannot use batteries other than the "InfoLITHIUM" battery pack (M series) (p. 96). • Do not short-circuit the DC plug of the arrow ...
... Adaptor from the wall socket immediately if any metallic objects. v mark 4 Connect the mains lead to the AC Adaptor. 5 Connect the mains lead to your camcorder. DC IN jack Battery pack DC plug Mains lead To the wall socket AC Adaptor 3 With the v mark on your... camcorder. b Notes • You cannot use batteries other than the "InfoLITHIUM" battery pack (M series) (p. 96). • Do not short-circuit the DC plug of the arrow ...
User Manual
Page 15
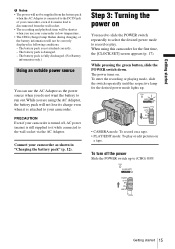
...is attached to (CHG) OFF. The battery pack is fully discharged. (For Battery information only.) Using an outside power source You can use your camcorder in low temperature. • The CHG (charge) lamp flashes during charging, or the battery information will not lose its mains lead is disconnected ... or playing mode, slide the switch repeatedly until the respective lamp for the first time, the [CLOCK SET] screen appears (p. 17). PRECAUTION Even if your camcorder is turned off the power Slide the POWER switch up . • CAMERA mode: To record on a tape. • PLAY/EDIT mode: To play ...
...is attached to (CHG) OFF. The battery pack is fully discharged. (For Battery information only.) Using an outside power source You can use your camcorder in low temperature. • The CHG (charge) lamp flashes during charging, or the battery information will not lose its mains lead is disconnected ... or playing mode, slide the switch repeatedly until the respective lamp for the first time, the [CLOCK SET] screen appears (p. 17). PRECAUTION Even if your camcorder is turned off the power Slide the POWER switch up . • CAMERA mode: To record on a tape. • PLAY/EDIT mode: To play ...
User Manual
Page 16
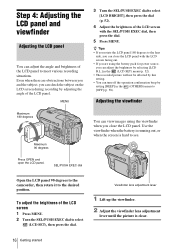
... can adjust the angle and brightness of the LCD panel to [OFF] (p. 58). SEL/PUSH EXEC dial Open the LCD panel 90 degrees to the camcorder, then rotate it to see. To adjust the brightness of the LCD screen with the LCD screen facing out. • If you are obstructions between...
... can adjust the angle and brightness of the LCD panel to [OFF] (p. 58). SEL/PUSH EXEC dial Open the LCD panel 90 degrees to the camcorder, then rotate it to see. To adjust the brightness of the LCD screen with the LCD screen facing out. • If you are obstructions between...
User Manual
Page 17
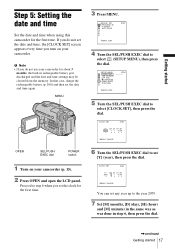
..., the built-in step 6, then press the dial. ,continued Getting started Step 5: Setting the date and time Set the date and time when using this camcorder for the first time. SETUP MENU CLOCK SET USB STREAM LTR SIZE LANGUAGE DEMO MODE RETURN STBY --:--:-- [MENU] : END 5 Turn the SEL/PUSH EXEC dial... 6 Turn the SEL/PUSH EXEC dial to select [CLOCK SET], then press the dial. MENU OPEN SEL/PUSH EXEC dial POWER switch 1 Turn on your camcorder for the first time. 3 Press MENU. MANUAL SET PROGRAM AE P EFFECT AUTO SHTR STBY [MENU] : END 4 Turn the SEL/PUSH EXEC dial to the year...
..., the built-in step 6, then press the dial. ,continued Getting started Step 5: Setting the date and time Set the date and time when using this camcorder for the first time. SETUP MENU CLOCK SET USB STREAM LTR SIZE LANGUAGE DEMO MODE RETURN STBY --:--:-- [MENU] : END 5 Turn the SEL/PUSH EXEC dial... 6 Turn the SEL/PUSH EXEC dial to select [CLOCK SET], then press the dial. MENU OPEN SEL/PUSH EXEC dial POWER switch 1 Turn on your camcorder for the first time. 3 Press MENU. MANUAL SET PROGRAM AE P EFFECT AUTO SHTR STBY [MENU] : END 4 Turn the SEL/PUSH EXEC dial to the year...
User Manual
Page 18
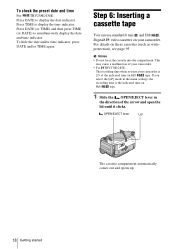
... tape. 1 Slide the OPEN/EJECT lever in the menu settings, the recording time is the indicated time on your camcorder is 2/3 of the arrow and open the lid until it clicks. To hide the date and/or time indicator, .../or TIME again. b Notes • Do not force the cassette into the compartment. This may cause a malfunction of your camcorder. • For TRV270E/285E: The recording time when you select the [LP] mode in the direction of the indicated time... the date and time indicator. To check the preset date and time For TRV238E/438E: Press DATE to display the date indicator.
... tape. 1 Slide the OPEN/EJECT lever in the menu settings, the recording time is the indicated time on your camcorder is 2/3 of the arrow and open the lid until it clicks. To hide the date and/or time indicator, .../or TIME again. b Notes • Do not force the cassette into the compartment. This may cause a malfunction of your camcorder. • For TRV270E/285E: The recording time when you select the [LP] mode in the direction of the indicated time... the date and time indicator. To check the preset date and time For TRV238E/438E: Press DATE to display the date indicator.
User Manual
Page 19
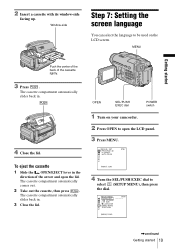
Window-side Step 7: Setting the screen language You can select the language to be used on your camcorder. 2 Press OPEN to select (SETUP MENU), then press the dial. MENU Getting started 19 The cassette compartment automatically slides back in the direction of the ...
Window-side Step 7: Setting the screen language You can select the language to be used on your camcorder. 2 Press OPEN to select (SETUP MENU), then press the dial. MENU Getting started 19 The cassette compartment automatically slides back in the direction of the ...
User Manual
Page 20
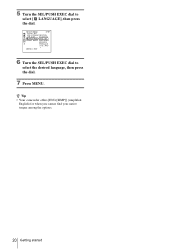
SETUP MENU STBY CLOCK SET USB STREAM DEUTSCH LTR SIZE LANGUAGE ENGL I SH DEMO MODE ENG [ S I MP ] ESPAÑOL FRANÇA I S I TAL I ANO [MENU] : END 6 Turn the SEL/PUSH EXEC dial to select [ LANGUAGE], then press the dial. 5 Turn the SEL/PUSH EXEC dial to select the desired language, then press the dial. 7 Press MENU. z Tip • Your camcorder offers [ENG [SIMP]] (simplified English) for when you cannot find your native tongue among the options. 20 Getting started
SETUP MENU STBY CLOCK SET USB STREAM DEUTSCH LTR SIZE LANGUAGE ENGL I SH DEMO MODE ENG [ S I MP ] ESPAÑOL FRANÇA I S I TAL I ANO [MENU] : END 6 Turn the SEL/PUSH EXEC dial to select [ LANGUAGE], then press the dial. 5 Turn the SEL/PUSH EXEC dial to select the desired language, then press the dial. 7 Press MENU. z Tip • Your camcorder offers [ENG [SIMP]] (simplified English) for when you cannot find your native tongue among the options. 20 Getting started
User Manual
Page 21
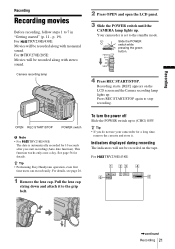
...until the CAMERA lamp lights up to (CHG) OFF. Recording starts. [REC] appears on the tape. This function works only once a day. For TRV238E/438E: 1 23 4 60min SP REC 0:00:00 6 5 ,continued Recording 21 For TRV270E/285E: Movies will be recorded along with stereo sound. To...recording The indicators will be recorded on the LCD screen and the Camera recording lamp lights up. Your camcorder is automatically recorded for 10 seconds after you do not use your camcorder for details. z Tip • Performing Easy Handycam operation, even first time users can record easily....
...until the CAMERA lamp lights up to (CHG) OFF. Recording starts. [REC] appears on the tape. This function works only once a day. For TRV238E/438E: 1 23 4 60min SP REC 0:00:00 6 5 ,continued Recording 21 For TRV270E/285E: Movies will be recorded along with stereo sound. To...recording The indicators will be recorded on the LCD screen and the Camera recording lamp lights up. Your camcorder is automatically recorded for 10 seconds after you do not use your camcorder for details. z Tip • Performing Easy Handycam operation, even first time users can record easily....
User Manual
Page 22
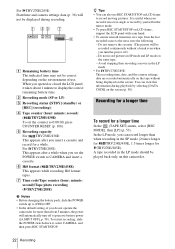
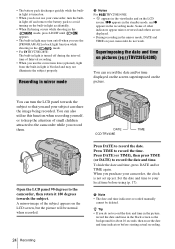
... time, date, and the camera settings data are recorded automatically on the tape without a break even when you turn off .) - You can view this camcorder. 22 Recording z Tips • You can record longer than when recording in the mirror mode. • To press REC START/STOP on LCD frame,... TRV270E/285E: Date/time and camera settings data (p. 36) will not be displayed during playback by yourself in the SP mode (2 times longer for TRV238E/438E, 1.5 times longer for more than about 1 minute to record moving pictures. Do not record pictures in the LP mode should be played back ...
... time, date, and the camera settings data are recorded automatically on the tape without a break even when you turn off .) - You can view this camcorder. 22 Recording z Tips • You can record longer than when recording in the mirror mode. • To press REC START/STOP on LCD frame,... TRV270E/285E: Date/time and camera settings data (p. 36) will not be displayed during playback by yourself in the SP mode (2 times longer for TRV238E/438E, 1.5 times longer for more than about 1 minute to record moving pictures. Do not record pictures in the LP mode should be played back ...
User Manual
Page 23
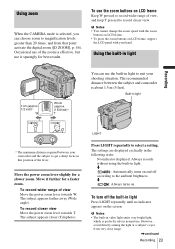
...80 cm (approx. 2 5/8 feet)* You can choose zoom to suit your hand. Built-in light Recording * The minimum distance required between the subject and camcorder is about 1.5 m (5 feet). The subject appears farther away (Wide angle). LIGHT Press LIGHT repeatedly to get a sharp focus in normal use. The ...'s eyes from that position of view Move the power zoom lever towards T. To use the zoom buttons on . The recommended distance between your camcorder and the subject to select a setting. To record closer view Move the power zoom lever towards W. b Notes • The built-in ...
...80 cm (approx. 2 5/8 feet)* You can choose zoom to suit your hand. Built-in light Recording * The minimum distance required between the subject and camcorder is about 1.5 m (5 feet). The subject appears farther away (Wide angle). LIGHT Press LIGHT repeatedly to get a sharp focus in normal use. The ...'s eyes from that position of view Move the power zoom lever towards T. To use the zoom buttons on . The recommended distance between your camcorder and the subject to select a setting. To record closer view Move the power zoom lever towards W. b Notes • The built-in ...
User Manual
Page 24
DATE TIME CCD-TRV438E Open the LCD panel 90 degrees to keep the attention of other indicators appear ... not work. Set the date and time to avoid turning on pictures ( TRV238E/438E) You can also utilize this function when recording yourself, or to the camcorder, then rotate it 180 degrees towards the subject so that you do not record... Xz appears in the standby mode, and z appears in the mirror mode, DATE and TIME on your camcorder do not use your camcorder, the clock is blocked and may not illuminate the subject properly. When you use the [PROGRAM AE] ...
DATE TIME CCD-TRV438E Open the LCD panel 90 degrees to keep the attention of other indicators appear ... not work. Set the date and time to avoid turning on pictures ( TRV238E/438E) You can also utilize this function when recording yourself, or to the camcorder, then rotate it 180 degrees towards the subject so that you do not record... Xz appears in the standby mode, and z appears in the mirror mode, DATE and TIME on your camcorder do not use your camcorder, the clock is blocked and may not illuminate the subject properly. When you use the [PROGRAM AE] ...

User Manual
Page 26
... OPEN REC START/STOP z Tip • Buttons that are available during Easy Handycam operation are restored when you cannot connect the USB cable to your camcorder. To turn the power off Slide the POWER switch up . p. 19). Pull the lens cap string down and attach it to the grip belt. 2 Press... to (CHG) OFF. Recording with USB Streaming. • All the settings return to their defaults during Easy Handycam operation. Recording starts. [REC] appears on your camcorder. • For TRV270E/285E: You cannot use Easy Handycam operation together with ease -
... OPEN REC START/STOP z Tip • Buttons that are available during Easy Handycam operation are restored when you cannot connect the USB cable to your camcorder. To turn the power off Slide the POWER switch up . p. 19). Pull the lens cap string down and attach it to the grip belt. 2 Press... to (CHG) OFF. Recording with USB Streaming. • All the settings return to their defaults during Easy Handycam operation. Recording starts. [REC] appears on your camcorder. • For TRV270E/285E: You cannot use Easy Handycam operation together with ease -

User Manual
Page 31
...] y [RED] y [CYAN] y [GREEN] y [BLUE] [SIZE] (size) [SMALL] y [LARGE] (You can create original titles (up to 2 types of title of within 20 characters each) in your camcorder). TITLE SET P1 STBY S ABCDE 1 2 3 4 5 $ ¥DM£ FGHIJ 67890 ¿ i ø " : KLMNO C ] PQRST cP2 ] UVWXY O K ] Z TITLE] : END To erase a character: Select [C]. The title is...
...] y [RED] y [CYAN] y [GREEN] y [BLUE] [SIZE] (size) [SMALL] y [LARGE] (You can create original titles (up to 2 types of title of within 20 characters each) in your camcorder). TITLE SET P1 STBY S ABCDE 1 2 3 4 5 $ ¥DM£ FGHIJ 67890 ¿ i ø " : KLMNO C ] PQRST cP2 ] UVWXY O K ] Z TITLE] : END To erase a character: Select [C]. The title is...
User Manual
Page 32
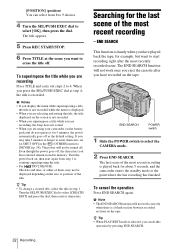
... dial at the point where the last recording has finished. END SEARCH POWER switch 1 Slide the POWER switch to continue superimposing the title. • For TRV238E/438E: The date and time, or either of them, may take 5 minutes or longer to enter characters, set [A.SHUT OFF] in the (OTHERS).... The title appears. 5 Press REC START/STOP. 6 Press TITLE at the scene you have played back the tape, for about 5 seconds, and the camcorder enters the standby mode at step 4, the title is a blank section between recorded sections on the battery pack and do this operation by pressing END...
... dial at the point where the last recording has finished. END SEARCH POWER switch 1 Slide the POWER switch to continue superimposing the title. • For TRV238E/438E: The date and time, or either of them, may take 5 minutes or longer to enter characters, set [A.SHUT OFF] in the (OTHERS).... The title appears. 5 Press REC START/STOP. 6 Press TITLE at the scene you have played back the tape, for about 5 seconds, and the camcorder enters the standby mode at step 4, the title is a blank section between recorded sections on the battery pack and do this operation by pressing END...


