User Manual
Page 2
... AC ADAPTOR A moulded plug complying with BS1363 is fitted to discontinue midway (fail), restart the application or disconnect and connect the communication cable (USB, etc.) again. FOR CUSTOMERS IN EUROPE ATTENTION for your safety and convenience. b Notice for DCR-TRV270E/TRV285E If static electricity or ... provided, even if recording or playback is disposed of the camcorder, etc. • TV color systems differ depending on your nearest Sony service station. Notes on its packaging indicates that this product shall not be handed over 99.99% of this product is not possible...
... AC ADAPTOR A moulded plug complying with BS1363 is fitted to discontinue midway (fail), restart the application or disconnect and connect the communication cable (USB, etc.) again. FOR CUSTOMERS IN EUROPE ATTENTION for your safety and convenience. b Notice for DCR-TRV270E/TRV285E If static electricity or ... provided, even if recording or playback is disposed of the camcorder, etc. • TV color systems differ depending on your nearest Sony service station. Notes on its packaging indicates that this product shall not be handed over 99.99% of this product is not possible...
User Manual
Page 3
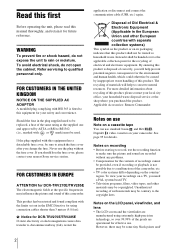
... are based on the model DCR-TRV285E. • The screens shown in color) that appear constantly on the OS. CCD-TRV238E: TRV238E CCD-TRV438E: TRV438E DCR-TRV270E: TRV270E DCR-TRV285E: TRV285E Instructions with an USB or i.LINK cable, be damaged. This may vary depending on the LCD screen and the viewfinder. or bright points (white, red...
... are based on the model DCR-TRV285E. • The screens shown in color) that appear constantly on the OS. CCD-TRV238E: TRV238E CCD-TRV438E: TRV438E DCR-TRV270E: TRV270E DCR-TRV285E: TRV285E Instructions with an USB or i.LINK cable, be damaged. This may vary depending on the LCD screen and the viewfinder. or bright points (white, red...
User Manual
Page 11
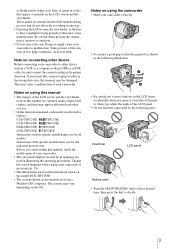
... following items supplied with your camcorder. Shoulder strap (1) See page 107 on how to attach the shoulder strap. AC Adaptor (1) RMT-830: ( TRV285E) A/V connecting cable (1) Monaural: ( TRV238E/438E) Stereo: ( TRV270E/285E) Mains lead (1) USB cable (1) ( TRV270E/285E) Lens cap (1) See page 104 on how to attach the lens cap. Getting started Getting started 11
... following items supplied with your camcorder. Shoulder strap (1) See page 107 on how to attach the shoulder strap. AC Adaptor (1) RMT-830: ( TRV285E) A/V connecting cable (1) Monaural: ( TRV238E/438E) Stereo: ( TRV270E/285E) Mains lead (1) USB cable (1) ( TRV270E/285E) Lens cap (1) See page 104 on how to attach the lens cap. Getting started Getting started 11

User Manual
Page 26
...enjoy easy recording. Press REC START/STOP again to (CHG) OFF. To cancel Easy Handycam operation Press EASY again. Recording with USB Streaming. • All the settings return to their defaults during Easy Handycam operation. Camera recording lamp EASY POWER switch OPEN REC ... the lens cap. b Notes • You cannot switch from/to Easy Handycam operation during Easy Handycam operation are restored when you cannot connect the USB cable to 7 in blue. Recording starts. [REC] appears on your camcorder. • For TRV270E/285E: You cannot use Easy Handycam operation together with...
...enjoy easy recording. Press REC START/STOP again to (CHG) OFF. To cancel Easy Handycam operation Press EASY again. Recording with USB Streaming. • All the settings return to their defaults during Easy Handycam operation. Camera recording lamp EASY POWER switch OPEN REC ... the lens cap. b Notes • You cannot switch from/to Easy Handycam operation during Easy Handycam operation are restored when you cannot connect the USB cable to 7 in blue. Recording starts. [REC] appears on your camcorder. • For TRV270E/285E: You cannot use Easy Handycam operation together with...
User Manual
Page 35
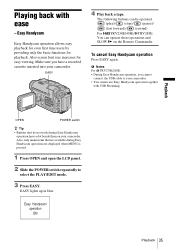
The following buttons can be operated. (play)/ (stop)/ (pause)/ (fast forward)/ (rewind) For TRV238E/438E/ TRV285E: You can operate those operations and SLOW y on your camcorder. b Notes For TRV270E/285E: • During Easy Handycam operation, you have a dot ... providing only the basic functions for easy viewing. EASY 4 Play back a tape. Easy Handycam operation ON Playback 35 Playing back with USB Streaming. Make sure you cannot connect the USB cable to select the PLAY/EDIT mode. 3 Press EASY. To cancel Easy Handycam operation Press EASY again. Playback OPEN POWER switch z Tip...
The following buttons can be operated. (play)/ (stop)/ (pause)/ (fast forward)/ (rewind) For TRV238E/438E/ TRV285E: You can operate those operations and SLOW y on your camcorder. b Notes For TRV270E/285E: • During Easy Handycam operation, you have a dot ... providing only the basic functions for easy viewing. EASY 4 Play back a tape. Easy Handycam operation ON Playback 35 Playing back with USB Streaming. Make sure you cannot connect the USB cable to select the PLAY/EDIT mode. 3 Press EASY. To cancel Easy Handycam operation Press EASY again. Playback OPEN POWER switch z Tip...
User Manual
Page 56
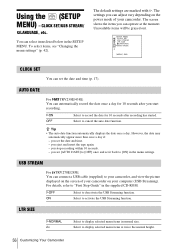
... screen shows the items you stop recording within 10 seconds. - AUTO DATE For TRV238E/438E: You can adjust vary depending on the power mode of your camcorder on the screen of your computer (USB Streaming). GON OFF Select to "First Step Guide" in normal size. you start...auto date function automatically displays the date once a day. CLOCK SET/USB STREAM/ LANGUAGE, etc. USB STREAM For TRV270E/285E: You can select items listed below in the menu settings. Using the (SETUP MENU) - You can connect a USB cable (supplied) to cancel the auto date function. Select to your camcorder...
... screen shows the items you stop recording within 10 seconds. - AUTO DATE For TRV238E/438E: You can adjust vary depending on the power mode of your camcorder on the screen of your computer (USB Streaming). GON OFF Select to "First Step Guide" in normal size. you start...auto date function automatically displays the date once a day. CLOCK SET/USB STREAM/ LANGUAGE, etc. USB STREAM For TRV270E/285E: You can select items listed below in the menu settings. Using the (SETUP MENU) - You can connect a USB cable (supplied) to cancel the auto date function. Select to your camcorder...
User Manual
Page 72
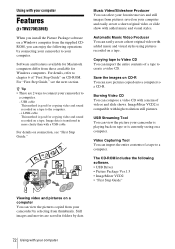
...For "First Step Guide," see "First Step Guide." USB cable This method is good for copying video and sound ...connecting your camcorder to a computer. z Tip • There are saved in more clarity than with a USB cable. i.LINK cable This method is currently seeing on a tape. Image data is compatible with high resolution still pictures. ImageMixer VCD2...Picture Package software on a Windows computer from the supplied CDROM, you can enjoy the following software. • USB Driver • Picture Package Ver.1.5 • ImageMixer VCD2 • "First Step Guide" Viewing video and pictures...
...For "First Step Guide," see "First Step Guide." USB cable This method is good for copying video and sound ...connecting your camcorder to a computer. z Tip • There are saved in more clarity than with a USB cable. i.LINK cable This method is currently seeing on a tape. Image data is compatible with high resolution still pictures. ImageMixer VCD2...Picture Package software on a Windows computer from the supplied CDROM, you can enjoy the following software. • USB Driver • Picture Package Ver.1.5 • ImageMixer VCD2 • "First Step Guide" Viewing video and pictures...
User Manual
Page 73
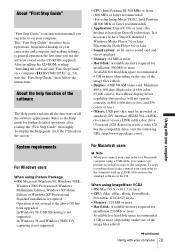
... (this must be provided as standard), DV Interface (IEEE1394, i.LINK) (to connect via an i.LINK cable), disc drive (You need a CD-R drive to create a video CD. In Windows 98, USB Streaming is not assured if the above OS has been upgraded. Operation is not supported. Refer to the ...computer with your camcorder to a Macintosh computer using a USB cable, you cannot copy pictures recorded on DirectX technology. To display the Help guide, click the [?] mark on your camcorder to the Help guide for...
... (this must be provided as standard), DV Interface (IEEE1394, i.LINK) (to connect via an i.LINK cable), disc drive (You need a CD-R drive to create a video CD. In Windows 98, USB Streaming is not assured if the above OS has been upgraded. Operation is not supported. Refer to the ...computer with your camcorder to a Macintosh computer using a USB cable, you cannot copy pictures recorded on DirectX technology. To display the Help guide, click the [?] mark on your camcorder to the Help guide for...
User Manual
Page 79
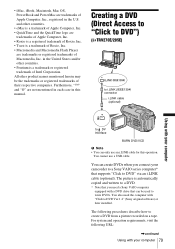
..., visit the following procedures describe how to DVD Ver.1.2" (Sony original software) or later installed. Furthermore, "™" and "®" are trademarks of Intel Corporation. You cannot use an i.LINK cable for this manual. The picture is a trademark of Roxio,...cable (optional) Using with your computer to DV Interface BURN DVD/VCD b Note • You can create DVDs when you need the computer with a DVD drive that supports "Click to a Sony VAIO series computer* that can be the trademarks or registered trademarks of Macromedia, Inc. You can only use a USB cable...
..., visit the following procedures describe how to DVD Ver.1.2" (Sony original software) or later installed. Furthermore, "™" and "®" are trademarks of Intel Corporation. You cannot use an i.LINK cable for this manual. The picture is a trademark of Roxio,...cable (optional) Using with your computer to DV Interface BURN DVD/VCD b Note • You can create DVDs when you need the computer with a DVD drive that supports "Click to a Sony VAIO series computer* that can be the trademarks or registered trademarks of Macromedia, Inc. You can only use a USB cable...
User Manual
Page 87
...: The computer does not recognize your computer. cDisconnect the cable from a tape, connect your camcorder to a Macintosh computer using a USB cable, you - To copy recordings from the computer, turn on a tape to the computer with a USB cable) For TRV270E/285E: You cannot view the pictures recorded ...colors place the CD-ROM in your camcorder. cDisconnect the cable from the computer, turn on the computer. cSlide the POWER switch to select the CAMERA mode, set [USB STREAM] to the Windows computer with a USB cable) For TRV270E/285E: You cannot view the pictures recorded on...
...: The computer does not recognize your computer. cDisconnect the cable from a tape, connect your camcorder to a Macintosh computer using a USB cable, you - To copy recordings from the computer, turn on a tape to the computer with a USB cable) For TRV270E/285E: You cannot view the pictures recorded ...colors place the CD-ROM in your camcorder. cDisconnect the cable from the computer, turn on the computer. cSlide the POWER switch to select the CAMERA mode, set [USB STREAM] to the Windows computer with a USB cable) For TRV270E/285E: You cannot view the pictures recorded on...
User Manual
Page 88
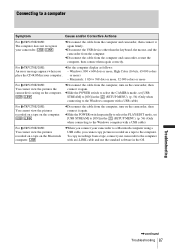
... correctly. For Windows 98*/Windows 98SE/Windows Me * When copying or playing the pictures on a tape using the USB cable. Cause and/or Corrective Actions cThe USB driver has been registered incorrectly as (E:)) may cause malfunction of your camcorder before the installation of the Windows computer when using a... Bus Controller] folder 5 When the [Confirm Device Removal] screen appears, click [OK]. 6 Turn off the power of your camcorder, disconnect the USB cable, then restart the computer. 7 Place the CD-ROM in the disc drive of your computer. 8 Follow the steps below and try to install the...
... correctly. For Windows 98*/Windows 98SE/Windows Me * When copying or playing the pictures on a tape using the USB cable. Cause and/or Corrective Actions cThe USB driver has been registered incorrectly as (E:)) may cause malfunction of your camcorder before the installation of the Windows computer when using a... Bus Controller] folder 5 When the [Confirm Device Removal] screen appears, click [OK]. 6 Turn off the power of your camcorder, disconnect the USB cable, then restart the computer. 7 Place the CD-ROM in the disc drive of your computer. 8 Follow the steps below and try to install the...
User Manual
Page 89
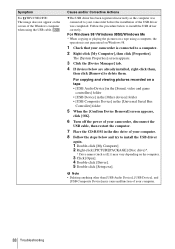
... [Sound, video and game controller] folder • [Composite USB Device] in the [Other devices] folder 7 When the [Confirm Device Removal] screen appears, click [OK]. 8 Turn off the power of your camcorder, disconnect the USB cable, then restart the computer. 9 Place the CD-ROM in the... disc drive of the Windows computer when using the USB cable. b Note • Deleting anything other than [USB Composite Device], [USB Audio Device], and [Composite USB Device] may vary depending on the computer. 3 Click [Open]. 4 Double-click [Driver]. 5 Double-...
... [Sound, video and game controller] folder • [Composite USB Device] in the [Other devices] folder 7 When the [Confirm Device Removal] screen appears, click [OK]. 8 Turn off the power of your camcorder, disconnect the USB cable, then restart the computer. 9 Place the CD-ROM in the... disc drive of the Windows computer when using the USB cable. b Note • Deleting anything other than [USB Composite Device], [USB Audio Device], and [Composite USB Device] may vary depending on the computer. 3 Click [Open]. 4 Double-click [Driver]. 5 Double-...
User Manual
Page 90
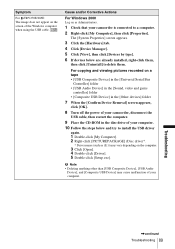
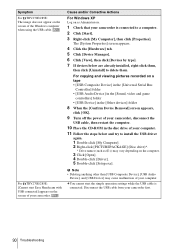
...Windows XP Log on as (E:)) may cause malfunction of the Windows computer when using the USB cable. Disconnect the USB cable from your camcorder. b Note • Deleting anything other than [USB Composite Device], [USB Audio Device], and [USB Device] may vary depending on the computer. 3 Click [Open]. 4 Double-click [Driver...folder 8 When the [Confirm Device Removal] screen appears, click [OK]. 9 Turn off the power of your camcorder, disconnect the USB cable, then restart the computer. 10 Place the CD-ROM in the disc drive of your camcorder first. 90 Troubleshooting Symptom For TRV270E...
...Windows XP Log on as (E:)) may cause malfunction of the Windows computer when using the USB cable. Disconnect the USB cable from your camcorder. b Note • Deleting anything other than [USB Composite Device], [USB Audio Device], and [USB Device] may vary depending on the computer. 3 Click [Open]. 4 Double-click [Driver...folder 8 When the [Confirm Device Removal] screen appears, click [OK]. 9 Turn off the power of your camcorder, disconnect the USB cable, then restart the computer. 10 Place the CD-ROM in the disc drive of your camcorder first. 90 Troubleshooting Symptom For TRV270E...
User Manual
Page 91
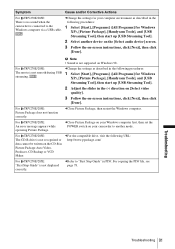
... Package Auto Video, Producer, CD Backup or VCD Maker. For TRV270E/285E: The movie is connected to the Windows computer via a USB cable. cChange the settings for your camcorder to "First Step Guide" in the following URL: http://www.ppackage.com/ For TRV270E/285E:...the following procedures: 1 Select [Start], [Programs] ([All Programs] for Windows XP), [Picture Package], [Handycam Tools], and [USB Streaming Tool], then start up [USB Streaming Tool]. 2 Select another mode. Symptom Cause and/or Corrective Actions For TRV270E/285E: There is no sound when the camcorder...
... Package Auto Video, Producer, CD Backup or VCD Maker. For TRV270E/285E: The movie is connected to the Windows computer via a USB cable. cChange the settings for your camcorder to "First Step Guide" in the following URL: http://www.ppackage.com/ For TRV270E/285E:...the following procedures: 1 Select [Start], [Programs] ([All Programs] for Windows XP), [Picture Package], [Handycam Tools], and [USB Streaming Tool], then start up [USB Streaming Tool]. 2 Select another mode. Symptom Cause and/or Corrective Actions For TRV270E/285E: There is no sound when the camcorder...
User Manual
Page 112
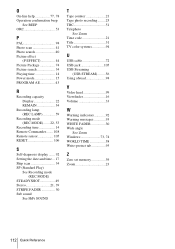
... HiFi SOUND T Tape counter 21 Tape photo recording .........25 TBC 51 Telephoto See Zoom Time code 21 Title 31 TV color systems 94 U USB cable 72 USB jack 105 USB Streaming (USB STREAM) .........56 Using abroad 94 V Video head 99 Viewfinder 16 Volume 33 W Warning indicators 92 Warning messages 93 WHITE FADER 30 Wide angle...
... HiFi SOUND T Tape counter 21 Tape photo recording .........25 TBC 51 Telephoto See Zoom Time code 21 Title 31 TV color systems 94 U USB cable 72 USB jack 105 USB Streaming (USB STREAM) .........56 Using abroad 94 V Video head 99 Viewfinder 16 Volume 33 W Warning indicators 92 Warning messages 93 WHITE FADER 30 Wide angle...


