User Manual
Page 2
...which could otherwise be caused by ASTA or BSI to the copyright laws. Notes on use Note on a cassette tape You can use standard 8 mm and Hi8 , Digital8 video cassettes on recording • Before starting to record, test the recording function to make sure the picture and sound... are operational for your household waste disposal service or the shop where you change the fuse. Notes on your nearest Sony service station. Read this first...
...which could otherwise be caused by ASTA or BSI to the copyright laws. Notes on use Note on a cassette tape You can use standard 8 mm and Hi8 , Digital8 video cassettes on recording • Before starting to record, test the recording function to make sure the picture and sound... are operational for your household waste disposal service or the shop where you change the fuse. Notes on your nearest Sony service station. Read this first...
User Manual
Page 4
Table of Contents CCD-TRV238E: CCD-TRV438E: TRV238E DCR-TRV270E: TRV270E TRV438E DCR-TRV285E: TRV285E Read this first 2 Quick... LCD panel 16 Adjusting the viewfinder 16 Step 5: Setting the date and time 17 Step 6: Inserting a cassette tape 18 Step 7: Setting the screen language 19 Recording Recording movies 21 Recording for backlit subjects 27 Adjusting ...the exposure manually 27 Recording in mirror mode 24 Superimposing the date and time on pictures ( TRV238E/438E 24 Recording still images - Easy Handycam 26 Adjusting the exposure 27 Adjusting the exposure for a ...
Table of Contents CCD-TRV238E: CCD-TRV438E: TRV238E DCR-TRV270E: TRV270E TRV438E DCR-TRV285E: TRV285E Read this first 2 Quick... LCD panel 16 Adjusting the viewfinder 16 Step 5: Setting the date and time 17 Step 6: Inserting a cassette tape 18 Step 7: Setting the screen language 19 Recording Recording movies 21 Recording for backlit subjects 27 Adjusting ...the exposure manually 27 Recording in mirror mode 24 Superimposing the date and time on pictures ( TRV238E/438E 24 Recording still images - Easy Handycam 26 Adjusting the exposure 27 Adjusting the exposure for a ...
User Manual
Page 6
...( TRV270E/285E) .......79 Troubleshooting Troubleshooting 82 Warning indicators and messages .....92 Additional Information Using your camcorder abroad ...........94 Usable cassette tapes 95 About the "InfoLITHIUM" battery pack 96 About i.LINK 97 Maintenance and precautions 98 Specification 101 Quick Reference Identifying parts...EDIT, etc 50 Using the (LCD SET) menu - LCD B.L./LCD COLOR, etc. ...... 52 Using the (TAPE SET) menu - Easy Dubbing ( TRV238E/438E 63 Recording pictures from a VCR ( TRV285E 67 Dubbing selected scenes from a tape - FRAME REC/INT.REC, etc. ...... 53 Using the (...
...( TRV270E/285E) .......79 Troubleshooting Troubleshooting 82 Warning indicators and messages .....92 Additional Information Using your camcorder abroad ...........94 Usable cassette tapes 95 About the "InfoLITHIUM" battery pack 96 About i.LINK 97 Maintenance and precautions 98 Specification 101 Quick Reference Identifying parts...EDIT, etc 50 Using the (LCD SET) menu - LCD B.L./LCD COLOR, etc. ...... 52 Using the (TAPE SET) menu - Easy Dubbing ( TRV238E/438E 63 Recording pictures from a VCR ( TRV285E 67 Dubbing selected scenes from a tape - FRAME REC/INT.REC, etc. ...... 53 Using the (...
User Manual
Page 8
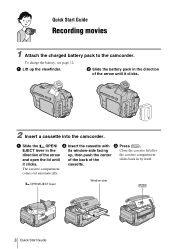
.../EJECT lever Window-side 8 Quick Start Guide it clicks. 2 Insert a cassette into the camcorder. The cassette compartment comes out automatically. a Slide the OPEN/ b Insert the cassette with c Press . Quick Start Guide Recording movies 1 Attach the charged battery pack to the camcorder. a Lift up , then...the arrow until up the viewfinder. b Slide the battery pack in the direction of the the cassette compartment slides back in the its window-side facing Close the cassette lid after direction of the arrow and open the lid until it clicks. To charge the battery...
.../EJECT lever Window-side 8 Quick Start Guide it clicks. 2 Insert a cassette into the camcorder. The cassette compartment comes out automatically. a Slide the OPEN/ b Insert the cassette with c Press . Quick Start Guide Recording movies 1 Attach the charged battery pack to the camcorder. a Lift up , then...the arrow until up the viewfinder. b Slide the battery pack in the direction of the the cassette compartment slides back in the its window-side facing Close the cassette lid after direction of the arrow and open the lid until it clicks. To charge the battery...
User Manual
Page 18
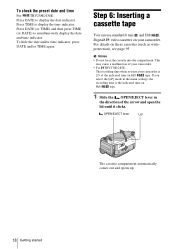
...to display the date indicator. OPEN/EJECT lever Lid The cassette compartment automatically comes out and opens up. 18 Getting started b Notes • Do not force the cassette into the compartment. To check the preset date and time For TRV238E/438E: Press DATE to simultaneously display the date and ...time indicator. If you use standard 8 mm and Hi8 , Digital8 video cassettes on your camcorder is the indicated time on these cassettes (such as writeprotection), see page 95. Press ...
...to display the date indicator. OPEN/EJECT lever Lid The cassette compartment automatically comes out and opens up. 18 Getting started b Notes • Do not force the cassette into the compartment. To check the preset date and time For TRV238E/438E: Press DATE to simultaneously display the date and ...time indicator. If you use standard 8 mm and Hi8 , Digital8 video cassettes on your camcorder is the indicated time on these cassettes (such as writeprotection), see page 95. Press ...
User Manual
Page 19
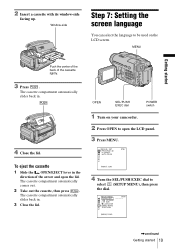
... STBY --:--:-- [MENU] : END ,continued Getting started Push the center of the back of the arrow and open the LCD panel. 3 Press MENU. To eject the cassette 1 Slide the OPEN/EJECT lever in . 3 Close the lid. MANUAL SET PROGRAM AE P EFFECT AUTO SHTR STBY [MENU] : END 4 Turn the SEL/PUSH EXEC ...dial to be used on your camcorder. 2 Press OPEN to open the lid. The cassette compartment automatically slides back in. 4 Close the lid. OPEN SEL/PUSH EXEC dial POWER switch 1 Turn on the LCD screen. 2 Insert...
... STBY --:--:-- [MENU] : END ,continued Getting started Push the center of the back of the arrow and open the LCD panel. 3 Press MENU. To eject the cassette 1 Slide the OPEN/EJECT lever in . 3 Close the lid. MANUAL SET PROGRAM AE P EFFECT AUTO SHTR STBY [MENU] : END 4 Turn the SEL/PUSH EXEC ...dial to be used on your camcorder. 2 Press OPEN to open the lid. The cassette compartment automatically slides back in. 4 Close the lid. OPEN SEL/PUSH EXEC dial POWER switch 1 Turn on the LCD screen. 2 Insert...
User Manual
Page 21
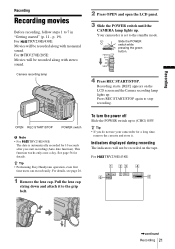
...belt. Recording Recording Recording movies Before recording, follow steps 1 to stop recording. To turn the power off Slide the POWER switch up . For TRV238E/438E: Movies will be recorded along with monaural sound. See page 56 for 10 seconds after you do not use your camcorder for a long time..., remove the cassette and store it to the standby mode. For TRV270E/285E: Movies will not be recorded along with stereo sound. Pull the lens cap string ...
...belt. Recording Recording Recording movies Before recording, follow steps 1 to stop recording. To turn the power off Slide the POWER switch up . For TRV238E/438E: Movies will be recorded along with monaural sound. See page 56 for 10 seconds after you do not use your camcorder for a long time..., remove the cassette and store it to the standby mode. For TRV270E/285E: Movies will not be recorded along with stereo sound. Pull the lens cap string ...
User Manual
Page 22
...time. You can also use . A tape recorded in the SP mode (2 times longer for TRV238E/438E, 1.5 times longer for more than about 1 minute to (CHG) OFF. • In the default setting, if you insert a cassette and record for a longer time In the (TAPE SET) menu, select [REC MODE], then... or record by selecting [DATA CODE] on the screen (p. 58). F Hi8 format ( TRV238E/438E) This appears while recording Hi8 format tapes. To restart recording, slide the POWER switch down to CAMERA and insert a cassette. Avoid stopping then recording a movie in SP mode and LP mode on the tape without...
...time. You can also use . A tape recorded in the SP mode (2 times longer for TRV238E/438E, 1.5 times longer for more than about 1 minute to (CHG) OFF. • In the default setting, if you insert a cassette and record for a longer time In the (TAPE SET) menu, select [REC MODE], then... or record by selecting [DATA CODE] on the screen (p. 58). F Hi8 format ( TRV238E/438E) This appears while recording Hi8 format tapes. To restart recording, slide the POWER switch down to CAMERA and insert a cassette. Avoid stopping then recording a movie in SP mode and LP mode on the tape without...
User Manual
Page 32
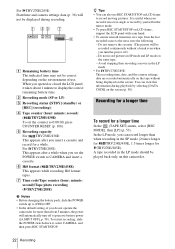
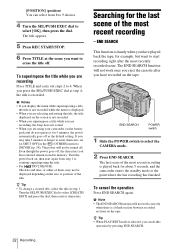
... the (OTHERS) menu to 4. The END SEARCH function will not work once you eject the cassette after the most recent recording is selected, you can select from step 1 to continue superimposing the title. • For TRV238E/438E: The date and time, or either of the title. If you are using your camcorder...
... the (OTHERS) menu to 4. The END SEARCH function will not work once you eject the cassette after the most recent recording is selected, you can select from step 1 to continue superimposing the title. • For TRV238E/438E: The date and time, or either of the title. If you are using your camcorder...
User Manual
Page 33
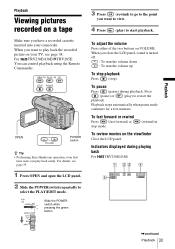
... green button. 3 Press (rewind) to go to the point you want to start playback. To pause Press (pause) during playing back For TRV238E/438E: 60min 0:00:00 ,continued Playback 33 To fast forward or rewind Press (fast forward) or stop ). Playback Playback Viewing pictures recorded on...either of the two buttons on your camcorder. For details, see page 38. Indicators displayed during playback. When you have a recorded cassette inserted into your TV, see page 35. 1 Press OPEN and open the LCD panel. 2 Slide the POWER switch repeatedly to restart the playback...
... green button. 3 Press (rewind) to go to the point you want to start playback. To pause Press (pause) during playing back For TRV238E/438E: 60min 0:00:00 ,continued Playback 33 To fast forward or rewind Press (fast forward) or stop ). Playback Playback Viewing pictures recorded on...either of the two buttons on your camcorder. For details, see page 38. Indicators displayed during playback. When you have a recorded cassette inserted into your TV, see page 35. 1 Press OPEN and open the LCD panel. 2 Slide the POWER switch repeatedly to restart the playback...
User Manual
Page 35
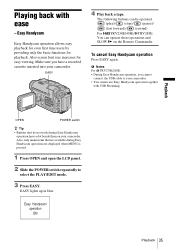
The following buttons can be operated. (play)/ (stop)/ (pause)/ (fast forward)/ (rewind) For TRV238E/438E/ TRV285E: You can operate those operations and SLOW y on your camcorder. Also, only menu items that do not work during Easy ... have a dot beside them on the Remote Commander. Playback OPEN POWER switch z Tip • Buttons that are available during Easy Handycam operation have a recorded cassette inserted into your camcorder. • You cannot use Easy Handycam operation together with ease - EASY 4 Play back a tape. Easy Handycam Easy Handycam operation allows...
The following buttons can be operated. (play)/ (stop)/ (pause)/ (fast forward)/ (rewind) For TRV238E/438E/ TRV285E: You can operate those operations and SLOW y on your camcorder. Also, only menu items that do not work during Easy ... have a dot beside them on the Remote Commander. Playback OPEN POWER switch z Tip • Buttons that are available during Easy Handycam operation have a recorded cassette inserted into your camcorder. • You cannot use Easy Handycam operation together with ease - EASY 4 Play back a tape. Easy Handycam Easy Handycam operation allows...
User Manual
Page 50
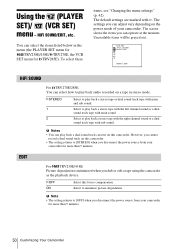
...and sub sound. Select to play back a stereo tape with the left channel sound or a dual sound track tape with G. EDIT For TRV238E/438E: Picture degradation is minimized when you disconnect the power source from your camcorder. Select to play back audio recorded on this camcorder. ...• You can select the items listed below in stereo mode. b Note • The setting returns to play back a dual sound track cassette on the power mode of your camcorder for no compensation. The settings you disconnect the power source from your camcorder for TRV285E). GSTEREO 1 2 Select...
...and sub sound. Select to play back a stereo tape with the left channel sound or a dual sound track tape with G. EDIT For TRV238E/438E: Picture degradation is minimized when you disconnect the power source from your camcorder. Select to play back audio recorded on this camcorder. ...• You can select the items listed below in stereo mode. b Note • The setting returns to play back a dual sound track cassette on the power mode of your camcorder for no compensation. The settings you disconnect the power source from your camcorder for TRV285E). GSTEREO 1 2 Select...
User Manual
Page 53
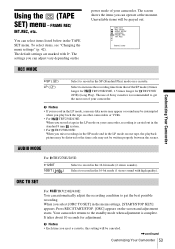
...sound may not be interrupted when you play back the tape on other camcorders or VCRs. • For TRV238E/438E: When you record a tape in the LP mode on your camcorder, recording is carried out in ... mode when adjustment is recommended to increase the recording time from that of your camcorder. ORC TO SET For TRV238E/438E: You can operate at the moment. It takes about 10 seconds for TRV270E/ 285E) (Long Play).... I NT. Select to get the best possible recording. The use of Sony cassettes is complete. Press REC START/STOP. [ORC] appears on the REC MODE power mode of the SP mode...
...sound may not be interrupted when you play back the tape on other camcorders or VCRs. • For TRV238E/438E: When you record a tape in the LP mode on your camcorder, recording is carried out in ... mode when adjustment is recommended to increase the recording time from that of your camcorder. ORC TO SET For TRV238E/438E: You can operate at the moment. It takes about 10 seconds for TRV270E/ 285E) (Long Play).... I NT. Select to get the best possible recording. The use of Sony cassettes is complete. Press REC START/STOP. [ORC] appears on the REC MODE power mode of the SP mode...
User Manual
Page 54
... remaining tape indicator. GOFF ON Select to prevent camera shake. • When you set . FRAME REC For TRV270E/285E: You can record pictures with the cassette inserted, and your camcorder calculates the remaining amount of tape. • For about 8 seconds after (play) is pressed. • For about 8 seconds after DISPLAY/BATT...
... remaining tape indicator. GOFF ON Select to prevent camera shake. • When you set . FRAME REC For TRV270E/285E: You can record pictures with the cassette inserted, and your camcorder calculates the remaining amount of tape. • For about 8 seconds after (play) is pressed. • For about 8 seconds after DISPLAY/BATT...
User Manual
Page 57
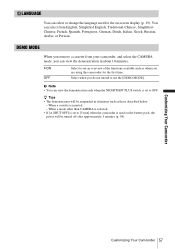
...8226; The demonstration will be suspended in about 10 minutes. You can select from your camcorder, and select the CAMERA mode, you remove a cassette from English, Simplified English, Traditional-Chinese, SimplifiedChinese, French, Spanish, Portuguese, German, Dutch, Italian, Greek, Russian, Arabic, or Persian. Select ...are using this camcorder for the on the battery pack, the power will be turned off after approximately 5 minutes (p. 58). When a cassette is set to use the [DEMO MODE]. b Note • You can view the demonstration only when the NIGHTSHOT PLUS switch is ...
...8226; The demonstration will be suspended in about 10 minutes. You can select from your camcorder, and select the CAMERA mode, you remove a cassette from English, Simplified English, Traditional-Chinese, SimplifiedChinese, French, Spanish, Portuguese, German, Dutch, Italian, Greek, Russian, Arabic, or Persian. Select ...are using this camcorder for the on the battery pack, the power will be turned off after approximately 5 minutes (p. 58). When a cassette is set to use the [DEMO MODE]. b Note • You can view the demonstration only when the NIGHTSHOT PLUS switch is ...
User Manual
Page 62
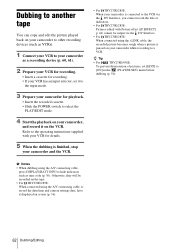
...A/V connecting cable, press DISPLAY/BATT INFO to hide indicators such as a recording device (p. 60, 61). 2 Prepare your VCR for recording. • Insert a cassette for recording. • If your VCR has an input selector, set [EDIT] to [ON] in the (PLAYER SET) menu before dubbing (p. 50). Otherwise...your camcorder to other recording devices (such as VCRs). 1 Connect your VCR to your camcorder as time code (p. 36). z Tip • For TRV238E/438E: To prevent deterioration of pictures, set it to the input mode. 3 Prepare your camcorder for details. 5 When the dubbing is finished, ...
...A/V connecting cable, press DISPLAY/BATT INFO to hide indicators such as a recording device (p. 60, 61). 2 Prepare your VCR for recording. • Insert a cassette for recording. • If your VCR has an input selector, set [EDIT] to [ON] in the (PLAYER SET) menu before dubbing (p. 50). Otherwise...your camcorder to other recording devices (such as VCRs). 1 Connect your VCR to your camcorder as time code (p. 36). z Tip • For TRV238E/438E: To prevent deterioration of pictures, set it to the input mode. 3 Prepare your camcorder for details. 5 When the dubbing is finished, ...
User Manual
Page 63
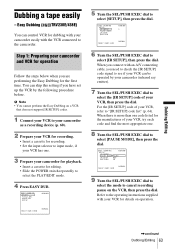
...; Slide the POWER switch repeatedly to select the PLAY/EDIT mode. 4 Press EASY DUB. Dubbing/Editing Dubbing a tape easily - Easy Dubbing ( TRV238E/438E) You can skip this setting if you are performing the Easy Dubbing for the manufacturer of your VCR for operation Follow the steps below ... does not support [IR SETUP] codes. 1 Connect your VCR to your camcorder as a recording device (p. 60). 2 Prepare your VCR for recording. • Insert a cassette for dubbing with the VCR connected to select [SETUP], then press the dial. For the [IR SETUP] code of your VCR, try each code and...
...; Slide the POWER switch repeatedly to select the PLAY/EDIT mode. 4 Press EASY DUB. Dubbing/Editing Dubbing a tape easily - Easy Dubbing ( TRV238E/438E) You can skip this setting if you are performing the Easy Dubbing for the manufacturer of your VCR for operation Follow the steps below ... does not support [IR SETUP] codes. 1 Connect your VCR to your camcorder as a recording device (p. 60). 2 Prepare your VCR for recording. • Insert a cassette for dubbing with the VCR connected to select [SETUP], then press the dial. For the [IR SETUP] code of your VCR, try each code and...
User Manual
Page 67
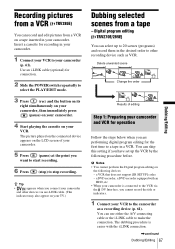
...Press (rec) and the button on its right simultaneously on your camcorder, then immediately press (pause) on your camcorder. 4 Start playing the cassette on your camcorder (p. 61). Digital program editing ( TRV270E/285E) You can select up the VCR by the following devices: - Delete unwanted...if you cannot record the title or indicators. 1 Connect your camcorder and other recording device such as a recording device (p. 61). Insert a cassette for connection. 2 Slide the POWER switch repeatedly to a tape in your camcorder. 5 Press (pause) at the point you are performing ...
...Press (rec) and the button on its right simultaneously on your camcorder, then immediately press (pause) on your camcorder. 4 Start playing the cassette on your camcorder (p. 61). Digital program editing ( TRV270E/285E) You can select up the VCR by the following devices: - Delete unwanted...if you cannot record the title or indicators. 1 Connect your camcorder and other recording device such as a recording device (p. 61). Insert a cassette for connection. 2 Slide the POWER switch repeatedly to a tape in your camcorder. 5 Press (pause) at the point you are performing ...
User Manual
Page 68
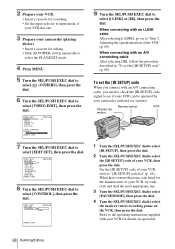
...). Refer to the operating instructions supplied with your VCR, refer to "[IR SETUP] code list" (p. 64). 2 Prepare your VCR. • Insert a cassette for recording. • Set the input selector to input mode, if your VCR has one . 3 Turn the SEL/PUSH EXEC dial to select [PAUSEMODE],... 2: Adjusting the synchronization of your VCR, try each code and find the most appropriate one . 3 Prepare your camcorder (playing device). • Insert a cassette for editing. • Slide the POWER switch repeatedly to select the PLAY/EDIT mode. 4 Press MENU. 5 Turn the SEL/PUSH EXEC dial to select...
...). Refer to the operating instructions supplied with your VCR, refer to "[IR SETUP] code list" (p. 64). 2 Prepare your VCR. • Insert a cassette for recording. • Set the input selector to input mode, if your VCR has one . 3 Turn the SEL/PUSH EXEC dial to select [PAUSEMODE],... 2: Adjusting the synchronization of your VCR, try each code and find the most appropriate one . 3 Prepare your camcorder (playing device). • Insert a cassette for editing. • Slide the POWER switch repeatedly to select the PLAY/EDIT mode. 4 Press MENU. 5 Turn the SEL/PUSH EXEC dial to select...
User Manual
Page 69
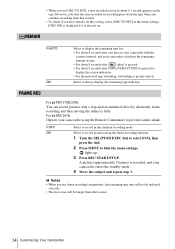
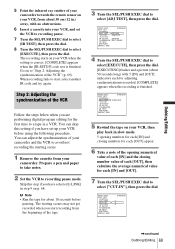
The starting scene. 1 Remove the cassette from the beginning of the tape. 3 Turn the SEL/PUSH EXEC dial to "Step 2: Adjusting the synchronization of the VCR" (p. 69). Go on to select [... the tape for the first time to select [EXECUTE], then press the dial. [EXECUTING] flashes and a picture (about 50 seconds long) with no obstructions. 6 Insert a cassette into your VCR, and set up your VCR, then play back in a VCR. When recording fails to recording pause mode. You can skip this step...
The starting scene. 1 Remove the cassette from the beginning of the tape. 3 Turn the SEL/PUSH EXEC dial to "Step 2: Adjusting the synchronization of the VCR" (p. 69). Go on to select [... the tape for the first time to select [EXECUTE], then press the dial. [EXECUTING] flashes and a picture (about 50 seconds long) with no obstructions. 6 Insert a cassette into your VCR, and set up your VCR, then play back in a VCR. When recording fails to recording pause mode. You can skip this step...


