User Manual
Page 2
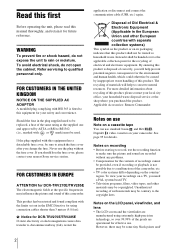
...data transfer to conserve natural resources. Notes on a TV, you change the fuse. Read this first Before operating the unit, please read this manual thoroughly, and retain it shall be handed over 99.99% of the pixels are recorded without the fuse cover. Should the fuse in the ...use Note on a cassette tape You can use standard 8 mm and Hi8 , Digital8 video cassettes on the country/ region. To view your nearest Sony service station. FOR CUSTOMERS IN EUROPE ATTENTION for the contents of the camcorder, etc. • TV color systems differ depending on your safety and convenience...
...data transfer to conserve natural resources. Notes on a TV, you change the fuse. Read this first Before operating the unit, please read this manual thoroughly, and retain it shall be handed over 99.99% of the pixels are recorded without the fuse cover. Should the fuse in the ...use Note on a cassette tape You can use standard 8 mm and Hi8 , Digital8 video cassettes on the country/ region. To view your nearest Sony service station. FOR CUSTOMERS IN EUROPE ATTENTION for the contents of the camcorder, etc. • TV color systems differ depending on your safety and convenience...
User Manual
Page 3
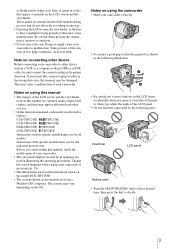
... when you open or close the LCD panel, or when you start reading this manual are normal results of the LCD screen and the viewfinder used on this manual are based on -screen displays in illustrating the operating procedures. CCD-TRV238E: TRV238E CCD-TRV438E: TRV438E DCR-TRV270E: TRV270E DCR-TRV285E: TRV285E Instructions with no specific model...
... when you open or close the LCD panel, or when you start reading this manual are normal results of the LCD screen and the viewfinder used on this manual are based on -screen displays in illustrating the operating procedures. CCD-TRV238E: TRV238E CCD-TRV438E: TRV438E DCR-TRV270E: TRV270E DCR-TRV285E: TRV285E Instructions with no specific model...
User Manual
Page 4
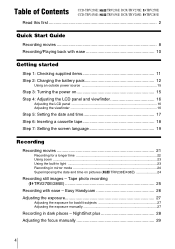
Table of Contents CCD-TRV238E: CCD-TRV438E: TRV238E DCR-TRV270E: TRV270E TRV438E DCR-TRV285E: TRV285E Read this first 2 Quick Start Guide Recording movies 8 Recording/Playing back with ease - Easy Handycam 26 Adjusting the ... tape 18 Step 7: Setting the screen language 19 Recording Recording movies 21 Recording for backlit subjects 27 Adjusting the exposure manually 27 Recording in dark places - NightShot plus 28 Adjusting the focus manually 29 4 Tape photo recording ( TRV270E/285E 25 Recording with ease 10 Getting started Step 1: Checking supplied items 11 Step...
Table of Contents CCD-TRV238E: CCD-TRV438E: TRV238E DCR-TRV270E: TRV270E TRV438E DCR-TRV285E: TRV285E Read this first 2 Quick Start Guide Recording movies 8 Recording/Playing back with ease - Easy Handycam 26 Adjusting the ... tape 18 Step 7: Setting the screen language 19 Recording Recording movies 21 Recording for backlit subjects 27 Adjusting the exposure manually 27 Recording in dark places - NightShot plus 28 Adjusting the focus manually 29 4 Tape photo recording ( TRV270E/285E 25 Recording with ease 10 Getting started Step 1: Checking supplied items 11 Step...
User Manual
Page 6
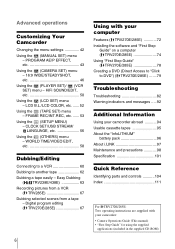
... 46 Using the (PLAYER SET)/ (VCR SET) menu - CLOCK SET/USB STREAM/ LANGUAGE, etc 56 Using the (OTHERS) menu - Easy Dubbing ( TRV238E/438E 63 Recording pictures from a VCR ( TRV285E 67 Dubbing selected scenes from a tape - Digital program editing ( TRV270E/285E 67 6 Using with your ...camcorder: • Camera Operations Guide (This manual) • "First Step Guide" for using the supplied applications (included in the supplied CD-ROM) FRAME REC/INT.REC, etc. ...... 53 Using...
... 46 Using the (PLAYER SET)/ (VCR SET) menu - CLOCK SET/USB STREAM/ LANGUAGE, etc 56 Using the (OTHERS) menu - Easy Dubbing ( TRV238E/438E 63 Recording pictures from a VCR ( TRV285E 67 Dubbing selected scenes from a tape - Digital program editing ( TRV270E/285E 67 6 Using with your ...camcorder: • Camera Operations Guide (This manual) • "First Step Guide" for using the supplied applications (included in the supplied CD-ROM) FRAME REC/INT.REC, etc. ...... 53 Using...
User Manual
Page 11
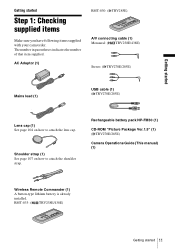
...-ROM "Picture Package Ver.1.5" (1) ( TRV270E/285E) Camera Operations Guide (This manual) (1) Wireless Remote Commander (1) A button-type lithium battery is already installed. Shoulder strap (1) See page 107 on how to attach the shoulder strap. AC Adaptor (1) RMT-830: ( TRV285E) A/V connecting cable (1) Monaural: ( TRV238E/438E) Stereo: ( TRV270E/285E) Mains lead (1) USB cable (1) ( TRV270E/285E...
...-ROM "Picture Package Ver.1.5" (1) ( TRV270E/285E) Camera Operations Guide (This manual) (1) Wireless Remote Commander (1) A button-type lithium battery is already installed. Shoulder strap (1) See page 107 on how to attach the shoulder strap. AC Adaptor (1) RMT-830: ( TRV285E) A/V connecting cable (1) Monaural: ( TRV238E/438E) Stereo: ( TRV270E/285E) Mains lead (1) USB cable (1) ( TRV270E/285E...
User Manual
Page 17
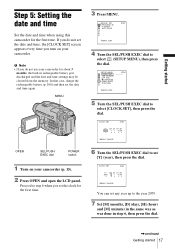
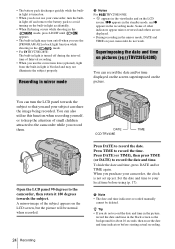
... the date and time again. MENU OPEN SEL/PUSH EXEC dial POWER switch 1 Turn on your camcorder (p. 15). 2 Press OPEN and open the LCD panel. MANUAL SET PROGRAM AE P EFFECT AUTO SHTR STBY [MENU] : END 4 Turn the SEL/PUSH EXEC dial to select [CLOCK SET], then press the dial. In that...
... the date and time again. MENU OPEN SEL/PUSH EXEC dial POWER switch 1 Turn on your camcorder (p. 15). 2 Press OPEN and open the LCD panel. MANUAL SET PROGRAM AE P EFFECT AUTO SHTR STBY [MENU] : END 4 Turn the SEL/PUSH EXEC dial to select [CLOCK SET], then press the dial. In that...
User Manual
Page 19
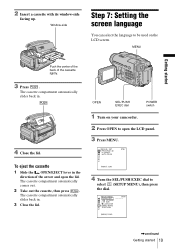
The cassette compartment automatically slides back in . 3 Close the lid. MANUAL SET PROGRAM AE P EFFECT AUTO SHTR STBY [MENU] : END 4 Turn the SEL/PUSH EXEC dial to open the lid. 2 Insert a cassette with its window-side ...
The cassette compartment automatically slides back in . 3 Close the lid. MANUAL SET PROGRAM AE P EFFECT AUTO SHTR STBY [MENU] : END 4 Turn the SEL/PUSH EXEC dial to open the lid. 2 Insert a cassette with its window-side ...
User Manual
Page 24
...camcorder do not work. Press TIME to record the date and time. b Note • The date and time indicators recorded manually cannot be normal when recorded. DATE TIME CCD-TRV438E Open the LCD panel 90 degrees to keep the attention of Interval recording. • When you use your camcorder, turn..., press DATE and/or TIME again. Press DATE to your camcorder, the clock is not set up yet. Recording in mirror mode b Notes For TRV238E/438E: • appears in the black screen as the background for about 10 seconds, then erase the date and time indicators before using (p. 17)....
...camcorder do not work. Press TIME to record the date and time. b Note • The date and time indicators recorded manually cannot be normal when recorded. DATE TIME CCD-TRV438E Open the LCD panel 90 degrees to keep the attention of Interval recording. • When you use your camcorder, turn..., press DATE and/or TIME again. Press DATE to your camcorder, the clock is not set up yet. Recording in mirror mode b Notes For TRV238E/438E: • appears in the black screen as the background for about 10 seconds, then erase the date and time indicators before using (p. 17)....
User Manual
Page 27
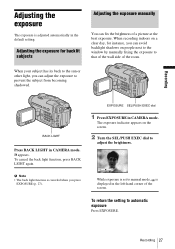
... SEL/PUSH EXEC dial 1 Press EXPOSURE in CAMERA mode. . Recording 27 When recording indoors on a clear day, for backlit subjects Adjusting the exposure manually You can fix the brightness of the room. BACK LIGHT Press BACK LIGHT in CAMERA mode. When your subject has its back to the sun... or other light, you can adjust the exposure to manual mode, is canceled when you press EXPOSURE (p. 27). While exposure is set to prevent the subject from becoming shadowed. Recording Adjusting the exposure...
... SEL/PUSH EXEC dial 1 Press EXPOSURE in CAMERA mode. . Recording 27 When recording indoors on a clear day, for backlit subjects Adjusting the exposure manually You can fix the brightness of the room. BACK LIGHT Press BACK LIGHT in CAMERA mode. When your subject has its back to the sun... or other light, you can adjust the exposure to manual mode, is canceled when you press EXPOSURE (p. 27). While exposure is set to prevent the subject from becoming shadowed. Recording Adjusting the exposure...
User Manual
Page 28
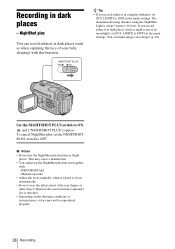
...; Do not cover the infrared port with your baby sleeping) with : - [PROGRAM AE] - To cancel NightShot plus function together with this function. Manual exposure • Adjust the focus manually when it is about 3 meters (10 feet). Recording in complete darkness, set the NIGHTSHOT PLUS switch to OFF. NightShot plus function in dark...
...; Do not cover the infrared port with your baby sleeping) with : - [PROGRAM AE] - To cancel NightShot plus function together with this function. Manual exposure • Adjust the focus manually when it is about 3 meters (10 feet). Recording in complete darkness, set the NIGHTSHOT PLUS switch to OFF. NightShot plus function in dark...
User Manual
Page 29
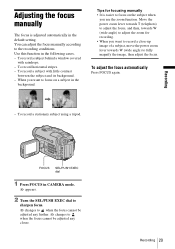
... to record a close-up image of a subject, move the power zoom lever towards W (wide angle) to adjust the zoom for focusing manually • It is adjusted automatically in the background. To record a subject behind a window covered with little contrast between the subject and its background... (wide angle) to fully magnify the image, then adjust the focus. To adjust the focus automatically Press FOCUS again. - Adjusting the focus manually The focus is easier to focus on a subject in the default setting. Recording FOCUS SEL/PUSH EXEC dial 1 Press FOCUS in the following cases...
... to record a close-up image of a subject, move the power zoom lever towards W (wide angle) to adjust the zoom for focusing manually • It is adjusted automatically in the background. To record a subject behind a window covered with little contrast between the subject and its background... (wide angle) to fully magnify the image, then adjust the focus. To adjust the focus automatically Press FOCUS again. - Adjusting the focus manually The focus is easier to focus on a subject in the default setting. Recording FOCUS SEL/PUSH EXEC dial 1 Press FOCUS in the following cases...
User Manual
Page 38
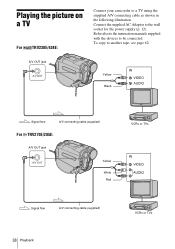
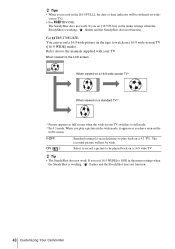
Refer also to the instruction manuals supplied with the devices to another tape, see page 62. To copy to be connected. Connect the supplied AC Adaptor to a TV using the supplied A/V connecting cable as shown in the following illustration. A/V OUT jack Yellow Black Signal flow A/V connecting cable (supplied) For TRV270E/285E: A/V OUT jack Yellow White Red VCRs or TVs Signal flow A/V connecting cable (supplied) 38 Playback VCRs or TVs Playing the picture on a TV For TRV238E/438E: Connect your camcorder to the wall socket for the power supply (p. 12).
Refer also to the instruction manuals supplied with the devices to another tape, see page 62. To copy to be connected. Connect the supplied AC Adaptor to a TV using the supplied A/V connecting cable as shown in the following illustration. A/V OUT jack Yellow Black Signal flow A/V connecting cable (supplied) For TRV270E/285E: A/V OUT jack Yellow White Red VCRs or TVs Signal flow A/V connecting cable (supplied) 38 Playback VCRs or TVs Playing the picture on a TV For TRV238E/438E: Connect your camcorder to the wall socket for the power supply (p. 12).
User Manual
Page 42
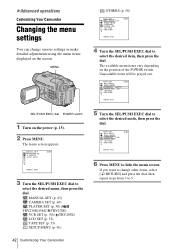
REC RETURN STBY [MENU] : END SEL/PUSH EXEC dial POWER switch 1 Turn on the position of the POWER switch. MANUAL SET PROGRAM AE P EFFECT AUTO SHTR STBY [MENU] : END 3 Turn the SEL/PUSH EXEC dial to hide the menu screen. The menu screen appears. REC ... menu items vary depending on the power (p. 15). 2 Press MENU. TAPE SET REC MODE AUDIO MODE REMAIN AUTO FRAME REC ON I N T. MANUAL SET (p. 43) CAMERA SET (p. 46) PLAYER SET (p. 50) ( TRV238E/438E/ TRV270E) VCR SET (p. 50) ( TRV285E) LCD SET (p. 52) TAPE SET (p. 53) SETUP MENU (p. 56) 5 Turn the SEL/PUSH EXEC dial...
REC RETURN STBY [MENU] : END SEL/PUSH EXEC dial POWER switch 1 Turn on the position of the POWER switch. MANUAL SET PROGRAM AE P EFFECT AUTO SHTR STBY [MENU] : END 3 Turn the SEL/PUSH EXEC dial to hide the menu screen. The menu screen appears. REC ... menu items vary depending on the power (p. 15). 2 Press MENU. TAPE SET REC MODE AUDIO MODE REMAIN AUTO FRAME REC ON I N T. MANUAL SET (p. 43) CAMERA SET (p. 46) PLAYER SET (p. 50) ( TRV238E/438E/ TRV270E) VCR SET (p. 50) ( TRV285E) LCD SET (p. 52) TAPE SET (p. 53) SETUP MENU (p. 56) 5 Turn the SEL/PUSH EXEC dial...
User Manual
Page 43
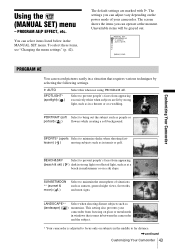
...the camcorder and the subject. * Your camcorder is adjusted to prevent people's faces from focusing on glass or metal mesh in tennis or golf. MANUAL SET PROGRAM AE P EFFECT AUTO SHTR [MENU] : END PROGRAM AE You can select items listed below in the middle to maintain the atmosphere of... in a situation that comes in midsummer or on a ski slope. G AUTO SPOTLIGHT* (spotlight) ( ) Select this when not using PROGRAM AE. Using the (MANUAL SET) menu - To select these items, see "Changing the menu settings" (p. 42). The settings you can adjust vary depending on subjects in the...
...the camcorder and the subject. * Your camcorder is adjusted to prevent people's faces from focusing on glass or metal mesh in tennis or golf. MANUAL SET PROGRAM AE P EFFECT AUTO SHTR [MENU] : END PROGRAM AE You can select items listed below in the middle to maintain the atmosphere of... in a situation that comes in midsummer or on a ski slope. G AUTO SPOTLIGHT* (spotlight) ( ) Select this when not using PROGRAM AE. Using the (MANUAL SET) menu - To select these items, see "Changing the menu settings" (p. 42). The settings you can adjust vary depending on subjects in the...
User Manual
Page 47
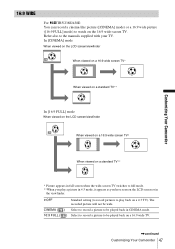
... be wide. GOFF Standard setting (to record pictures to play a picture in full screen when the wide-screen TV switches to the manuals supplied with your TV. 16:9 WIDE For TRV238E/438E: You can record a cinema-like picture ([CINEMA] mode) or a 16:9 wide picture ([16:9 FULL] mode) to watch on the LCD...
... be wide. GOFF Standard setting (to record pictures to play a picture in full screen when the wide-screen TV switches to the manuals supplied with your TV. 16:9 WIDE For TRV238E/438E: You can record a cinema-like picture ([CINEMA] mode) or a 16:9 wide picture ([16:9 FULL] mode) to watch on the LCD...
User Manual
Page 48
... on a 16:9 wide screen TV* When viewed on wide- Select to record a picture to full mode. **In 4:3 mode. If you set [16:9 WIDE] to the manuals supplied with your TV.
... on a 16:9 wide screen TV* When viewed on wide- Select to record a picture to full mode. **In 4:3 mode. If you set [16:9 WIDE] to the manuals supplied with your TV.

User Manual
Page 55
... the menu settings. Connect your camcorder to [OFF] in recording time of flowers blooming, etc., with this function. z Tips • If you adjust the focus manually, you may be able to record clear pictures even if the light changes (p. 29). • You can achieve excellent recordings of up during the operation...
... the menu settings. Connect your camcorder to [OFF] in recording time of flowers blooming, etc., with this function. z Tips • If you adjust the focus manually, you may be able to record clear pictures even if the light changes (p. 29). • You can achieve excellent recordings of up during the operation...
User Manual
Page 73
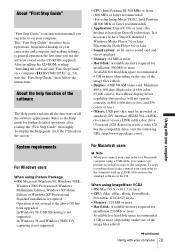
About "First Step Guide" "First Step Guide" is an instruction manual you can refer to on a computer ( TRV270E/285E)" (p. 74), start the "First Step Guide," then follow the instructions. After installing the CD-ROM, reading "Installing ...
About "First Step Guide" "First Step Guide" is an instruction manual you can refer to on a computer ( TRV270E/285E)" (p. 74), start the "First Step Guide," then follow the instructions. After installing the CD-ROM, reading "Installing ...
User Manual
Page 75
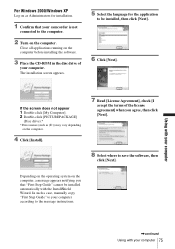
...], check [I accept the terms of your camcorder is not connected to save the software, then click [Next]. Using with your computer 75 In such a case, manually copy "First Step Guide" to your computer according to be installed automatically with your computer ,continued Using with the InstallShield Wizard. The installation screen appears...
...], check [I accept the terms of your camcorder is not connected to save the software, then click [Next]. Using with your computer 75 In such a case, manually copy "First Step Guide" to your computer according to be installed automatically with your computer ,continued Using with the InstallShield Wizard. The installation screen appears...
User Manual
Page 79
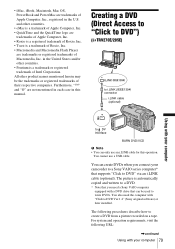
...optional) Using with your computer to DV Interface BURN DVD/VCD b Note • You can only use a USB cable. You also need a Sony VAIO computer equipped with "Click to DVD" via an i.LINK cable (optional). For system and operation requirements, visit the following procedures describe how to ...trademark of Roxio, Inc. • Toast is a trademark or registered trademark of their respective companies. You cannot use an i.LINK cable for this manual. in the United States and/or other product names mentioned herein may be used to create a DVD from a picture recorded on a tape. The...
...optional) Using with your computer to DV Interface BURN DVD/VCD b Note • You can only use a USB cable. You also need a Sony VAIO computer equipped with "Click to DVD" via an i.LINK cable (optional). For system and operation requirements, visit the following procedures describe how to ...trademark of Roxio, Inc. • Toast is a trademark or registered trademark of their respective companies. You cannot use an i.LINK cable for this manual. in the United States and/or other product names mentioned herein may be used to create a DVD from a picture recorded on a tape. The...


