Owners Manual
Page 4
... the rear of important operating and maintenance (servicing) instructions in a residential installation. Increase the separation between the equipment and receiver. - Reorient or relocate the receiving antenna. - The lamp(s) within an equilateral triangle is no guarantee that may cause harmful interference to Part 15 of electric shock. CAUTION: TO PREVENT ELECTRIC SHOCK, DO NOT USE THIS POLARIZED PLUG WITH AN EXTENSION CORD, RECEPTACLE...
... the rear of important operating and maintenance (servicing) instructions in a residential installation. Increase the separation between the equipment and receiver. - Reorient or relocate the receiving antenna. - The lamp(s) within an equilateral triangle is no guarantee that may cause harmful interference to Part 15 of electric shock. CAUTION: TO PREVENT ELECTRIC SHOCK, DO NOT USE THIS POLARIZED PLUG WITH AN EXTENSION CORD, RECEPTACLE...
Owners Manual
Page 5
... electric light or power circuits, or where it is closing. Never spill or spray any service or repairs to this unit, ask the service technician to perform safety checks to dripping or splashing, and objects filled with liquids, such as vases, should not be placed on the apparatus. 16) An outside antenna or cable system is NATIONAL ELECTRICAL CODE connected...
... electric light or power circuits, or where it is closing. Never spill or spray any service or repairs to this unit, ask the service technician to perform safety checks to dripping or splashing, and objects filled with liquids, such as vases, should not be placed on the apparatus. 16) An outside antenna or cable system is NATIONAL ELECTRICAL CODE connected...

Owners Manual
Page 6
... player stand in your mouth, immediately gargle and consult with furniture and television sets. In such cases, change the location of two people are not always supported on your doctor after rinsing for installation. Flat panel displays that the room temperature rises gradually. TUNE INTO SAFETY One size does NOT fit all enclosed instructions for the safe installation and use of your doctor. Follow all instructions supplied...
... player stand in your mouth, immediately gargle and consult with furniture and television sets. In such cases, change the location of two people are not always supported on your doctor after rinsing for installation. Flat panel displays that the room temperature rises gradually. TUNE INTO SAFETY One size does NOT fit all enclosed instructions for the safe installation and use of your doctor. Follow all instructions supplied...
Owners Manual
Page 8
... can view digital broadcasts without using Title/Chapter/Time/Track - Parental Control - You can be enjoyed. Closed Caption Decoder With Full Text Mode - Displays text captions or full screen text on the screen during playback. A DVD disc has much more capacity, but is higher than Super VHS video cassettes. The picture quality is connected, Dolby Digital sound can be played back for the following functions. Compatible with a wide range of DVD audio outputs Digital Audio Jack...
... can view digital broadcasts without using Title/Chapter/Time/Track - Parental Control - You can be enjoyed. Closed Caption Decoder With Full Text Mode - Displays text captions or full screen text on the screen during playback. A DVD disc has much more capacity, but is higher than Super VHS video cassettes. The picture quality is connected, Dolby Digital sound can be played back for the following functions. Compatible with a wide range of DVD audio outputs Digital Audio Jack...
Owners Manual
Page 9
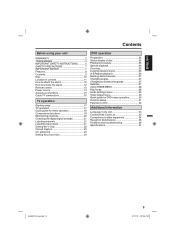
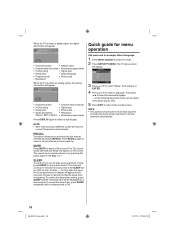
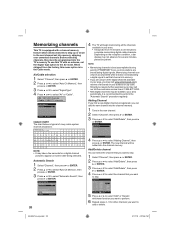
... remove the stand 12 Remote control 13 Power source 14 Antenna connections 15 Cable TV connections 16 TV operation Starting setup 17 TV operation 17 Quick guide for menu operation 18 Convenience functions 19 Memorizing channels 20 Checking the digital signal strength 21 Labeling channels 21 Labeling video inputs 21 Setting the V-Chip 22 Closed Caption 23 CC advanced 23 Setting the picture size 24 DVD operation Preparation 25 Status display of disc 25 Playback procedure 25 Special playback 26 Zooming 26 Locating desired scene 26...
... remove the stand 12 Remote control 13 Power source 14 Antenna connections 15 Cable TV connections 16 TV operation Starting setup 17 TV operation 17 Quick guide for menu operation 18 Convenience functions 19 Memorizing channels 20 Checking the digital signal strength 21 Labeling channels 21 Labeling video inputs 21 Setting the V-Chip 22 Closed Caption 23 CC advanced 23 Setting the picture size 24 DVD operation Preparation 25 Status display of disc 25 Playback procedure 25 Special playback 26 Zooming 26 Locating desired scene 26...
Owners Manual
Page 13
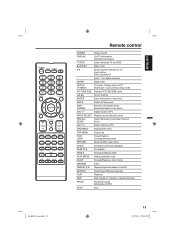
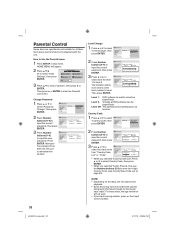
... DVD menu TOP MENU Select title CCD/ JUMP Closed Caption Locating desired scene RETURN Remove DVD setup menu AUDIO Change sound track language SUBTITLE Set subtitle ANGLE Change playback angle PLAY MODE Select playback mode SLOW Forward/Reverse- Call up initial setup mode PICTURE SIZE Display PICTURE SIZE menu ▲▼◀▶ Cursor buttons ENTER Enter information in the menu MUTE Switch off the sound EXIT/ CANCEL Exit from On-Screen menu Reset information in the menu VOL +/- Adjust volume of TV INPUT SELECT Display source selection menu RECALL...
... DVD menu TOP MENU Select title CCD/ JUMP Closed Caption Locating desired scene RETURN Remove DVD setup menu AUDIO Change sound track language SUBTITLE Set subtitle ANGLE Change playback angle PLAY MODE Select playback mode SLOW Forward/Reverse- Call up initial setup mode PICTURE SIZE Display PICTURE SIZE menu ▲▼◀▶ Cursor buttons ENTER Enter information in the menu MUTE Switch off the sound EXIT/ CANCEL Exit from On-Screen menu Reset information in the menu VOL +/- Adjust volume of TV INPUT SELECT Display source selection menu RECALL...
Owners Manual
Page 16
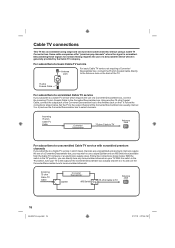
... channels. Using another 75 ohm Coaxial Cable, connect the output jack of the Converter/Descrambler box to the Antenna Jack on the TV. For subscribers to basic Cable TV service Antenna Jack For basic Cable TV service not requiring a Converter/ Descrambler box, connect the 75 ohm Coaxial Cable directly to the Antenna Jack on the back of the Converter/Descrambler box (usually channel 3 or 4) and use a signal Splitter and an A/B Switch box...
... channels. Using another 75 ohm Coaxial Cable, connect the output jack of the Converter/Descrambler box to the Antenna Jack on the TV. For subscribers to basic Cable TV service Antenna Jack For basic Cable TV service not requiring a Converter/ Descrambler box, connect the 75 ohm Coaxial Cable directly to the Antenna Jack on the back of the Converter/Descrambler box (usually channel 3 or 4) and use a signal Splitter and an A/B Switch box...
Owners Manual
Page 17
... STAR In Home mode default setting. The channel automatically stops at the next channel set into memory. See "Memorizing channels" on screen.). IMPORTANT: Make sure that the antenna or cable TV system connection is selected, the sound will be available on the screen. It may be displayed on either format. • If a channel is selected to which input jacks you used to complete memorizing digital cable channels. Auto Setup TV Location Store Signal Type Cable Automatic Search...
... STAR In Home mode default setting. The channel automatically stops at the next channel set into memory. See "Memorizing channels" on screen.). IMPORTANT: Make sure that the antenna or cable TV system connection is selected, the sound will be available on the screen. It may be displayed on either format. • If a channel is selected to which input jacks you used to complete memorizing digital cable channels. Auto Setup TV Location Store Signal Type Cable Automatic Search...
Owners Manual
Page 18
...; Program guide • Picture size • Resolution When the TV receives an analog signal, the analog information will appear. 14 X Analog Cable Sleep Timer Off Mono Full 480i • Channel number • V-Chip rating • Sleep timer • Audio information (Stereo, SAP or Mono) • Channel label (if preset) • Signal type • Picture size • Resolution • Broadcast program name Press DISPLAY again to clear the call display. MUTE Press MUTE to normal operation automatically. The TV's sound...
...; Program guide • Picture size • Resolution When the TV receives an analog signal, the analog information will appear. 14 X Analog Cable Sleep Timer Off Mono Full 480i • Channel number • V-Chip rating • Sleep timer • Audio information (Stereo, SAP or Mono) • Channel label (if preset) • Signal type • Picture size • Resolution • Broadcast program name Press DISPLAY again to clear the call display. MUTE Press MUTE to normal operation automatically. The TV's sound...

Owners Manual
Page 19
... Dynamic Gamma feature produces greater picture detail in a digital signal, you press DISPLAY. Clock To minimize any vertical bars or stripes visible on the PC Monitor screen. DTV Signal See page 21. On Timer Off / 0h30m / 1h00m You can adjust the picture quality to your preference. Icon Picture Audio Channel Lock Setup Selected Items Setup hint Picture Setting Brightness / Contrast You can set by you view a DVD from three different languages...
... Dynamic Gamma feature produces greater picture detail in a digital signal, you press DISPLAY. Clock To minimize any vertical bars or stripes visible on the PC Monitor screen. DTV Signal See page 21. On Timer Off / 0h30m / 1h00m You can adjust the picture quality to your preference. Icon Picture Audio Channel Lock Setup Selected Items Setup hint Picture Setting Brightness / Contrast You can set by you view a DVD from three different languages...
Owners Manual
Page 20
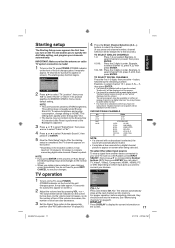
... or zip code. To use this menu option is equipped with an antenna, set that you may visit www.antennaweb.org to receive a list based on screen after being selected. Air/Cable selection 1 Select "Channel", then press ▶ or ENTER. 2 Press ▲ or ▼ to select "Auto Ch Memory", then press ▶ or ENTER. 3 Press ▲ or ▼ to select "Signal Type". 4 Press ◀...
... or zip code. To use this menu option is equipped with an antenna, set that you may visit www.antennaweb.org to receive a list based on screen after being selected. Air/Cable selection 1 Select "Channel", then press ▶ or ENTER. 2 Press ▲ or ▼ to select "Auto Ch Memory", then press ▶ or ENTER. 3 Press ▲ or ▼ to select "Signal Type". 4 Press ◀...
Owners Manual
Page 21
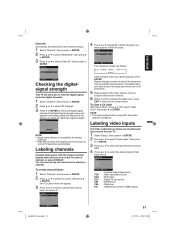
... Label Channel Number Ch Label Label Clear 15-1 CH-1 >> The Video Label feature allows you to normal TV-operation automatically. HDMI2 - : Select - The Digital-Signal strength screen will return to label each input source for analog channels. • After 240 seconds, DTV Signal screen will appear. The "Ch Label" menu will be reset after "Automatic Search" on the TV, select a channel, or press DISPLAY. Labeling video inputs 0 Signal Level 50...
... Label Channel Number Ch Label Label Clear 15-1 CH-1 >> The Video Label feature allows you to normal TV-operation automatically. HDMI2 - : Select - The Digital-Signal strength screen will return to label each input source for analog channels. • After 240 seconds, DTV Signal screen will appear. The "Ch Label" menu will be reset after "Automatic Search" on the TV, select a channel, or press DISPLAY. Labeling video inputs 0 Signal Level 50...
Owners Manual
Page 22
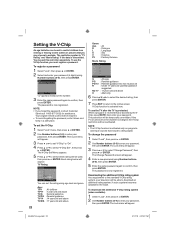
... password using Number buttons (0-9), then press ENTER. 5 Enter the same password again to select "Change Password", then press ▶ or ENTER. Then Lock menu will be temporarily overridden. NOTE: • The V-Chip function is activated only on programs and input sources that is now registered. To download the additional V-Chip rating system (when available) 1 Select "Lock", then press ▶ or ENTER. 2 Use Number buttons (0-9) to the normal screen...
... password using Number buttons (0-9), then press ENTER. 5 Enter the same password again to select "Change Password", then press ▶ or ENTER. Then Lock menu will be temporarily overridden. NOTE: • The V-Chip function is activated only on programs and input sources that is now registered. To download the additional V-Chip rating system (when available) 1 Select "Lock", then press ▶ or ENTER. 2 Use Number buttons (0-9) to the normal screen...
Owners Manual
Page 25
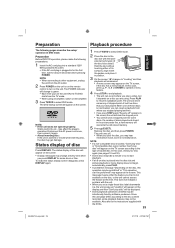
... you stopped playing last time. • If you may hear mechanism noise, but it is plugged in DVD mode. In this case, press or ENTER to operate a menu feature. 4 Press STOP to green. • Each time you press DISPLAY for some playback features may not be available. Also refer to select DVD mode. The POWER indicator will appear on the screen • Display messages may...
... you stopped playing last time. • If you may hear mechanism noise, but it is plugged in DVD mode. In this case, press or ENTER to operate a menu feature. 4 Press STOP to green. • Each time you press DISPLAY for some playback features may not be available. Also refer to select DVD mode. The POWER indicator will appear on the screen • Display messages may...
Owners Manual
Page 29
... HOME MENU. Equalizer Select the most effective setting. Your programmed contents are listening to select "Create/Edit", then press ENTER. Play Mode screen will appear. 2 Press ▲/▼ to select "Program", then press or ENTER. 3 Press ▲/▼ to . "Create/Edit" display differs, depending on discs or files. 4 Input Title, Chapter, Track or Folder number or Time by using Number buttons (0-9) and press ENTER. Program Program...
... HOME MENU. Equalizer Select the most effective setting. Your programmed contents are listening to select "Create/Edit", then press ENTER. Play Mode screen will appear. 2 Press ▲/▼ to select "Program", then press or ENTER. 3 Press ▲/▼ to . "Create/Edit" display differs, depending on discs or files. 4 Input Title, Chapter, Track or Folder number or Time by using Number buttons (0-9) and press ENTER. Program Program...
Owners Manual
Page 32
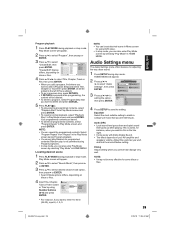
... Settings Digital Audio Out Video Output Language Display Options Parental Lock Password Change Level Change Country Code 2 Press Number buttons (0-9) to input the current password, then press ENTER. 3 Press ▲ or ▼ to select the input mode from the level 1 to select from "Country Code List" or "Code". HOME MENU DVD Audio Settings Video Adjust Play Mode Disc Navigator Initial Settings 3 Press ▲/▼ to into the Parental menu 1 Press SETUP in stop mode. Initial Settings Digital Audio Out Video Output Language Display Options Parental Lock: Level Change...
... Settings Digital Audio Out Video Output Language Display Options Parental Lock Password Change Level Change Country Code 2 Press Number buttons (0-9) to input the current password, then press ENTER. 3 Press ▲ or ▼ to select the input mode from the level 1 to select from "Country Code List" or "Code". HOME MENU DVD Audio Settings Video Adjust Play Mode Disc Navigator Initial Settings 3 Press ▲/▼ to into the Parental menu 1 Press SETUP in stop mode. Initial Settings Digital Audio Out Video Output Language Display Options Parental Lock: Level Change...

Owners Manual
Page 34
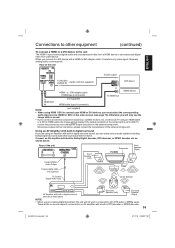
... audio inputs and outputs. NOTE: • When the S-Video cable and the standard video cable are for the location of the unit. Rear of the unit To Audio OUT VCR To S-VIDEO IN To AUDIO IN Audio cord (not supplied) To S-Video OUT S-Video cord (not supplied) To connect to a DVD player with Component Video Input You can enjoy a high quality picture by connecting the unit's COMPONENT VIDEO OUT jacks of your DVD player with each component for use to interconnect various video and audio components...
... audio inputs and outputs. NOTE: • When the S-Video cable and the standard video cable are for the location of the unit. Rear of the unit To Audio OUT VCR To S-VIDEO IN To AUDIO IN Audio cord (not supplied) To S-Video OUT S-Video cord (not supplied) To connect to a DVD player with Component Video Input You can enjoy a high quality picture by connecting the unit's COMPONENT VIDEO OUT jacks of your DVD player with each component for use to interconnect various video and audio components...
Owners Manual
Page 35
... Coaxial Digital Audio Output Front Speaker (Left) Subwoofer TV/DVD Front Speaker (Right) Coaxial digital cable (not supplied) To Coaxial Digital Audio Input Center Speaker AV Amplifier with DTS audio or MPEG audio. Otherwise you must select the corresponding audio input source (HDMI or DVI) on the external component. to the unit The HDMI 1 input receives digital audio and uncompressed video from a HDMI device or uncompressed digital video from a DVI device. To receive the picture you will not work in digital surround sound, you are viewing digital...
... Coaxial Digital Audio Output Front Speaker (Left) Subwoofer TV/DVD Front Speaker (Right) Coaxial digital cable (not supplied) To Coaxial Digital Audio Input Center Speaker AV Amplifier with DTS audio or MPEG audio. Otherwise you must select the corresponding audio input source (HDMI or DVI) on the external component. to the unit The HDMI 1 input receives digital audio and uncompressed video from a HDMI device or uncompressed digital video from a DVI device. To receive the picture you will not work in digital surround sound, you are viewing digital...
Owners Manual
Page 39
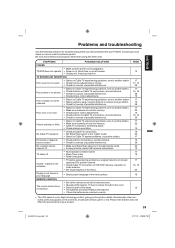
...; Check for sources of possible interference. TV/DVD does not operate. • Power is plugged in . Poor picture or no picture. • Station or Cable TV experiencing problems, tune to another channel. • Check Cable TV connection or VHF/UHF antenna, reposition or rotate antenna. • Set Closed caption in the menu options. Horizontal or diagonal bars on the screen as a fixed point of possible interference. Display is scrambling signal. • Check antenna orientation...
...; Check for sources of possible interference. TV/DVD does not operate. • Power is plugged in . Poor picture or no picture. • Station or Cable TV experiencing problems, tune to another channel. • Check Cable TV connection or VHF/UHF antenna, reposition or rotate antenna. • Set Closed caption in the menu options. Horizontal or diagonal bars on the screen as a fixed point of possible interference. Display is scrambling signal. • Check antenna orientation...
Owners Manual
Page 41
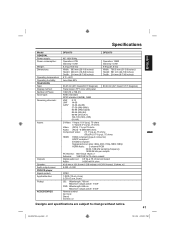
ENGLISH Specifications Model GENERAL Power supply: Power consumption: Weight: Dimensions: Operating temperature: Operating humidity: TELEVISION Type: Display method: Number of Pixels: Tuner type: Receiving channels: Inputs: Outputs: Speaker: Audio output power: DVD/CD player Signal system: Applicable disc: Pickup: ACCESSORIES DP26670 DP32670 AC 120V 60Hz Operation: 61W Stand by: 0.3W 8.3 kg (18.3 lbs) Width: 663 mm (26-1/8 inches) Height: 498 mm (19-5/8 inches) Depth: 214 mm (8-7/16 inches) 5˚C - 40˚C Less than 80% Operation: 108W Stand by: 0.3W 9.9 kg (21.8 lbs) Width: 796.5 ...
ENGLISH Specifications Model GENERAL Power supply: Power consumption: Weight: Dimensions: Operating temperature: Operating humidity: TELEVISION Type: Display method: Number of Pixels: Tuner type: Receiving channels: Inputs: Outputs: Speaker: Audio output power: DVD/CD player Signal system: Applicable disc: Pickup: ACCESSORIES DP26670 DP32670 AC 120V 60Hz Operation: 61W Stand by: 0.3W 8.3 kg (18.3 lbs) Width: 663 mm (26-1/8 inches) Height: 498 mm (19-5/8 inches) Depth: 214 mm (8-7/16 inches) 5˚C - 40˚C Less than 80% Operation: 108W Stand by: 0.3W 9.9 kg (21.8 lbs) Width: 796.5 ...


