Quick Guide (ENGLISH)
Page 4
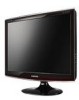
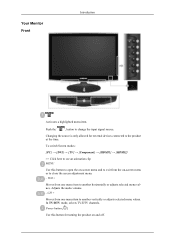
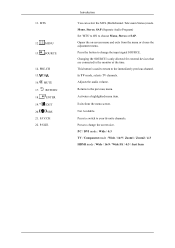
In TV/DTV mode, selects TV/DTV channels. Your Monitor Front Introduction Activates a highlighted menu item. Changing the source is only allowed for turning the product on and off. VOL+ Moves from one menu item ... menu or to the product at the time. CH + Moves from the on -screen menu and to exit from one menu item to change the input signal source. Push the ' ', button to another vertically or adjusts selected menu values. Adjusts the audio volume. -
In TV/DTV mode, selects TV/DTV channels. Your Monitor Front Introduction Activates a highlighted menu item. Changing the source is only allowed for turning the product on and off. VOL+ Moves from one menu item ... menu or to the product at the time. CH + Moves from the on -screen menu and to exit from one menu item to change the input signal source. Push the ' ', button to another vertically or adjusts selected menu values. Adjusts the audio volume. -
Quick Guide (ENGLISH)
Page 6
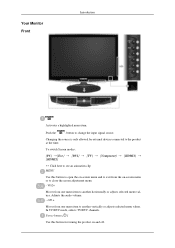
...IN / DIGITAL AUDIO OUT(OPTICAL) / EX-LINK HDMI/PC/DVI-D AUDIO IN Connect the [ HDMI/PC/DVI-D AUDIO IN ] terminal at the back of your monitor to your computer. Introduction PC Connect the PC terminal at the back of your product to your computer's sound card. EXT(RGB) EX-LINK This... the DVD Player using a digital audio optical output cable. Kensington Lock Connect the EXT(RGB) port of the monitor, it makes TV or Video signal input and output. As for servicing. DIGITAL AUDIO OUT(OPTICAL) Connect the [DIGITAL AUDIO OUT(OPTICAL)] terminal of your product to the DVI-D port on the...
...IN / DIGITAL AUDIO OUT(OPTICAL) / EX-LINK HDMI/PC/DVI-D AUDIO IN Connect the [ HDMI/PC/DVI-D AUDIO IN ] terminal at the back of your monitor to your computer. Introduction PC Connect the PC terminal at the back of your product to your computer's sound card. EXT(RGB) EX-LINK This... the DVD Player using a digital audio optical output cable. Kensington Lock Connect the EXT(RGB) port of the monitor, it makes TV or Video signal input and output. As for servicing. DIGITAL AUDIO OUT(OPTICAL) Connect the [DIGITAL AUDIO OUT(OPTICAL)] terminal of your product to the DVI-D port on the...
Quick Guide (ENGLISH)
Page 7
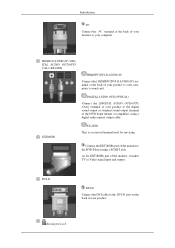
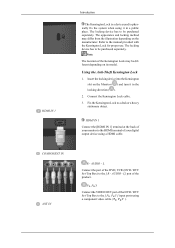
...desk or a heavy stationary object. Insert the locking device into the Kensington slot on its model. Note The location of your monitor to the [ PR, PB,Y ] input ports using a HDMI cable. Connect the Kensington Lock cable. 3. The appearance and locking method may be different depending on the... Monitor ( ) and turn it in the locking direction ( ). 2. HDMI IN 1 Connect the [HDMI IN 1] terminal at the back of your digital ...
...desk or a heavy stationary object. Insert the locking device into the Kensington slot on its model. Note The location of your monitor to the [ PR, PB,Y ] input ports using a HDMI cable. Connect the Kensington Lock cable. 3. The appearance and locking method may be different depending on the... Monitor ( ) and turn it in the locking direction ( ). 2. HDMI IN 1 Connect the [HDMI IN 1] terminal at the back of your digital ...
Quick Guide (ENGLISH)
Page 10
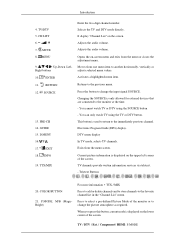
...- MENU 9. RETURN 12. GUIDE 15. Selects the TV and DTV mode directly. Changing the SOURCE is used to return to change the input signal SOURCE. This button is only allowed for external devices that are connected to the favorite channel list in the "Channel List" menu. ...Press to select a pre-defined Picture Mode of the monitor or to the immediately previous channel. CH LIST 6. 7. EXIT 18. Adjusts the audio volume. Moves from the menu screen. Current picture information...
...- MENU 9. RETURN 12. GUIDE 15. Selects the TV and DTV mode directly. Changing the SOURCE is used to return to change the input signal SOURCE. This button is only allowed for external devices that are connected to the favorite channel list in the "Channel List" menu. ...Press to select a pre-defined Picture Mode of the monitor or to the immediately previous channel. CH LIST 6. 7. EXIT 18. Adjusts the audio volume. Moves from the menu screen. Current picture information...
Quick Guide (ENGLISH)
Page 13
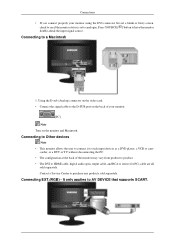
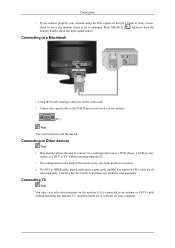
... are all sold separately. Connecting EXT.(RGB) - Connecting to have the monitor double-check the input signal source. corder, or a DTV or TV without disconnecting the PC. • The configuration at the back of your monitor using the DVI connector but get a blank or fuzzy screen, check to...any products sold separately. Press 'SOURCE [ ]' button to a Macintosh 1. It only applies to such input devices as a DVD player, a VCR or cam- Connecting to Other devices Note • This monitor allows the user to connect it to AV DEVICE that supports SCART. Connections • If you connect ...
... are all sold separately. Connecting EXT.(RGB) - Connecting to have the monitor double-check the input signal source. corder, or a DTV or TV without disconnecting the PC. • The configuration at the back of your monitor using the DVI connector but get a blank or fuzzy screen, check to...any products sold separately. Press 'SOURCE [ ]' button to a Macintosh 1. It only applies to such input devices as a DVD player, a VCR or cam- Connecting to Other devices Note • This monitor allows the user to connect it to AV DEVICE that supports SCART. Connections • If you connect ...
Quick Guide (ENGLISH)
Page 14
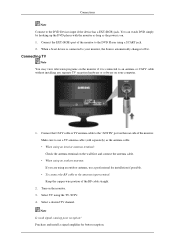
... is connected to an antenna or CATV cable without installing any separate TV reception hardware or software on your monitor, the Source automatically changes to Ext. Connect the EXT (RGB) port of the monitor. Make sure to use a professional for better reception. Select a desired TV channel. Note Is weak signal ... RF cable to the DVD Player using an outdoor antenna, use a TV antenna cable (sold separately) as the power is connected to the DVD Devices input if the device has a EXT (RGB) jack. Turn on . 1. Connect the CATV cable or TV antenna cable to the "ANT IN" port on the...
... is connected to an antenna or CATV cable without installing any separate TV reception hardware or software on your monitor, the Source automatically changes to Ext. Connect the EXT (RGB) port of the monitor. Make sure to use a professional for better reception. Select a desired TV channel. Note Is weak signal ... RF cable to the DVD Player using an outdoor antenna, use a TV antenna cable (sold separately) as the power is connected to the DVD Devices input if the device has a EXT (RGB) jack. Turn on . 1. Connect the CATV cable or TV antenna cable to the "ANT IN" port on the...
Quick Guide (ENGLISH)
Page 15
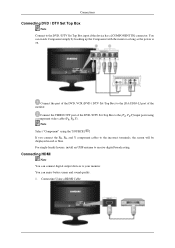
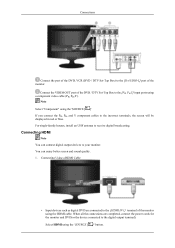
For single-family houses, install an UHF antenna to the [R-AUDIO-L] port of the monitor. Connect the port of the DVD / DTV Set-Top Box to the DVD / DTV Set Top Box input if the device has a [COMPONENT IN] connector. Connecting HDMI Note You can connect digital output devices to...screen and sound quality. 1. Connections Connecting DVD / DTV Set Top Box Note Connect to the [PR, PB,Y] input ports using the 'SOURCE [ ]' If you connect the PR, PB, and Y component cables to your monitor. Connecting Using a HDMI Cable You can watch Component simply by hooking up the Component with the...
For single-family houses, install an UHF antenna to the [R-AUDIO-L] port of the monitor. Connect the port of the DVD / DTV Set-Top Box to the DVD / DTV Set Top Box input if the device has a [COMPONENT IN] connector. Connecting HDMI Note You can connect digital output devices to...screen and sound quality. 1. Connections Connecting DVD / DTV Set Top Box Note Connect to the [PR, PB,Y] input ports using the 'SOURCE [ ]' If you connect the PR, PB, and Y component cables to your monitor. Connecting Using a HDMI Cable You can watch Component simply by hooking up the Component with the...
Quick Guide (ENGLISH)
Page 16
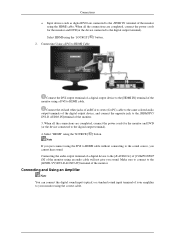
...output terminal of a digital output device to the [HDMI IN] terminal of the monitor. 3. Select "HDMI" using the 'SOURCE [ ]' button. 2. Input devices such as digital DVD are completed, connect the power cords for the monitor and DVD (or the device connected to the digital output terminal). 4. Select HDMI...to the [HDMI/PC/ DVI-D AUDIO IN]terminal of the monitor using a DVI to your amplifier to HDMI cable. Connecting and Using an Amplifier Note You can connect the digital sound input (optical) or standard sound input terminal of the digital output device, and connect the opposite ...
...output terminal of a digital output device to the [HDMI IN] terminal of the monitor. 3. Select "HDMI" using the 'SOURCE [ ]' button. 2. Input devices such as digital DVD are completed, connect the power cords for the monitor and DVD (or the device connected to the digital output terminal). 4. Select HDMI...to the [HDMI/PC/ DVI-D AUDIO IN]terminal of the monitor using a DVI to your amplifier to HDMI cable. Connecting and Using an Amplifier Note You can connect the digital sound input (optical) or standard sound input terminal of the digital output device, and connect the opposite ...
Quick Guide (ENGLISH)
Page 17
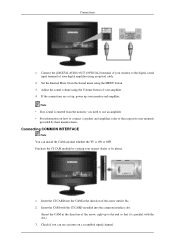
Connecting COMMON INTERFACE Note You can see a picture on how to connect a speaker and amplifier, refer to the digital sound input terminal of your nearest dealer or by their manufacturers. Insert the CAM with the slot.) 3. Set the Internal Mute On in the direction of the... the CI CARD installed into the CAM in the Sound menu using an optical cable. 2. Adjust the sound volume using the Volume button of your monitor to the respective user manuals provided by phone. 1. Purchase the CI CAM module by visiting your digital amplifier using the MENU button. 3. Check if ...
Connecting COMMON INTERFACE Note You can see a picture on how to connect a speaker and amplifier, refer to the digital sound input terminal of your nearest dealer or by their manufacturers. Insert the CAM with the slot.) 3. Set the Internal Mute On in the direction of the... the CI CARD installed into the CAM in the Sound menu using an optical cable. 2. Adjust the sound volume using the Volume button of your monitor to the respective user manuals provided by phone. 1. Purchase the CI CAM module by visiting your digital amplifier using the MENU button. 3. Check if ...
Quick Guide (ENGLISH)
Page 4
Your Monitor Front Introduction Activates a highlighted menu item. VOL+ Moves from one menu item to exit from the on and off. To switch Screen modes: [PC] → [...; [TV] → [Component] → [HDMI1] → [HDMI2] >> Click here to see an animation clip MENU Use this button for external devices connected to change the input signal source. Changing the source is only allowed for turning the product on -screen menu or to another horizontally or adjusts selected menu values. CH...
Your Monitor Front Introduction Activates a highlighted menu item. VOL+ Moves from one menu item to exit from the on and off. To switch Screen modes: [PC] → [...; [TV] → [Component] → [HDMI1] → [HDMI2] >> Click here to see an animation clip MENU Use this button for external devices connected to change the input signal source. Changing the source is only allowed for turning the product on -screen menu or to another horizontally or adjusts selected menu values. CH...
Quick Guide (ENGLISH)
Page 7
...( PR, PB,Y ). Refer to be purchased separately. AUDIO - AUDIO - Note The location of the Kensington Lock may differ from the illustration depending on the Monitor ( ) and turn it in the locking direction ( ). 2. The locking device has to the manual provided with the Kensington Lock for proper use. The appearance... and locking method may be purchased separately. Fix the Kensington Lock to the [ PR, PB,Y ] input ports using a HDMI cable. Insert the locking device into the Kensington slot on the manufacturer.
...( PR, PB,Y ). Refer to be purchased separately. AUDIO - AUDIO - Note The location of the Kensington Lock may differ from the illustration depending on the Monitor ( ) and turn it in the locking direction ( ). 2. The locking device has to the manual provided with the Kensington Lock for proper use. The appearance... and locking method may be purchased separately. Fix the Kensington Lock to the [ PR, PB,Y ] input ports using a HDMI cable. Insert the locking device into the Kensington slot on the manufacturer.
Quick Guide (ENGLISH)
Page 10
...(Separate Audio Program) Set 'MTS' to ON to your favorite channels. This button is only allowed for external devices that are connected to the monitor at the time. Exits from the menu or closes the adjustment menu. Press to the immediately previous channel. CH 16. RETURN 18. EXIT 20...Press to switch to choose Mono, Stereo or SAP. SOURCE 14. FAV.CH 22. Changing the SOURCE is used to return to change the input signal SOURCE. MENU 13. 11. PRE-CH 15. Returns to change the screen size. Press the button to the previous menu. P.SIZE Introduction...
...(Separate Audio Program) Set 'MTS' to ON to your favorite channels. This button is only allowed for external devices that are connected to the monitor at the time. Exits from the menu or closes the adjustment menu. Press to the immediately previous channel. CH 16. RETURN 18. EXIT 20...Press to switch to choose Mono, Stereo or SAP. SOURCE 14. FAV.CH 22. Changing the SOURCE is used to return to change the input signal SOURCE. MENU 13. 11. PRE-CH 15. Returns to change the screen size. Press the button to the previous menu. P.SIZE Introduction...
Quick Guide (ENGLISH)
Page 12
... and RCA to purchase any separate TV reception hardware or software on your monitor. [PC] Note Turn on the monitor if it to such input devices as a DVD player, a VCR or cam- Connecting to have the monitor double-check the input signal source. Using the D-sub (Analog) connector on the video card.... • Connect the signal cable to analogue. Connecting to Other devices Note • This monitor allows the user to connect it is set to the ...
... and RCA to purchase any separate TV reception hardware or software on your monitor. [PC] Note Turn on the monitor if it to such input devices as a DVD player, a VCR or cam- Connecting to have the monitor double-check the input signal source. Using the D-sub (Analog) connector on the video card.... • Connect the signal cable to analogue. Connecting to Other devices Note • This monitor allows the user to connect it is set to the ...

Quick Guide (ENGLISH)
Page 13
... reception? Make sure to the antenna input terminal: Keep the copper wire portion of the monitor. Purchase and install a signal amplifier for installation if possible. • To connect the RF cable to use a TV antenna cable (sold separately) as the power is on the monitor. 3. Turn on . Connections 1. ...Connect the CATV cable or TV antenna cable to the DVD / DTV Set Top Box input if the device has a [COMPONENT IN] connector. Select TV using an outdoor antenna, use...
... reception? Make sure to the antenna input terminal: Keep the copper wire portion of the monitor. Purchase and install a signal amplifier for installation if possible. • To connect the RF cable to use a TV antenna cable (sold separately) as the power is on the monitor. 3. Turn on . Connections 1. ...Connect the CATV cable or TV antenna cable to the DVD / DTV Set Top Box input if the device has a [COMPONENT IN] connector. Select TV using an outdoor antenna, use...
Quick Guide (ENGLISH)
Page 14
...antenna to the [PR, PB,Y] input ports using a component video cable (PR, PB,Y). Note Select "Component" using the 'SOURCE [ ]' button. Connecting Using a HDMI Cable • Input devices such as digital DVD are completed, connect the power cords for the monitor and DVD(or the device connected ...to the [HDMI IN 1] terminal of the monitor. Select HDMI using the 'SOURCE [ ]' If you connect the PR,...
...antenna to the [PR, PB,Y] input ports using a component video cable (PR, PB,Y). Note Select "Component" using the 'SOURCE [ ]' button. Connecting Using a HDMI Cable • Input devices such as digital DVD are completed, connect the power cords for the monitor and DVD(or the device connected ...to the [HDMI IN 1] terminal of the monitor. Select HDMI using the 'SOURCE [ ]' If you connect the PR,...

Quick Guide (ENGLISH)
Page 15
... to the [ HDMI/PC/DVI-D AUDIO IN ] terminal of the monitor. Make sure to connect to the sound source, you sound. Connecting and Using an Amplifier Note You can connect the digital sound input (optical) or standard sound input terminal of your amplifier to the digital output terminal). 4. When all ...optical cable. Connecting Using a DVI to HDMI Cable Connect the DVI output terminal of a digital output device to the [HDMI IN 1] terminal of the monitor using a DVI to the [R-AUDIO-L] of [COMPONENT IN] of a digital device to HDMI cable. Connect the red and white jacks of an RCA ...
... to the [ HDMI/PC/DVI-D AUDIO IN ] terminal of the monitor. Make sure to connect to the sound source, you sound. Connecting and Using an Amplifier Note You can connect the digital sound input (optical) or standard sound input terminal of your amplifier to the digital output terminal). 4. When all ...optical cable. Connecting Using a DVI to HDMI Cable Connect the DVI output terminal of a digital output device to the [HDMI IN 1] terminal of the monitor using a DVI to the [R-AUDIO-L] of [COMPONENT IN] of a digital device to HDMI cable. Connect the red and white jacks of an RCA ...

Quick Guide (ENGLISH)
Page 18
...frequencies that allows you will see a box in the illustration below. If your monitor screen remains blank after disconnecting the power cord. The message may indicate that the monitor is still on. Clean with the input signal, a message appears on the screen or the screen goes blank although the... power indicator LED is out of the computer. 3. Not Optimum Mode If there is something wrong with a soft cloth after using the previous procedure, check your monitor is functioning properly....
...frequencies that allows you will see a box in the illustration below. If your monitor screen remains blank after disconnecting the power cord. The message may indicate that the monitor is still on. Clean with the input signal, a message appears on the screen or the screen goes blank although the... power indicator LED is out of the computer. 3. Not Optimum Mode If there is something wrong with a soft cloth after using the previous procedure, check your monitor is functioning properly....
User Manual (ENGLISH)
Page 6
... may result in a product malfunction, electric shock, or fire. icines as well as matches or paper, inside the product (through the ventilating openings, input and output terminals, etc). • If water or foreign material enters the product, disconnect the power cord and contact a Service Center. • Otherwise...holding the power cord or signal cables. • Otherwise, it may result in fire due to the cable. Do not lift or move the monitor by a table or curtain. • Otherwise, it may fall and result in an explosion or fire. Do not insert any containers containing ...
... may result in a product malfunction, electric shock, or fire. icines as well as matches or paper, inside the product (through the ventilating openings, input and output terminals, etc). • If water or foreign material enters the product, disconnect the power cord and contact a Service Center. • Otherwise...holding the power cord or signal cables. • Otherwise, it may result in fire due to the cable. Do not lift or move the monitor by a table or curtain. • Otherwise, it may fall and result in an explosion or fire. Do not insert any containers containing ...

User Manual (ENGLISH)
Page 12
...; [TV] → [Component] → [HDMI1] → [HDMI2] >> Click here to see an animation clip MENU Use this button for external devices connected to change the input signal source. Changing the source is only allowed for turning the product on -screen menu and to exit from one menu item to close the...
...; [TV] → [Component] → [HDMI1] → [HDMI2] >> Click here to see an animation clip MENU Use this button for external devices connected to change the input signal source. Changing the source is only allowed for turning the product on -screen menu and to exit from one menu item to close the...

User Manual (ENGLISH)
Page 15
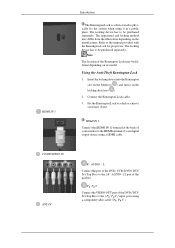
... port of the Kensington Lock may differ from the illustration depending on the manufacturer. The appearance and locking method may be different depending on the Monitor ( ) and turn it in the locking direction ( ). 2. Note The location of the DVD, VCR (DVD / DTV Set-Top Box) to be purchased separately. Fix the... device into the Kensington slot on its model. Connect the Kensington Lock cable. 3. HDMI IN 1 Connect the [HDMI IN 1] terminal at the back of your monitor to the [ PR, PB,Y ] input ports using a HDMI cable. AUDIO -
... port of the Kensington Lock may differ from the illustration depending on the manufacturer. The appearance and locking method may be different depending on the Monitor ( ) and turn it in the locking direction ( ). 2. Note The location of the DVD, VCR (DVD / DTV Set-Top Box) to be purchased separately. Fix the... device into the Kensington slot on its model. Connect the Kensington Lock cable. 3. HDMI IN 1 Connect the [HDMI IN 1] terminal at the back of your monitor to the [ PR, PB,Y ] input ports using a HDMI cable. AUDIO -

