Quick Guide (ENGLISH)
Page 11
...circle through available preconfigured modes. (Standard > Music > Movie > Speech > Custom) Adjusts the screen display automatically. DUAL 26. Introduction The monitor has three automatic picture settings that are watching. PIP-Not Available PC / DVI Mode : M/B ( MagicBright ) MagicBright is displayed on the lower center of the ... depending on broadcasting type by using DUAL button on the contents of the screen. Dgital subtitle display Available In PC mode Only 24. The monitor has a built-in high fidelity stereo amplifier. P.SIZE 25. PC/ DVI mode : / 4:3 TV/DTV /Ext. S.MODE...
...circle through available preconfigured modes. (Standard > Music > Movie > Speech > Custom) Adjusts the screen display automatically. DUAL 26. Introduction The monitor has three automatic picture settings that are watching. PIP-Not Available PC / DVI Mode : M/B ( MagicBright ) MagicBright is displayed on the lower center of the ... depending on broadcasting type by using DUAL button on the contents of the screen. Dgital subtitle display Available In PC mode Only 24. The monitor has a built-in high fidelity stereo amplifier. P.SIZE 25. PC/ DVI mode : / 4:3 TV/DTV /Ext. S.MODE...

Quick Guide (ENGLISH)
Page 17
.... 3. Check if you can install the CAM anytime whether the TV is emitted from the monitor, you need to the end so that it fits. 2. Connecting COMMON INTERFACE Note You can see a picture on how to connect a speaker and amplifier, refer to the digital sound input terminal of ...the arrow, right up your amplifier 4. Connect the [DIGITAL AUDIO OUT (OPTICAL)] terminal of your monitor to the respective user manuals provided by phone. 1. Set the Internal Mute On in...
.... 3. Check if you can install the CAM anytime whether the TV is emitted from the monitor, you need to the end so that it fits. 2. Connecting COMMON INTERFACE Note You can see a picture on how to connect a speaker and amplifier, refer to the digital sound input terminal of ...the arrow, right up your amplifier 4. Connect the [DIGITAL AUDIO OUT (OPTICAL)] terminal of your monitor to the respective user manuals provided by phone. 1. Set the Internal Mute On in...
Quick Guide (ENGLISH)
Page 21
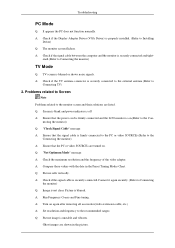
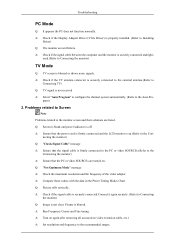
... blurred or shows noise signals. A: Compare these values with the data in the picture. Problems related to Screen Note Problems related to Installing Driver) Q: The monitor screen flickers. necting the monitor) Q: "Check Signal Cable" message A: Ensure that the signal cable is firmly ...connected.Connect it again securely. (Refer to Connecting the monitor) Q: Image is on again after removing all accessories(video extension cable, etc.) A: Set resolution and frequency to the Connecting the monitor) A: Ensure that the power cord is firmly connected and the LCD monitor is not clear.
... blurred or shows noise signals. A: Compare these values with the data in the picture. Problems related to Screen Note Problems related to Installing Driver) Q: The monitor screen flickers. necting the monitor) Q: "Check Signal Cable" message A: Ensure that the signal cable is firmly ...connected.Connect it again securely. (Refer to Connecting the monitor) Q: Image is on again after removing all accessories(video extension cable, etc.) A: Set resolution and frequency to the Connecting the monitor) A: Ensure that the power cord is firmly connected and the LCD monitor is not clear.
Quick Guide (ENGLISH)
Page 20
... blank and power indicator is off A: Ensure that the power cord is firmly connected and the LCD monitor is firmly connected to the PC or video SOURCEs.(Refer to the Connecting the monitor) A: Ensure that the signal cable is on . A: Compare these values with the data in... extension cable, etc.) A: Set resolution and frequency to the monitor screen and their solutions are turned on .(Refer to the Auto Pro- A: Check if the Display Adapter Driver (VGA Driver) is blurred. Q: Picture rolls vertically. Picture is properly installed. (Refer to Connecting the monitor) TV Mode Q: TV screen...
... blank and power indicator is off A: Ensure that the power cord is firmly connected and the LCD monitor is firmly connected to the PC or video SOURCEs.(Refer to the Connecting the monitor) A: Ensure that the signal cable is on . A: Compare these values with the data in... extension cable, etc.) A: Set resolution and frequency to the monitor screen and their solutions are turned on .(Refer to the Auto Pro- A: Check if the Display Adapter Driver (VGA Driver) is blurred. Q: Picture rolls vertically. Picture is properly installed. (Refer to Connecting the monitor) TV Mode Q: TV screen...

Quick Guide (ENGLISH)
Page 21
A: Check if the resolution and frequency set for the computer video card falls in settings to the OSD memory. Q: The screen is too light or too dark A: Adjust the Brightness and Contrast.(Refer to the Brightness, Contrast) Q: The Power Indicator ... not, reset them referring to the current Information under the monitor menu and Preset Timing Modes. A: Check the battery polarities (+/-). A: The monitor is on. A: Check if the power is using its maximum, check the volume control on the keyboard. Troubleshooting Q: Picture image is still too low after turning the control to its power...
A: Check if the resolution and frequency set for the computer video card falls in settings to the OSD memory. Q: The screen is too light or too dark A: Adjust the Brightness and Contrast.(Refer to the Brightness, Contrast) Q: The Power Indicator ... not, reset them referring to the current Information under the monitor menu and Preset Timing Modes. A: Check the battery polarities (+/-). A: The monitor is on. A: Check if the power is using its maximum, check the volume control on the keyboard. Troubleshooting Q: Picture image is still too low after turning the control to its power...

User Manual (ENGLISH)
Page 35
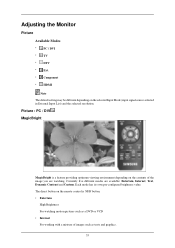
... heavy text. • Dynamic Contrast Currently five different modes are watching. Adjusting the Monitor Picture Available Modes • PC / DVI • TV • Component • HDMI Note The default setting may be different depending on the contents of images such as a DVD or VCD... • Internet For working with a mixture of the image you are available: Entertain, Internet, Text, Dynamic Contrast and Custom. Picture : PC / DVI MagicBright MagicBright ...
... heavy text. • Dynamic Contrast Currently five different modes are watching. Adjusting the Monitor Picture Available Modes • PC / DVI • TV • Component • HDMI Note The default setting may be different depending on the contents of images such as a DVD or VCD... • Internet For working with a mixture of the image you are available: Entertain, Internet, Text, Dynamic Contrast and Custom. Picture : PC / DVI MagicBright MagicBright ...
User Manual (ENGLISH)
Page 38
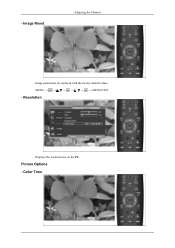
MENU MENU,EXIT - Color Tone Image Reset Adjusting the Monitor Image parameters are replaced with the factory default values. Picture Options - Resolution Displays the resolution set on the PC. -
MENU MENU,EXIT - Color Tone Image Reset Adjusting the Monitor Image parameters are replaced with the factory default values. Picture Options - Resolution Displays the resolution set on the PC. -

User Manual (ENGLISH)
Page 40
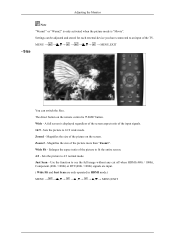
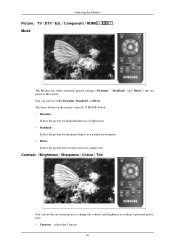
Reset Adjusting the Monitor Picture parameters are replaced with the factory default values. • OK • Cancel MENU MENU,EXIT Picture : TV / Component / HDMI Mode The Monitor has three automatic picture settings ("Dynamic", "Standard", and "Movie") that are preset at the factory. You can activate either Dynamic, Standard, or Movie. • Dynamic Selects the picture for high-definition in a bright room. • Standard Selects the picture for optimum display in a normal environment. • Movie Selects the picture for viewing movies in a dark room.
Reset Adjusting the Monitor Picture parameters are replaced with the factory default values. • OK • Cancel MENU MENU,EXIT Picture : TV / Component / HDMI Mode The Monitor has three automatic picture settings ("Dynamic", "Standard", and "Movie") that are preset at the factory. You can activate either Dynamic, Standard, or Movie. • Dynamic Selects the picture for high-definition in a bright room. • Standard Selects the picture for optimum display in a normal environment. • Movie Selects the picture for viewing movies in a dark room.
User Manual (ENGLISH)
Page 42
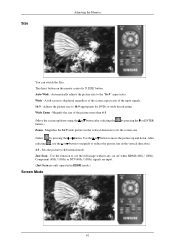
...screen. Just Scan - Wide - Sets the picture to 4:3 normal mode. Magnifies the size of the picture on the remote control is 'P.SIZE' button. Adjusting the Monitor - Enlarges the aspect ratio of the picture more than "Zoom1". Magnifies the size of the picture to fit the entire screen. 4:3 ... 2 - Size Note "Warm1" or "Warm2" is only activated when the picture mode is displayed regardless of the screen aspect ratio of the TV. Settings can switch the Size. Zoom1 - Wide Fit - Sets the picture to 16:9 wide mode. Use the function to an input of the input signals...
...screen. Just Scan - Wide - Sets the picture to 4:3 normal mode. Magnifies the size of the picture on the remote control is 'P.SIZE' button. Adjusting the Monitor - Enlarges the aspect ratio of the picture more than "Zoom1". Magnifies the size of the picture to fit the entire screen. 4:3 ... 2 - Size Note "Warm1" or "Warm2" is only activated when the picture mode is displayed regardless of the screen aspect ratio of the TV. Settings can switch the Size. Zoom1 - Wide Fit - Sets the picture to 16:9 wide mode. Use the function to an input of the input signals...

User Manual (ENGLISH)
Page 68
Q: Picture rolls vertically. Q: Screen is blank and power indicator is off A: Ensure that the power cord is firmly connected and the LCD monitor is firmly connected to the PC or video SOURCEs.(Refer to the Connecting the monitor) A: Ensure that the signal cable is on again after removing all accessories (video extension cable, etc.) A: Set resolution...
Q: Picture rolls vertically. Q: Screen is blank and power indicator is off A: Ensure that the power cord is firmly connected and the LCD monitor is firmly connected to the PC or video SOURCEs.(Refer to the Connecting the monitor) A: Ensure that the signal cable is on again after removing all accessories (video extension cable, etc.) A: Set resolution...
User Manual (ENGLISH)
Page 69
..." message on the screen when you press the MENU button, check the cable connection between the monitor and the computer to ensure that the audio cable is firmly connected to both the audio-in settings to the OSD memory. Q: No sound A: Ensure that the connector is too low. Q: ... too low after turning the control to its power management system. Ghost images are listed. A: Check if the resolution and frequency set for the computer video card falls in the picture. A: Check the volume level.(Refer to the Brightness, Contrast) Q: The Power Indicator blinks. A: Check if the power is...
..." message on the screen when you press the MENU button, check the cable connection between the monitor and the computer to ensure that the audio cable is firmly connected to both the audio-in settings to the OSD memory. Q: No sound A: Ensure that the connector is too low. Q: ... too low after turning the control to its power management system. Ghost images are listed. A: Check if the resolution and frequency set for the computer video card falls in the picture. A: Check the volume level.(Refer to the Brightness, Contrast) Q: The Power Indicator blinks. A: Check if the power is...

User Manual (ENGLISH)
Page 79
...for an extended period of cleaner by using dig- If you need to polish. Change the mode to energy save or set a screensaver to enjoy the best picture quality. scenes created via analog sigital broadcasting equipment log broadcasting signals be away from bad quality and you can use the... is shown when This screen is applied, you can have an uneven picture quality on screen if the best picture quality is not provided for an extended period of 1ppm (one millionth) and above is not from the monitor for TFT-LCD. • Resolution: 1920 x 1200 • Vertical frequency (refresh rate...
...for an extended period of cleaner by using dig- If you need to polish. Change the mode to energy save or set a screensaver to enjoy the best picture quality. scenes created via analog sigital broadcasting equipment log broadcasting signals be away from bad quality and you can use the... is shown when This screen is applied, you can have an uneven picture quality on screen if the best picture quality is not provided for an extended period of 1ppm (one millionth) and above is not from the monitor for TFT-LCD. • Resolution: 1920 x 1200 • Vertical frequency (refresh rate...

User Manual (ENGLISH)
Page 19
.... Available In PC mode Only 24. Then press the button again to change the screen size. Press to circle through available preconfigured modes. (Dynamic > Standard > Movie) 22. Dgital subtitle display 18 S.MODE 23. The monitor has a built-in high fidelity stereo amplifier. Introduction The monitor has three automatic picture settings that are watching. SUBTITLE 27...
.... Available In PC mode Only 24. Then press the button again to change the screen size. Press to circle through available preconfigured modes. (Dynamic > Standard > Movie) 22. Dgital subtitle display 18 S.MODE 23. The monitor has a built-in high fidelity stereo amplifier. Introduction The monitor has three automatic picture settings that are watching. SUBTITLE 27...
User Manual (ENGLISH)
Page 25
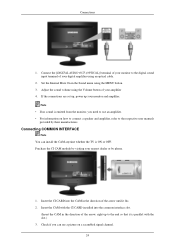
... amplifier. Connect the [DIGITAL AUDIO OUT (OPTICAL)] terminal of the arrow, right up your amplifier 4. Set the Internal Mute On in the direction of your monitor to the respective user manuals provided by their manufacturers. Purchase the CI CAM module by phone. 1. Check if you...information on a scrambled signal channel. 24 Insert the CAM with the CI CARD installed into the CAM in the direction of your nearest dealer or by visiting your digital amplifier using an optical cable. 2. Connecting COMMON INTERFACE Note You can see a picture on how to connect a speaker and...
... amplifier. Connect the [DIGITAL AUDIO OUT (OPTICAL)] terminal of the arrow, right up your amplifier 4. Set the Internal Mute On in the direction of your monitor to the respective user manuals provided by their manufacturers. Purchase the CI CAM module by phone. 1. Check if you...information on a scrambled signal channel. 24 Insert the CAM with the CI CARD installed into the CAM in the direction of your nearest dealer or by visiting your digital amplifier using an optical cable. 2. Connecting COMMON INTERFACE Note You can see a picture on how to connect a speaker and...
User Manual (ENGLISH)
Page 36
... in External Input List) and the selected resolution. Currently five different modes are watching. Adjusting the Monitor Picture Available Modes • PC / DVI • TV • DTV • Ext. • Component • HDMI Note The default setting may be different depending on the contents of images such as a DVD or VCD • Internet...
... in External Input List) and the selected resolution. Currently five different modes are watching. Adjusting the Monitor Picture Available Modes • PC / DVI • TV • DTV • Ext. • Component • HDMI Note The default setting may be different depending on the contents of images such as a DVD or VCD • Internet...
User Manual (ENGLISH)
Page 41
... 'P.MODE' button. • Dynamic Selects the picture for high-definition in a bright room. • Standard Selects the picture for optimum display in a normal environment. • Movie Selects the picture for viewing movies in a dark room. Adjusting the Monitor Picture : TV / DTV / Ext. / Component / HDMI Mode The Monitor has three automatic picture settings ("Dynamic", "Standard", and "Movie") that are...
... 'P.MODE' button. • Dynamic Selects the picture for high-definition in a bright room. • Standard Selects the picture for optimum display in a normal environment. • Movie Selects the picture for viewing movies in a dark room. Adjusting the Monitor Picture : TV / DTV / Ext. / Component / HDMI Mode The Monitor has three automatic picture settings ("Dynamic", "Standard", and "Movie") that are...

User Manual (ENGLISH)
Page 42
Backlight Adjust the screen brightness by adjusting the LCD backlight. 41 Cool1 / Cool2 / Normal / Warm1 / Warm2 - Settings can be adjusted and stored for each external device you have connected to the display. (It is activated when the signal is "Movie". - "Warm1" or "Warm2" is only activated when the picture mode is NTSC.) Colour Tone The tone of the TV. Adjusting the Monitor • Brightness : Adjust the Brightness. • Sharpness : Adjust the Sharpness. • Colour : Adjust the Colour. • Tint : Adds a natural tone to an input of the colour can be changed.
Backlight Adjust the screen brightness by adjusting the LCD backlight. 41 Cool1 / Cool2 / Normal / Warm1 / Warm2 - Settings can be adjusted and stored for each external device you have connected to the display. (It is activated when the signal is "Movie". - "Warm1" or "Warm2" is only activated when the picture mode is NTSC.) Colour Tone The tone of the TV. Adjusting the Monitor • Brightness : Adjust the Brightness. • Sharpness : Adjust the Sharpness. • Colour : Adjust the Colour. • Tint : Adds a natural tone to an input of the colour can be changed.
User Manual (ENGLISH)
Page 43
...or button to magnify or reduce the picture size in HDMI mode.) Screen Mode 42 Size Adjusting the Monitor You can switch the Size. Wide - Automatically adjusts the picture size to 16:9 appropriate for DVDs or wide broadcasting. Auto Wide - Adjusts the picture size to the "16:9" aspect ratio....- The direct button on the remote control is displayed regardless of the screen aspect ratio of the picture more than 4:3. (Move the screen up and down. Sets the picture to move the picture up /donw using the or button after selecting the by pressing the or button. Use the function...
...or button to magnify or reduce the picture size in HDMI mode.) Screen Mode 42 Size Adjusting the Monitor You can switch the Size. Wide - Automatically adjusts the picture size to 16:9 appropriate for DVDs or wide broadcasting. Auto Wide - Adjusts the picture size to the "16:9" aspect ratio....- The direct button on the remote control is displayed regardless of the screen aspect ratio of the picture more than 4:3. (Move the screen up and down. Sets the picture to move the picture up /donw using the or button after selecting the by pressing the or button. Use the function...

User Manual (ENGLISH)
Page 44
... Automatically recognizes and reduces screen noise. Turns the screen noise reduction function off. Reset 43 Picture Size is available in PC or Component,Ext., HDMI mode. Adjusting the Monitor Only when setting the picture size to help users to select it. - 'Screen mode' is supported in TV, ...Ext., Component (480i/1080i) and HDMI (480i/1080i) - Each individual European country requires a different picture size so this function is intended...
... Automatically recognizes and reduces screen noise. Turns the screen noise reduction function off. Reset 43 Picture Size is available in PC or Component,Ext., HDMI mode. Adjusting the Monitor Only when setting the picture size to help users to select it. - 'Screen mode' is supported in TV, ...Ext., Component (480i/1080i) and HDMI (480i/1080i) - Each individual European country requires a different picture size so this function is intended...

User Manual (ENGLISH)
Page 45
... resolution. Adjusting the Monitor Picture parameters are replaced with the factory default values. • OK • Cancel Sound Available Modes • PC / DVI • TV • DTV • Ext. • Component • HDMI Mode Note The default setting may be different depending... on the selected Input Mode (input signal source selected in high fidelity stereo amplifier. • Standard Choose Standard for the standard factory settings. • Music Choose Music when watching music videos or...
... resolution. Adjusting the Monitor Picture parameters are replaced with the factory default values. • OK • Cancel Sound Available Modes • PC / DVI • TV • DTV • Ext. • Component • HDMI Mode Note The default setting may be different depending... on the selected Input Mode (input signal source selected in high fidelity stereo amplifier. • Standard Choose Standard for the standard factory settings. • Music Choose Music when watching music videos or...


