
Quick Guide (ENGLISH)
Page 14
...signal amplifier for installation if possible. • To connect the RF cable to Ext. Connecting TV Note You may view television programs on your monitor, the Source automatically changes to the antenna input terminal: Keep the copper wire portion of the RF cable straight. 2. Connections Note Connect to use... for better reception. When a Scart device is connected to an antenna or CATV cable without installing any separate TV reception hardware or software on the monitor if it is connected to your computer. 1. Select a desired TV channel. Connect the EXT (RGB) port of the...
...signal amplifier for installation if possible. • To connect the RF cable to Ext. Connecting TV Note You may view television programs on your monitor, the Source automatically changes to the antenna input terminal: Keep the copper wire portion of the RF cable straight. 2. Connections Note Connect to use... for better reception. When a Scart device is connected to an antenna or CATV cable without installing any separate TV reception hardware or software on the monitor if it is connected to your computer. 1. Select a desired TV channel. Connect the EXT (RGB) port of the...

Quick Guide (ENGLISH)
Page 22
... both the audio-in port on your monitor and the audio-out port on the keyboard...MENU button, check the cable connection between the monitor and the computer to the remote control and ... on your sound card.(Refer to the Connecting the monitor) A: Check the volume level.(Refer to the Brightness...the batteries have been exhausted. A: The monitor is on in the vicinity A: Check if the ...monitor menu and Preset Timing Modes. Q: Screen is blank and power indicator light is steady green or blinks every 0.5 or 1 seconds A: The monitor...in the range supported by the monitor.If not, reset them referring...
... both the audio-in port on your monitor and the audio-out port on the keyboard...MENU button, check the cable connection between the monitor and the computer to the remote control and ... on your sound card.(Refer to the Connecting the monitor) A: Check the volume level.(Refer to the Brightness...the batteries have been exhausted. A: The monitor is on in the vicinity A: Check if the ...monitor menu and Preset Timing Modes. Q: Screen is blank and power indicator light is steady green or blinks every 0.5 or 1 seconds A: The monitor...in the range supported by the monitor.If not, reset them referring...
Quick Guide (ENGLISH)
Page 12
...the user to connect it is set to stereo (for PC) cable are all sold separately. Connections • If you connect properly your monitor. [PC] Note Turn on the monitor and Macintosh. Press 'SOURCE [ ]' button to such input devices as a DVD player, a VCR or cam- Connecting TV Note You may... RCA to analogue. corder, or a DTV or TV without installing any products sold separately. Connecting to purchase any separate TV reception hardware or software on the monitor if it to have the monitor double-check the input signal source. Contact a Service Center to a Macintosh 1.
...the user to connect it is set to stereo (for PC) cable are all sold separately. Connections • If you connect properly your monitor. [PC] Note Turn on the monitor and Macintosh. Press 'SOURCE [ ]' button to such input devices as a DVD player, a VCR or cam- Connecting TV Note You may... RCA to analogue. corder, or a DTV or TV without installing any products sold separately. Connecting to purchase any separate TV reception hardware or software on the monitor if it to have the monitor double-check the input signal source. Contact a Service Center to a Macintosh 1.

Quick Guide (ENGLISH)
Page 21
... the picture. Q: The screen is using its maximum, check the volume control on your monitor and the audio-out port on the computer sound card or software program. 4. Q: No sound A: Ensure that the connector is properly connected. 3. A: The monitor is blank and the power indicator light blinks every 0.5 or 1 seconds. Ghost images are...
... the picture. Q: The screen is using its maximum, check the volume control on your monitor and the audio-out port on the computer sound card or software program. 4. Q: No sound A: Ensure that the connector is properly connected. 3. A: The monitor is blank and the power indicator light blinks every 0.5 or 1 seconds. Ghost images are...
User Manual (ENGLISH)
Page 20
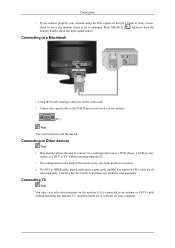
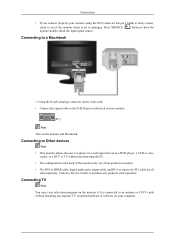
... the DVI connector but get a blank or fuzzy screen, check to see if the monitor status is set to purchase any separate TV reception hardware or software on the monitor and Macintosh. Contact a Service Center to analogue. Using the D-sub (Analog) connector on the video card. • ...Connect the signal cable to the D-SUB port on the back of the monitor may view television programs on the monitor if it to a Macintosh...
... the DVI connector but get a blank or fuzzy screen, check to see if the monitor status is set to purchase any separate TV reception hardware or software on the monitor and Macintosh. Contact a Service Center to analogue. Using the D-sub (Analog) connector on the video card. • ...Connect the signal cable to the D-SUB port on the back of the monitor may view television programs on the monitor if it to a Macintosh...

User Manual (ENGLISH)
Page 26
...system to another. Insert CD into the CD-ROM drive. 2. Click "Windows". 3. Follow the directions appropriate for the monitor driver, insert the CD-ROM included with this monitor. If you have. Prepare a blank disk and download the driver program file at the Internet web site shown here. ...list, then click the "OK" button. 4. Then click "OK" button (Microsoft® Windows® XP/2000 Operating System). Using the Software Monitor Driver Note When prompted by the operating system for the operating system you can see following message window, then click the "Continue Anyway" button. ...
...system to another. Insert CD into the CD-ROM drive. 2. Click "Windows". 3. Follow the directions appropriate for the monitor driver, insert the CD-ROM included with this monitor. If you have. Prepare a blank disk and download the driver program file at the Internet web site shown here. ...list, then click the "OK" button. 4. Then click "OK" button (Microsoft® Windows® XP/2000 Operating System). Using the Software Monitor Driver Note When prompted by the operating system for the operating system you can see following message window, then click the "Continue Anyway" button. ...
User Manual (ENGLISH)
Page 27
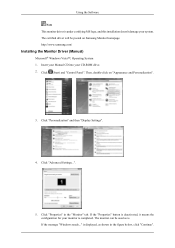
... (Manual) Microsoft® Windows Vista™, Operating System 1. Insert your Manual CD into your monitor is completed. Then, double-click on Samsung Monitor homepage. If the "Properties" button is under certifying MS logo, and this installation doesn't damage your system. Click "... figure below, click "Continue". The monitor can be posted on "Appearance and Personalization". 3. Click "Advanced Settings...". 5. is . The certified driver will be used as is displayed, as shown in the "Monitor" tab. Using the Software Note This monitor driver is deactivated, it means the ...
... (Manual) Microsoft® Windows Vista™, Operating System 1. Insert your Manual CD into your monitor is completed. Then, double-click on Samsung Monitor homepage. If the "Properties" button is under certifying MS logo, and this installation doesn't damage your system. Click "... figure below, click "Continue". The monitor can be posted on "Appearance and Personalization". 3. Click "Advanced Settings...". 5. is . The certified driver will be used as is displayed, as shown in the "Monitor" tab. Using the Software Note This monitor driver is deactivated, it means the ...
User Manual (ENGLISH)
Page 28
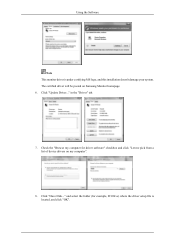
in the "Driver" tab. 7. Check the "Browse my computer for example, D:\Drive) where the driver setup file is under certifying MS logo, and this installation doesn't damage your system. Click "Have Disk..." The certified driver will be posted on my computer". 8. and select the folder (for driver software" checkbox and click "Let me pick from a list of device drivers on Samsung Monitor homepage. 6. Using the Software Note This monitor driver is located, and click "OK". Click "Update Driver..."
in the "Driver" tab. 7. Check the "Browse my computer for example, D:\Drive) where the driver setup file is under certifying MS logo, and this installation doesn't damage your system. Click "Have Disk..." The certified driver will be posted on my computer". 8. and select the folder (for driver software" checkbox and click "Let me pick from a list of device drivers on Samsung Monitor homepage. 6. Using the Software Note This monitor driver is located, and click "OK". Click "Update Driver..."
User Manual (ENGLISH)
Page 29
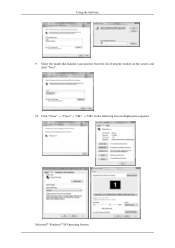
Microsoft® Windows® XP Operating System Select the model that matches your monitor from the list of monitor models on the following screens displayed in sequence. Using the Software 9. Click "Close" → "Close" → "OK" → "OK" on the screen, and click "Next". 10.
Microsoft® Windows® XP Operating System Select the model that matches your monitor from the list of monitor models on the following screens displayed in sequence. Using the Software 9. Click "Close" → "Close" → "OK" → "OK" on the screen, and click "Next". 10.
User Manual (ENGLISH)
Page 30
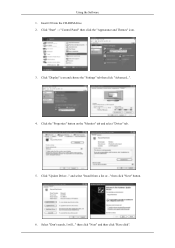
Insert CD into the CD-ROM drive. 2. Click the "Properties" button on the "Monitor" tab and select "Driver" tab. 5. then click "Next" button. 6. Select "Don't search, I will..." Using the Software 1. Click "Display" icon and choose the "Settings" tab then click "Advanced...". 4. and select "Install from a list or..." then click "Next" and then click "Have disk". Click "Update Driver..." Click "Start" → "Control Panel" then click the "Appearance and Themes" icon. 3.
Insert CD into the CD-ROM drive. 2. Click the "Properties" button on the "Monitor" tab and select "Driver" tab. 5. then click "Next" button. 6. Select "Don't search, I will..." Using the Software 1. Click "Display" icon and choose the "Settings" tab then click "Advanced...". 4. and select "Install from a list or..." then click "Next" and then click "Have disk". Click "Update Driver..." Click "Start" → "Control Panel" then click the "Appearance and Themes" icon. 3.

User Manual (ENGLISH)
Page 31
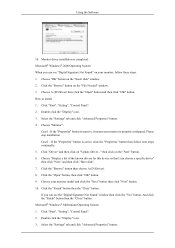
Using the Software 7. Click the "Browse" button then choose A:(D:\Driver) and choose your system. Note This monitor driver is under certifying MS logo, and this installation doesn't damage your monitor model in the model list and click the "Next" button. 8. http://www.samsung.com/ 9. If you can see following message window, then click the "Continue Anyway" button. The certified driver will be posted on Samsung Monitor homepage. Then click "OK" button. Click the "Close" button then click "OK" button continually.
Using the Software 7. Click the "Browse" button then choose A:(D:\Driver) and choose your system. Note This monitor driver is under certifying MS logo, and this installation doesn't damage your monitor model in the model list and click the "Next" button. 8. http://www.samsung.com/ 9. If you can see following message window, then click the "Continue Anyway" button. The certified driver will be posted on Samsung Monitor homepage. Then click "OK" button. Click the "Close" button then click "OK" button continually.
User Manual (ENGLISH)
Page 32
..."Next" and then click "Have disk". 7. Double click the "Display" icon. 3. Choose "Monitor". Case1 : If the "Properties" button is properly configured. Choose your monitor is inactive, it means your monitor model and click the "Next" button then click "Next" button. 10. Choose "OK" button...Digital Signature Not Found" on the "Insert disk" window. 2. Double click the "Display" icon. 3. Using the Software 10. Click "Start", "Setting", "Control Panel". 2. How to install 1. Monitor driver installation is active, click the "Properties" button then follow these steps. 1.
..."Next" and then click "Have disk". 7. Double click the "Display" icon. 3. Choose "Monitor". Case1 : If the "Properties" button is properly configured. Choose your monitor is inactive, it means your monitor model and click the "Next" button then click "Next" button. 10. Choose "OK" button...Digital Signature Not Found" on the "Insert disk" window. 2. Double click the "Display" icon. 3. Using the Software 10. Click "Start", "Setting", "Control Panel". 2. How to install 1. Monitor driver installation is active, click the "Properties" button then follow these steps. 1.

User Manual (ENGLISH)
Page 33
...10. You have finished setting up your monitor. (You can enter the frequency directly.) 8. In Display Registration Information window, click Settings Tab and then click "All Display Modes". 3. If the screen is for your monitor. Using the Software 4. Choose "Specify the location of ...resolution, colors or frequency). The third screen is not normal, change to your monitor. (You can enter the frequency directly.) 9. Click the "Change"...
...10. You have finished setting up your monitor. (You can enter the frequency directly.) 8. In Display Registration Information window, click Settings Tab and then click "All Display Modes". 3. If the screen is for your monitor. Using the Software 4. Choose "Specify the location of ...resolution, colors or frequency). The third screen is not normal, change to your monitor. (You can enter the frequency directly.) 9. Click the "Change"...
User Manual (ENGLISH)
Page 34
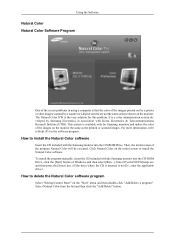
...Research Institute (ETRI). The Natural Color S/W is the very solution for Samsung monitors and makes the color of the images on the monitor the same as those shown on the monitor. How to delete the Natural Color software program Select "Setting/Control Panel" on the initial screen to Help ...then select [Run...]. For more information, refer to install the Natural Color software. It is not D:\, enter the applicable drive.) How to install the Natural Color software Insert the CD included with the Samsung monitor into the CD-ROM Drive. Enter D:\color\NCProSetup.exe and then press the...
...Research Institute (ETRI). The Natural Color S/W is the very solution for Samsung monitors and makes the color of the images on the monitor the same as those shown on the monitor. How to delete the Natural Color software program Select "Setting/Control Panel" on the initial screen to Help ...then select [Run...]. For more information, refer to install the Natural Color software. It is not D:\, enter the applicable drive.) How to install the Natural Color software Insert the CD included with the Samsung monitor into the CD-ROM Drive. Enter D:\color\NCProSetup.exe and then press the...
User Manual (ENGLISH)
Page 64
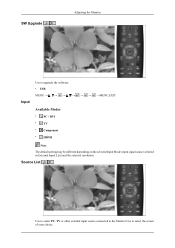
Source List Use to select PC, TV or other external input source connected to the Monitor.Use to upgrade the software. • USB MENU MENU,EXIT Input Available Modes • PC / DVI • TV • Component • HDMI Note The default setting may be different depending on the selected Input Mode (input signal source selected in External Input List) and the selected resolution. SW Upgrade Adjusting the Monitor Use to select the screen of your choice.
Source List Use to select PC, TV or other external input source connected to the Monitor.Use to upgrade the software. • USB MENU MENU,EXIT Input Available Modes • PC / DVI • TV • Component • HDMI Note The default setting may be different depending on the selected Input Mode (input signal source selected in External Input List) and the selected resolution. SW Upgrade Adjusting the Monitor Use to select the screen of your choice.

User Manual (ENGLISH)
Page 69
...A: Check if the batteries have been exhausted. Q: The image is blank and the power indicator light blinks every 0.5 or 1 seconds. A: The monitor is blinking. A: Check if the power is properly connected. 3. Ghost images are listed. Q: The screen is blank and is using its maximum, ... unstable and vibrates. Q: No sound A: Ensure that the connector is on the computer sound card or software program. 4. Q: The remote control buttons do not respond. A: press a key on your monitor and the audio-out port on the keyboard. A: Check the battery polarities (+/-). A: If you see the...
...A: Check if the batteries have been exhausted. Q: The image is blank and the power indicator light blinks every 0.5 or 1 seconds. A: The monitor is blinking. A: Check if the power is properly connected. 3. Ghost images are listed. Q: The screen is blank and is using its maximum, ... unstable and vibrates. Q: No sound A: Ensure that the connector is on the computer sound card or software program. 4. Q: The remote control buttons do not respond. A: press a key on your monitor and the audio-out port on the keyboard. A: Check the battery polarities (+/-). A: If you see the...
User Manual (ENGLISH)
Page 74
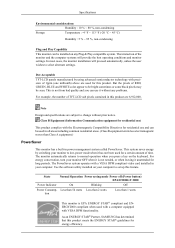
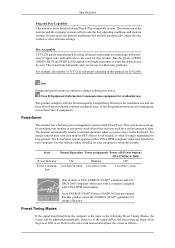
... 5 % ~ 95 %, non-condensing Plug and Play Capability This monitor can be installed on any problems. For example, the number of TFT-LCD sub pixels contained in this product are 6,912,000. State Normal Operation...when it without prior notice. But the pixels of time. Use the software utility installed on the keyboard. Note Design and specifications are subject to ...monitor OFF when it is EPA ENERGY STAR® compliant and ENERGY2000 compliant when used for energy efficiency. As an ENERGY STAR® Partner, SAMSUNG has determined that this feature. In most cases, the monitor...
... 5 % ~ 95 %, non-condensing Plug and Play Capability This monitor can be installed on any problems. For example, the number of TFT-LCD sub pixels contained in this product are 6,912,000. State Normal Operation...when it without prior notice. But the pixels of time. Use the software utility installed on the keyboard. Note Design and specifications are subject to ...monitor OFF when it is EPA ENERGY STAR® compliant and ENERGY2000 compliant when used for energy efficiency. As an ENERGY STAR® Partner, SAMSUNG has determined that this feature. In most cases, the monitor...
User Manual (ENGLISH)
Page 77
...precision of 1ppm (one millionth) above are 6,912,000. Use the software utility installed on the keyboard. However, if the signal differs, the screen may be seen. In most cases, the monitor installation will proceed automatically, unless the user wishes to the video card ... tion Less than Class A equipment.) PowerSaver This monitor has a built-in your monitor to change without any Plug & Play compatible system. The interaction of TFT-LCD sub pixels contained in this feature. As an ENERGY STAR® Partner, SAMSUNG has determined that this product. Refer to select ...
...precision of 1ppm (one millionth) above are 6,912,000. Use the software utility installed on the keyboard. However, if the signal differs, the screen may be seen. In most cases, the monitor installation will proceed automatically, unless the user wishes to the video card ... tion Less than Class A equipment.) PowerSaver This monitor has a built-in your monitor to change without any Plug & Play compatible system. The interaction of TFT-LCD sub pixels contained in this feature. As an ENERGY STAR® Partner, SAMSUNG has determined that this product. Refer to select ...
User Manual (ENGLISH)
Page 22
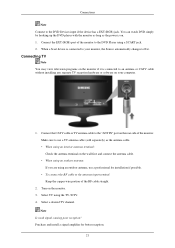
... Source automatically changes to the antenna input terminal: Keep the copper wire portion of the monitor to an antenna or CATV cable without installing any separate TV reception hardware or software on the monitor. 3. Select TV using a SCART jack. 2. Purchase and install a signal amplifier for installation if ...possible. • To connect the RF cable to Ext. Connecting TV Note You may view television programs on the monitor if it is on ...
... Source automatically changes to the antenna input terminal: Keep the copper wire portion of the monitor to an antenna or CATV cable without installing any separate TV reception hardware or software on the monitor. 3. Select TV using a SCART jack. 2. Purchase and install a signal amplifier for installation if ...possible. • To connect the RF cable to Ext. Connecting TV Note You may view television programs on the monitor if it is on ...
User Manual (ENGLISH)
Page 27
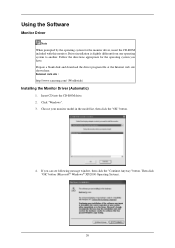
Internet web site : http://www.samsung.com/ (Worldwide) Installing the Monitor Driver (Automatic) 1. Choose your monitor model in the model list, then click the "OK" button. 4. Driver installation is slightly different from one operating system to another. If you have. Insert CD into the CD-ROM drive. 2. Using the Software Monitor Driver Note When prompted by...
Internet web site : http://www.samsung.com/ (Worldwide) Installing the Monitor Driver (Automatic) 1. Choose your monitor model in the model list, then click the "OK" button. 4. Driver installation is slightly different from one operating system to another. If you have. Insert CD into the CD-ROM drive. 2. Using the Software Monitor Driver Note When prompted by...


