Quick Guide (ENGLISH)
Page 2
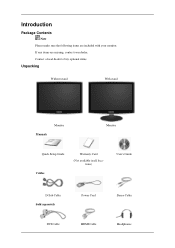
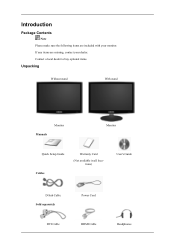
Contact a local dealer to buy optional items. Unpacking Without stand With stand Manuals Monitor Monitor Quick Setup Guide Cables Warranty Card (Not available in all locations) User's Guide D-Sub Cable Sold separately DVI Cable Power Cord HDMI Cable Stereo Cable Headphones If any items are included with your dealer. Introduction Package Contents Note Please make sure the following items are missing, contact your monitor.
Contact a local dealer to buy optional items. Unpacking Without stand With stand Manuals Monitor Monitor Quick Setup Guide Cables Warranty Card (Not available in all locations) User's Guide D-Sub Cable Sold separately DVI Cable Power Cord HDMI Cable Stereo Cable Headphones If any items are included with your dealer. Introduction Package Contents Note Please make sure the following items are missing, contact your monitor.
Quick Guide (ENGLISH)
Page 5
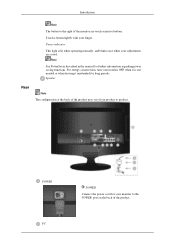
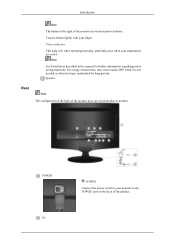
Touch a button lightly with your monitor OFF when it unattended for further information regarding power saving functions. For energy conservation, turn your finger. POWER PC POWER Connect the power cord for ... needed or when leaving it is lit when operating normally, and blinks once when your monitor to product. Note See PowerSaver described in the manual for long periods. Speaker Rear Note The configuration at the back of the monitor are saved. Introduction Note The button to the right of the product may vary...
Touch a button lightly with your monitor OFF when it unattended for further information regarding power saving functions. For energy conservation, turn your finger. POWER PC POWER Connect the power cord for ... needed or when leaving it is lit when operating normally, and blinks once when your monitor to product. Note See PowerSaver described in the manual for long periods. Speaker Rear Note The configuration at the back of the monitor are saved. Introduction Note The button to the right of the product may vary...
Quick Guide (ENGLISH)
Page 7
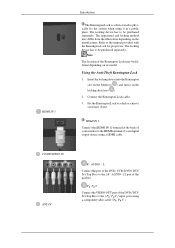
... device has to be purchased separately. L Connect the port of the product. AUDIO - Insert the locking device into the Kensington slot on the Monitor ( ) and turn it in the locking direction ( ). 2. COMPONENT IN ANT IN R - AUDIO - The locking device has to be purchased... video cable ( PR, PB,Y ). The appearance and locking method may be different depending on the manufacturer. Fix the Kensington Lock to the manual provided with the Kensington Lock for proper use. Connect the Kensington Lock cable. 3. Refer to a desk or a heavy stationary object. L] port...
... device has to be purchased separately. L Connect the port of the product. AUDIO - Insert the locking device into the Kensington slot on the Monitor ( ) and turn it in the locking direction ( ). 2. COMPONENT IN ANT IN R - AUDIO - The locking device has to be purchased... video cable ( PR, PB,Y ). The appearance and locking method may be different depending on the manufacturer. Fix the Kensington Lock to the manual provided with the Kensington Lock for proper use. Connect the Kensington Lock cable. 3. Refer to a desk or a heavy stationary object. L] port...
Quick Guide (ENGLISH)
Page 17
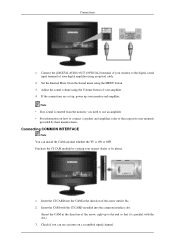
...MENU button. 3. Connect the [DIGITAL AUDIO OUT (OPTICAL)] terminal of your monitor to use an amplifier. • For information on a scrambled signal channel. Purchase the CI CAM module by... visiting your monitor and amplifier. Connections 1. Insert the CI CARD into the common interface slot. (Insert ..., refer to the end so that it fits. 2. Note • If no sound is emitted from the monitor, you can install the CAM anytime whether the TV is parallel with the slot.) 3. If the connections are ...
...MENU button. 3. Connect the [DIGITAL AUDIO OUT (OPTICAL)] terminal of your monitor to use an amplifier. • For information on a scrambled signal channel. Purchase the CI CAM module by... visiting your monitor and amplifier. Connections 1. Insert the CI CARD into the common interface slot. (Insert ..., refer to the end so that it fits. 2. Note • If no sound is emitted from the monitor, you can install the CAM anytime whether the TV is parallel with the slot.) 3. If the connections are ...
Quick Guide (ENGLISH)
Page 23
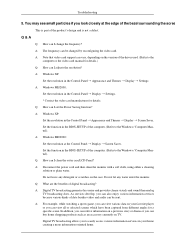
...the product's design and is not a defect. A: Disconnect the power cord and then clean the monitor with a soft cloth, using either a cleaning solution or plain water. A: For example, while ... you can view various data on TV. Digital TV broadcasting allows you can I clean the outer case/LCD Panel? Q & A Q: How can buy home shopping products such as an accessory currently on your home... card. Q: What are the benefits of the computer. (Refer to the computer or the video card manual for details.) Q: How can I adjusts the resolution? Q: How can I set the Power Saving function...
...the product's design and is not a defect. A: Disconnect the power cord and then clean the monitor with a soft cloth, using either a cleaning solution or plain water. A: For example, while ... you can view various data on TV. Digital TV broadcasting allows you can I clean the outer case/LCD Panel? Q & A Q: How can buy home shopping products such as an accessory currently on your home... card. Q: What are the benefits of the computer. (Refer to the computer or the video card manual for details.) Q: How can I adjusts the resolution? Q: How can I set the Power Saving function...

Quick Guide (ENGLISH)
Page 2
Introduction Package Contents Note Please make sure the following items are missing, contact your monitor. If any items are included with your dealer. Contact a local dealer to buy optional items. Unpacking Without stand With stand Manuals Monitor Monitor Quick Setup Guide Cables Warranty Card (Not available in all locations) User's Guide D-Sub Cable Sold separately DVI Cable Power Cord HDMI Cable Headphones
Introduction Package Contents Note Please make sure the following items are missing, contact your monitor. If any items are included with your dealer. Contact a local dealer to buy optional items. Unpacking Without stand With stand Manuals Monitor Monitor Quick Setup Guide Cables Warranty Card (Not available in all locations) User's Guide D-Sub Cable Sold separately DVI Cable Power Cord HDMI Cable Headphones

Quick Guide (ENGLISH)
Page 5
... the POWER port on the back of the product may vary from product to the right of the monitor are saved. Power indicator This light is not needed or when leaving it is lit when operating normally, and blinks once when your finger. Speaker ... back of the product. Introduction Note The button to product. Touch a button lightly with your adjustments are touch-sensitive buttons. For energy conservation, turn your monitor OFF when it unattended for further information regarding power saving functions. Note See PowerSaver described in the...
... the POWER port on the back of the product may vary from product to the right of the monitor are saved. Power indicator This light is not needed or when leaving it is lit when operating normally, and blinks once when your finger. Speaker ... back of the product. Introduction Note The button to product. Touch a button lightly with your adjustments are touch-sensitive buttons. For energy conservation, turn your monitor OFF when it unattended for further information regarding power saving functions. Note See PowerSaver described in the...
Quick Guide (ENGLISH)
Page 7
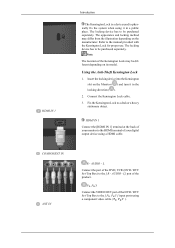
... Kensington Lock cable. 3. PR, PB,Y Connect the VIDEO OUT port of the DVD / DTV Set-Top Box to the manual provided with the Kensington Lock for proper use. Note The location of your monitor to the [ R - Using the Anti-Theft Kensington Lock 1. COMPONENT IN ANT IN R - AUDIO - L] port of... be purchased separately. HDMI IN 1 Connect the [HDMI IN 1] terminal at the back of the Kensington Lock may differ from the illustration depending on the Monitor ( ) and turn it in the locking direction ( ). 2. HDMI IN 1 Introduction The Kensington Lock is a device used to physically fix the system ...
... Kensington Lock cable. 3. PR, PB,Y Connect the VIDEO OUT port of the DVD / DTV Set-Top Box to the manual provided with the Kensington Lock for proper use. Note The location of your monitor to the [ R - Using the Anti-Theft Kensington Lock 1. COMPONENT IN ANT IN R - AUDIO - L] port of... be purchased separately. HDMI IN 1 Connect the [HDMI IN 1] terminal at the back of the Kensington Lock may differ from the illustration depending on the Monitor ( ) and turn it in the locking direction ( ). 2. HDMI IN 1 Introduction The Kensington Lock is a device used to physically fix the system ...

Quick Guide (ENGLISH)
Page 16
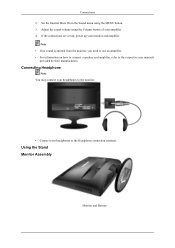
... amplifier. Connections 2. If the connections are set up, power up your headphones to the respective user manuals provided by their manufacturers. Using the Stand Monitor Assembly Monitor and Bottom Note • If no sound is emitted from the monitor, you need to use an amplifier. • For information on how to connect a speaker and...
... amplifier. Connections 2. If the connections are set up, power up your headphones to the respective user manuals provided by their manufacturers. Using the Stand Monitor Assembly Monitor and Bottom Note • If no sound is emitted from the monitor, you need to use an amplifier. • For information on how to connect a speaker and...
Quick Guide (ENGLISH)
Page 22
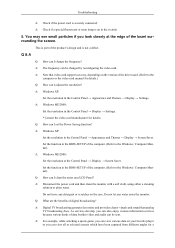
... can I clean the outer case/LCD Panel? A: Windows ME/2000: Set the resolution in the Control Panel → Appearance and Themes → Display → Settings. A: Windows ME/2000: Set the resolution at the edge of the computer. (Refer to the Windows / Computer Manual). Set the function in the BIOS...-SETUP of the bezel surrounding the screen. A: Disconnect the power cord and then clean the monitor with a soft cloth, using either a cleaning solution or plain water. A: ...
... can I clean the outer case/LCD Panel? A: Windows ME/2000: Set the resolution in the Control Panel → Appearance and Themes → Display → Settings. A: Windows ME/2000: Set the resolution at the edge of the computer. (Refer to the Windows / Computer Manual). Set the function in the BIOS...-SETUP of the bezel surrounding the screen. A: Disconnect the power cord and then clean the monitor with a soft cloth, using either a cleaning solution or plain water. A: ...

User Manual (ENGLISH)
Page 1
SyncMaster T240HD/T260HD LCD Monitor User Manual
SyncMaster T240HD/T260HD LCD Monitor User Manual
User Manual (ENGLISH)
Page 10
Contact a local dealer to buy optional items. Unpacking Without stand With stand Manuals Monitor Monitor Quick Setup Guide Cables Warranty Card (Not available in all locations) User's Guide D-Sub Cable Sold separately DVI Cable Power Cord HDMI Cable Headphones Introduction Package Contents Note Please make sure the following items are missing, contact your monitor. If any items are included with your dealer.
Contact a local dealer to buy optional items. Unpacking Without stand With stand Manuals Monitor Monitor Quick Setup Guide Cables Warranty Card (Not available in all locations) User's Guide D-Sub Cable Sold separately DVI Cable Power Cord HDMI Cable Headphones Introduction Package Contents Note Please make sure the following items are missing, contact your monitor. If any items are included with your dealer.
User Manual (ENGLISH)
Page 13
...See PowerSaver described in the manual for long periods. POWER PC POWER Connect the power cord for your adjustments are touch-sensitive buttons. Power indicator This light is not needed or when leaving it is lit when operating normally, and blinks once when your monitor to the POWER port on ...the back of the product may vary from product to the right of the monitor are saved. For energy conservation, turn your finger. Speaker Rear Note The configuration ...
...See PowerSaver described in the manual for long periods. POWER PC POWER Connect the power cord for your adjustments are touch-sensitive buttons. Power indicator This light is not needed or when leaving it is lit when operating normally, and blinks once when your monitor to the POWER port on ...the back of the product may vary from product to the right of the monitor are saved. For energy conservation, turn your finger. Speaker Rear Note The configuration ...

User Manual (ENGLISH)
Page 15
Fix the Kensington Lock to the manual provided with the Kensington Lock for proper use. The locking device has to be purchased separately. COMPONENT IN ANT IN R - HDMI IN 1 Connect the [HDMI IN 1] terminal at the back of your monitor to the HDMI terminal of your digital output device ... - L Connect the port of the product. PR, PB,Y Connect the VIDEO OUT port of the Kensington Lock may differ from the illustration depending on the Monitor ( ) and turn it in the locking direction ( ). 2. Using the Anti-Theft Kensington Lock 1. L] port of the DVD, VCR (DVD / DTV Set...
Fix the Kensington Lock to the manual provided with the Kensington Lock for proper use. The locking device has to be purchased separately. COMPONENT IN ANT IN R - HDMI IN 1 Connect the [HDMI IN 1] terminal at the back of your monitor to the HDMI terminal of your digital output device ... - L Connect the port of the product. PR, PB,Y Connect the VIDEO OUT port of the Kensington Lock may differ from the illustration depending on the Monitor ( ) and turn it in the locking direction ( ). 2. Using the Anti-Theft Kensington Lock 1. L] port of the DVD, VCR (DVD / DTV Set...
User Manual (ENGLISH)
Page 24
...connection terminal. Set the Internal Mute On in the Sound menu using the Volume button of your amplifier 4. Using the Stand Monitor Assembly Monitor and Bottom Connections 2. Adjust the sound volume using the MENU button. 3. Connecting Headphone Note You may connect your headphones to the... respective user manuals provided by their manufacturers. Note • If no sound is emitted from the monitor, you need to use an amplifier. • For information on how to connect a speaker and...
...connection terminal. Set the Internal Mute On in the Sound menu using the Volume button of your amplifier 4. Using the Stand Monitor Assembly Monitor and Bottom Connections 2. Adjust the sound volume using the MENU button. 3. Connecting Headphone Note You may connect your headphones to the... respective user manuals provided by their manufacturers. Note • If no sound is emitted from the monitor, you need to use an amplifier. • For information on how to connect a speaker and...
User Manual (ENGLISH)
Page 27
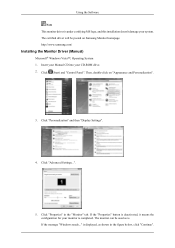
... "Continue". Click (Start) and "Control Panel". If the message "Windows needs..." Insert your Manual CD into your monitor is completed. is under certifying MS logo, and this installation doesn't damage your system. Then, double-click on Samsung Monitor homepage. The monitor can be posted on "Appearance and Personalization". 3. Click "Personalization" and then "Display Settings". 4. Click...
... "Continue". Click (Start) and "Control Panel". If the message "Windows needs..." Insert your Manual CD into your monitor is completed. is under certifying MS logo, and this installation doesn't damage your system. Then, double-click on Samsung Monitor homepage. The monitor can be posted on "Appearance and Personalization". 3. Click "Personalization" and then "Display Settings". 4. Click...
User Manual (ENGLISH)
Page 34
... click the "Add/Delete" button. Then, the initial screen of Windows and then select [Run...]. To install the program manually, insert the CD included with the Samsung monitor into the CD-ROM Drive, click the [Start] button of the program Natural Color will be executed. Enter D:\color\NCProSetup... [Enter] key. (If the drive where the CD is inserted is the very solution for Samsung monitors and makes the color of the images printed out by a printer or other images scanned by Samsung Electronics in the software program. The Natural Color S/W is not D:\, enter the applicable drive.)...
... click the "Add/Delete" button. Then, the initial screen of Windows and then select [Run...]. To install the program manually, insert the CD included with the Samsung monitor into the CD-ROM Drive, click the [Start] button of the program Natural Color will be executed. Enter D:\color\NCProSetup... [Enter] key. (If the drive where the CD is inserted is the very solution for Samsung monitors and makes the color of the images printed out by a printer or other images scanned by Samsung Electronics in the software program. The Natural Color S/W is not D:\, enter the applicable drive.)...
User Manual (ENGLISH)
Page 51
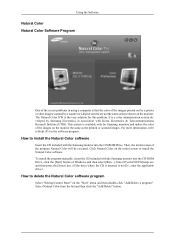
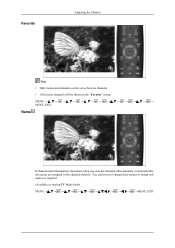
MENU MENU,EXIT Name If channel name information is broadcast when you store the channels either manually or automatically, the names are assigned to the channels directly. Favorite Adjusting the Monitor Note • Only memorized channels can however change these names or assign new names as favorite channels. • All favorite channels will be shown in Analog TV Mode Only) MENU MENU,EXIT You can be set as required. (Available in the "Favorite" menu.
MENU MENU,EXIT Name If channel name information is broadcast when you store the channels either manually or automatically, the names are assigned to the channels directly. Favorite Adjusting the Monitor Note • Only memorized channels can however change these names or assign new names as favorite channels. • All favorite channels will be shown in Analog TV Mode Only) MENU MENU,EXIT You can be set as required. (Available in the "Favorite" menu.
User Manual (ENGLISH)
Page 54
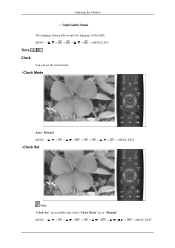
MENU → MENU,EXIT Clock Mode Auto / Manual MENU MENU,EXIT - Adjusting the Monitor The language chosen affects only the language of the OSD. Clock Set Note "Clock Set" are available only when "Clock Mode" set the current time. - MENU MENU,EXIT Time Clock You can set to "Manual".
MENU → MENU,EXIT Clock Mode Auto / Manual MENU MENU,EXIT - Adjusting the Monitor The language chosen affects only the language of the OSD. Clock Set Note "Clock Set" are available only when "Clock Mode" set the current time. - MENU MENU,EXIT Time Clock You can set to "Manual".
User Manual (ENGLISH)
Page 55
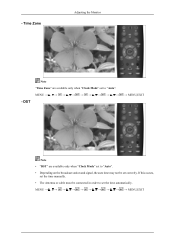
- If this occurs, set the time manually. • The Antenna or cable must be set correctly. DST Note "Time Zone" are available only when "Clock Mode" set the time automatically. MENU MENU,EXIT MENU → MENU,EXIT Note • "DST" are available only when "Clock Mode" set to set to "Auto". • Depending on the broadcast station and signal, the auto time may not be connected in order to "Auto". Time Zone Adjusting the Monitor -
- If this occurs, set the time manually. • The Antenna or cable must be set correctly. DST Note "Time Zone" are available only when "Clock Mode" set the time automatically. MENU MENU,EXIT MENU → MENU,EXIT Note • "DST" are available only when "Clock Mode" set to set to "Auto". • Depending on the broadcast station and signal, the auto time may not be connected in order to "Auto". Time Zone Adjusting the Monitor -


