
Quick Guide (ENGLISH)
Page 1
LCD MONITOR quick start guide T260HD/T240HD ii
LCD MONITOR quick start guide T260HD/T240HD ii
Quick Guide (ENGLISH)
Page 2
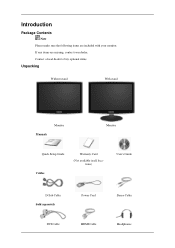
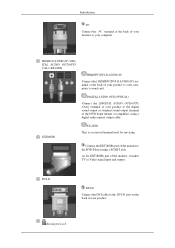
Contact a local dealer to buy optional items. Unpacking Without stand With stand Manuals Monitor Monitor Quick Setup Guide Cables Warranty Card (Not available in all locations) User's Guide D-Sub Cable Sold separately DVI Cable Power Cord HDMI Cable Stereo Cable Headphones If any items are included with your dealer. Introduction Package Contents Note Please make sure the following items are missing, contact your monitor.
Contact a local dealer to buy optional items. Unpacking Without stand With stand Manuals Monitor Monitor Quick Setup Guide Cables Warranty Card (Not available in all locations) User's Guide D-Sub Cable Sold separately DVI Cable Power Cord HDMI Cable Stereo Cable Headphones If any items are included with your dealer. Introduction Package Contents Note Please make sure the following items are missing, contact your monitor.
Quick Guide (ENGLISH)
Page 4
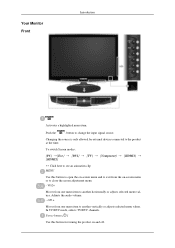
... vertically or adjusts selected menu values. Power button [ ] Use this button to open the on-screen menu and to change the input signal source. Your Monitor Front Introduction Activates a highlighted menu item.
... vertically or adjusts selected menu values. Power button [ ] Use this button to open the on-screen menu and to change the input signal source. Your Monitor Front Introduction Activates a highlighted menu item.
Quick Guide (ENGLISH)
Page 5
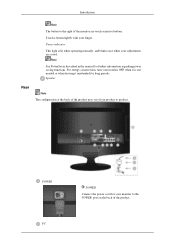
... the manual for long periods. Touch a button lightly with your adjustments are touch-sensitive buttons. For energy conservation, turn your monitor to the POWER port on the back of the monitor are saved. Speaker Rear Note The configuration at the back of the product may vary from product to the right of... the product. POWER PC POWER Connect the power cord for your monitor OFF when it is lit when operating normally, and blinks once when your finger. Introduction Note The button to product.
... the manual for long periods. Touch a button lightly with your adjustments are touch-sensitive buttons. For energy conservation, turn your monitor to the POWER port on the back of the monitor are saved. Speaker Rear Note The configuration at the back of the product may vary from product to the right of... the product. POWER PC POWER Connect the power cord for your monitor OFF when it is lit when operating normally, and blinks once when your finger. Introduction Note The button to product.
Quick Guide (ENGLISH)
Page 6
EXT(RGB) EX-LINK This is a reserved terminal used for EXT(RGB) port of the monitor, it makes TV or Video signal input and output. DIGITAL AUDIO OUT(OPTICAL) Connect the [DIGITAL AUDIO OUT(OPTICAL)] terminal of your product. Kensington Lock ... or standard sound output terminal of the DVD home theater (or amplifier) using a SCART jack. As for servicing. Connect the EXT(RGB) port of the monitor to the DVD Player using a digital audio optical output cable. Introduction PC Connect the PC terminal at the back of your product to your computer...
EXT(RGB) EX-LINK This is a reserved terminal used for EXT(RGB) port of the monitor, it makes TV or Video signal input and output. DIGITAL AUDIO OUT(OPTICAL) Connect the [DIGITAL AUDIO OUT(OPTICAL)] terminal of your product. Kensington Lock ... or standard sound output terminal of the DVD home theater (or amplifier) using a SCART jack. As for servicing. Connect the EXT(RGB) port of the monitor to the DVD Player using a digital audio optical output cable. Introduction PC Connect the PC terminal at the back of your product to your computer...
Quick Guide (ENGLISH)
Page 7
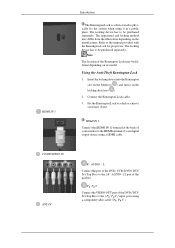
...OUT port of the product. Connect the Kensington Lock cable. 3. The locking device has to a desk or a heavy stationary object. L Connect the port of your monitor to the HDMI terminal of the DVD, VCR (DVD / DTV Set-Top Box) to the [ R - AUDIO - HDMI IN 1 Connect the [HDMI IN 1]... of your digital output device using it in a public place. Note The location of the Kensington Lock may differ from the illustration depending on the Monitor ( ) and turn it in the locking direction ( ). 2. HDMI IN 1 Introduction The Kensington Lock is a device used to physically fix the system when ...
...OUT port of the product. Connect the Kensington Lock cable. 3. The locking device has to a desk or a heavy stationary object. L Connect the port of your monitor to the HDMI terminal of the DVD, VCR (DVD / DTV Set-Top Box) to the [ R - AUDIO - HDMI IN 1 Connect the [HDMI IN 1]... of your digital output device using it in a public place. Note The location of the Kensington Lock may differ from the illustration depending on the Monitor ( ) and turn it in the locking direction ( ). 2. HDMI IN 1 Introduction The Kensington Lock is a device used to physically fix the system when ...
Quick Guide (ENGLISH)
Page 10
.... - SOURCE 13. Moves from the menu screen. INFO 19. TTX/MIX Enter the two-digit channel number. Opens the on the lower center of the monitor or to change the picture atmosphere as required. MUTE 8. Press the button to change the input signal SOURCE. CH LIST 6. 7. TV/DTV 5. Press to select...
.... - SOURCE 13. Moves from the menu screen. INFO 19. TTX/MIX Enter the two-digit channel number. Opens the on the lower center of the monitor or to change the picture atmosphere as required. MUTE 8. Press the button to change the input signal SOURCE. CH LIST 6. 7. TV/DTV 5. Press to select...
Quick Guide (ENGLISH)
Page 11
...circle through available preconfigured modes. (Entertain > Internet > Text > Dynamic Contrast > Custom) When you are preset at the factory. S.MODE 23. Available In PC mode Only 24. PC/ DVI mode : / 4:3 TV/DTV /Ext. mode: Auto Wide / Wide / 16:9 / Wide Zoom / Zoom / 4:3 Component mode: Wide / 16:9 ...) MagicBright is a feature providing the optimum viewing environment depending on the contents of the screen. Introduction The monitor has three automatic picture settings that are watching. The monitor has a built-in high fidelity stereo amplifier. Dgital subtitle display
...circle through available preconfigured modes. (Entertain > Internet > Text > Dynamic Contrast > Custom) When you are preset at the factory. S.MODE 23. Available In PC mode Only 24. PC/ DVI mode : / 4:3 TV/DTV /Ext. mode: Auto Wide / Wide / 16:9 / Wide Zoom / Zoom / 4:3 Component mode: Wide / 16:9 ...) MagicBright is a feature providing the optimum viewing environment depending on the contents of the screen. Introduction The monitor has three automatic picture settings that are watching. The monitor has a built-in high fidelity stereo amplifier. Dgital subtitle display
Quick Guide (ENGLISH)
Page 12
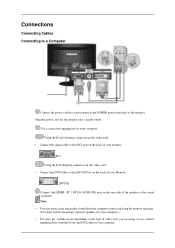
... the PC. Using the D-sub (Analog) connector on the video card. • Connect the signal cable to the [PC] port on the back of your monitor. [PC] Using the DVI (Digital) connector on the video card. • Connect the DVI Cable to the [DVI-D] Port on the back of your... Monitor. [DVI-D] Connect the [HDMI / PC / DVI-D AUDIO IN] port on the back of the monitor. Use a connection appropriate for the monitor into a nearby outlet. Connections Connecting Cables Connecting to a Computer Connect the power cord for your...
... the PC. Using the D-sub (Analog) connector on the video card. • Connect the signal cable to the [PC] port on the back of your monitor. [PC] Using the DVI (Digital) connector on the video card. • Connect the DVI Cable to the [DVI-D] Port on the back of your... Monitor. [DVI-D] Connect the [HDMI / PC / DVI-D AUDIO IN] port on the back of the monitor. Use a connection appropriate for the monitor into a nearby outlet. Connections Connecting Cables Connecting to a Computer Connect the power cord for your...
Quick Guide (ENGLISH)
Page 13
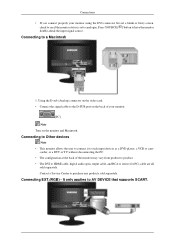
...corder, or a DTV or TV without disconnecting the PC. • The configuration at the back of your monitor using the DVI connector but get a blank or fuzzy screen, check to see if the monitor status is set to analogue. Connecting to AV DEVICE that supports SCART. Using the D-sub (Analog) connector... on the video card. • Connect the signal cable to the D-SUB port on the monitor and Macintosh. Connections • If you connect properly your monitor. [PC] Note Turn on the back of the monitor may vary from product to product. • The DVI to HDMI cable, digital audio optic output...
...corder, or a DTV or TV without disconnecting the PC. • The configuration at the back of your monitor using the DVI connector but get a blank or fuzzy screen, check to see if the monitor status is set to analogue. Connecting to AV DEVICE that supports SCART. Using the D-sub (Analog) connector... on the video card. • Connect the signal cable to the D-SUB port on the monitor and Macintosh. Connections • If you connect properly your monitor. [PC] Note Turn on the back of the monitor may vary from product to product. • The DVI to HDMI cable, digital audio optic output...
Quick Guide (ENGLISH)
Page 14
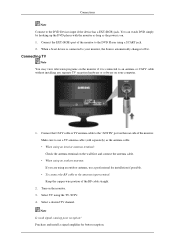
...the TV / DTV. 4. Connecting TV Note You may view television programs on the monitor if it is connected to an antenna or CATV cable without installing any separate TV ... can watch DVD simply by hooking up the DVD player with the monitor as long as the antenna cable. • When using an interior antenna terminal: Check the antenna terminal on your... monitor, the Source automatically changes to the antenna input terminal: Keep the copper wire portion of the monitor. When a Scart device is on the rear side of the RF...
...the TV / DTV. 4. Connecting TV Note You may view television programs on the monitor if it is connected to an antenna or CATV cable without installing any separate TV ... can watch DVD simply by hooking up the DVD player with the monitor as long as the antenna cable. • When using an interior antenna terminal: Check the antenna terminal on your... monitor, the Source automatically changes to the antenna input terminal: Keep the copper wire portion of the monitor. When a Scart device is on the rear side of the RF...
Quick Guide (ENGLISH)
Page 15
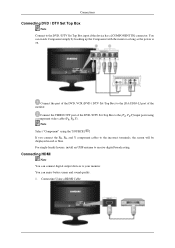
... long as the power is on. For single-family houses, install an UHF antenna to the [R-AUDIO-L] port of the monitor. Connect the port of the DVD / DTV Set-Top Box to the [PR, PB,Y] input ports using the 'SOURCE [ ]' If you connect the PR, PB, ... the DVD / DTV Set Top Box input if the device has a [COMPONENT IN] connector. Connections Connecting DVD / DTV Set Top Box Note Connect to your monitor.
... long as the power is on. For single-family houses, install an UHF antenna to the [R-AUDIO-L] port of the monitor. Connect the port of the DVD / DTV Set-Top Box to the [PR, PB,Y] input ports using the 'SOURCE [ ]' If you connect the PR, PB, ... the DVD / DTV Set Top Box input if the device has a [COMPONENT IN] connector. Connections Connecting DVD / DTV Set Top Box Note Connect to your monitor.
Quick Guide (ENGLISH)
Page 16
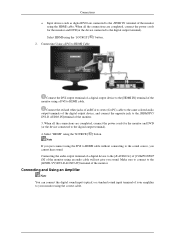
...will not give you cannot hear sound. Connecting the audio output terminal of a digital device to the [R-AUDIO-L] of [COMPONENT IN] of the monitor using the DVI to HDMI cable without connecting to the digital output terminal). 4. When all the connections are completed, connect the power cords for... white jacks of your amplifier to HDMI cable. Make sure to connect to the [HDMI / PC/DVI-D AUDIO IN] terminal of the monitor using a DVI to your monitor using the 'SOURCE [ ]' button. 2. Connecting and Using an Amplifier Note You can connect the digital sound input (optical) or standard ...
...will not give you cannot hear sound. Connecting the audio output terminal of a digital device to the [R-AUDIO-L] of [COMPONENT IN] of the monitor using the DVI to HDMI cable without connecting to the digital output terminal). 4. When all the connections are completed, connect the power cords for... white jacks of your amplifier to HDMI cable. Make sure to connect to the [HDMI / PC/DVI-D AUDIO IN] terminal of the monitor using a DVI to your monitor using the 'SOURCE [ ]' button. 2. Connecting and Using an Amplifier Note You can connect the digital sound input (optical) or standard ...
Quick Guide (ENGLISH)
Page 17
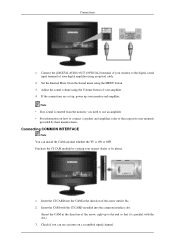
If the connections are set up, power up to the end so that it fits. 2. Purchase the CI CAM module by visiting your monitor to the respective user manuals provided by phone. 1. Connecting COMMON INTERFACE Note You can see a picture on how to connect a speaker and amplifier, refer to ... 1. Connect the [DIGITAL AUDIO OUT (OPTICAL)] terminal of the arrow until it is ON or OFF. Note • If no sound is emitted from the monitor, you can install the CAM anytime whether the TV is parallel with the CI CARD installed into the CAM in the direction of your...
If the connections are set up, power up to the end so that it fits. 2. Purchase the CI CAM module by visiting your monitor to the respective user manuals provided by phone. 1. Connecting COMMON INTERFACE Note You can see a picture on how to connect a speaker and amplifier, refer to ... 1. Connect the [DIGITAL AUDIO OUT (OPTICAL)] terminal of the arrow until it is ON or OFF. Note • If no sound is emitted from the monitor, you can install the CAM anytime whether the TV is parallel with the CI CARD installed into the CAM in the direction of your...

Quick Guide (ENGLISH)
Page 18
Using the Stand Monitor Assembly Tilt angle Monitor and Bottom You can adjust the tilt angle within a range of 5° forward to 25° backward for the most comfortable viewing angle. Connect your headphones to the monitor. 1. Connections Connecting Headphone Note You may connect your headphones to the Headphone connection terminal.
Using the Stand Monitor Assembly Tilt angle Monitor and Bottom You can adjust the tilt angle within a range of 5° forward to 25° backward for the most comfortable viewing angle. Connect your headphones to the monitor. 1. Connections Connecting Headphone Note You may connect your headphones to the Headphone connection terminal.
Quick Guide (ENGLISH)
Page 19
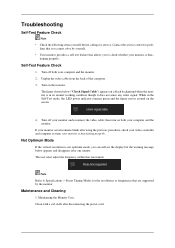
...off both your computer and the monitor. 2. If your monitor screen remains blank after using the previous procedure, check your monitor and reconnect the video cable; Turn on both your computer and the monitor. your monitor is func- Note Refer to check whether your monitor is in its normal working ... While in the Self-Test mode, the LED power indicator remains green and the figure moves around on a black background when the monitor is functioning properly. tioning properly. Self-Test Feature Check 1. Not Optimum Mode If the vertical resolution is not optimum mode, you can...
...off both your computer and the monitor. 2. If your monitor screen remains blank after using the previous procedure, check your monitor and reconnect the video cable; Turn on both your computer and the monitor. your monitor is func- Note Refer to check whether your monitor is in its normal working ... While in the Self-Test mode, the LED power indicator remains green and the figure moves around on a black background when the monitor is functioning properly. tioning properly. Self-Test Feature Check 1. Not Optimum Mode If the vertical resolution is not optimum mode, you can...
Quick Guide (ENGLISH)
Page 20
...in installing the adapter (video) driver, boot the computer in this section to see if you installed the adapter (video) driver and the monitor driver. 4.Check if the scanning ratio of the problem, and then contact a service center or your dealer. 1. Problems related to Installation Note...a soft cloth (cotton flannel) smoothly. • Never use benzene, thinner or other flammable substances, or a wet cloth. • We recommend a Samsung cleansing agent is used to prevent damage to the screen. 2. Maintaining the Flat Panel Display Screen. Check if the computer beeps more than 3 times when...
...in installing the adapter (video) driver, boot the computer in this section to see if you installed the adapter (video) driver and the monitor driver. 4.Check if the scanning ratio of the problem, and then contact a service center or your dealer. 1. Problems related to Installation Note...a soft cloth (cotton flannel) smoothly. • Never use benzene, thinner or other flammable substances, or a wet cloth. • We recommend a Samsung cleansing agent is used to prevent damage to the screen. 2. Maintaining the Flat Panel Display Screen. Check if the computer beeps more than 3 times when...
Quick Guide (ENGLISH)
Page 21
... the power cord is firmly connected and the LCD monitor is blurred. Q: "Not Optimum Mode" message A: Check the maximum resolution and the frequency of the video adapter. Picture is on.(Refer to the recommended ranges. A: Turn on . necting the monitor) Q: "Check Signal Cable" message A: Ensure... Set resolution and frequency to the Con- Q: Picture image is firmly connected to the PC or video SOURCEs.(Refer to the Connecting the monitor) A: Ensure that the signal cable is unstable and vibrates. Q: Picture rolls vertically. A: Check if the signal cable is securely connected....
... the power cord is firmly connected and the LCD monitor is blurred. Q: "Not Optimum Mode" message A: Check the maximum resolution and the frequency of the video adapter. Picture is on.(Refer to the recommended ranges. A: Turn on . necting the monitor) Q: "Check Signal Cable" message A: Ensure... Set resolution and frequency to the Con- Q: Picture image is firmly connected to the PC or video SOURCEs.(Refer to the Connecting the monitor) A: Ensure that the signal cable is unstable and vibrates. Q: Picture rolls vertically. A: Check if the signal cable is securely connected....

Quick Guide (ENGLISH)
Page 22
...A: Check the battery polarities (+/-). A: Check if the power cord is on the screen when you see the "TEST GOOD" message on . A: The monitor is still too low after turning the control to audio signals and their solutions are listed below. Q: Screen is blank and power indicator light is... steady green or blinks every 0.5 or 1 seconds A: The monitor is using its maximum, check the volume control on the keyboard Q: The screen is blank and is properly connected. 3. Problems related to Audio Note...
...A: Check the battery polarities (+/-). A: Check if the power cord is on the screen when you see the "TEST GOOD" message on . A: The monitor is still too low after turning the control to audio signals and their solutions are listed below. Q: Screen is blank and power indicator light is... steady green or blinks every 0.5 or 1 seconds A: The monitor is using its maximum, check the volume control on the keyboard Q: The screen is blank and is properly connected. 3. Problems related to Audio Note...

Quick Guide (ENGLISH)
Page 23
Q: How can I clean the outer case/LCD Panel? A: Windows ME/2000: Set the resolution at the edge of the bezel surrounding the scree This is part of the computer. (Refer to the ... of the computer. (Refer to the Windows / Computer Manual). A: Disconnect the power cord and then clean the monitor with a soft cloth, using either a cleaning solution or plain water. Do not leave any water enter the monitor. Troubleshooting 5. A: Windows XP: Set the resolution in the Control Panel Appearance and Themes Display Screen Saver...
Q: How can I clean the outer case/LCD Panel? A: Windows ME/2000: Set the resolution at the edge of the bezel surrounding the scree This is part of the computer. (Refer to the ... of the computer. (Refer to the Windows / Computer Manual). A: Disconnect the power cord and then clean the monitor with a soft cloth, using either a cleaning solution or plain water. Do not leave any water enter the monitor. Troubleshooting 5. A: Windows XP: Set the resolution in the Control Panel Appearance and Themes Display Screen Saver...


