User Manual (ENGLISH)
Page 3
...1.2 Component Location 1.4 Front View 1.4 Rear View 1.5 Control Panel Functions 1.6 SCX-5315F 1.6 SCX-5115 1.9 Making Connections 1.11 Installing the Drum and Toner Cartridges 1.14 Turning the Machine On 1.17 Loading Paper 1.17 Tray Setting the Paper Size 1.20 Changing the Display Language 1.20 Using Save Modes 1.21 Toner Save 1.21 Paper Save 1.21 Power Save 1.22 Chapter 2: INSTALLING SOFTWARE About Samsung Software 2.2 MFP Driver 2.2 SmarThru Software 2.2 OCR Software (AnyPage Lite 2.2 System Requirements 2.3 Installing Samsung Software 2.4 Uninstalling Samsung Software...
...1.2 Component Location 1.4 Front View 1.4 Rear View 1.5 Control Panel Functions 1.6 SCX-5315F 1.6 SCX-5115 1.9 Making Connections 1.11 Installing the Drum and Toner Cartridges 1.14 Turning the Machine On 1.17 Loading Paper 1.17 Tray Setting the Paper Size 1.20 Changing the Display Language 1.20 Using Save Modes 1.21 Toner Save 1.21 Paper Save 1.21 Power Save 1.22 Chapter 2: INSTALLING SOFTWARE About Samsung Software 2.2 MFP Driver 2.2 SmarThru Software 2.2 OCR Software (AnyPage Lite 2.2 System Requirements 2.3 Installing Samsung Software 2.4 Uninstalling Samsung Software...

User Manual (ENGLISH)
Page 4
... Setting the Paper Size for Copying 3.9 Chapter 4: COPYING Loading Paper for Copy Output 4.2 Selecting a Paper Tray 4.2 Making Copies from the Automatic Document Feeder 4.3 Making Copies using the Document Glass 4.4 Setting Copy Options 4.6 Image 4.6 Contrast 4.7 Set 4.7 Zoom 4.8 Auto Fit Copying 4.9 Clone Copying 4.10 Duplex Copying 4.11 Collation Copying 4.12 Chapter 5: PRINTING Printing a Document 5.2 Printer Settings 5.3 Accessing Printer Settings 5.3 Printer Properties Tabs 5.4 Printer Properties Buttons & Icons 5.12 Setting Up the Locally Shared Printer 5.12 In Windows...
... Setting the Paper Size for Copying 3.9 Chapter 4: COPYING Loading Paper for Copy Output 4.2 Selecting a Paper Tray 4.2 Making Copies from the Automatic Document Feeder 4.3 Making Copies using the Document Glass 4.4 Setting Copy Options 4.6 Image 4.6 Contrast 4.7 Set 4.7 Zoom 4.8 Auto Fit Copying 4.9 Clone Copying 4.10 Duplex Copying 4.11 Collation Copying 4.12 Chapter 5: PRINTING Printing a Document 5.2 Printer Settings 5.3 Accessing Printer Settings 5.3 Printer Properties Tabs 5.4 Printer Properties Buttons & Icons 5.12 Setting Up the Locally Shared Printer 5.12 In Windows...
User Manual (ENGLISH)
Page 16
...GETTING STARTED Thank you for purchasing Samsung multifunctional product. This chapter provides step-by-step instructions on setting up the machine, and installing the software. This machine provides printing, copying, scanning, and faxing (SCX-5315F only) functions! This chapter includes: • Unpacking • Component Location • Control Panel Functions • Making Connections • Installing the Drum and Toner Cartridges • Turning the Machine On • Loading Paper • Tray Setting the Paper Size • Changing the Display Language • Using Save Modes
...GETTING STARTED Thank you for purchasing Samsung multifunctional product. This chapter provides step-by-step instructions on setting up the machine, and installing the software. This machine provides printing, copying, scanning, and faxing (SCX-5315F only) functions! This chapter includes: • Unpacking • Component Location • Control Panel Functions • Making Connections • Installing the Drum and Toner Cartridges • Turning the Machine On • Loading Paper • Tray Setting the Paper Size • Changing the Display Language • Using Save Modes
User Manual (ENGLISH)
Page 23
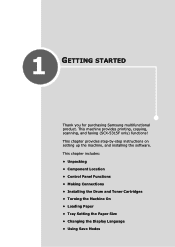
... menu item. Enters the menu functions in the Copy mode only). Used to stop an operation at any time. 13 Also, used to change the number of paper (available in conjunction with 8 the one-touch buttons. Scrolls though the menu items. When you to save paper by using less toner to 7 print a document. Allows you set the copy size or the copy page number, they can be used to clear/cancel the copy options such as the zoom rate and multi copy pages in Copy mode. * Navigation buttons 1.8 GETTING STARTED...
... menu item. Enters the menu functions in the Copy mode only). Used to stop an operation at any time. 13 Also, used to change the number of paper (available in conjunction with 8 the one-touch buttons. Scrolls though the menu items. When you to save paper by using less toner to 7 print a document. Allows you set the copy size or the copy page number, they can be used to clear/cancel the copy options such as the zoom rate and multi copy pages in Copy mode. * Navigation buttons 1.8 GETTING STARTED...
User Manual (ENGLISH)
Page 25
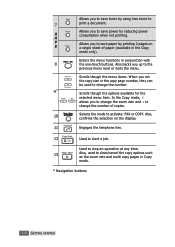
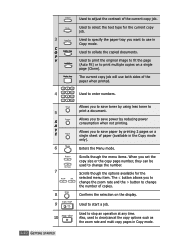
... save toner by using less toner to clear/cancel the copy options such as the zoom rate and multi copy pages in Copy mode. Used to specify the paper tray you to use both sides of the current copy job. Allows you want to save power by printing 2 pages on a single sheet of copies. Confirms the selection on a single page (Clone). 3 C O P Y 4 5 S A V E 6 7 8 9 10 1.10 GETTING STARTED Used to collate the copied documents. Used to print the original image to fit the page (Auto Fit) or to enter numbers. Enters the Menu mode...
... save toner by using less toner to clear/cancel the copy options such as the zoom rate and multi copy pages in Copy mode. Used to specify the paper tray you to use both sides of the current copy job. Allows you want to save power by printing 2 pages on a single sheet of copies. Confirms the selection on a single page (Clone). 3 C O P Y 4 5 S A V E 6 7 8 9 10 1.10 GETTING STARTED Used to collate the copied documents. Used to print the original image to fit the page (Auto Fit) or to enter numbers. Enters the Menu mode...
User Manual (ENGLISH)
Page 35
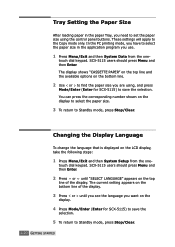
... System Setup from the one - touch dial keypad. Changing the Display Language To change the language that is displayed on the display. 4 Press Mode/Enter (Enter for SCX-5115) to save the selection. 5 To return to find the paper size you are using the control panel buttons. touch dial keypad. You can press the corresponding number shown on the bottom line. 2 Use or to Standby mode, press Stop/Clear. 1.20 GETTING STARTED These settings will apply to Standby mode, press Stop/Clear. SCX-5115 users...
... System Setup from the one - touch dial keypad. Changing the Display Language To change the language that is displayed on the display. 4 Press Mode/Enter (Enter for SCX-5115) to save the selection. 5 To return to find the paper size you are using the control panel buttons. touch dial keypad. You can press the corresponding number shown on the bottom line. 2 Use or to Standby mode, press Stop/Clear. 1.20 GETTING STARTED These settings will apply to Standby mode, press Stop/Clear. SCX-5115 users...
User Manual (ENGLISH)
Page 37
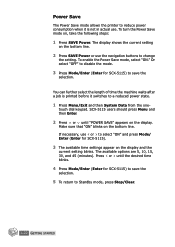
... "OFF" to disable the mode. 3 Press Mode/Enter (Enter for SCX-5115) to Standby mode, press Stop/Clear. 1.22 GETTING STARTED touch dial keypad. To turn the Power Save mode on the bottom line. You can further select the length of time the machine waits after a job is printed before it is not in actual use or to change the setting. The display shows the current setting on the bottom line. 2 Press SAVE Power or use the navigation buttons to select...
... "OFF" to disable the mode. 3 Press Mode/Enter (Enter for SCX-5115) to Standby mode, press Stop/Clear. 1.22 GETTING STARTED touch dial keypad. To turn the Power Save mode on the bottom line. You can further select the length of time the machine waits after a job is printed before it is not in actual use or to change the setting. The display shows the current setting on the bottom line. 2 Press SAVE Power or use the navigation buttons to select...
User Manual (ENGLISH)
Page 39
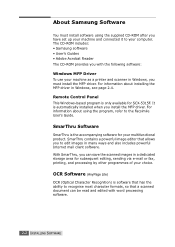
... you have set up your machine and connected it to your choice. OCR Software (AnyPage Lite) OCR (Optical Character Recognition) is the accompanying software for your machine as a printer and scanner in Windows, see page 2.4. About Samsung Software You must install the MFP driver. For information about using the supplied CD-ROM after you to the Facsimile User's Guide. With SmarThru, you install the MFP driver. SmarThru contains a powerful image editor that a scanned document can save the scanned images in...
... you have set up your machine and connected it to your choice. OCR Software (AnyPage Lite) OCR (Optical Character Recognition) is the accompanying software for your machine as a printer and scanner in Windows, see page 2.4. About Samsung Software You must install the MFP driver. For information about using the supplied CD-ROM after you to the Facsimile User's Guide. With SmarThru, you install the MFP driver. SmarThru contains a powerful image editor that a scanned document can save the scanned images in...

User Manual (ENGLISH)
Page 42
... users. 2 If you select the Custom installation, you may choose the options you want to print and scan. 6 Selecting the type, Click Next. Recommended for most users. •Compact: Only the MFP driver will be installed. •Custom: You may choose the options you want to install. • SmarThru Software: to scan and edit images and to work with electronic documents. • OCR Software: AnyPage Lite software to enable OCR. • MFP Driver: to install. INSTALLING SOFTWARE...
... users. 2 If you select the Custom installation, you may choose the options you want to print and scan. 6 Selecting the type, Click Next. Recommended for most users. •Compact: Only the MFP driver will be installed. •Custom: You may choose the options you want to install. • SmarThru Software: to scan and edit images and to work with electronic documents. • OCR Software: AnyPage Lite software to enable OCR. • MFP Driver: to install. INSTALLING SOFTWARE...
User Manual (ENGLISH)
Page 54
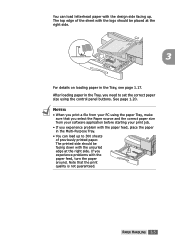
... design side facing up to set the correct paper size using the paper Tray, make sure that the print quality is not guaranteed. PAPER HANDLING 3.5 The top edge of previously printed paper. After loading paper in the Tray, you experience problems with the paper feed, place the paper in the Tray, see page 1.17. NOTES: • When you print a file from your software application before starting your print job. • If you experience problem with the paper feed, turn the paper around...
... design side facing up to set the correct paper size using the paper Tray, make sure that the print quality is not guaranteed. PAPER HANDLING 3.5 The top edge of previously printed paper. After loading paper in the Tray, you experience problems with the paper feed, place the paper in the Tray, see page 1.17. NOTES: • When you print a file from your software application before starting your print job. • If you experience problem with the paper feed, turn the paper around...
User Manual (ENGLISH)
Page 58
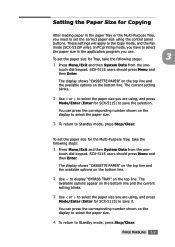
... the one - SCX-5115 users should press Menu and then Enter. Setting the Paper Size for Tray, take the following steps: 3 1 Press Menu/Exit and then System Data from the one - To set the paper size for SCX-5115) to Standby mode, press Stop/Clear. The display shows "CASSETTE PAPER" on the top line and the available options on the bottom line. 2 Use to display "BYPASS TRAY" on the bottom line and the current setting blinks. 3 Use or to the Copy mode, and the Fax mode (SCX...
... the one - SCX-5115 users should press Menu and then Enter. Setting the Paper Size for Tray, take the following steps: 3 1 Press Menu/Exit and then System Data from the one - To set the paper size for SCX-5115) to Standby mode, press Stop/Clear. The display shows "CASSETTE PAPER" on the top line and the available options on the bottom line. 2 Use to display "BYPASS TRAY" on the bottom line and the current setting blinks. 3 Use or to the Copy mode, and the Fax mode (SCX...
User Manual (ENGLISH)
Page 62
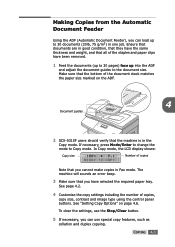
... in Fax mode. If necessary, press Mode/Enter to change the mode to Copy mode. Make sure that the bottom of copies, copy size, contrast and image type using the control panel buttons. See "Setting Copy Options" on the ADF. 4 Document guides 2 SCX-5315F users should verify that you have been removed. 1 Feed the documents (up to 30 pages) face up to 30 documents (20lb, 75 g/m2) in the Copy mode. COPYING 4.3 See page 4.2. 4 Customise the copy settings including the number of the document stack matches the paper size marked on page 4.6. Making Copies...
... in Fax mode. If necessary, press Mode/Enter to change the mode to Copy mode. Make sure that the bottom of copies, copy size, contrast and image type using the control panel buttons. See "Setting Copy Options" on the ADF. 4 Document guides 2 SCX-5315F users should verify that you have been removed. 1 Feed the documents (up to 30 pages) face up to 30 documents (20lb, 75 g/m2) in the Copy mode. COPYING 4.3 See page 4.2. 4 Customise the copy settings including the number of the document stack matches the paper size marked on page 4.6. Making Copies...

User Manual (ENGLISH)
Page 64
... copies, copy size, contrast and image type using the control panel buttons. NOTES: • Leaving the cover open while copying will sounds an error beep. 5 Make sure that you are in Fax mode. To clear the settings, use the Stop/Clear button. 7 If necessary, you cannot make copies in the ADF. See "Setting Copy Options" on the printout, so always keep it clean. COPYING 4.5 The slanted cover may cause black spots on page 4.6. The display shows the copy processing. NOTE: Make sure that no other documents are copying a page...
... copies, copy size, contrast and image type using the control panel buttons. NOTES: • Leaving the cover open while copying will sounds an error beep. 5 Make sure that you are in Fax mode. To clear the settings, use the Stop/Clear button. 7 If necessary, you cannot make copies in the ADF. See "Setting Copy Options" on the printout, so always keep it clean. COPYING 4.5 The slanted cover may cause black spots on page 4.6. The display shows the copy processing. NOTE: Make sure that no other documents are copying a page...
User Manual (ENGLISH)
Page 69
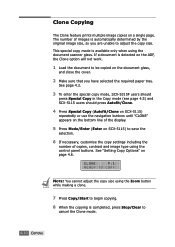
... copy size using the document scanner glass. If a document is completed, press Stop/Clear to cancel the Clone mode. 4.10 COPYING See page 4.2. 3 To enter the special copy mode, SCX-5315F users should press Special Copy in the Copy mode (see page 4.5) and SCX-5115 users should press Autofit/Clone. 4 Press Special Copy (Autofit/Clone on SCX-5115) repeatedly or use the navigation buttons until "CLONE" appears on the bottom line of the display. 5 Press Mode/Enter (Enter on a single page. Clone Copying The Clone feature prints multiple image copies...
... copy size using the document scanner glass. If a document is completed, press Stop/Clear to cancel the Clone mode. 4.10 COPYING See page 4.2. 3 To enter the special copy mode, SCX-5315F users should press Special Copy in the Copy mode (see page 4.5) and SCX-5115 users should press Autofit/Clone. 4 Press Special Copy (Autofit/Clone on SCX-5115) repeatedly or use the navigation buttons until "CLONE" appears on the bottom line of the display. 5 Press Mode/Enter (Enter on a single page. Clone Copying The Clone feature prints multiple image copies...
User Manual (ENGLISH)
Page 102
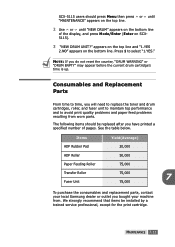
SCX-5115 users should be installed by a trained service professional, except for the print cartridge. We strongly recommend that items be replaced after you will need to replace the toner and drum cartridges, roller, and fuser unit to maintain top performance and to avoid print quality problems and paper feed problems resulting from . Press 1 to time, you have printed a specified number of the display, and press Mode/Enter (Enter on the bottom line. Items Yield(Average) ADF Rubber Pad...
SCX-5115 users should be installed by a trained service professional, except for the print cartridge. We strongly recommend that items be replaced after you will need to replace the toner and drum cartridges, roller, and fuser unit to maintain top performance and to avoid print quality problems and paper feed problems resulting from . Press 1 to time, you have printed a specified number of the display, and press Mode/Enter (Enter on the bottom line. Items Yield(Average) ADF Rubber Pad...
User Manual (ENGLISH)
Page 117
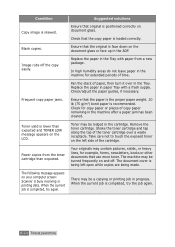
... Tray. Blank copies. Replace the paper in the cartridge. Toner yield is recommended. Take care not to touch the exposed toner on the left open while copies are being left side of the toner cartridge over in the ADF. Condition Suggested solutions Copy image is positioned correctly on document glass. Ensure that use more toner. Check/adjust the paper guides, if necessary. Remove the toner cartridge. The document cover is busy receiving or printing data. The following message appears on your computer screen: Scanner...
... Tray. Blank copies. Replace the paper in the cartridge. Toner yield is recommended. Take care not to touch the exposed toner on the left open while copies are being left side of the toner cartridge over in the ADF. Condition Suggested solutions Copy image is positioned correctly on document glass. Ensure that use more toner. Check/adjust the paper guides, if necessary. Remove the toner cartridge. The document cover is busy receiving or printing data. The following message appears on your computer screen: Scanner...
User Manual (ENGLISH)
Page 118
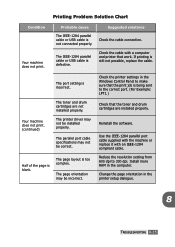
... is blank. The port setting is defective. Check the printer settings in the Windows Control Panel to make sure that the print job is being sent to 300 dpi. Use the IEEE-1284 parallel port cable supplied with the machine or replace it with a computer and printer that the toner and drum cartridges are not installed properly. The IEEE-1284 parallel cable or USB cable is incorrect. Change the page orientation in the computer. If printing is not connected...
... is blank. The port setting is defective. Check the printer settings in the Windows Control Panel to make sure that the print job is being sent to 300 dpi. Use the IEEE-1284 parallel port cable supplied with the machine or replace it with a computer and printer that the toner and drum cartridges are not installed properly. The IEEE-1284 parallel cable or USB cable is incorrect. Change the page orientation in the computer. If printing is not connected...

User Manual (ENGLISH)
Page 119
... print job is too slow. If your printer icon with an ECP parallel port, enable this mode of the display. Press Mode/Enter (Enter on the top line of operation. Point to select "SLOW." 4. Probable cause Suggested solutions When the USB mode is equipped with the right mouse button. Press Stop/Clear to return to "SLOW." Click your computer is set to save the selection. 5. Change the USB mode to Standby mode. SCX-5115 users should...
... print job is too slow. If your printer icon with an ECP parallel port, enable this mode of the display. Press Mode/Enter (Enter on the top line of operation. Point to select "SLOW." 4. Probable cause Suggested solutions When the USB mode is equipped with the right mouse button. Press Stop/Clear to return to "SLOW." Click your computer is set to save the selection. 5. Change the USB mode to Standby mode. SCX-5115 users should...

User Manual (ENGLISH)
Page 122
... display shows a "MEMORY FULL" message, delete any documents you the fax had a temporary document jam. Clean the document glass, referring to choose the proper paper size. 8 TROUBLESHOOTING 8.19 A noisy phone line can cause line errors. The fax machine sending you no longer need from the memory, then restore the document. The machine dials a number, but fails to store the document. You may have chosen the wrong paper settings in the memory There may be turned off, out of the words are lines...
... display shows a "MEMORY FULL" message, delete any documents you the fax had a temporary document jam. Clean the document glass, referring to choose the proper paper size. 8 TROUBLESHOOTING 8.19 A noisy phone line can cause line errors. The fax machine sending you no longer need from the memory, then restore the document. The machine dials a number, but fails to store the document. You may have chosen the wrong paper settings in the memory There may be turned off, out of the words are lines...
User Manual (ENGLISH)
Page 143
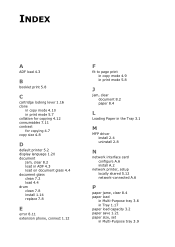
... 5.2 display language 1.20 document jam, clear 8.2 load in ADF 4.3 load on document glass 4.4 document glass clean 7.2 load 4.4 drum clean 7.8 install 1.14 replace 7.8 E error 8.11 extension phone, connect 1.12 F fit to page print in copy mode 4.9 in print mode 5.8 J jam, clear document 8.2 paper 8.4 L Loading Paper in the Tray 3.1 M MFP driver install 2.4 uninstall 2.8 N network interface card configure A.6 install A.2 network printer, setup locally shared 5.12 network-connected A.6 P paper jame, clear 8.4 paper load in Multi-Purpose tray 3.6 in Tray 1.17 paper load capacity 3.2 paper save...
... 5.2 display language 1.20 document jam, clear 8.2 load in ADF 4.3 load on document glass 4.4 document glass clean 7.2 load 4.4 drum clean 7.8 install 1.14 replace 7.8 E error 8.11 extension phone, connect 1.12 F fit to page print in copy mode 4.9 in print mode 5.8 J jam, clear document 8.2 paper 8.4 L Loading Paper in the Tray 3.1 M MFP driver install 2.4 uninstall 2.8 N network interface card configure A.6 install A.2 network printer, setup locally shared 5.12 network-connected A.6 P paper jame, clear 8.4 paper load in Multi-Purpose tray 3.6 in Tray 1.17 paper load capacity 3.2 paper save...


