User Manual (ENGLISH)
Page 3
... Panel Functions 1.6 SCX-5315F 1.6 SCX-5115 1.9 Making Connections 1.11 Installing the Drum and Toner Cartridges 1.14 Turning the Machine On 1.17 Loading Paper 1.17 Tray Setting the Paper Size 1.20 Changing the Display Language 1.20 Using Save Modes 1.21 Toner Save 1.21 Paper Save 1.21 Power Save 1.22 Chapter 2: INSTALLING SOFTWARE About Samsung Software 2.2 MFP...
... Panel Functions 1.6 SCX-5315F 1.6 SCX-5115 1.9 Making Connections 1.11 Installing the Drum and Toner Cartridges 1.14 Turning the Machine On 1.17 Loading Paper 1.17 Tray Setting the Paper Size 1.20 Changing the Display Language 1.20 Using Save Modes 1.21 Toner Save 1.21 Paper Save 1.21 Power Save 1.22 Chapter 2: INSTALLING SOFTWARE About Samsung Software 2.2 MFP...
User Manual (ENGLISH)
Page 5
Chapter 6: SCANNING Scanning using the Samsung SmarThru 6.2 Scanning Process with TWAIN-enabled Software ...... 6.4 Chapter 7: MAINTENANCE Cleaning the Scan Unit 7.2 Expected Cartridge Life 7.3 Replacing the Toner Cartridge 7.3 Setting to Notify Toner Low 7.7 Cleaning the Drum 7.8 Replacing the Drum Cartridge 7.8 Consumables and Replacement Parts 7.11 Chapter 8: TROUBLESHOOTING Document Jams 8.2 Input Misfeed 8.2 Exit Misfeed 8.3 Roller Misfeed 8.3 Paper...
Chapter 6: SCANNING Scanning using the Samsung SmarThru 6.2 Scanning Process with TWAIN-enabled Software ...... 6.4 Chapter 7: MAINTENANCE Cleaning the Scan Unit 7.2 Expected Cartridge Life 7.3 Replacing the Toner Cartridge 7.3 Setting to Notify Toner Low 7.7 Cleaning the Drum 7.8 Replacing the Drum Cartridge 7.8 Consumables and Replacement Parts 7.11 Chapter 8: TROUBLESHOOTING Document Jams 8.2 Input Misfeed 8.2 Exit Misfeed 8.3 Roller Misfeed 8.3 Paper...
User Manual (ENGLISH)
Page 16
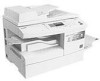
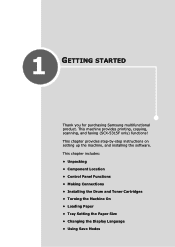
This machine provides printing, copying, scanning, and faxing (SCX-5315F only) functions! This chapter includes: • Unpacking • Component Location • Control Panel Functions • Making Connections • Installing the Drum and Toner Cartridges • Turning the Machine On • Loading... Paper • Tray Setting the Paper Size • Changing the Display Language • Using Save Modes 1 GETTING STARTED Thank you for purchasing Samsung multifunctional product. This ...
This machine provides printing, copying, scanning, and faxing (SCX-5315F only) functions! This chapter includes: • Unpacking • Component Location • Control Panel Functions • Making Connections • Installing the Drum and Toner Cartridges • Turning the Machine On • Loading... Paper • Tray Setting the Paper Size • Changing the Display Language • Using Save Modes 1 GETTING STARTED Thank you for purchasing Samsung multifunctional product. This ...
User Manual (ENGLISH)
Page 18
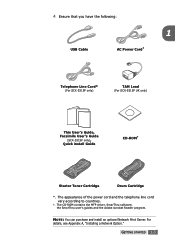
... have the following: 1 USB Cable AC Power Cord* Telephone Line Cord* (For SCX-5315F only) TAM Lead (For SCX-5315F UK only) This User's Guide, Facsimile User's Guide (SCX-5315F only), Quick install Guide CD-ROM† Starter Toner Cartridge Drum Cartridge *. NOTE: You can purchase and install an optional Network Print Server. GETTING...
... have the following: 1 USB Cable AC Power Cord* Telephone Line Cord* (For SCX-5315F only) TAM Lead (For SCX-5315F UK only) This User's Guide, Facsimile User's Guide (SCX-5315F only), Quick install Guide CD-ROM† Starter Toner Cartridge Drum Cartridge *. NOTE: You can purchase and install an optional Network Print Server. GETTING...
User Manual (ENGLISH)
Page 22
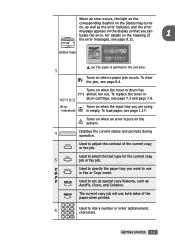
... 1 the error messages, see page 7.3 and page 7.8. (Error indicators) Turns on when the input tray you can locate the error. To replace the toner or drum cartridge, see page 8.11. (status map) ex) The paper is empty. To load paper, see page 8.4. Turns on when an error occurs on when the... toner or drum has almost run out. P Y Used to set up special copy features, such as the error indicator, and the error message appears on the display so...
... 1 the error messages, see page 7.3 and page 7.8. (Error indicators) Turns on when the input tray you can locate the error. To replace the toner or drum cartridge, see page 8.11. (status map) ex) The paper is empty. To load paper, see page 8.4. Turns on when an error occurs on when the... toner or drum has almost run out. P Y Used to set up special copy features, such as the error indicator, and the error message appears on the display so...
User Manual (ENGLISH)
Page 24
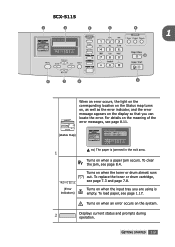
... an error occurs on when the toner or drum almost runs out. GETTING STARTED 1.9 To clear the jam, see page 7.3 and page 7.8. Turns on the meaning of the error messages, see page 1.17. Turns on when the input tray you can locate the error. SCX-5115 1 2 3 4 5 1 10 6 7 8 9 When an error occurs, the light...
... an error occurs on when the toner or drum almost runs out. GETTING STARTED 1.9 To clear the jam, see page 7.3 and page 7.8. Turns on the meaning of the error messages, see page 1.17. Turns on when the input tray you can locate the error. SCX-5115 1 2 3 4 5 1 10 6 7 8 9 When an error occurs, the light...
User Manual (ENGLISH)
Page 29
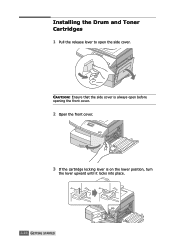
Installing the Drum and Toner Cartridges 1 Pull the release lever to open before opening the front cover. 2 Open the front cover. 3 If the cartridge locking lever is on the lower position, turn the lever upward until it locks into place. 1.14 GETTING STARTED CAUTION: Ensure that the side cover is always open the side cover.
Installing the Drum and Toner Cartridges 1 Pull the release lever to open before opening the front cover. 2 Open the front cover. 3 If the cartridge locking lever is on the lower position, turn the lever upward until it locks into place. 1.14 GETTING STARTED CAUTION: Ensure that the side cover is always open the side cover.
User Manual (ENGLISH)
Page 30
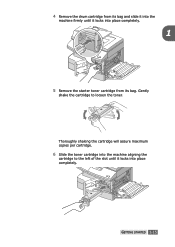
Gently shake the cartridge to the left of the slot until it locks into place completely. GETTING STARTED 1.15 Thoroughly shaking the cartridge will assure maximum copies per cartridge. 6 Slide the toner cartridge into the machine aligning the cartridge to loosen the toner. 4 Remove the drum cartridge from its bag and slide it into the machine firmly until it locks into place completely. 1 5 Remove the starter toner cartridge from its bag.
Gently shake the cartridge to the left of the slot until it locks into place completely. GETTING STARTED 1.15 Thoroughly shaking the cartridge will assure maximum copies per cartridge. 6 Slide the toner cartridge into the machine aligning the cartridge to loosen the toner. 4 Remove the drum cartridge from its bag and slide it into the machine firmly until it locks into place completely. 1 5 Remove the starter toner cartridge from its bag.
User Manual (ENGLISH)
Page 31
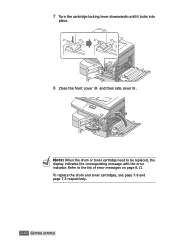
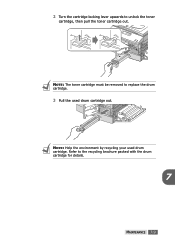
7 Turn the cartridge locking lever downwards until it locks into place. 8 Close the front cover 1 and then side cover 2 . 2 1 NOTE: When the drum or toner cartridge need to the list of error messages on page 8.11. To replace the drum and toner cartridges, see page 7.8 and page 7.3 respectively. 1.16 GETTING STARTED Refer to be replaced, the display indicates the corresponding message with the error indicator.
7 Turn the cartridge locking lever downwards until it locks into place. 8 Close the front cover 1 and then side cover 2 . 2 1 NOTE: When the drum or toner cartridge need to the list of error messages on page 8.11. To replace the drum and toner cartridges, see page 7.8 and page 7.3 respectively. 1.16 GETTING STARTED Refer to be replaced, the display indicates the corresponding message with the error indicator.
User Manual (ENGLISH)
Page 92
This chapter includes: • Cleaning the Scan Unit • Expected Cartridge Life • Replacing the Toner Cartridge • Setting to Notify Toner Low (Available in SCX-5315F only) • Cleaning the Drum • Replacing the Drum Cartridge • Consumables and Replacement Parts 7 MAINTENANCE This chapter provides information for maintaining the cartridge and your machine.
This chapter includes: • Cleaning the Scan Unit • Expected Cartridge Life • Replacing the Toner Cartridge • Setting to Notify Toner Low (Available in SCX-5315F only) • Cleaning the Drum • Replacing the Drum Cartridge • Consumables and Replacement Parts 7 MAINTENANCE This chapter provides information for maintaining the cartridge and your machine.
User Manual (ENGLISH)
Page 99
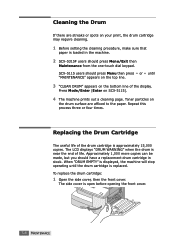
...the top line. 3 "CLEAN DRUM" appears on SCX-5115). 4 The machine prints out a cleaning page. The LCD displays "DRUM WARNING" when the drum is replaced. Approximately 1,000 more copies can be made, but you should have a replacement drum cartridge in the machine. 2 SCX-5315F users should press Menu ...particles on the drum surface are streaks or spots on your print, the drum cartridge may require cleaning. 1 Before setting the cleaning procedure, make sure that paper is approximately 15,000 copies. SCX-5115 users should press Menu/Exit then Maintenance from the one-touch dial ...
...the top line. 3 "CLEAN DRUM" appears on SCX-5115). 4 The machine prints out a cleaning page. The LCD displays "DRUM WARNING" when the drum is replaced. Approximately 1,000 more copies can be made, but you should have a replacement drum cartridge in the machine. 2 SCX-5315F users should press Menu ...particles on the drum surface are streaks or spots on your print, the drum cartridge may require cleaning. 1 Before setting the cleaning procedure, make sure that paper is approximately 15,000 copies. SCX-5115 users should press Menu/Exit then Maintenance from the one-touch dial ...
User Manual (ENGLISH)
Page 100
2 Turn the cartridge locking lever upwards to replace the drum cartridge. 3 Pull the used drum cartridge. NOTE: The toner cartridge must be removed to unlock the toner cartridge, then pull the toner cartridge out. NOTE: Help the environment by recycling your used drum cartridge out. Refer to the recycling brochure packed with the drum cartridge for details. 7 MAINTENANCE 7.9
2 Turn the cartridge locking lever upwards to replace the drum cartridge. 3 Pull the used drum cartridge. NOTE: The toner cartridge must be removed to unlock the toner cartridge, then pull the toner cartridge out. NOTE: Help the environment by recycling your used drum cartridge out. Refer to the recycling brochure packed with the drum cartridge for details. 7 MAINTENANCE 7.9
User Manual (ENGLISH)
Page 101
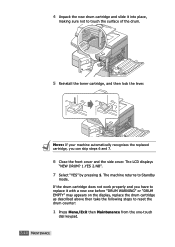
...and the side cover. The LCD displays "NEW DRUM? 1.YES 2.NO". 7 Select "YES" by pressing 1. 4 Unpack the new drum cartridge and slide it with a new one before "DRUM WARNING" or "DRUM EMPTY" may appears on the display, replace the drum cartridge as described above then take the following ...steps to reset the drum counter: 1 Press Menu/Exit then Maintenance from the one-touch dial keypad. 7.10...
...and the side cover. The LCD displays "NEW DRUM? 1.YES 2.NO". 7 Select "YES" by pressing 1. 4 Unpack the new drum cartridge and slide it with a new one before "DRUM WARNING" or "DRUM EMPTY" may appears on the display, replace the drum cartridge as described above then take the following ...steps to reset the drum counter: 1 Press Menu/Exit then Maintenance from the one-touch dial keypad. 7.10...
User Manual (ENGLISH)
Page 102
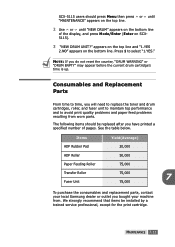
..., contact your machine from worn parts. Consumables and Replacement Parts From time to time, you do not reset the counter, "DRUM WARNING" or "DRUM ENPTY" may appear before the current drum cartridge's time is up. appears on the top line and "1.YES 2.NO" appears on SCX5115). 3 "NEW... be replaced after you bought your local Samsung dealer or outlet you have printed a specified number of the display, and press Mode/Enter (Enter on the bottom line. Press 1 to avoid print quality problems and paper feed problems resulting from . SCX-5115 users should be installed by a trained ...
..., contact your machine from worn parts. Consumables and Replacement Parts From time to time, you do not reset the counter, "DRUM WARNING" or "DRUM ENPTY" may appear before the current drum cartridge's time is up. appears on the top line and "1.YES 2.NO" appears on SCX5115). 3 "NEW... be replaced after you bought your local Samsung dealer or outlet you have printed a specified number of the display, and press Mode/Enter (Enter on the bottom line. Press 1 to avoid print quality problems and paper feed problems resulting from . SCX-5115 users should be installed by a trained ...
User Manual (ENGLISH)
Page 108
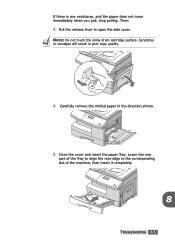
If there is any resistance, and the paper does not move immediately when you pull, stop pulling. Lower the rear part of the Tray to align the rear edge to open the side cover. NOTE: Do not touch the shiny drum cartridge surface. Then: 3 Pull the release lever to the corresponding slot of the machine, then insert it completely. 8 TROUBLESHOOTING 8.5 Scratches or smudges will result in poor copy quality. 4 Carefully remove the misfed paper in the direction shown. 5 Close the cover and insert the paper Tray.
If there is any resistance, and the paper does not move immediately when you pull, stop pulling. Lower the rear part of the Tray to align the rear edge to open the side cover. NOTE: Do not touch the shiny drum cartridge surface. Then: 3 Pull the release lever to the corresponding slot of the machine, then insert it completely. 8 TROUBLESHOOTING 8.5 Scratches or smudges will result in poor copy quality. 4 Carefully remove the misfed paper in the direction shown. 5 Close the cover and insert the paper Tray.
User Manual (ENGLISH)
Page 114
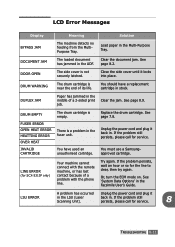
...JAM The machine detects no feeding from the MultiPurpose Tray. Clear the jam. DRUM EMPTY FUSER ERROR OPEN HEAT ERROR HEATTING ERROR OVER HEAT INVALID CARTRIDGE The drum cartridge is a problem in the LSU (Laser Scanning Unit). Close the side cover until it in the fuser unit. ...a Samsungapproved cartridge. Try again. Clear the document jam. DRUM WARNING The drum cartridge is not securely latched. DUPLEX JAM Paper has jammed in the Multi-Purpose Tray. If the problem persists, wait an hour or so for SCX-5315F only) Your machine cannot connect with the remote machine...
...JAM The machine detects no feeding from the MultiPurpose Tray. Clear the jam. DRUM EMPTY FUSER ERROR OPEN HEAT ERROR HEATTING ERROR OVER HEAT INVALID CARTRIDGE The drum cartridge is a problem in the LSU (Laser Scanning Unit). Close the side cover until it in the fuser unit. ...a Samsungapproved cartridge. Try again. Clear the document jam. DRUM WARNING The drum cartridge is not securely latched. DUPLEX JAM Paper has jammed in the Multi-Purpose Tray. If the problem persists, wait an hour or so for SCX-5315F only) Your machine cannot connect with the remote machine...
User Manual (ENGLISH)
Page 115
...machine, you have the fax machine loaded with the original document. Install the drum cartridge. Remove paper. Paper has jammed in the fuser area. See page 8.6. The machine is waiting for SCX-5315F only) SCANNER LOCKED Meaning Solution The memory is overstacked in the paper..., or split the transmission into more than one operation. The drum cartridge is locked. Enter the correct poll code. Try again. Paper is full. Display MEMORY FULL (for SCX-5315F only) NO ANSWER (for SCX-5315F only) POLLING ERROR (for SCX-5315F only) NO DEVELOPER CARTRIDGE NO PAPER...
...machine, you have the fax machine loaded with the original document. Install the drum cartridge. Remove paper. Paper has jammed in the fuser area. See page 8.6. The machine is waiting for SCX-5315F only) SCANNER LOCKED Meaning Solution The memory is overstacked in the paper..., or split the transmission into more than one operation. The drum cartridge is locked. Enter the correct poll code. Try again. Paper is full. Display MEMORY FULL (for SCX-5315F only) NO ANSWER (for SCX-5315F only) POLLING ERROR (for SCX-5315F only) NO DEVELOPER CARTRIDGE NO PAPER...
User Manual (ENGLISH)
Page 118
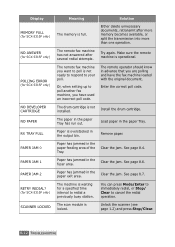
...Use the IEEE-1284 parallel port cable supplied with the machine or replace it with a computer and printer that the toner and drum cartridges are not installed properly. The printer driver may be correct. The parallel port cable specifications may not be incorrect. The page... the software. Printing Problem Solution Chart Condition Your machine does not print. Your machine does not print. (continued) The toner and drum cartridges are installed properly. Check the cable with an IEEE-1284 compliant cable. Change the page orientation in the computer. The IEEE-...
...Use the IEEE-1284 parallel port cable supplied with the machine or replace it with a computer and printer that the toner and drum cartridges are not installed properly. The printer driver may be correct. The parallel port cable specifications may not be incorrect. The page... the software. Printing Problem Solution Chart Condition Your machine does not print. Your machine does not print. (continued) The toner and drum cartridges are installed properly. Check the cable with an IEEE-1284 compliant cable. Change the page orientation in the computer. The IEEE-...
User Manual (ENGLISH)
Page 139
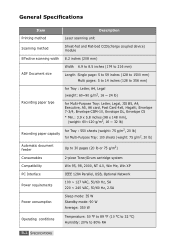
General Specifications Item Description Printing method Laser scanning unit Scanning method Sheet-fed and Flat-bed CCD(charge coupled device) module Effective scanning width 8.2 inches (208 mm) ADF Document size Width 6.9 to 8.5 ... Multi-Purpose Tray: 100 sheets (weight: 75 g/m2, 20 lb) Automatic document feeder Up to 30 pages (20 lb or 75 g/m2) Consumables 2-piece Toner/Drum cartridge system Compatibility Win 95, 98, 2000, NT 4.0, Win Me, Win XP PC Interface IEEE 1284 Parallel, USB, Optional Network Power requirements 100 ~ 127 VAC...
General Specifications Item Description Printing method Laser scanning unit Scanning method Sheet-fed and Flat-bed CCD(charge coupled device) module Effective scanning width 8.2 inches (208 mm) ADF Document size Width 6.9 to 8.5 ... Multi-Purpose Tray: 100 sheets (weight: 75 g/m2, 20 lb) Automatic document feeder Up to 30 pages (20 lb or 75 g/m2) Consumables 2-piece Toner/Drum cartridge system Compatibility Win 95, 98, 2000, NT 4.0, Win Me, Win XP PC Interface IEEE 1284 Parallel, USB, Optional Network Power requirements 100 ~ 127 VAC...
User Manual (ENGLISH)
Page 140
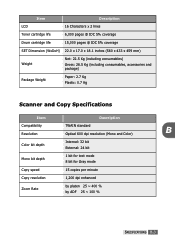
Item Description LCD 16 Characters x 2 lines Toner cartridge life 6,000 pages @ IDC 5% coverage Drum cartridge life 15,000 pages @ IDC 5% coverage SET Dimension (WxDxH) 22.0 x 17.0 x 18.1 inches (560 x 433 x 459 mm) Weight Net: 22.5 Kg (including consumables) Gross: ...
Item Description LCD 16 Characters x 2 lines Toner cartridge life 6,000 pages @ IDC 5% coverage Drum cartridge life 15,000 pages @ IDC 5% coverage SET Dimension (WxDxH) 22.0 x 17.0 x 18.1 inches (560 x 433 x 459 mm) Weight Net: 22.5 Kg (including consumables) Gross: ...

