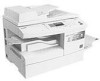

User Manual (ENGLISH)
Page 4
... 4.4 Setting Copy Options 4.6 Image 4.6 Contrast 4.7 Set 4.7 Zoom 4.8 Auto Fit Copying 4.9 Clone Copying 4.10 Duplex Copying 4.11 Collation Copying 4.12 Chapter 5: PRINTING Printing a Document 5.2 Printer Settings 5.3 Accessing Printer Settings 5.3 Printer Properties Tabs 5.4 Printer Properties Buttons & Icons 5.12 Setting Up the Locally Shared Printer 5.12 In Windows 9x/Me 5.12 In Windows NT 4.0/2000/XP 5.13 iii
... 4.4 Setting Copy Options 4.6 Image 4.6 Contrast 4.7 Set 4.7 Zoom 4.8 Auto Fit Copying 4.9 Clone Copying 4.10 Duplex Copying 4.11 Collation Copying 4.12 Chapter 5: PRINTING Printing a Document 5.2 Printer Settings 5.3 Accessing Printer Settings 5.3 Printer Properties Tabs 5.4 Printer Properties Buttons & Icons 5.12 Setting Up the Locally Shared Printer 5.12 In Windows 9x/Me 5.12 In Windows NT 4.0/2000/XP 5.13 iii
User Manual (ENGLISH)
Page 6
... Operating Systems A.7 Printing a Network Configuration Page A.7 Configuring TCP/IP A.8 Configuring Netware A.10 Restoring the Network Configuration A.11 Resetting the Network Interface Card A.11 Configuring the Samsung Network Printer Port ....... A.13 Appendix B: SPECIFICATIONS General Specifications B.2 Scanner and Copy Specifications B.3 Printer Specifications B.4 Facsimile Specifications B.4 v A.12 Installing Samsung Network Printer Port A.12 Selecting the Samsung Network Printer Port ......
... Operating Systems A.7 Printing a Network Configuration Page A.7 Configuring TCP/IP A.8 Configuring Netware A.10 Restoring the Network Configuration A.11 Resetting the Network Interface Card A.11 Configuring the Samsung Network Printer Port ....... A.13 Appendix B: SPECIFICATIONS General Specifications B.2 Scanner and Copy Specifications B.3 Printer Specifications B.4 Facsimile Specifications B.4 v A.12 Installing Samsung Network Printer Port A.12 Selecting the Samsung Network Printer Port ......
User Manual (ENGLISH)
Page 9
... conform to the requirements of DHHS 21 CFR, chapter 1 Subchapter J for Class I(1) laser products, and elsewhere is certified in the U.S. The laser system and printer are not considered to laser radiation above a Class I STR LEN. INVISIBLE LASER RADIATION WHEN THIS COVER OPEN. RADIACI N LASER INVISIBLE CUANDO SE ABRE. STIRR IKKE INN I level during normal operation, user...
... conform to the requirements of DHHS 21 CFR, chapter 1 Subchapter J for Class I(1) laser products, and elsewhere is certified in the U.S. The laser system and printer are not considered to laser radiation above a Class I STR LEN. INVISIBLE LASER RADIATION WHEN THIS COVER OPEN. RADIACI N LASER INVISIBLE CUANDO SE ABRE. STIRR IKKE INN I level during normal operation, user...

User Manual (ENGLISH)
Page 28
.... • When using the a USB connection, your machine. You will need to buy the a IEEE1284 compliant cable. • You only need to connect one of the computer requires a certified parallel cable. NOTE: • To connect the machine to the parallel port of the above cables. • If you are... using a USB cable, you want to use a parallel printer cable, only use a IEEE1284 compliant cable and connect it to achieve successful results. If this occurs, select the Slow mode to the parallel connector on...
.... • When using the a USB connection, your machine. You will need to buy the a IEEE1284 compliant cable. • You only need to connect one of the computer requires a certified parallel cable. NOTE: • To connect the machine to the parallel port of the above cables. • If you are... using a USB cable, you want to use a parallel printer cable, only use a IEEE1284 compliant cable and connect it to achieve successful results. If this occurs, select the Slow mode to the parallel connector on...
User Manual (ENGLISH)
Page 36
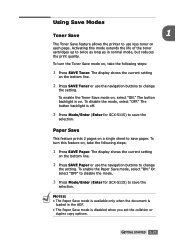
... turn the Toner Save mode on a single sheet to save the selection. Or select "OFF" to disable the mode. 3 Press Mode/Enter (Enter for SCX-5115) to save the selection. GETTING STARTED 1.21 To enable the Toner Save mode on . NOTES: • The Paper Save mode is available only when the... is on , select "ON." To enable the Paper Save mode, select "ON." Using Save Modes Toner Save 1 The Toner Save feature allows the printer to use less toner on the bottom line. 2 Press SAVE Paper or use the navigation buttons to change the setting. The display shows the current...
... turn the Toner Save mode on a single sheet to save the selection. Or select "OFF" to disable the mode. 3 Press Mode/Enter (Enter for SCX-5115) to save the selection. GETTING STARTED 1.21 To enable the Toner Save mode on . NOTES: • The Paper Save mode is available only when the... is on , select "ON." To enable the Paper Save mode, select "ON." Using Save Modes Toner Save 1 The Toner Save feature allows the printer to use less toner on the bottom line. 2 Press SAVE Paper or use the navigation buttons to change the setting. The display shows the current...
User Manual (ENGLISH)
Page 37
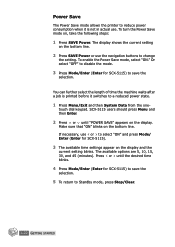
... Press Mode/Enter (Enter for SCX-5115) to save the selection. SCX-5115 users should press Menu and then Enter. 2 Press or until the desired time blinks. 4 Press Mode/Enter (Enter for SCX-5115) to save the selection. 5.... 2 Press SAVE Power or use or to select "ON" and press Mode/ Enter (Enter for SCX-5115). 3 The available time settings appear on the display. touch dial keypad. Make sure that "ON" blinks... the following steps: 1 Press SAVE Power. Power Save The Power Save mode allows the printer to reduce power consumption when it is printed before it switches to a reduced power state. 1...
... Press Mode/Enter (Enter for SCX-5115) to save the selection. SCX-5115 users should press Menu and then Enter. 2 Press or until the desired time blinks. 4 Press Mode/Enter (Enter for SCX-5115) to save the selection. 5.... 2 Press SAVE Power or use or to select "ON" and press Mode/ Enter (Enter for SCX-5115). 3 The available time settings appear on the display. touch dial keypad. Make sure that "ON" blinks... the following steps: 1 Press SAVE Power. Power Save The Power Save mode allows the printer to reduce power consumption when it is printed before it switches to a reduced power state. 1...

User Manual (ENGLISH)
Page 38
You must install the Samsung software to use your machine as a printer and scanner. The topics included in this chapter are: • About Samsung Software • System Requirements • Installing Samsung Software • Uninstalling Samsung Software 2 INSTALLING SOFTWARE This chapter provides information about installing the supplied Samsung software.
You must install the Samsung software to use your machine as a printer and scanner. The topics included in this chapter are: • About Samsung Software • System Requirements • Installing Samsung Software • Uninstalling Samsung Software 2 INSTALLING SOFTWARE This chapter provides information about installing the supplied Samsung software.
User Manual (ENGLISH)
Page 39
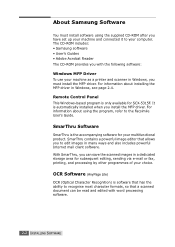
About Samsung Software You must install the MFP driver. For information about using the supplied CD-ROM after you have set up your machine and connected it ... fax, printing, and processing by other programmes of your machine as a printer and scanner in Windows, you to recognise most character formats, so that has the ability to edit images in a dedicated storage area for SCX-5315F. The CD-ROM includes: • Samsung software • User's Guides • Adobe Acrobat Reader The CD...
About Samsung Software You must install the MFP driver. For information about using the supplied CD-ROM after you have set up your machine and connected it ... fax, printing, and processing by other programmes of your machine as a printer and scanner in Windows, you to recognise most character formats, so that has the ability to edit images in a dedicated storage area for SCX-5315F. The CD-ROM includes: • Samsung software • User's Guides • Adobe Acrobat Reader The CD...
User Manual (ENGLISH)
Page 45
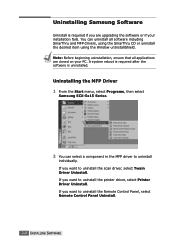
... a component in the MFP driver to uninstall the printer driver, select Printer Driver Uninstall. If you want to uninstall the scan driver, select Twain Driver Uninstall. If you want to uninstall individually. Uninstalling the MFP Driver 1 From the Start menu, select Programs, then select Samsung SCX-5x15 Series. 2 You can uninstall all applications are...
... a component in the MFP driver to uninstall the printer driver, select Printer Driver Uninstall. If you want to uninstall the scan driver, select Twain Driver Uninstall. If you want to uninstall individually. Uninstalling the MFP Driver 1 From the Start menu, select Programs, then select Samsung SCX-5x15 Series. 2 You can uninstall all applications are...
User Manual (ENGLISH)
Page 46
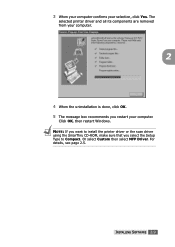
The selected printer driver and all its components are removed from your computer. 2 4 When the uninstallation is done, click OK. 5 The message box recommends you select the Setup Type to Compact. Click OK, then restart Windows. NOTE: If you want to install the printer driver or the scan driver using the SmarThru CD-ROM, make sure that you restart your selection, click Yes. INSTALLING SOFTWARE 2.9 Or select Custom then select MFP Driver. For details, see page 2.5. 3 When your computer confirms your computer.
The selected printer driver and all its components are removed from your computer. 2 4 When the uninstallation is done, click OK. 5 The message box recommends you select the Setup Type to Compact. Click OK, then restart Windows. NOTE: If you want to install the printer driver or the scan driver using the SmarThru CD-ROM, make sure that you restart your selection, click Yes. INSTALLING SOFTWARE 2.9 Or select Custom then select MFP Driver. For details, see page 2.5. 3 When your computer confirms your computer.
User Manual (ENGLISH)
Page 52
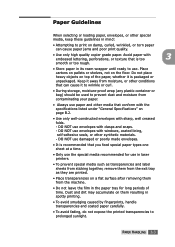
... unpackaged. Avoid paper with clasps and snaps. - DO NOT use envelopes with embossed lettering, perforations, or texture that you feed special paper types one sheet at a time. • Only use the special media recommended for long periods of the paper, whether it is too 3 smooth or ... wrap (any plastic container or bag) should be used to print on them from the machine. • Do not leave the film in laser printers. • To prevent special media such as transparencies and label sheets from sticking together, remove them from contaminating your paper. • Always use...
... unpackaged. Avoid paper with clasps and snaps. - DO NOT use envelopes with embossed lettering, perforations, or texture that you feed special paper types one sheet at a time. • Only use the special media recommended for long periods of the paper, whether it is too 3 smooth or ... wrap (any plastic container or bag) should be used to print on them from the machine. • Do not leave the film in laser printers. • To prevent special media such as transparencies and label sheets from sticking together, remove them from contaminating your paper. • Always use...
User Manual (ENGLISH)
Page 74
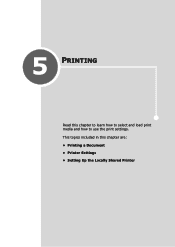
This topics included in this chapter to learn how to select and load print media and how to use the print settings. 5 PRINTING Read this chapter are: • Printing a Document • Printer Settings • Setting Up the Locally Shared Printer
This topics included in this chapter to learn how to select and load print media and how to use the print settings. 5 PRINTING Read this chapter are: • Printing a Document • Printer Settings • Setting Up the Locally Shared Printer

User Manual (ENGLISH)
Page 75
...Samsung SCX-5x15 Series PCL 6 is paper in the paper tray. 2 Verify that you want to make any adjustments that your machine is properly connected to the computer, the machine is powered on page 5.3. 5.2 PRINTING Click Properties or Setup if you want to the user's guide of your default printer.... For details, see "Installing Samsung Software" on the application program you are using . Printing a Document This procedure describes the general steps required for your ...
...Samsung SCX-5x15 Series PCL 6 is paper in the paper tray. 2 Verify that you want to make any adjustments that your machine is properly connected to the computer, the machine is powered on page 5.3. 5.2 PRINTING Click Properties or Setup if you want to the user's guide of your default printer.... For details, see "Installing Samsung Software" on the application program you are using . Printing a Document This procedure describes the general steps required for your ...

User Manual (ENGLISH)
Page 76
... adjust 5 the printing contrast you to make changes to the printer settings. Be sure to set Samsung SCX-5x15 Series PCL 6 as the default printer for copying. PRINTING 5.3 Printer Settings You can access printer settings by using either of the control panel buttons to use ...Print Setup command from the Printers folder, then select File > Properties (or select the printer icon in the printer driver. Accessing Printer Settings You can use the machine as paper size, paper orientation, and margins. Or • Select Samsung SCX-5x15 Series PCL 6 printer from within any necessary ...
... adjust 5 the printing contrast you to make changes to the printer settings. Be sure to set Samsung SCX-5x15 Series PCL 6 as the default printer for copying. PRINTING 5.3 Printer Settings You can access printer settings by using either of the control panel buttons to use ...Print Setup command from the Printers folder, then select File > Properties (or select the printer icon in the printer driver. Accessing Printer Settings You can use the machine as paper size, paper orientation, and margins. Or • Select Samsung SCX-5x15 Series PCL 6 printer from within any necessary ...
User Manual (ENGLISH)
Page 77
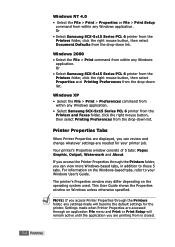
... depending on Windows unless otherwise specified. Windows XP • Select the File > Print > Preferences command from within any Windows application. • Select Samsung SCX-5x15 Series PCL 6 printer from the Printers and Faxes folder, click the right mouse button, then select Printing Preferences from is closed. 5.4 PRINTING For information on the Windows-based tabs...
... depending on Windows unless otherwise specified. Windows XP • Select the File > Print > Preferences command from within any Windows application. • Select Samsung SCX-5x15 Series PCL 6 printer from the Printers and Faxes folder, click the right mouse button, then select Printing Preferences from is closed. 5.4 PRINTING For information on the Windows-based tabs...
User Manual (ENGLISH)
Page 78
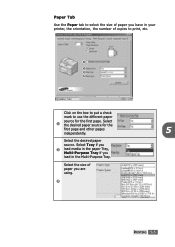
Paper Tab Use the Paper tab to use the different paper source for the first page and other pages independently. 5 Select the desired paper source. Select 1 the desired paper source for the first page. Select Tray if you 2 load media in the paper Tray, Multi-Purpose Tray if you load in your printer, the orientation, the number of paper you have in the Multi-Purpose Tray. Select the size of copies to print, etc. 1 2 3 4 Click on the box to put a check mark to select the size of paper you are using. 3 PRINTING 5.5
Paper Tab Use the Paper tab to use the different paper source for the first page and other pages independently. 5 Select the desired paper source. Select 1 the desired paper source for the first page. Select Tray if you 2 load media in the paper Tray, Multi-Purpose Tray if you load in your printer, the orientation, the number of paper you have in the Multi-Purpose Tray. Select the size of copies to print, etc. 1 2 3 4 Click on the box to put a check mark to select the size of paper you are using. 3 PRINTING 5.5

User Manual (ENGLISH)
Page 79
... of your text and images, make the characters and images appear smoother. • Printer Default - Set this setting to improve the print quality of paper you are using SRT. Choose this Samsung Resolution enhancement Technology (SRT) option to use the SRT that can occur on the ... by smoothing out jagged edges that 2 your specific printing needs. 1 3 2 4 5.6 PRINTING You can appear to adjust the print quality for your printer provides. • Normal - Choose to refine the print quality of each character. • Image Enhance - The higher the setting, the sharpen the ...
... of your text and images, make the characters and images appear smoother. • Printer Default - Set this setting to improve the print quality of paper you are using SRT. Choose this Samsung Resolution enhancement Technology (SRT) option to use the SRT that can occur on the ... by smoothing out jagged edges that 2 your specific printing needs. 1 3 2 4 5.6 PRINTING You can appear to adjust the print quality for your printer provides. • Normal - Choose to refine the print quality of each character. • Image Enhance - The higher the setting, the sharpen the ...
User Manual (ENGLISH)
Page 80
Toner Save Mode allows the printer to put a check mark and enable this mode. Click on the box to use less toner on the sheet. PRINTING 5.7 With this mode will extend ...
Toner Save Mode allows the printer to put a check mark and enable this mode. Click on the box to use less toner on the sheet. PRINTING 5.7 With this mode will extend ...
User Manual (ENGLISH)
Page 85
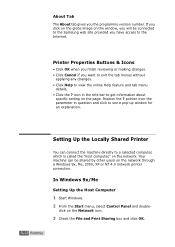
icon in question and click to see a pop-up window for an explanation. Setting Up the Locally Shared Printer You can be connected to the Samsung web site provided you have access to the Internet. Your machine can connect the machine directly to a selected computer, which is called the...information about specific setting on the Network icon. 3 Check the File and Print Sharing box and click OK. 5.12 PRINTING click on the page. Printer Properties Buttons & Icons • Click OK when you finish reviewing or making changes. • Click Cancel if you the programme version number. In...
icon in question and click to see a pop-up window for an explanation. Setting Up the Locally Shared Printer You can be connected to the Samsung web site provided you have access to the Internet. Your machine can connect the machine directly to a selected computer, which is called the...information about specific setting on the Network icon. 3 Check the File and Print Sharing box and click OK. 5.12 PRINTING click on the page. Printer Properties Buttons & Icons • Click OK when you finish reviewing or making changes. • Click Cancel if you the programme version number. In...

User Manual (ENGLISH)
Page 86
... your network folder in the Shared Name field and then click OK. Fill in the left column. 3 Right-click the shared name and select Capture Printer Port. 4 Select the port you want, check the Reconnect at log on box and then click OK. 5 From the Start menu, select Settings and ...then Printers. 6 Double-click your printer icon. 7 From the Printer menu, select Properties. 8 From the Details tab, select the printer port and click OK. 5 In Windows NT 4.0/2000/XP Setting Up the Host Computer 1 Start Windows. 2...
... your network folder in the Shared Name field and then click OK. Fill in the left column. 3 Right-click the shared name and select Capture Printer Port. 4 Select the port you want, check the Reconnect at log on box and then click OK. 5 From the Start menu, select Settings and ...then Printers. 6 Double-click your printer icon. 7 From the Printer menu, select Properties. 8 From the Details tab, select the printer port and click OK. 5 In Windows NT 4.0/2000/XP Setting Up the Host Computer 1 Start Windows. 2...


