User Manual (ENGLISH)
Page 5
Chapter 6: SCANNING Scanning using the Samsung SmarThru 6.2 Scanning Process with TWAIN-enabled Software ...... 6.4 Chapter 7: MAINTENANCE Cleaning the Scan Unit 7.2 Expected Cartridge Life 7.3 Replacing the Toner Cartridge 7.3 Setting to Notify Toner Low 7.7 Cleaning the Drum 7.8 Replacing the Drum Cartridge 7.8 Consumables and Replacement Parts 7.11 Chapter 8: TROUBLESHOOTING Document Jams 8.2 Input Misfeed 8.2 Exit Misfeed 8.3 Roller Misfeed...
Chapter 6: SCANNING Scanning using the Samsung SmarThru 6.2 Scanning Process with TWAIN-enabled Software ...... 6.4 Chapter 7: MAINTENANCE Cleaning the Scan Unit 7.2 Expected Cartridge Life 7.3 Replacing the Toner Cartridge 7.3 Setting to Notify Toner Low 7.7 Cleaning the Drum 7.8 Replacing the Drum Cartridge 7.8 Consumables and Replacement Parts 7.11 Chapter 8: TROUBLESHOOTING Document Jams 8.2 Input Misfeed 8.2 Exit Misfeed 8.3 Roller Misfeed...
User Manual (ENGLISH)
Page 7
... fall, causing serious damage. 7. To reduce the risk of fire or shock. If you to qualified service personnel under the following conditions: • When any part of fire or electric shock. 10. Unplug the product from the telephone jack, PC and AC wall outlet, and refer servicing to dangerous voltages or...
... fall, causing serious damage. 7. To reduce the risk of fire or shock. If you to qualified service personnel under the following conditions: • When any part of fire or electric shock. 10. Unplug the product from the telephone jack, PC and AC wall outlet, and refer servicing to dangerous voltages or...

User Manual (ENGLISH)
Page 11
...identification of its use a computer or other electronic device to send any customer terminal equipment incompatible with the rules and regulations in FCC Part 68. Radio Frequency Emissions FCC Information to the User This equipment has been tested and found to comply with the limits for a ...Class A digital device, pursuant to Part 15 of such terminal equipment, or otherwise materially affect its business and is not inconsistent with telephone company communications facilities, or require modification...
...identification of its use a computer or other electronic device to send any customer terminal equipment incompatible with the rules and regulations in FCC Part 68. Radio Frequency Emissions FCC Information to the User This equipment has been tested and found to comply with the limits for a ...Class A digital device, pursuant to Part 15 of such terminal equipment, or otherwise materially affect its business and is not inconsistent with telephone company communications facilities, or require modification...
User Manual (ENGLISH)
Page 12
... emergency number. • This product may cause harm to assure proper service from your line is not designed to advise the emergency service dispatcher of Part 68. The sum of all the equipment.
... emergency number. • This product may cause harm to assure proper service from your line is not designed to advise the emergency service dispatcher of Part 68. The sum of all the equipment.
User Manual (ENGLISH)
Page 92
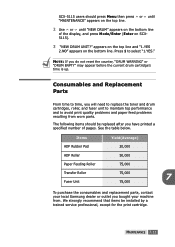
This chapter includes: • Cleaning the Scan Unit • Expected Cartridge Life • Replacing the Toner Cartridge • Setting to Notify Toner Low (Available in SCX-5315F only) • Cleaning the Drum • Replacing the Drum Cartridge • Consumables and Replacement Parts 7 MAINTENANCE This chapter provides information for maintaining the cartridge and your machine.
This chapter includes: • Cleaning the Scan Unit • Expected Cartridge Life • Replacing the Toner Cartridge • Setting to Notify Toner Low (Available in SCX-5315F only) • Cleaning the Drum • Replacing the Drum Cartridge • Consumables and Replacement Parts 7 MAINTENANCE This chapter provides information for maintaining the cartridge and your machine.
User Manual (ENGLISH)
Page 102
... recommend that items be replaced after you bought your local Samsung dealer or outlet you have printed a specified number of the display, and press Mode/Enter (Enter on SCX5115). 3 "NEW DRUM UNIT?" MAINTENANCE 7.11 Consumables and Replacement Parts From time to time, you do not reset the counter..."NEW DRUM" appears on the bottom line. appears on the top line and "1.YES 2.NO" appears on the bottom line of pages. SCX-5115 users should be installed by a trained service professional, except for the print cartridge. Items Yield(Average) ADF Rubber Pad 20,000 ADF Roller ...
... recommend that items be replaced after you bought your local Samsung dealer or outlet you have printed a specified number of the display, and press Mode/Enter (Enter on SCX5115). 3 "NEW DRUM UNIT?" MAINTENANCE 7.11 Consumables and Replacement Parts From time to time, you do not reset the counter..."NEW DRUM" appears on the bottom line. appears on the top line and "1.YES 2.NO" appears on the bottom line of pages. SCX-5115 users should be installed by a trained service professional, except for the print cartridge. Items Yield(Average) ADF Rubber Pad 20,000 ADF Roller ...

User Manual (ENGLISH)
Page 107
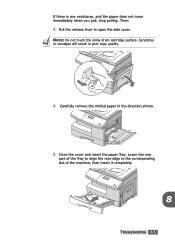
... the display. 1 Pull the paper Tray open the side cover and then close it straight out. Once you pull it out completely, lift the front part of the Tray slightly up to release the Tray from the machine. 2 Remove the jammed paper by gently pulling it to clear the jam. Follow...
... the display. 1 Pull the paper Tray open the side cover and then close it straight out. Once you pull it out completely, lift the front part of the Tray slightly up to release the Tray from the machine. 2 Remove the jammed paper by gently pulling it to clear the jam. Follow...
User Manual (ENGLISH)
Page 108
Scratches or smudges will result in poor copy quality. 4 Carefully remove the misfed paper in the direction shown. 5 Close the cover and insert the paper Tray. Then: 3 Pull the release lever to the corresponding slot of the Tray to align the rear edge to open the side cover. NOTE: Do not touch the shiny drum cartridge surface. Lower the rear part of the machine, then insert it completely. 8 TROUBLESHOOTING 8.5 If there is any resistance, and the paper does not move immediately when you pull, stop pulling.
Scratches or smudges will result in poor copy quality. 4 Carefully remove the misfed paper in the direction shown. 5 Close the cover and insert the paper Tray. Then: 3 Pull the release lever to the corresponding slot of the Tray to align the rear edge to open the side cover. NOTE: Do not touch the shiny drum cartridge surface. Lower the rear part of the machine, then insert it completely. 8 TROUBLESHOOTING 8.5 If there is any resistance, and the paper does not move immediately when you pull, stop pulling.
User Manual (ENGLISH)
Page 125
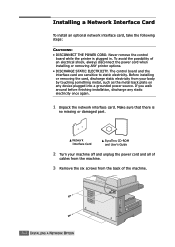
Never remove the control board while the printer is no missing or damaged part. œ¤Network Interface Card œ¤SyncThru CD-ROM and User's Guide 2 Turn your body by touching something metal, such as the metal back ...
Never remove the control board while the printer is no missing or damaged part. œ¤Network Interface Card œ¤SyncThru CD-ROM and User's Guide 2 Turn your body by touching something metal, such as the metal back ...

