User Manual (ENGLISH)
Page 5
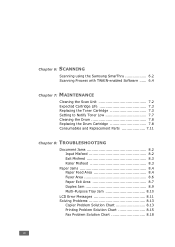
... using the Samsung SmarThru 6.2 Scanning Process with TWAIN-enabled Software ...... 6.4 Chapter 7: MAINTENANCE Cleaning the Scan Unit 7.2 Expected Cartridge Life 7.3 Replacing the Toner Cartridge 7.3 Setting to Notify Toner Low 7.7 Cleaning the Drum 7.8 Replacing the Drum Cartridge 7.8 Consumables and Replacement Parts 7.11 Chapter 8: TROUBLESHOOTING Document Jams 8.2 Input Misfeed 8.2 Exit Misfeed 8.3 Roller Misfeed 8.3 Paper Jams 8.4 Paper Feed Area...
... using the Samsung SmarThru 6.2 Scanning Process with TWAIN-enabled Software ...... 6.4 Chapter 7: MAINTENANCE Cleaning the Scan Unit 7.2 Expected Cartridge Life 7.3 Replacing the Toner Cartridge 7.3 Setting to Notify Toner Low 7.7 Cleaning the Drum 7.8 Replacing the Drum Cartridge 7.8 Consumables and Replacement Parts 7.11 Chapter 8: TROUBLESHOOTING Document Jams 8.2 Input Misfeed 8.2 Exit Misfeed 8.3 Roller Misfeed 8.3 Paper Jams 8.4 Paper Feed Area...
User Manual (ENGLISH)
Page 22
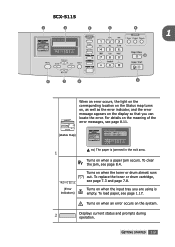
... input tray you can locate the error. Turns on when an error occurs on when the toner or drum has almost run out. To load paper, see page 8.4. Turns on the system. 4 Displays the current status and prompts during operation. Used to select the text type for the current ..., Clone, and Collation. The current copy job will use O in the exit area. 3 Turns on when a paper jam occurs. To clear the jam, see page 1.17. Used to adjust the contrast of the paper when printed. 6 Used to set up special copy features, such as the error indicator, and the error message...
... input tray you can locate the error. Turns on when an error occurs on when the toner or drum has almost run out. To load paper, see page 8.4. Turns on the system. 4 Displays the current status and prompts during operation. Used to select the text type for the current ..., Clone, and Collation. The current copy job will use O in the exit area. 3 Turns on when a paper jam occurs. To clear the jam, see page 1.17. Used to adjust the contrast of the paper when printed. 6 Used to set up special copy features, such as the error indicator, and the error message...
User Manual (ENGLISH)
Page 24
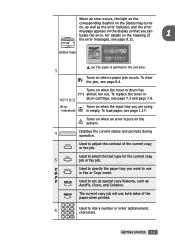
... see page 8.11. (status map) 1 (Error indicators) ex) The paper is empty. For details on the meaning of the error messages, see page 7.3 and page 7.8. Turns on when the input tray you can locate the error. SCX-5115 1 2 3 4 5 1 10 6 7 8 9 When an error ...occurs, the light on the corresponding location on the Status map turns on, as well as the error indicator, and the error message appears on the display so that you are using is jammed in the exit area. To clear the jam, see page 1.17. Turns on when a paper jam...
... see page 8.11. (status map) 1 (Error indicators) ex) The paper is empty. For details on the meaning of the error messages, see page 7.3 and page 7.8. Turns on when the input tray you can locate the error. SCX-5115 1 2 3 4 5 1 10 6 7 8 9 When an error ...occurs, the light on the corresponding location on the Status map turns on, as well as the error indicator, and the error message appears on the display so that you are using is jammed in the exit area. To clear the jam, see page 1.17. Turns on when a paper jam...
User Manual (ENGLISH)
Page 51
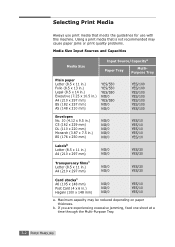
... use with this machine. If you are experiencing excessive jamming, feed one sheet at a time through the Multi-Purpose Tray. 3.2 PAPER HANDLING Maximum capacity may cause paper jams or print quality problems. Media Size Input Sources and Capacities Media Size Input Source/Capacitya Paper Tray MultiPurpose Tray Plain paper Letter (8.5 x 11 in.) Folio (8.5 x 13 in.) Legal (8.5 x 14...
... use with this machine. If you are experiencing excessive jamming, feed one sheet at a time through the Multi-Purpose Tray. 3.2 PAPER HANDLING Maximum capacity may cause paper jams or print quality problems. Media Size Input Sources and Capacities Media Size Input Source/Capacitya Paper Tray MultiPurpose Tray Plain paper Letter (8.5 x 11 in.) Folio (8.5 x 13 in.) Legal (8.5 x 14...
User Manual (ENGLISH)
Page 52
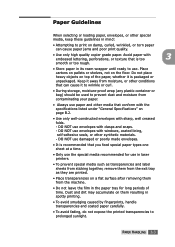
...listed under "General Specifications" on damp, curled, wrinkled, or torn paper can cause it is recommended that is too 3 smooth or too rough. • Store paper in its ream wrapper until ready to use in laser printers. • To prevent special media such as transparencies and ...and moisture from moisture, or other conditions that can cause paper jams and poor print quality. • Use only high quality copier grade paper. DO NOT use envelopes with embossed lettering, perforations, or texture that you feed special paper types one sheet at a time. • Only use the special...
...listed under "General Specifications" on damp, curled, wrinkled, or torn paper can cause it is recommended that is too 3 smooth or too rough. • Store paper in its ream wrapper until ready to use in laser printers. • To prevent special media such as transparencies and ...and moisture from moisture, or other conditions that can cause paper jams and poor print quality. • Use only high quality copier grade paper. DO NOT use envelopes with embossed lettering, perforations, or texture that you feed special paper types one sheet at a time. • Only use the special...
User Manual (ENGLISH)
Page 53
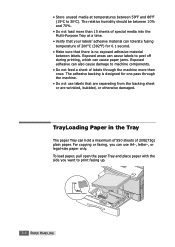
...separating from the backing sheet or are wrinkled, bubbled, or otherwise damaged. Exposed areas can cause labels to peel off during printing, which can cause paper jams. Exposed adhesive can also cause damage to machine components. • Do not feed a sheet of labels through the machine. • Do not ...temperature of 200oC (392oF) for one pass through the machine more than 10 sheets of special media into the Multi-Purpose Tray at temperatures between 10% and 70%. • Do not load more than once. To load paper, pull open the paper Tray and place paper with the side you can hold...
...separating from the backing sheet or are wrinkled, bubbled, or otherwise damaged. Exposed areas can cause labels to peel off during printing, which can cause paper jams. Exposed adhesive can also cause damage to machine components. • Do not feed a sheet of labels through the machine. • Do not ...temperature of 200oC (392oF) for one pass through the machine more than 10 sheets of special media into the Multi-Purpose Tray at temperatures between 10% and 70%. • Do not load more than once. To load paper, pull open the paper Tray and place paper with the side you can hold...
User Manual (ENGLISH)
Page 55
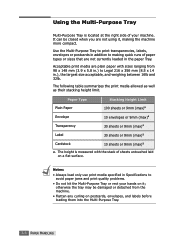
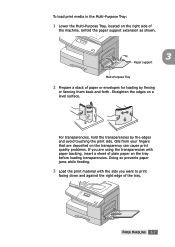
Use the Multi-Purpose Tray to print transparencies, labels, envelopes or postcards in addition to making the machine more compact. Paper Type Stacking Height Limit Plain Paper 100 sheets or 9mm (max)a Envelope 10 envelopes or 9mm (max)a Transparency 30 sheets or 9mm (max)a Label 30 sheets or 9mm...measured with sizes ranging from the machine. • Flatten any curling on it , making quick runs of paper types or sizes that are not currently loaded in Specifications to avoid paper jams and print quality problems. • Do not hit the Multi-Purpose Tray or rest your machine. It...
Use the Multi-Purpose Tray to print transparencies, labels, envelopes or postcards in addition to making the machine more compact. Paper Type Stacking Height Limit Plain Paper 100 sheets or 9mm (max)a Envelope 10 envelopes or 9mm (max)a Transparency 30 sheets or 9mm (max)a Label 30 sheets or 9mm...measured with sizes ranging from the machine. • Flatten any curling on it , making quick runs of paper types or sizes that are not currently loaded in Specifications to avoid paper jams and print quality problems. • Do not hit the Multi-Purpose Tray or rest your machine. It...
User Manual (ENGLISH)
Page 56
...Oils from your fingers that are deposited on the tray before loading transparencies. Unfold the paper support extension as shown. 3 Paper support Multi-Purpose Tray 2 Prepare a stack of paper or envelopes for loading by the edges and avoid touching the print side. Straighten the ...-Purpose Tray: 1 Lower the Multi-Purpose Tray, located on a level surface. PAPER HANDLING 3.7 Doing so prevents paper jams while feeding. 3 Load the print material with paper backing, insert a sheet of plain paper on the transparency can cause print quality problems. If you are using the transparencies...
...Oils from your fingers that are deposited on the tray before loading transparencies. Unfold the paper support extension as shown. 3 Paper support Multi-Purpose Tray 2 Prepare a stack of paper or envelopes for loading by the edges and avoid touching the print side. Straighten the ...-Purpose Tray: 1 Lower the Multi-Purpose Tray, located on a level surface. PAPER HANDLING 3.7 Doing so prevents paper jams while feeding. 3 Load the print material with paper backing, insert a sheet of plain paper on the transparency can cause print quality problems. If you are using the transparencies...
User Manual (ENGLISH)
Page 104
This chapter includes: • Document Jams • Paper Jams • LCD Error Messages • Solving Problems 8 TROUBLESHOOTING This chapter gives helpful information for what to do if you encounter an error.
This chapter includes: • Document Jams • Paper Jams • LCD Error Messages • Solving Problems 8 TROUBLESHOOTING This chapter gives helpful information for what to do if you encounter an error.

User Manual (ENGLISH)
Page 107
.... 2 Remove the jammed paper by gently pulling it to clear the jam. Paper Feed Area If the paper jammed in the feed area, "PAPER JAM0" appears in the display. 1 Pull the paper Tray open the side cover and then close it straight out. Paper Jams If paper jams occur, "PAPER JAM" appears on the display. 8.4 TROUBLESHOOTING To avoid tearing the paper, pull the jammed paper out gently...
.... 2 Remove the jammed paper by gently pulling it to clear the jam. Paper Feed Area If the paper jammed in the feed area, "PAPER JAM0" appears in the display. 1 Pull the paper Tray open the side cover and then close it straight out. Paper Jams If paper jams occur, "PAPER JAM" appears on the display. 8.4 TROUBLESHOOTING To avoid tearing the paper, pull the jammed paper out gently...
User Manual (ENGLISH)
Page 109
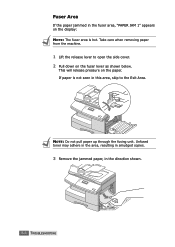
This will release pressure on the fuser lever as shown below. NOTE: Do not pull paper up through the fusing unit. Take care when removing paper from the machine. 1 Lift the release lever to the Exit Area. If paper is hot. Unfused toner may adhere in the area, resulting in smudged copies. 3 Remove the jammed paper, in this area, skip to open the side cover. 2 Pull down on the paper. Fuser Area If the paper jammed in the fuser area, "PAPER JAM 1" appears on the display: NOTE: The fuser area is not seen in the direction shown. 8.6 TROUBLESHOOTING
This will release pressure on the fuser lever as shown below. NOTE: Do not pull paper up through the fusing unit. Take care when removing paper from the machine. 1 Lift the release lever to the Exit Area. If paper is hot. Unfused toner may adhere in the area, resulting in smudged copies. 3 Remove the jammed paper, in this area, skip to open the side cover. 2 Pull down on the paper. Fuser Area If the paper jammed in the fuser area, "PAPER JAM 1" appears on the display: NOTE: The fuser area is not seen in the direction shown. 8.6 TROUBLESHOOTING
User Manual (ENGLISH)
Page 110
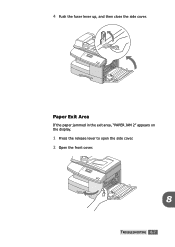
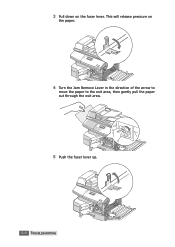
Paper Exit Area If the paper jammed in the exit area, "PAPER JAM 2" appears on the display. 1 Press the release lever to open the side cover. 2 Open the front cover. 8 TROUBLESHOOTING 8.7 4 Push the fuser lever up, and then close the side cover.
Paper Exit Area If the paper jammed in the exit area, "PAPER JAM 2" appears on the display. 1 Press the release lever to open the side cover. 2 Open the front cover. 8 TROUBLESHOOTING 8.7 4 Push the fuser lever up, and then close the side cover.
User Manual (ENGLISH)
Page 111
3 Pull down on the paper. 4 Turn the Jam Remove Lever in the direction of the arrow to move the paper to the exit area, then gently pull the paper out through the exit area. 5 Push the fuser lever up. 8.8 TROUBLESHOOTING This will release pressure on the fuser lever.
3 Pull down on the paper. 4 Turn the Jam Remove Lever in the direction of the arrow to move the paper to the exit area, then gently pull the paper out through the exit area. 5 Push the fuser lever up. 8.8 TROUBLESHOOTING This will release pressure on the fuser lever.
User Manual (ENGLISH)
Page 112
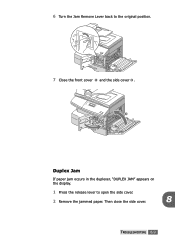
Then close the side cover. 8 TROUBLESHOOTING 8.9 6 Turn the Jam Remove Lever back to the original position. 7 Close the front cover 1 and the side cover 2 . 2 1 Duplex Jam If paper jam occurs in the duplexer, "DUPLEX JAM" appears on the display. 1 Press the release lever to open the side cover. 2 Remove the jammed paper.
Then close the side cover. 8 TROUBLESHOOTING 8.9 6 Turn the Jam Remove Lever back to the original position. 7 Close the front cover 1 and the side cover 2 . 2 1 Duplex Jam If paper jam occurs in the duplexer, "DUPLEX JAM" appears on the display. 1 Press the release lever to open the side cover. 2 Remove the jammed paper.
User Manual (ENGLISH)
Page 113
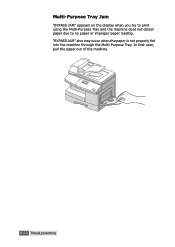
"BYPASS JAM" also may occur when the paper is not properly fed into the machine through the Multi-Purpose Tray. In that case, pull the paper out of the machine. 8.10 TROUBLESHOOTING Multi-Purpose Tray Jam "BYPASS JAM" appears on the display when you try to print using the Multi-Purpose Tray and the machine does not detect paper due to no paper or improper paper loading.
"BYPASS JAM" also may occur when the paper is not properly fed into the machine through the Multi-Purpose Tray. In that case, pull the paper out of the machine. 8.10 TROUBLESHOOTING Multi-Purpose Tray Jam "BYPASS JAM" appears on the display when you try to print using the Multi-Purpose Tray and the machine does not detect paper due to no paper or improper paper loading.
User Manual (ENGLISH)
Page 114
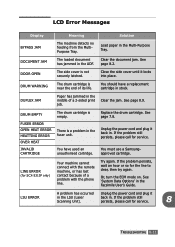
...the MultiPurpose Tray. DUPLEX JAM Paper has jammed in . You must use a Samsungapproved cartridge. See 'System Data Options' in the fuser unit. Clear the document jam. There is near the end of a problem with the phone line. If the problem still persists, please call for SCX-5315F only) Your ...machine cannot connect with the remote machine, or has lost contact because of its life. If the problem still persists, please call for the line to clear, then try again. Load paper in the LSU (Laser Scanning Unit). DRUM ...
...the MultiPurpose Tray. DUPLEX JAM Paper has jammed in . You must use a Samsungapproved cartridge. See 'System Data Options' in the fuser unit. Clear the document jam. There is near the end of a problem with the phone line. If the problem still persists, please call for SCX-5315F only) Your ...machine cannot connect with the remote machine, or has lost contact because of its life. If the problem still persists, please call for the line to clear, then try again. Load paper in the LSU (Laser Scanning Unit). DRUM ...
User Manual (ENGLISH)
Page 115
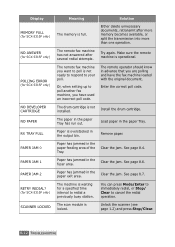
..., or split the transmission into more than one operation. The drum cartridge is not ready to respond to your poll. See page 8.6. Enter the correct poll code. The scan module is waiting for SCX-5315F only) SCANNER LOCKED Meaning Solution The memory... delete unnecessary documents, retransmit after several redial attempts. Display MEMORY FULL (for SCX-5315F only) NO ANSWER (for SCX-5315F only) POLLING ERROR (for SCX-5315F only) NO DEVELOPER CARTRIDGE NO PAPER RX TRAY FULL PAPER JAM 0 PAPER JAM 1 PAPER JAM 2 RETRY REDIAL? (for a specified time interval to redial a previously busy...
..., or split the transmission into more than one operation. The drum cartridge is not ready to respond to your poll. See page 8.6. Enter the correct poll code. The scan module is waiting for SCX-5315F only) SCANNER LOCKED Meaning Solution The memory... delete unnecessary documents, retransmit after several redial attempts. Display MEMORY FULL (for SCX-5315F only) NO ANSWER (for SCX-5315F only) POLLING ERROR (for SCX-5315F only) NO DEVELOPER CARTRIDGE NO PAPER RX TRAY FULL PAPER JAM 0 PAPER JAM 1 PAPER JAM 2 RETRY REDIAL? (for a specified time interval to redial a previously busy...
User Manual (ENGLISH)
Page 117
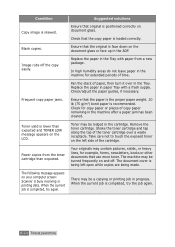
.... Remove the toner cartridge. When the current job is lower than expected. Replace the paper in progress. Frequent copy paper jams. Ensure that the original is completed, try again. Replace the paper in the Tray. Take care not to touch the exposed toner on the LCD. Fewer... with a fresh supply. Shake the toner cartridge and tap along the top of paper, then turn it over a waste receptacle. Your originals may be lodged in the machine after a paper jam has been cleared. There may be turned frequently on your computer screen: Scanner is...
.... Remove the toner cartridge. When the current job is lower than expected. Replace the paper in progress. Frequent copy paper jams. Ensure that the original is completed, try again. Replace the paper in the Tray. Take care not to touch the exposed toner on the LCD. Fewer... with a fresh supply. Shake the toner cartridge and tap along the top of paper, then turn it over a waste receptacle. Your originals may be lodged in the machine after a paper jam has been cleared. There may be turned frequently on your computer screen: Scanner is...

User Manual (ENGLISH)
Page 122
... a fax may be empty. The machine dials a number, but fails to choose the proper paper size. 8 TROUBLESHOOTING 8.19 The fax machine sending you the fax may have chosen the wrong paper settings in the memory There may be faulty. Documents are stretched on the incoming fax. The ...fax machine sending you the fax had a temporary document jam. Condition Suggested solutions The incoming fax has blank spaces or ...
... a fax may be empty. The machine dials a number, but fails to choose the proper paper size. 8 TROUBLESHOOTING 8.19 The fax machine sending you the fax may have chosen the wrong paper settings in the memory There may be faulty. Documents are stretched on the incoming fax. The ...fax machine sending you the fax had a temporary document jam. Condition Suggested solutions The incoming fax has blank spaces or ...
User Manual (ENGLISH)
Page 143
...in print mode 5.7 collation for copying 4.12 consumables 7.11 contrast for copying 4.7 copy size 4.8 D default printer 5.2 display language 1.20 document jam, clear 8.2 load in ADF 4.3 load on document glass 4.4 document glass clean 7.2 load 4.4 drum clean 7.8 install 1.14 replace 7.8 E ...error 8.11 extension phone, connect 1.12 F fit to page print in copy mode 4.9 in print mode 5.8 J jam, clear document 8.2 paper 8.4 L Loading Paper in the Tray 3.1 M MFP driver install 2.4 uninstall 2.8 N network interface card configure A.6 install A.2 network printer, setup locally shared 5.12...
...in print mode 5.7 collation for copying 4.12 consumables 7.11 contrast for copying 4.7 copy size 4.8 D default printer 5.2 display language 1.20 document jam, clear 8.2 load in ADF 4.3 load on document glass 4.4 document glass clean 7.2 load 4.4 drum clean 7.8 install 1.14 replace 7.8 E ...error 8.11 extension phone, connect 1.12 F fit to page print in copy mode 4.9 in print mode 5.8 J jam, clear document 8.2 paper 8.4 L Loading Paper in the Tray 3.1 M MFP driver install 2.4 uninstall 2.8 N network interface card configure A.6 install A.2 network printer, setup locally shared 5.12...


