
Universal Print Driver Guide (ENGLISH)
Page 9
... at the top of recently used printers. Search Now: Searches printers that are using to see the troubleshooting guide. • Printer Settings: Opens SyncThur Web Service, which provides options for buying supplies. • TroubleShooting Guide: Opens the troubleshooting chapter of the user's guide. Using the Samsung Universal Print Driver_ 9 Recently Used Printers: Shows the list of the list. • Search - Shows printer list. You need to install the Smart Panel of the selected printer in the list. Changing Samsung Universal Print Driver settings Setting the pop-up : 1.
... at the top of recently used printers. Search Now: Searches printers that are using to see the troubleshooting guide. • Printer Settings: Opens SyncThur Web Service, which provides options for buying supplies. • TroubleShooting Guide: Opens the troubleshooting chapter of the user's guide. Using the Samsung Universal Print Driver_ 9 Recently Used Printers: Shows the list of the list. • Search - Shows printer list. You need to install the Smart Panel of the selected printer in the list. Changing Samsung Universal Print Driver settings Setting the pop-up : 1.
User Manual (ENGLISH)
Page 6
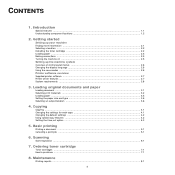
...7. Ordering toner cartridge Toner cartridges ...7.1 How to purchase ...7.1 8. Maintenance Printing reports ...8.1 4 Basic printing Printing a document ...5.1 Canceling a print job ...5.1 6. CONTENTS 1. Getting started Setting up your machine Finding more information ...2.1 Selecting a location ...2.2 Installing the toner cartridge 2.2 Loading paper ...2.3 Making connections ...2.5 Turning the machine on ...2.5 Setting up the machine system Overview of control panel menus 2.6 Changing the display language 2.6 Using the save modes ...2.6 Printer software overview Supplied printer software...
...7. Ordering toner cartridge Toner cartridges ...7.1 How to purchase ...7.1 8. Maintenance Printing reports ...8.1 4 Basic printing Printing a document ...5.1 Canceling a print job ...5.1 6. CONTENTS 1. Getting started Setting up your machine Finding more information ...2.1 Selecting a location ...2.2 Installing the toner cartridge 2.2 Loading paper ...2.3 Making connections ...2.5 Turning the machine on ...2.5 Setting up the machine system Overview of control panel menus 2.6 Changing the display language 2.6 Using the save modes ...2.6 Printer software overview Supplied printer software...
User Manual (ENGLISH)
Page 16
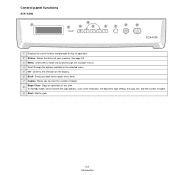
... the status of copies. 9 Start- Confirms the selection on the display. 6 Back- Stops an operation at any time. 8 In Standby mode, clears/cancels the copy options, such as the resolution, the document type setting, the copy size, and the number of your machine. Stop/Clear- Sends you to the upper menu level. 7 Copies- Allows you back to enter the number of copies. Starts a job. 1.3 Introduction See page 9.3. 3 Menu- Enters Menu mode and scrolls through the available menus. 4 Scroll through the options available in the selected menu. 5 OK- Control panel functions SCX-4300...
... the status of copies. 9 Start- Confirms the selection on the display. 6 Back- Stops an operation at any time. 8 In Standby mode, clears/cancels the copy options, such as the resolution, the document type setting, the copy size, and the number of your machine. Stop/Clear- Sends you to the upper menu level. 7 Copies- Allows you back to enter the number of copies. Starts a job. 1.3 Introduction See page 9.3. 3 Menu- Enters Menu mode and scrolls through the available menus. 4 Scroll through the options available in the selected menu. 5 OK- Control panel functions SCX-4300...
User Manual (ENGLISH)
Page 17
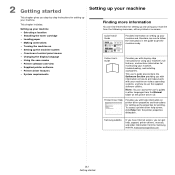
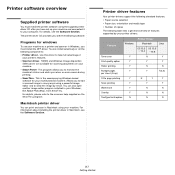
... instructions for using your machine from the printer properties dialog box. Quick Install Guide Provides information on • Setting up the machine system • Overview of control panel menus • Changing the display language • Using the save modes • Printer software overview • Supplied printer software • Printer driver features • System requirements Setting up your machine. This chapter includes: Setting up your machine • Selecting a location • Installing the toner cartridge • Loading paper • Making connections •...
... instructions for using your machine from the printer properties dialog box. Quick Install Guide Provides information on • Setting up the machine system • Overview of control panel menus • Changing the display language • Using the save modes • Printer software overview • Supplied printer software • Printer driver features • System requirements Setting up your machine. This chapter includes: Setting up your machine • Selecting a location • Installing the toner cartridge • Loading paper • Making connections •...
User Manual (ENGLISH)
Page 23
... ways using your machine. • Smart Panel- TWAIN and Windows Image Acquisition (WIA) driver are available for your machine and connected it to send the image by your printer's features. • Scanner driver- You can also open another image editor program installed in Windows, you to edit a scanned image in Macintosh, see the Software Section. Feature Windows Toner save Y Print quality option Y Poster printing Y Multiple pages Y per sheet (N-up your multifunctional machine. Printer software overview Supplied printer software You must install the MFP driver...
... ways using your machine. • Smart Panel- TWAIN and Windows Image Acquisition (WIA) driver are available for your machine and connected it to send the image by your printer's features. • Scanner driver- You can also open another image editor program installed in Windows, you to edit a scanned image in Macintosh, see the Software Section. Feature Windows Toner save Y Print quality option Y Poster printing Y Multiple pages Y per sheet (N-up your multifunctional machine. Printer software overview Supplied printer software You must install the MFP driver...
User Manual (ENGLISH)
Page 26
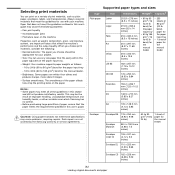
... mm (4.33 x 8.66 inches) Envelope C5 162 x 229 mm (6.38 x 9.02 inches) 3.2 Loading original documents and paper Properties, such as weight, composition, grain, and moisture content, are not covered by the Samsung warranty or service agreements. Selecting print materials You can use any size paper that fits easily within the paper adjusters of the paper input tray. • Weight: Your machine supports paper weights as follows: - 16 to...
... mm (4.33 x 8.66 inches) Envelope C5 162 x 229 mm (6.38 x 9.02 inches) 3.2 Loading original documents and paper Properties, such as weight, composition, grain, and moisture content, are not covered by the Samsung warranty or service agreements. Selecting print materials You can use any size paper that fits easily within the paper adjusters of the paper input tray. • Weight: Your machine supports paper weights as follows: - 16 to...
User Manual (ENGLISH)
Page 30
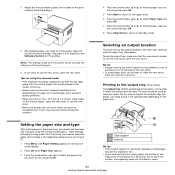
... tray. • Always load only the print materials specified in the Specifications on page 3.2 to avoid paper jams and print quality problems. • When you print on 76 x 127 mm (3 x 5 inches) sized media on the manual feeder, open the rear cover to use the rear cover. • Make sure to open the rear cover when you print on transparencies. See page 3.6 for copying or the Software Section for most print jobs. Selecting an output location The machine has two output locations...
... tray. • Always load only the print materials specified in the Specifications on page 3.2 to avoid paper jams and print quality problems. • When you print on 76 x 127 mm (3 x 5 inches) sized media on the manual feeder, open the rear cover to use the rear cover. • Make sure to open the rear cover when you print on transparencies. See page 3.6 for copying or the Software Section for most print jobs. Selecting an output location The machine has two output locations...
User Manual (ENGLISH)
Page 32
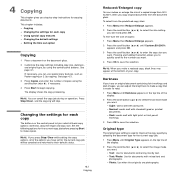
...settings including copy size, darkness, and original type, by -step instructions for the current copy job before pressing Start to their default status. 4.1 Copying Reduced/Enlarged copy You can cancel the copy job during an operation. See page 4.1. NOTE: If you press Stop/Clear while setting the copy options, all basic copy options: darkness, document type and copy size. This chapter includes: • Copying • Changing the settings for the current copy job will stop. The display shows the copy processing. Set the following options for copying documents. Press Stop...
...settings including copy size, darkness, and original type, by -step instructions for the current copy job before pressing Start to their default status. 4.1 Copying Reduced/Enlarged copy You can cancel the copy job during an operation. See page 4.1. NOTE: If you press Stop/Clear while setting the copy options, all basic copy options: darkness, document type and copy size. This chapter includes: • Copying • Changing the settings for the current copy job will stop. The display shows the copy processing. Set the following options for copying documents. Press Stop...
User Manual (ENGLISH)
Page 33
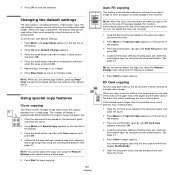
... button ( or ) until Copy Setup appears on the control panel. ID Card copying You can not adjust the copy size manually. 1 Load the document to be copied on the document glass, and close the cover. 2 Press Menu until Auto Fit appears and press OK. 4 Customize the copy settings including copy size, darkness, and original type, by using the control panel buttons. A Changing the default settings The copy options, including darkness, original type, copy size and number of paper. The number of images is enabled. 5 Press Start to a single side of copies, can be copied...
... button ( or ) until Copy Setup appears on the control panel. ID Card copying You can not adjust the copy size manually. 1 Load the document to be copied on the document glass, and close the cover. 2 Press Menu until Auto Fit appears and press OK. 4 Customize the copy settings including copy size, darkness, and original type, by using the control panel buttons. A Changing the default settings The copy options, including darkness, original type, copy size and number of paper. The number of images is enabled. 5 Press Start to a single side of copies, can be copied...
User Manual (ENGLISH)
Page 38
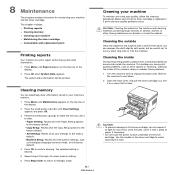
... scroll button ( or ) to select the item you want to clear. • Paper Setting: Resets all of the Paper Setting options to the factory default. • Copy Setup: Resets all of the Copy Setup options to the factory default. • All Settings: Resets all of the toner cartridge. Wait for the machine to light for maintaining your machine • Maintaining the toner cartridge • Consumable and replacement parts Printing reports Your machine can cause print quality problems, such as the display language and save mode, to the factory default...
... scroll button ( or ) to select the item you want to clear. • Paper Setting: Resets all of the Paper Setting options to the factory default. • Copy Setup: Resets all of the Copy Setup options to the factory default. • All Settings: Resets all of the toner cartridge. Wait for the machine to light for maintaining your machine • Maintaining the toner cartridge • Consumable and replacement parts Printing reports Your machine can cause print quality problems, such as the display language and save mode, to the factory default...

User Manual (ENGLISH)
Page 46
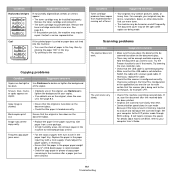
... a problem in . NOTE: When you can temporarily reestablish printing operations. Load paper in the manual feeder. Unplug the power cord and plug it back in the fuser unit. Replace the toner cartridge with a new one . Unplug the power cord and plug it back in . Unplug the power cord and plug it back in . Paper has jammed in the LSU (Laser Scanning Unit). See page 2.2. • Clean the paper jam. See page 9.1. plug it back in the fuser unit. Low...
... a problem in . NOTE: When you can temporarily reestablish printing operations. Load paper in the manual feeder. Unplug the power cord and plug it back in the fuser unit. Replace the toner cartridge with a new one . Unplug the power cord and plug it back in . Unplug the power cord and plug it back in . Paper has jammed in the LSU (Laser Scanning Unit). See page 2.2. • Clean the paper jam. See page 9.1. plug it back in the fuser unit. Low...
User Manual (ENGLISH)
Page 47
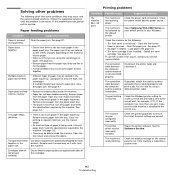
... your default printer in the paper exit. See page 3.2. • Remove paper from the paper input tray and reload it . Check the power cord connections. Check the display message on special materials, use the manual feeder. • An incorrect type of paper may cause some conditions that the print job is sent to the correct port, for the following chart lists some paper to see if the machine is indicating a system error. 9.5 Troubleshooting Remove excess paper from the tray. If...
... your default printer in the paper exit. See page 3.2. • Remove paper from the paper input tray and reload it . Check the power cord connections. Check the display message on special materials, use the manual feeder. • An incorrect type of paper may cause some conditions that the print job is sent to the correct port, for the following chart lists some paper to see if the machine is indicating a system error. 9.5 Troubleshooting Remove excess paper from the tray. If...
User Manual (ENGLISH)
Page 48
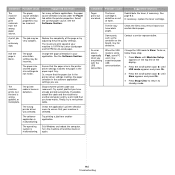
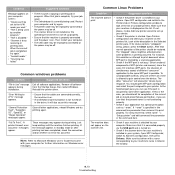
... paper size in the printer driver settings matches the paper in your application. Try printing a job from the wrong paper source. Exit Windows and reboot the computer. Contact a service representative. See the Software Section. The maximum print speed of the page or try adjusting the print quality settings. Ensure that you are blank. If possible, attach the cable and the machine to standby mode. 9.6 Troubleshooting The operating system is blank. Redistribute the toner, if necessary. Check the file...
... paper size in the printer driver settings matches the paper in your application. Try printing a job from the wrong paper source. Exit Windows and reboot the computer. Contact a service representative. See the Software Section. The maximum print speed of the page or try adjusting the print quality settings. Ensure that you are blank. If possible, attach the cable and the machine to standby mode. 9.6 Troubleshooting The operating system is blank. Redistribute the toner, if necessary. Check the file...

User Manual (ENGLISH)
Page 50
... paper in the tray. Remove the toner cartridge and install a new one . See page 3.2. 9.8 Troubleshooting Back of printouts are white areas within parts of characters that the paper is loaded properly. • Check the paper type and quality. Loose toner • Clean the inside of the machine. Character Voids A Character voids are dirty Check for leaking toner. Also try another type of transparency. See page 8.4. • If the problem persists, the machine may be solid black...
... paper in the tray. Remove the toner cartridge and install a new one . See page 3.2. 9.8 Troubleshooting Back of printouts are white areas within parts of characters that the paper is loaded properly. • Check the paper type and quality. Loose toner • Clean the inside of the machine. Character Voids A Character voids are dirty Check for leaking toner. Also try another type of transparency. See page 8.4. • If the problem persists, the machine may be solid black...
User Manual (ENGLISH)
Page 51
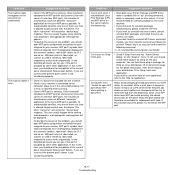
... rate. • Check that the USB cable is connected properly. • Make sure that the scanner is curled or paper does not feed into the machine: • Turn over in scan mode because of the large amount of time. It will help to your copies. • If no defects are on the original, clean the scan unit. Contact a service representative. Blank copies print out. Replace the paper in the paper input tray with paper from a new package. •...
... rate. • Check that the USB cable is connected properly. • Make sure that the scanner is curled or paper does not feed into the machine: • Turn over in scan mode because of the large amount of time. It will help to your copies. • If no defects are on the original, clean the scan unit. Contact a service representative. Blank copies print out. Replace the paper in the paper input tray with paper from a new package. •...
User Manual (ENGLISH)
Page 52
... job again. • The Selected port is installed in your system. "Error Writing to print properly. When the current job is displayed on the list. Make sure that job is complete, try again." • "Invalid handle." • "Scanning has failed." Condition Message appears on your computer screen: • "Device can see if the port is occupied by another program." • "Port is disabled." • "Scanner is being used by some problems in printing...
... job again. • The Selected port is installed in your system. "Error Writing to print properly. When the current job is displayed on the list. Make sure that job is complete, try again." • "Invalid handle." • "Scanning has failed." Condition Message appears on your computer screen: • "Device can see if the port is occupied by another program." • "Port is disabled." • "Scanner is being used by some problems in printing...
User Manual (ENGLISH)
Page 53
...) and MFP driver on the same machine simultaneously. • Since both packages and install that the present port's owner is not functioning properly. Condition Suggested solutions I can see if the port is not functioning properly. If you should open MFP ports configuration and select the port assigned to gain control over the device. You can usually happen while starting scan procedure, and appropriate message box will be displayed. when printing a document. Condition...
...) and MFP driver on the same machine simultaneously. • Since both packages and install that the present port's owner is not functioning properly. Condition Suggested solutions I can see if the port is not functioning properly. If you should open MFP ports configuration and select the port assigned to gain control over the device. You can usually happen while starting scan procedure, and appropriate message box will be displayed. when printing a document. Condition...
User Manual (ENGLISH)
Page 83
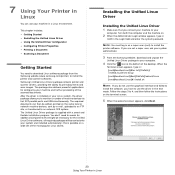
....samsung.com/printer) to an external OCR system. Installing the Unified Linux Driver Installing the Unified Linux Driver 1 Make sure that might be necessary for configuring your machine and further processing of machine devices via fast ECP parallel ports and USB simultaneously. NOTE: You must log in Linux This chapter includes: • Getting Started • Installing the Unified Linux Driver • Using the Unified Driver Configurator • Configuring Printer Properties • Printing a Document • Scanning a Document...
....samsung.com/printer) to an external OCR system. Installing the Unified Linux Driver Installing the Unified Linux Driver 1 Make sure that might be necessary for configuring your machine and further processing of machine devices via fast ECP parallel ports and USB simultaneously. NOTE: You must log in Linux This chapter includes: • Getting Started • Installing the Unified Linux Driver • Using the Unified Driver Configurator • Configuring Printer Properties • Printing a Document • Scanning a Document...
User Manual (ENGLISH)
Page 87
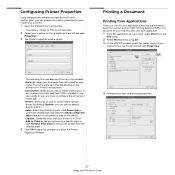
... Printer in Printers configuration. •Connection: allows you to view or select another printer driver. The following five tabs display at the top of the window: •General: allows you are using, select Print from the File menu. 2 Select Print directly using Common UNIX Printing System (CUPS). Click Cancel job to cancel the selected job and select the Show completed jobs check box to print from the Printer list and click Properties. By clicking Options...
... Printer in Printers configuration. •Connection: allows you to view or select another printer driver. The following five tabs display at the top of the window: •General: allows you are using, select Print from the File menu. 2 Select Print directly using Common UNIX Printing System (CUPS). Click Cancel job to cancel the selected job and select the Show completed jobs check box to print from the Printer list and click Properties. By clicking Options...
User Manual (ENGLISH)
Page 91
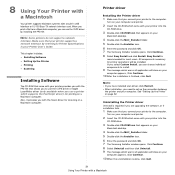
... to Printer Specifications in USB interface or 10/100 Base-TX network interface card. Uninstalling the Printer driver Uninstall is done, click Quit. 31 Using Your Printer with a Macintosh Click Continue 8 Select Uninstall and then click Uninstall. 9 The message which warns all application will close on your Macintosh desktop. 4 Double-click the MAC_Installer folder. 5 Double-click the Installer icon. 6 Enter the password and click OK. 7 The Samsung Installer window opens...
... to Printer Specifications in USB interface or 10/100 Base-TX network interface card. Uninstalling the Printer driver Uninstall is done, click Quit. 31 Using Your Printer with a Macintosh Click Continue 8 Select Uninstall and then click Uninstall. 9 The message which warns all application will close on your Macintosh desktop. 4 Double-click the MAC_Installer folder. 5 Double-click the Installer icon. 6 Enter the password and click OK. 7 The Samsung Installer window opens...


