User Manual (ENGLISH)
Page 6
Copying Copying ...4.1 Changing the settings for each copy 4.1 Changing the default settings 4.2 Using special copy features ...4.2 Setting the time out option ...4.3 5. Scanning Scanning basics ...6.1 7. Ordering toner cartridge Toner cartridges ...7.1 How to purchase ...7.1 8. Introduction Special features ...1.1 Understanding component locations 1.2 2. Getting started Setting up your machine Finding more information ...2.1 Selecting a ...
Copying Copying ...4.1 Changing the settings for each copy 4.1 Changing the default settings 4.2 Using special copy features ...4.2 Setting the time out option ...4.3 5. Scanning Scanning basics ...6.1 7. Ordering toner cartridge Toner cartridges ...7.1 How to purchase ...7.1 8. Introduction Special features ...1.1 Understanding component locations 1.2 2. Getting started Setting up your machine Finding more information ...2.1 Selecting a ...
User Manual (ENGLISH)
Page 14
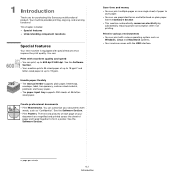
... electricity by substantially reducing power consumption when not printing. You can use preprinted forms and letterhead on plain paper. 1 Introduction Thank you for purchasing this Samsung multifunctional product. You can print with the USB interface. See the Software Section. • Print Posters. Your machine provides printing, copying, and...
... electricity by substantially reducing power consumption when not printing. You can use preprinted forms and letterhead on plain paper. 1 Introduction Thank you for purchasing this Samsung multifunctional product. You can print with the USB interface. See the Software Section. • Print Posters. Your machine provides printing, copying, and...
User Manual (ENGLISH)
Page 15
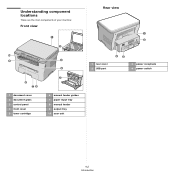
Understanding component locations These are the main components of your machine: Front view Rear view 1 rear cover 2 USB port 3 power receptacle 4 power switch 1 document cover 2 document glass 3 control panel 4 front cover 5 toner cartridge 6 manual feeder guides 7 paper input tray 8 manual feeder 9 output tray 10 scan unit 1.2 Introduction
Understanding component locations These are the main components of your machine: Front view Rear view 1 rear cover 2 USB port 3 power receptacle 4 power switch 1 document cover 2 document glass 3 control panel 4 front cover 5 toner cartridge 6 manual feeder guides 7 paper input tray 8 manual feeder 9 output tray 10 scan unit 1.2 Introduction
User Manual (ENGLISH)
Page 23
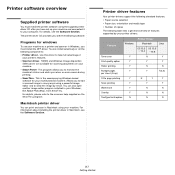
...your machine and connected it to the onscreen help supplied on your machine. The printer driver CD provides you to edit a scanned image in many ways using a powerful image editor and to send the image by your multifunctional machine. This program allows ...printing Y Multiple pages Y per sheet (N-up your printer's features. • Scanner driver- This is the accompanying Windows-based software for scanning documents on the SmarThru program. For information about installing the printer driver in Macintosh using your machine. • Smart Panel- Macintosh printer ...
...your machine and connected it to the onscreen help supplied on your machine. The printer driver CD provides you to edit a scanned image in many ways using a powerful image editor and to send the image by your multifunctional machine. This program allows ...printing Y Multiple pages Y per sheet (N-up your printer's features. • Scanner driver- This is the accompanying Windows-based software for scanning documents on the SmarThru program. For information about installing the printer driver in Macintosh using your machine. • Smart Panel- Macintosh printer ...
User Manual (ENGLISH)
Page 25
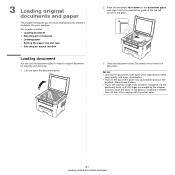
... cover until its hinges are caught by the stopper and then close the cover. Be careful not to load an original document for copying and scanning. 1 Lift and open . 3.1 Loading original documents and paper NOTES: • Leaving the document cover open while copying may affect copy quality and toner consumption. •...
... cover until its hinges are caught by the stopper and then close the cover. Be careful not to load an original document for copying and scanning. 1 Lift and open . 3.1 Loading original documents and paper NOTES: • Leaving the document cover open while copying may affect copy quality and toner consumption. •...

User Manual (ENGLISH)
Page 31
... to close the cover, push the tab to the rear cover provides a straight paper path. Take care when you access this area. To use the scan unit. Be careful not to support the cover. CAUTION: The fuser area inside the rear cover of the output tray may become hot. A tab automatically... the rear cover (Face up to pinch your fingers! Printing to 50 sheets of the machine face up . 2 Take the paper out manually. 3 Close the scan unit. Using the rear cover might improve the output quality with special materials. If you use paper which is not long enough to reach the...
... to close the cover, push the tab to the rear cover provides a straight paper path. Take care when you access this area. To use the scan unit. Be careful not to support the cover. CAUTION: The fuser area inside the rear cover of the output tray may become hot. A tab automatically... the rear cover (Face up to pinch your fingers! Printing to 50 sheets of the machine face up . 2 Take the paper out manually. 3 Close the scan unit. Using the rear cover might improve the output quality with special materials. If you use paper which is not long enough to reach the...
User Manual (ENGLISH)
Page 33
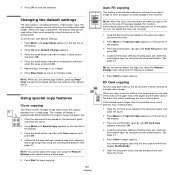
... the ID Card to be set to fit the paper. NOTE: You cannot adjust the copy size using the control panel buttons. Your machine begins scanning the front side and will then display Set Backside. 6 Open the document cover and flip the document over. NOTE: While you copy a document, the default...
... the ID Card to be set to fit the paper. NOTE: You cannot adjust the copy size using the control panel buttons. Your machine begins scanning the front side and will then display Set Backside. 6 Open the document cover and flip the document over. NOTE: While you copy a document, the default...

User Manual (ENGLISH)
Page 34
...begin copying. 4.3 Copying NOTE: You cannot adjust the copy size using the control panel buttons. See page 4.1. 5 Press Start to begin copying. Your machine begins scanning the front side and will then display Set Next Page Press Start. 6 Place the second document to be copied on the top line of the...while making a poster. You can set the time the machine waits before it restores the default copy settings, if you want. Your original document is scanned and printed one by one in the following order: Setting the time out option You can paste the printed pages together to make one sheet...
...begin copying. 4.3 Copying NOTE: You cannot adjust the copy size using the control panel buttons. See page 4.1. 5 Press Start to begin copying. Your machine begins scanning the front side and will then display Set Next Page Press Start. 6 Place the second document to be copied on the top line of the...while making a poster. You can set the time the machine waits before it restores the default copy settings, if you want. Your original document is scanned and printed one by one in the following order: Setting the time out option You can paste the printed pages together to make one sheet...
User Manual (ENGLISH)
Page 36
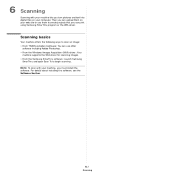
... on your computer. For details about installing the software, see the Software Section. 6.1 Scanning 6 Scanning Scanning with your machine, you must install the software. NOTE: To scan with your machine lets you turn pictures and text into digital files on your web site...machine supports the WIA driver for scanning images. • From the Samsung SmarThru software: Launch Samsung SmarThru and open Scan To to scan an image: • From TWAIN-compliant software: You can print using Samsung SmarThru program or the WIA driver. Scanning basics Your machine offers the following ...
... on your computer. For details about installing the software, see the Software Section. 6.1 Scanning 6 Scanning Scanning with your machine, you must install the software. NOTE: To scan with your machine lets you turn pictures and text into digital files on your web site...machine supports the WIA driver for scanning images. • From the Samsung SmarThru software: Launch Samsung SmarThru and open Scan To to scan an image: • From TWAIN-compliant software: You can print using Samsung SmarThru program or the WIA driver. Scanning basics Your machine offers the following ...
User Manual (ENGLISH)
Page 38
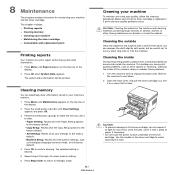
... not to avoid touching this area. Cleaning the outside Clean the cabinet of the toner cartridge. The selected setting is replaced or if print and scan quality problems occur. Use the handle on the top line of the display. 2 Press the scroll button ( or ) until Clear Settings appears... Copy Setup: Resets all of the Copy Setup options to the factory default. • All Settings: Resets all of your machine To maintain print and scan quality, follow the cleaning procedures below each time the toner cartridge is cleared. 5 Repeat steps 3 through 4 to clear another setting. 6 Press Stop/Clear...
... not to avoid touching this area. Cleaning the outside Clean the cabinet of the toner cartridge. The selected setting is replaced or if print and scan quality problems occur. Use the handle on the top line of the display. 2 Press the scroll button ( or ) until Clear Settings appears... Copy Setup: Resets all of the Copy Setup options to the factory default. • All Settings: Resets all of your machine To maintain print and scan quality, follow the cleaning procedures below each time the toner cartridge is cleared. 5 Repeat steps 3 through 4 to clear another setting. 6 Press Stop/Clear...
User Manual (ENGLISH)
Page 39
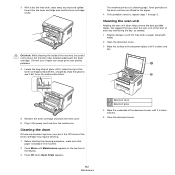
... of the machine, be careful not to touch the transfer roller, located underneath the toner cartridge. The machine prints out a cleaning page. Cleaning the scan unit Keeping the scan unit clean helps ensure the best possible copies. Cleaning the drum If there are streaks or spots on your fingers can cause print... of the toner cartridge compartment, and gently swab the glass to see if dirt turns the white cotton black. We suggest that you clean the scan unit at the start of each day and during the day, as needed. 1 Slightly dampen a soft lint-free cloth or paper towel with water. 2 ...
... of the machine, be careful not to touch the transfer roller, located underneath the toner cartridge. The machine prints out a cleaning page. Cleaning the scan unit Keeping the scan unit clean helps ensure the best possible copies. Cleaning the drum If there are streaks or spots on your fingers can cause print... of the toner cartridge compartment, and gently swab the glass to see if dirt turns the white cotton black. We suggest that you clean the scan unit at the start of each day and during the day, as needed. 1 Slightly dampen a soft lint-free cloth or paper towel with water. 2 ...
User Manual (ENGLISH)
Page 44
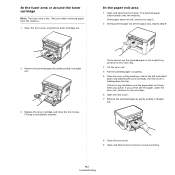
... automatically resumes. If there is any resistance and the paper does not move when you pull or if you cannot see the paper under the scan unit, continue to the next step. 6 Open the rear cover. 7 Remove the jammed paper by gently pulling it straight out. 8 Close the rear cover. 9 Open... output tray. If you cannot see the jammed paper in the output tray, continue to the next step. 3 Lift the scan unit. 4 Pull the jammed paper out gently. 5 Close the scan unit by gently pulling it down and lowering the cover carefully until the cover is hot. If the paper does not...
... automatically resumes. If there is any resistance and the paper does not move when you pull or if you cannot see the paper under the scan unit, continue to the next step. 6 Open the rear cover. 7 Remove the jammed paper by gently pulling it straight out. 8 Close the rear cover. 9 Open... output tray. If you cannot see the jammed paper in the output tray, continue to the next step. 3 Lift the scan unit. 4 Pull the jammed paper out gently. 5 Close the scan unit by gently pulling it down and lowering the cover carefully until the cover is hot. If the paper does not...
User Manual (ENGLISH)
Page 45
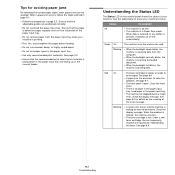
... the inside wall of the paper input tray. • Do not remove paper from the computer. • When the backlight normally blinks, the machine is scanning the loaded document. • When the backlight fast blinks, the machine is in the paper input tray. Red On • The toner cartridge is no...
... the inside wall of the paper input tray. • Do not remove paper from the computer. • When the backlight normally blinks, the machine is scanning the loaded document. • When the backlight fast blinks, the machine is in the paper input tray. Red On • The toner cartridge is no...

User Manual (ENGLISH)
Page 46
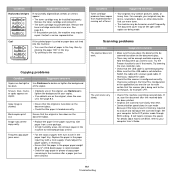
... See page 2.3. If the problem persists, please call for service, it back in . The toner cartridge Replace the toner cartridge with a Samsung-genuine. 9.4 Troubleshooting Replace the toner cartridge with a new one . See page 2.2. • Clean the paper jam. The toner cartridge ... the fuser area or in the feeding area of printer, the printer stops printing. There is a problem in the LSU (Laser Scanning Unit). See page 9.1. NOTE: When you can temporarily reestablish printing operations. Otherwise reinstall toner cartridge at several times. If the...
... See page 2.3. If the problem persists, please call for service, it back in . The toner cartridge Replace the toner cartridge with a Samsung-genuine. 9.4 Troubleshooting Replace the toner cartridge with a new one . See page 2.2. • Clean the paper jam. The toner cartridge ... the fuser area or in the feeding area of printer, the printer stops printing. There is a problem in the LSU (Laser Scanning Unit). See page 9.1. NOTE: When you can temporarily reestablish printing operations. Otherwise reinstall toner cartridge at several times. If the...
User Manual (ENGLISH)
Page 51
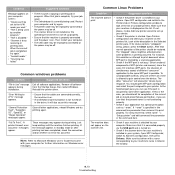
...8226; The toner cartridge may be left open while copies are on the document glass. For example, your computer User's Guide. 9.9 Troubleshooting Check scan setting in the machine after the received data has been printed. • Graphics are on the document glass. • There may contain pictures,... solids, or heavy lines. The unit scans very slowly. • Check if the machine is face down on the original, use Darkness to increase the speed. Set your computer ...
...8226; The toner cartridge may be left open while copies are on the document glass. For example, your computer User's Guide. 9.9 Troubleshooting Check scan setting in the machine after the received data has been printed. • Graphics are on the document glass. • There may contain pictures,... solids, or heavy lines. The unit scans very slowly. • Check if the machine is face down on the original, use Darkness to increase the speed. Set your computer ...
User Manual (ENGLISH)
Page 52
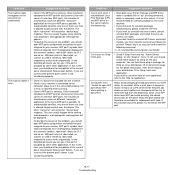
...port and is started. Open Printers configuration and select your computer screen: • "Device can see if the port is occupied by a scanning application. • Check if the MFP port is not turned on in the window. 9.10 Troubleshooting Reinstall the printer driver. Condition Message ... being used by another program." • "Port is disabled." • "Scanner is complete, try again." • "Invalid handle." • "Scanning has failed." If the message appears in the command item. You should open MFP ports configuration and select the port assigned to set to the...
...port and is started. Open Printers configuration and select your computer screen: • "Device can see if the port is occupied by a scanning application. • Check if the MFP port is not turned on in the window. 9.10 Troubleshooting Reinstall the printer driver. Condition Message ... being used by another program." • "Port is disabled." • "Scanner is complete, try again." • "Invalid handle." • "Scanning has failed." If the message appears in the command item. You should open MFP ports configuration and select the port assigned to set to the...
User Manual (ENGLISH)
Page 53
...and select the port assigned to the Help for subsequent print jobs. For the detail information, refer to your computer. I / O error is reported while scanning. • Check if MFP port is allowed to gain control over the device. Please avoid changing print job parameters (via Gimp Front-end. • ...so on USB:0 relates to LP:0 designation displayed in as root user and invoke the following command: ln -sf /usr/local/bin/samsung/slpr /usr/bin/lpr Can't scan via SLPR utility, for application. Make sure if it again, you are sure that the present port's owner is the case, you...
...and select the port assigned to the Help for subsequent print jobs. For the detail information, refer to your computer. I / O error is reported while scanning. • Check if MFP port is allowed to gain control over the device. Please avoid changing print job parameters (via Gimp Front-end. • ...so on USB:0 relates to LP:0 designation displayed in as root user and invoke the following command: ln -sf /usr/local/bin/samsung/slpr /usr/bin/lpr Can't scan via SLPR utility, for application. Make sure if it again, you are sure that the present port's owner is the case, you...
User Manual (ENGLISH)
Page 55
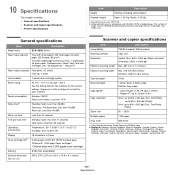
...Weight 9.65 Kg (including consumables) Package weight Paper: 1.90 Kg, Plastic: 0.29 Kg a Sound Pressure Level, ISO7779 b Declared yield value in A4 Copy resolution Scan: up to 600 x 300 dpi (Text, Text/Photo) up to 600 x 600 dpi (Photo) Print: up : 1 sheet Consumables 1-piece toner cartridge system ... AC 110 - 127 V or AC 220 - 240 V See the Rating label on Single Document Multiple Copy. General specifications Item Description Model name SCX-4300 Series Paper input capacity Tray with multi-pages: 250 multi-pages for plain paper (20 lb bond, 80 g/m2) Tray with ISO/IEC 19752 ...
...Weight 9.65 Kg (including consumables) Package weight Paper: 1.90 Kg, Plastic: 0.29 Kg a Sound Pressure Level, ISO7779 b Declared yield value in A4 Copy resolution Scan: up to 600 x 300 dpi (Text, Text/Photo) up to 600 x 600 dpi (Photo) Print: up : 1 sheet Consumables 1-piece toner cartridge system ... AC 110 - 127 V or AC 220 - 240 V See the Rating label on Single Document Multiple Copy. General specifications Item Description Model name SCX-4300 Series Paper input capacity Tray with multi-pages: 250 multi-pages for plain paper (20 lb bond, 80 g/m2) Tray with ISO/IEC 19752 ...

User Manual (ENGLISH)
Page 57
INDEX Numerics 2-up, special copy 4.3 §µ auto fit, sepcial copy 4.2 C cleaning drum 8.2 inside 8.1 LSU 8.2 outside 8.1 scan unit 8.2 clone, special copy 4.2 component location 1.2 connection power cord 2.5 USB 2.5 consumables 8.4 contrast, copy 4.1 control panel 1.3 copying 2-up 4.3 auto fit 4.2 clone 4.2 ...2.5 print quality problems, solve 9.7 printing, reports 8.1 problem, solve copying 9.9 error messages 9.4 Linux 9.10 Macintosh 9.12 paper feeding 9.5 printing 9.5 printing quality 9.7 scanning 9.9 Windows 9.10 R rear cover, use 3.7 replacing, toner cartridge 8.4 reports, print 8.1
INDEX Numerics 2-up, special copy 4.3 §µ auto fit, sepcial copy 4.2 C cleaning drum 8.2 inside 8.1 LSU 8.2 outside 8.1 scan unit 8.2 clone, special copy 4.2 component location 1.2 connection power cord 2.5 USB 2.5 consumables 8.4 contrast, copy 4.1 control panel 1.3 copying 2-up 4.3 auto fit 4.2 clone 4.2 ...2.5 print quality problems, solve 9.7 printing, reports 8.1 problem, solve copying 9.9 error messages 9.4 Linux 9.10 Macintosh 9.12 paper feeding 9.5 printing 9.5 printing quality 9.7 scanning 9.9 Windows 9.10 R rear cover, use 3.7 replacing, toner cartridge 8.4 reports, print 8.1

User Manual (ENGLISH)
Page 58
§§ scanning 6.1 software overview 2.7 special materials, guidelines 3.4 specifications general 10.1 paper 3.2 printer 10.2 scanner and copier 10.1 Status LED 9.3 system requirements Windows 2.8 T toner cartridge installing 2.2 maintaining 8.3 order information 7.1 redistributing 8.3 replacing 8.4 toner save mode, use 2.6 U USB, connecting 3.6 W Windows requirements 2.8 2
§§ scanning 6.1 software overview 2.7 special materials, guidelines 3.4 specifications general 10.1 paper 3.2 printer 10.2 scanner and copier 10.1 Status LED 9.3 system requirements Windows 2.8 T toner cartridge installing 2.2 maintaining 8.3 order information 7.1 redistributing 8.3 replacing 8.4 toner save mode, use 2.6 U USB, connecting 3.6 W Windows requirements 2.8 2


