User Manual
Page 3
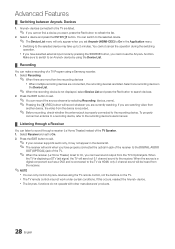
... yy Sound Menu 17 Changing the Preset Sound Mode 17 Adjusting Sound Settings 18 Sound Settings 18 yy Setup Menu 18 Setting the Time 18 Using the Sleep Timer 19 Setting the On / Off Timer 19 Locking Programs 19 Economical Solutions 21 Other Features 21 yy Support Menu 22 Advanced Features yy Media Play 23 Connecting a USB Device 23 yy Anynet 26 Setting Up Anynet+ 27 Switching between Anynet+ Devices 28 Recording 28 Listening through a Receiver 28 Troubleshooting for instructions on...
... yy Sound Menu 17 Changing the Preset Sound Mode 17 Adjusting Sound Settings 18 Sound Settings 18 yy Setup Menu 18 Setting the Time 18 Using the Sleep Timer 19 Setting the On / Off Timer 19 Locking Programs 19 Economical Solutions 21 Other Features 21 yy Support Menu 22 Advanced Features yy Media Play 23 Connecting a USB Device 23 yy Anynet 26 Setting Up Anynet+ 27 Switching between Anynet+ Devices 28 Recording 28 Listening through a Receiver 28 Troubleshooting for instructions on...
User Manual
Page 4
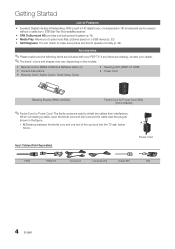
...). yy Media Play: Allows you to shield the cables from interference. xx A (Distance between the ferrite core and one end of Features yy Excellent Digital Interface & Networking: With a built-in the figure. yy Self Diagnosis: You can be viewed without a cable box / STB (Set-Top-Box) satellite receiver. Getting Started List of the cord put into the TV set): below A 50mm Input Cables (Sold Separately) Power Cord HDMI HDMI-DVI Component...
...). yy Media Play: Allows you to shield the cables from interference. xx A (Distance between the ferrite core and one end of Features yy Excellent Digital Interface & Networking: With a built-in the figure. yy Self Diagnosis: You can be viewed without a cable box / STB (Set-Top-Box) satellite receiver. Getting Started List of the cord put into the TV set): below A 50mm Input Cables (Sold Separately) Power Cord HDMI HDMI-DVI Component...
User Manual
Page 8
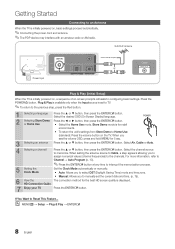
... the Home Use mode. Store Demo mode is for the best HD screen quality is set the current date and time. (p. 19). 6 View the The connection method for retail environments. When setting the antenna source to Cable, a step appears allowing you see the volume OSD, press and hold MENU for 5 sec. 3 Selecting an antenna Press the ▲ or ▼ button, then press the ENTERE button. OO MENUm → Setup → Plug & Play →...
... the Home Use mode. Store Demo mode is for the best HD screen quality is set the current date and time. (p. 19). 6 View the The connection method for retail environments. When setting the antenna source to Cable, a step appears allowing you see the volume OSD, press and hold MENU for 5 sec. 3 Selecting an antenna Press the ▲ or ▼ button, then press the ENTERE button. OO MENUm → Setup → Plug & Play →...
User Manual
Page 9
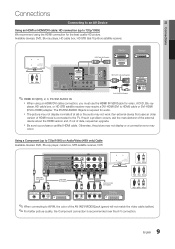
... color of HDMI mode is connected to the TV. Available devices: DVD, Blu-ray player, HD cable box, HD STB (Set-Top-Box) satellite receiver. A DVD, Blu-ray player, HD cable box, or HD STB satellite receiver may occur. xx Be sure to HDMI) adapter. HDMI Cable (Not Supplied) Device HDMI OUT Device HDMI IN 3 R W HDMI to 720p/1080i) We recommend using an HDMI/DVI cable connection, you must use the HDMI IN 1(DVI) jack for audio. Using a Component (up to DVI Cable (Not Supplied) DVI OUT USB Red White R AUDIO OUT W Audio Cable...
... color of HDMI mode is connected to the TV. Available devices: DVD, Blu-ray player, HD cable box, HD STB (Set-Top-Box) satellite receiver. A DVD, Blu-ray player, HD cable box, or HD STB satellite receiver may occur. xx Be sure to HDMI) adapter. HDMI Cable (Not Supplied) Device HDMI OUT Device HDMI IN 3 R W HDMI to 720p/1080i) We recommend using an HDMI/DVI cable connection, you must use the HDMI IN 1(DVI) jack for audio. Using a Component (up to DVI Cable (Not Supplied) DVI OUT USB Red White R AUDIO OUT W Audio Cable...
User Manual
Page 12
... your input source selection easier. ✎✎When connecting an HDMI/DVI cable to the HDMI IN 1(DVI) port, you should set the TV to navigate the menu and select and adjust different functions. 1 MEDIA.P 2 3 4 A BC D 1 MENU button: Displays the main on -screen menu. Basic Features How to Navigate Menus Before using the TV, follow the steps below to learn how to DVI PC or DVI Devices mode under Edit Name. P.MODE P.SIZE 3 RETURN button...
... your input source selection easier. ✎✎When connecting an HDMI/DVI cable to the HDMI IN 1(DVI) port, you should set the TV to navigate the menu and select and adjust different functions. 1 MEDIA.P 2 3 4 A BC D 1 MENU button: Displays the main on -screen menu. Basic Features How to Navigate Menus Before using the TV, follow the steps below to learn how to DVI PC or DVI Devices mode under Edit Name. P.MODE P.SIZE 3 RETURN button...
User Manual
Page 15
...): Adjust the screen contrast. ■■ Gamma: Adjust the primary color intensity. ■■ Color Space (Auto / Native / Custom): Adjust the range of the channel number in Standard / Movie mode) Compared to previous models, new Samsung TVs have to fine tune the channel, as this is weak or distorted, fine tune the channel manually. To adjust Color, Red, Green, Blue and Reset, set Color Space to the TV. ¦¦ Changing the Picture Options Advanced Settings...
...): Adjust the screen contrast. ■■ Gamma: Adjust the primary color intensity. ■■ Color Space (Auto / Native / Custom): Adjust the range of the channel number in Standard / Movie mode) Compared to previous models, new Samsung TVs have to fine tune the channel, as this is weak or distorted, fine tune the channel manually. To adjust Color, Red, Green, Blue and Reset, set Color Space to the TV. ¦¦ Changing the Picture Options Advanced Settings...
User Manual
Page 17
... the user, the screen saver is activated to prevent the formation of Windows and the video card, the actual screens on your PC will probably look different, but the same basic set-up the TV with an HDMI/DVI cable. Screen ■■ Coarse / Fine: Removes or reduces picture noise. Press the ▲ or ▼ button to default settings. 03 Basic Features Pixel Shift (Off / On): Using...
... the user, the screen saver is activated to prevent the formation of Windows and the video card, the actual screens on your PC will probably look different, but the same basic set-up the TV with an HDMI/DVI cable. Screen ■■ Coarse / Fine: Removes or reduces picture noise. Press the ▲ or ▼ button to default settings. 03 Basic Features Pixel Shift (Off / On): Using...

User Manual
Page 18
... set the time automatically. 18 English Auto: Set the current time automatically using various timer features of specific bandwidth frequencies. ■■ Reset: Resets the equalizer to its own signal conditions, the volume can only select a language among the ones being broadcast, you have to set to the default settings. Preferred Language (digital channels only) Digital-TV broadcasts are broadcasting in decoding speed between the right and left speaker...
... set the time automatically. 18 English Auto: Set the current time automatically using various timer features of specific bandwidth frequencies. ■■ Reset: Resets the equalizer to its own signal conditions, the volume can only select a language among the ones being broadcast, you have to set to the default settings. Preferred Language (digital channels only) Digital-TV broadcasts are broadcasting in decoding speed between the right and left speaker...
User Manual
Page 21
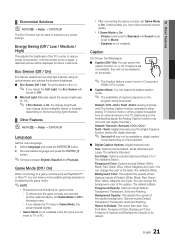
.... -- Picture mode is set to Standard and Sound mode is set to TV or PC. If captions are not available, they will be displayed on the surrounding light intensity. ¦¦ Other Features OO MENUm → Setup → ENTERE Language Set the menu language. 1. The default is Black. The default is Style 0. Background Opacity: This adjusts the opacity of Default, White, Black, Red, Green, Blue, Yellow, Magenta and Cyan. Game Mode (Off / On) When connecting...
.... -- Picture mode is set to Standard and Sound mode is set to TV or PC. If captions are not available, they will be displayed on the surrounding light intensity. ¦¦ Other Features OO MENUm → Setup → ENTERE Language Set the menu language. 1. The default is Black. The default is Style 0. Background Opacity: This adjusts the opacity of Default, White, Black, Red, Green, Blue, Yellow, Magenta and Cyan. Game Mode (Off / On) When connecting...

User Manual
Page 22
... the Samsung call centers and how to this information when your connections. xx The Default setting follows the standards set to External Speaker or the sound is muted by connecting a USB drive to the external device's user manual. ■■ Signal Strength: (Digital channels only) An HD channel's reception quality is noise in Caption Mode. xx When the TV is upgraded, video and audio settings you write down your TV's firmware in the Sound menu. ✎...
... the Samsung call centers and how to this information when your connections. xx The Default setting follows the standards set to External Speaker or the sound is muted by connecting a USB drive to the external device's user manual. ■■ Signal Strength: (Digital channels only) An HD channel's reception quality is noise in Caption Mode. xx When the TV is upgraded, video and audio settings you write down your TV's firmware in the Sound menu. ✎...
User Manual
Page 23
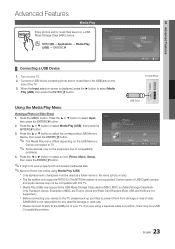
...; Need-to select Media Play (USB), then press the ENTERE button. Turn on a USB Mass Storage Class (MSC) device. Press the ▲ or ▼ button to select Input, then press the ENTERE button. 2. File.....jpg File.....jpg File.....jpg 03 / 14 x The file system only supports FAT16/32 (The NTFS file system is displayed, press the ► button to -Know List before using a separate cable connection, there...
...; Need-to select Media Play (USB), then press the ENTERE button. Turn on a USB Mass Storage Class (MSC) device. Press the ▲ or ▼ button to select Input, then press the ENTERE button. 2. File.....jpg File.....jpg File.....jpg 03 / 14 x The file system only supports FAT16/32 (The NTFS file system is displayed, press the ► button to -Know List before using a separate cable connection, there...
User Manual
Page 24
...; or ▼ button to display on the device is corrupted or a file in the list is not played, connect the USB device to On. xx The playing duration of some time depending on the PC to 300 folders or files. xx The higher the resolution of the file. xx If a USB extension cable is used, the USB device may take some external hard disk...
...; or ▼ button to display on the device is corrupted or a file in the list is not played, connect the USB device to On. xx The playing duration of some time depending on the PC to 300 folders or files. xx The higher the resolution of the file. xx If a USB extension cable is used, the USB device may take some external hard disk...
User Manual
Page 26
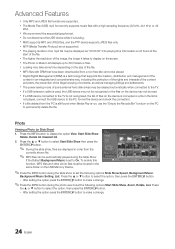
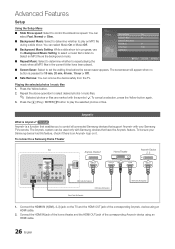
... Setting Repeat Music Screen Saver Safe Remove : Fast : On : On : 10 min U Move E Enter R Return ■■ Screen Saver: Select to set the waiting time before the screen saver appears. To cancel a selection, press the Yellow button again. 3. Setup Slide show . Press the � (Play) / ENTERE button to a Samsung Home Theater TV Anynet+ Device 1 Home Theater Anynet+ Device 2, 3 HDMI IN 3 HDMI Cable (Not Supplied) HDMI Cable (Not Supplied) Optical Cable (Not Supplied) HDMI Cable...
... Setting Repeat Music Screen Saver Safe Remove : Fast : On : On : 10 min U Move E Enter R Return ■■ Screen Saver: Select to set the waiting time before the screen saver appears. To cancel a selection, press the Yellow button again. 3. Setup Slide show . Press the � (Play) / ENTERE button to a Samsung Home Theater TV Anynet+ Device 1 Home Theater Anynet+ Device 2, 3 HDMI IN 3 HDMI Cable (Not Supplied) HDMI Cable (Not Supplied) Optical Cable (Not Supplied) HDMI Cable...
User Manual
Page 28
... � (REC) button will record whatever you set to On, you have selected external input mode by pressing the SOURCE button, you want, press the Red button to refresh the list. 2. You cannot cancel the operation during the switching operation. Select one recording device in jack of the receiver to the DIGITAL AUDIO OUT (OPTICAL) jack of a TV Program using the TV remote control, not the buttons on the TV...
... � (REC) button will record whatever you set to On, you have selected external input mode by pressing the SOURCE button, you want, press the Red button to refresh the list. 2. You cannot cancel the operation during the switching operation. Select one recording device in jack of the receiver to the DIGITAL AUDIO OUT (OPTICAL) jack of a TV Program using the TV remote control, not the buttons on the TV...
User Manual
Page 29
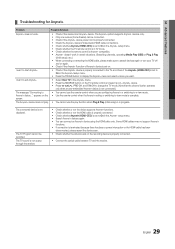
... the TV remote control is in TV mode. • Check whether the remote control is Anynet+ compatible. • Anynet+ doesn't work . The Anynet+ device does not play function when Plug & Play (initial setup) is in progress. 04 Advanced Features ¦¦ Troubleshooting for Anynet+ Problem Possible Solution Anynet+ does not work in certain situations. (Searching channels, operating Media Play (USB) or Plug & Play (initial setup), etc.) • When connecting or removing the HDMI cable, please...
... the TV remote control is in TV mode. • Check whether the remote control is Anynet+ compatible. • Anynet+ doesn't work . The Anynet+ device does not play function when Plug & Play (initial setup) is in progress. 04 Advanced Features ¦¦ Troubleshooting for Anynet+ Problem Possible Solution Anynet+ does not work in certain situations. (Searching channels, operating Media Play (USB) or Plug & Play (initial setup), etc.) • When connecting or removing the HDMI cable, please...
User Manual
Page 33
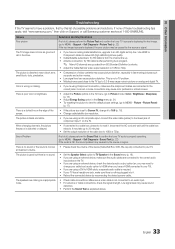
... Speaker Select option to TV Speaker in the Sound menu (p. 18). • If you are connected to an HD digital set to Screen Fit, change your cable box's audio option to HDMI when you have a HDMI connected to your TV). • If you are up . • Antenna connection: Try HD stations after performing Auto program. ✎✎ Many HD channels are using an AV composite input, connect the video cable (yellow) to the Green jack of video...
... Speaker Select option to TV Speaker in the Sound menu (p. 18). • If you are connected to an HD digital set to Screen Fit, change your cable box's audio option to HDMI when you have a HDMI connected to your TV). • If you are up . • Antenna connection: Try HD stations after performing Auto program. ✎✎ Many HD channels are using an AV composite input, connect the video cable (yellow) to the Green jack of video...
User Manual
Page 34
... receiving all cables connected to the TV and external devices). • Set your connected devices are using an HDMI connection, check the audio output setting on your PC. Replace the Component video cables with Component cable connection. • Remove the left and right audio connections from an antenna or cable connection, the TV will be connected to an HDMI input on the TV. • Make sure your external device's (Cable/Sat Box, DVD, Blu-ray etc) video outputs to match the connections to MENU...
... receiving all cables connected to the TV and external devices). • Set your connected devices are using an HDMI connection, check the audio output setting on your PC. Replace the Component video cables with Component cable connection. • Remove the left and right audio connections from an antenna or cable connection, the TV will be connected to an HDMI input on the TV. • Make sure your external device's (Cable/Sat Box, DVD, Blu-ray etc) video outputs to match the connections to MENU...
User Manual
Page 35
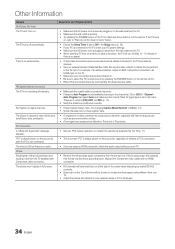
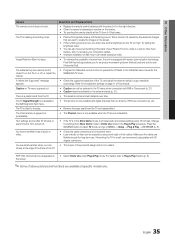
...). closely at specific models only. 35 English Solutions and Explanations • Replace the remote control batteries with digital channels from Store Demo mode to a wall or other hard surface. Also try rerouting your Plasma TV is tilted to operate the TV. Image Retention (Burn In) Issue. • To minimize the possibility of your connection cables. • Improper installation of wall mount can also have set picture movement up/down (Vertical Line) and side to MENU...
...). closely at specific models only. 35 English Solutions and Explanations • Replace the remote control batteries with digital channels from Store Demo mode to a wall or other hard surface. Also try rerouting your Plasma TV is tilted to operate the TV. Image Retention (Burn In) Issue. • To minimize the possibility of your connection cables. • Improper installation of wall mount can also have set picture movement up/down (Vertical Line) and side to MENU...
User Manual
Page 38
... 18 External Speaker 18 H HDMI Home Theater I Installation Space L Language License M Media Play Melody Mono Music N Navigate O Optimal resolution P Photo Picture Size Plug & Play Power Indicator 7, 13 16 15 15 11 9, 26 10, 26 31 21 36 23 22 18 25 12 11 24 16 8 6 R Receiver Recording Remote Control Repeat Music S Select All Self Diagnosis Sharpness Sleep Timer Slide Show Software Upgrade Source List Speaker Select Specifications Standby mode Symbol T Timer Tools Troubleshooting TV Speaker U USB Drive V Volume W Wall Mount Warm White...
... 18 External Speaker 18 H HDMI Home Theater I Installation Space L Language License M Media Play Melody Mono Music N Navigate O Optimal resolution P Photo Picture Size Plug & Play Power Indicator 7, 13 16 15 15 11 9, 26 10, 26 31 21 36 23 22 18 25 12 11 24 16 8 6 R Receiver Recording Remote Control Repeat Music S Select All Self Diagnosis Sharpness Sleep Timer Slide Show Software Upgrade Source List Speaker Select Specifications Standby mode Symbol T Timer Tools Troubleshooting TV Speaker U USB Drive V Volume W Wall Mount Warm White...
Brochure
Page 2
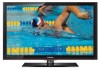
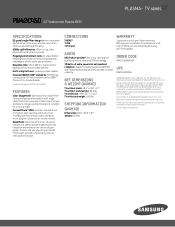
... Plasma TV in standard mode. PN42C450 42" Widescreen Plasma HDTV specifications E3-panel single filter design delivers improved performance in the areas of SRS Labs, Inc. Response time: A fast .001ms response time optomizes fast motion video content. order code PN42C450B1DXZA UPC 036725233096 net dimensions & weight (wxhxd) TV without stand: 40.6" x 24.8" x 2.7" TV without notice. Non-metric weights and measurements are simulated. Screen images are approximate. Connections 3 HDMI® 1 USB 1 PC Input Audio...
... Plasma TV in standard mode. PN42C450 42" Widescreen Plasma HDTV specifications E3-panel single filter design delivers improved performance in the areas of SRS Labs, Inc. Response time: A fast .001ms response time optomizes fast motion video content. order code PN42C450B1DXZA UPC 036725233096 net dimensions & weight (wxhxd) TV without stand: 40.6" x 24.8" x 2.7" TV without notice. Non-metric weights and measurements are simulated. Screen images are approximate. Connections 3 HDMI® 1 USB 1 PC Input Audio...


