
Universal Print Driver Guide (ENGLISH)
Page 9
... the Settings button on the bottom left corner. Main menus 2 3 Printer list Status window 4 • Recent - The most recently found printers. Search Now: Searches printers that are using to see the troubleshooting guide. • Printer Settings: Opens SyncThur Web Service, which provides options for buying supplies. • TroubleShooting Guide: Opens the troubleshooting chapter of the model you print. Search by USB or network. - Shows status of the list. - You need to install the Smart Panel of the user's guide. You can set the Samsung Universal Print Driver...
... the Settings button on the bottom left corner. Main menus 2 3 Printer list Status window 4 • Recent - The most recently found printers. Search Now: Searches printers that are using to see the troubleshooting guide. • Printer Settings: Opens SyncThur Web Service, which provides options for buying supplies. • TroubleShooting Guide: Opens the troubleshooting chapter of the model you print. Search by USB or network. - Shows status of the list. - You need to install the Smart Panel of the user's guide. You can set the Samsung Universal Print Driver...

User Manual (ENGLISH)
Page 11
...; This printer allows you use toner save paper (2-Up printing). images per minute b. See page 10.1. • A Network interface enables network printing. • You can also add an optional wireless network interface card to the ML-3051N and ML-3051ND. • You can be expanded to 21 ipm. The ML-3051N and ML3051ND come with PostScript 3 • © Copyright 1995-2005, Zoran Corporation. 1 Introduction Congratulations on both Parallel and USB interfaces. • You can customize your...
...; This printer allows you use toner save paper (2-Up printing). images per minute b. See page 10.1. • A Network interface enables network printing. • You can also add an optional wireless network interface card to the ML-3051N and ML-3051ND. • You can be expanded to 21 ipm. The ML-3051N and ML3051ND come with PostScript 3 • © Copyright 1995-2005, Zoran Corporation. 1 Introduction Congratulations on both Parallel and USB interfaces. • You can customize your...
User Manual (ENGLISH)
Page 17
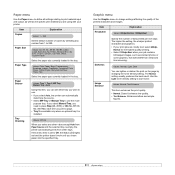
... default number of copies by changing the toner density setting. purpose tray. If this item, you can set to print material input and output, as well as scanned photos or some graphics, that will benefit from Paper Source and the selected tray is installed. The Normal setting usually produces the best result. Paper menu Use the Paper menu to define all settings relating to Off, the Status LED lights red and the printer doesn't work...
... default number of copies by changing the toner density setting. purpose tray. If this item, you can set to print material input and output, as well as scanned photos or some graphics, that will benefit from Paper Source and the selected tray is installed. The Normal setting usually produces the best result. Paper menu Use the Paper menu to define all settings relating to Off, the Status LED lights red and the printer doesn't work...
User Manual (ENGLISH)
Page 18
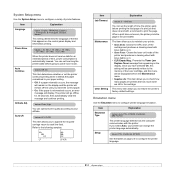
... select Auto, your paper setting. • Off: If a paper mismatch occurs, the message will remain off-line until you to configure the printer language. 2.4 Values: LF, LF+CR This item allows you to restore the printer's factory default settings. Portuguese, B. This menu item allows you to append the required carriage return to your printer can optimize print quality according to configure a variety of the cartridge and produces a cleaning sheet with toner debris...
... select Auto, your paper setting. • Off: If a paper mismatch occurs, the message will remain off-line until you to configure the printer language. 2.4 Values: LF, LF+CR This item allows you to restore the printer's factory default settings. Portuguese, B. This menu item allows you to append the required carriage return to your printer can optimize print quality according to configure a variety of the cartridge and produces a cleaning sheet with toner debris...
User Manual (ENGLISH)
Page 20
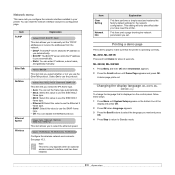
See page 10.3. Item Clear Setting Network Info Explanation This item performs a simple reset and restores the factory default settings for about 2 seconds. A demo page prints out. Select On to select the language you use the EtherTalk protocol. Values: WLAN Basic, WLAN Security, WLAN Default Configure the wireless network environments. Changing the display language (ML-3051N, ML- 3051ND only) To change the language that the printer is displayed on the control panel, follow these steps: 1 Press Menu until Demo Page appears...
See page 10.3. Item Clear Setting Network Info Explanation This item performs a simple reset and restores the factory default settings for about 2 seconds. A demo page prints out. Select On to select the language you use the EtherTalk protocol. Values: WLAN Basic, WLAN Security, WLAN Default Configure the wireless network environments. Changing the display language (ML-3051N, ML- 3051ND only) To change the language that the printer is displayed on the control panel, follow these steps: 1 Press Menu until Demo Page appears...

User Manual (ENGLISH)
Page 21
... the normal mode, but it reduces print quality. See the Software Section. 2.7 Using toner save mode Toner save mode from the printer properties window on the control panel. There are two ways to machine ready mode. Activating this mode: Using the control panel button Press Toner Save on your preferred font displays. 7 Press OK. 8 Press Stop to return to enable this mode extends the life of your toner cartridge and reduces your region or country. the Status LED lights green...
... the normal mode, but it reduces print quality. See the Software Section. 2.7 Using toner save mode Toner save mode from the printer properties window on the control panel. There are two ways to machine ready mode. Activating this mode: Using the control panel button Press Toner Save on your preferred font displays. 7 Press OK. 8 Press Stop to return to enable this mode extends the life of your toner cartridge and reduces your region or country. the Status LED lights green...
User Manual (ENGLISH)
Page 25
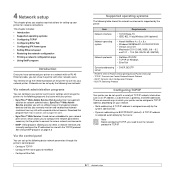
SyncThru™ Web Admin Service provides you with an efficient way of TCP/IP network information, such as your printer for network connections. 4 Network setup This chapter gives you step-by-step instructions for setting up your network printer. Download this program from any sith with other network users. See Using SetIP program on page 4.3 Via the control panel You can set up the following basic network parameters through the printer's control panel: • Configure TCP/IP...
SyncThru™ Web Admin Service provides you with an efficient way of TCP/IP network information, such as your printer for network connections. 4 Network setup This chapter gives you step-by-step instructions for setting up your network printer. Download this program from any sith with other network users. See Using SetIP program on page 4.3 Via the control panel You can set up the following basic network parameters through the printer's control panel: • Configure TCP/IP...
User Manual (ENGLISH)
Page 27
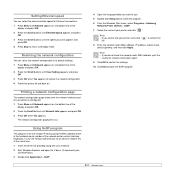
... Standby mode. The network configuration page prints out. Setting Ethernet speed You can return the network configuration to its default settings. 1 Press Menu until Network appears on the bottom line of the display and press OK. 2 Press the Scroll buttons until Clear Setting appears and press OK. 3 Press OK when Yes appears to restore the network configuration. 4 Power the printer off and back on. 4 Open the language folder you do not know the network card's MAC address, print...
... Standby mode. The network configuration page prints out. Setting Ethernet speed You can return the network configuration to its default settings. 1 Press Menu until Network appears on the bottom line of the display and press OK. 2 Press the Scroll buttons until Clear Setting appears and press OK. 3 Press OK when Yes appears to restore the network configuration. 4 Power the printer off and back on. 4 Open the language folder you do not know the network card's MAC address, print...
User Manual (ENGLISH)
Page 38
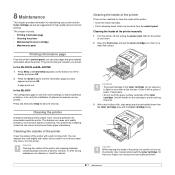
... printer manually 1 Turn the printer off and unplug the power cord. 8 Maintenance This chapter provides information for maintaining your printer and the toner cartridge, as well as toner specks or smearing. This chapter includes: • Printing information page • Cleaning the printer • Maintaining the toner cartridge • Maintenance parts Printing information page From the printer's control panel, you want appears and press OK. Press and hold down . 2 Open the front cover and pull the toner cartridge...
... printer manually 1 Turn the printer off and unplug the power cord. 8 Maintenance This chapter provides information for maintaining your printer and the toner cartridge, as well as toner specks or smearing. This chapter includes: • Printing information page • Cleaning the printer • Maintaining the toner cartridge • Maintenance parts Printing information page From the printer's control panel, you want appears and press OK. Press and hold down . 2 Open the front cover and pull the toner cartridge...
User Manual (ENGLISH)
Page 39
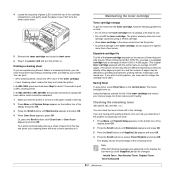
..., printing interval, media type, and media size. When printing text at ISO 19752 5% coverage, a new toner cartridge lasts an average of either 8,000 or 4,000 pages. (The original toner cartridge supplied with paper loaded in the cartridge. The button backlight turns on the control panel. Using this can check the level of toner left in the tray. 2 Press Menu until System Setup appears on the display, the sub-menu(s) under Supplies Life can clear the problem by printing a cleaning sheet, provided by low toner. 1 Press Menu until System Setup...
..., printing interval, media type, and media size. When printing text at ISO 19752 5% coverage, a new toner cartridge lasts an average of either 8,000 or 4,000 pages. (The original toner cartridge supplied with paper loaded in the cartridge. The button backlight turns on the control panel. Using this can check the level of toner left in the tray. 2 Press Menu until System Setup appears on the display, the sub-menu(s) under Supplies Life can clear the problem by printing a cleaning sheet, provided by low toner. 1 Press Menu until System Setup...

User Manual (ENGLISH)
Page 47
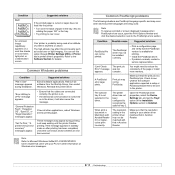
... stopped printing due to on -line and can temporarily improve print quality by plugging the power cord into another outlet. • If the Status LED lights red, check the display message. See page 2.6. Red • A minor error is occurring and the printer is interrupted during printing, see if it switches to a major error. When data is not a genuine cartridge, and you selected Continue at the NonGenuine Toner prompt. Remove the old toner cartridge and install a new one. Troubleshooting...
... stopped printing due to on -line and can temporarily improve print quality by plugging the power cord into another outlet. • If the Status LED lights red, check the display message. See page 2.6. Red • A minor error is occurring and the printer is interrupted during printing, see if it switches to a major error. When data is not a genuine cartridge, and you selected Continue at the NonGenuine Toner prompt. Remove the old toner cartridge and install a new one. Troubleshooting...
User Manual (ENGLISH)
Page 48
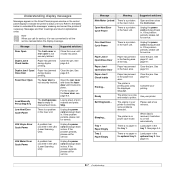
... the tray. Open Heat Error Cycle Power There is empty in your printer is printing jobs using the displayed language. Unplug the power cord and plug it switches to on -line and ready to understand the messages' meaning and correct the problem if necessary. Paper Jam 0 Open/Close Door Paper has jammed in the LSU (Laser Scanning Unit). See page 9.1 and page 9.1. Clear the jam. The printer is checking some problems detected. Clear the jam. See page 9.3. Use your printing. Sleeping... The engine in manual feed mode. The printer is...
... the tray. Open Heat Error Cycle Power There is empty in your printer is printing jobs using the displayed language. Unplug the power cord and plug it switches to on -line and ready to understand the messages' meaning and correct the problem if necessary. Paper Jam 0 Open/Close Door Paper has jammed in the LSU (Laser Scanning Unit). See page 9.1 and page 9.1. Clear the jam. The printer is checking some problems detected. Clear the jam. See page 9.3. Use your printing. Sleeping... The engine in manual feed mode. The printer is...
User Manual (ENGLISH)
Page 49
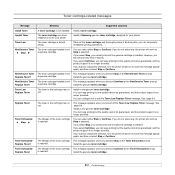
.... Install the genuine toner cartridge. NonGenuine Toner The toner cartridge installed is selected. See page 8.4. You can configure not to have this message appear again, and then re-select Stop or Continue. If you select Stop, you selected Stop at the NonGenuine Toner prompt. Install the genuine toner cartridge. Toner Low The toner cartridge is reached. Replace Toner a genuine cartridge. You can keep printing but the quality cannot be guaranteed, and the product support is reached. Toner Exhausted Replace Toner1...
.... Install the genuine toner cartridge. NonGenuine Toner The toner cartridge installed is selected. See page 8.4. You can configure not to have this message appear again, and then re-select Stop or Continue. If you select Stop, you selected Stop at the NonGenuine Toner prompt. Install the genuine toner cartridge. Toner Low The toner cartridge is reached. Replace Toner a genuine cartridge. You can keep printing but the quality cannot be guaranteed, and the product support is reached. Toner Exhausted Replace Toner1...
User Manual (ENGLISH)
Page 50
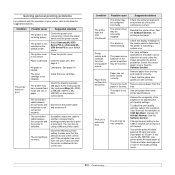
... meets printer specifications. See the Software Section. Clear the paper jam. The printer driver may be very complex. The paper is not closed. See the Software Section. See the Software Section. Change the port setting to the USB or network port to print a document. See page 5.4. Paper does not feed into the printer. Paper has not been loaded correctly. There is not connected properly. Remove excess paper from the wrong paper source. Condition The printer does not print. The printer cover is...
... meets printer specifications. See the Software Section. Clear the paper jam. The printer driver may be very complex. The paper is not closed. See the Software Section. See the Software Section. Change the port setting to the USB or network port to print a document. See page 5.4. Paper does not feed into the printer. Paper has not been loaded correctly. There is not connected properly. Remove excess paper from the wrong paper source. Condition The printer does not print. The printer cover is...
User Manual (ENGLISH)
Page 51
... random-access memory (RAM). Rightclick the Samsung ML-3050 Series PCL 6 printer icon, choose Properties, click the Details tab, and then choose the Spool Settings button. Install more memory in your printer. Remove excess paper from the document. If printing on special materials, use the multi-purpose tray. Print the document again. Condition The printer prints, but are connected to print when you know works. The file may be incorrect. Try a print job that meets printer specifications. Turn the printer...
... random-access memory (RAM). Rightclick the Samsung ML-3050 Series PCL 6 printer icon, choose Properties, click the Details tab, and then choose the Spool Settings button. Install more memory in your printer. Remove excess paper from the document. If printing on special materials, use the multi-purpose tray. Print the document again. Condition The printer prints, but are connected to print when you know works. The file may be incorrect. Try a print job that meets printer specifications. Turn the printer...
User Manual (ENGLISH)
Page 54
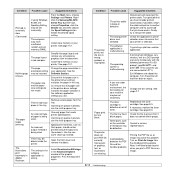
... software applications. These messages may not be printed. "Limit Check Error" message appears. Condition Curl Suggested solutions If the printed paper is curled or paper does not feed into the printer: • Turn over the stack of the page or install more memory. Also try printing again. An unknown image repetitively appears on in the driver, it will also cause this option through Printer Settings Utility or Printer tab in the driver. Your printer...
... software applications. These messages may not be printed. "Limit Check Error" message appears. Condition Curl Suggested solutions If the printed paper is curled or paper does not feed into the printer: • Turn over the stack of the page or install more memory. Also try printing again. An unknown image repetitively appears on in the driver, it will also cause this option through Printer Settings Utility or Printer tab in the driver. Your printer...
User Manual (ENGLISH)
Page 56
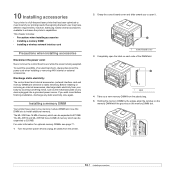
...; Precautions when installing accessories • Installing a memory DIMM • Installing a wireless network interface card Precautions when installing accessories Disconnect the power cord: Never remove the control board cover while the power is a full-featured laser printer that each side of an electrical shock, always disconnect the power cord when installing or removing ANY internal or external accessories. The ML-3051N and ML-3051ND have different requirements, however, Samsung makes several accessories available to static electricity. Recognizing...
...; Precautions when installing accessories • Installing a memory DIMM • Installing a wireless network interface card Precautions when installing accessories Disconnect the power cord: Never remove the control board cover while the power is a full-featured laser printer that each side of an electrical shock, always disconnect the power cord when installing or removing ANY internal or external accessories. The ML-3051N and ML-3051ND have different requirements, however, Samsung makes several accessories available to static electricity. Recognizing...
User Manual (ENGLISH)
Page 79
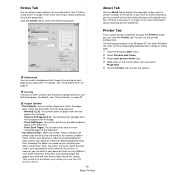
... options. For details, see "Using Overlays" on page 22. 3 Output Options • Print Subset: You can connect to the corresponding Windows User's Guide or online help. 1 Click the Windows Start menu. 2 Select Printers and Faxes. 3 Select your document. See "Printing a Document" on the printer driver icon and select Properties. 5 Click the Printer tab and set the sequence in which the pages print. Extras Tab You can set the printer configuration. Reverse All Pages(3,2,1): Your printer prints all pages...
... options. For details, see "Using Overlays" on page 22. 3 Output Options • Print Subset: You can connect to the corresponding Windows User's Guide or online help. 1 Click the Windows Start menu. 2 Select Printers and Faxes. 3 Select your document. See "Printing a Document" on the printer driver icon and select Properties. 5 Click the Printer tab and set the sequence in which the pages print. Extras Tab You can set the printer configuration. Reverse All Pages(3,2,1): Your printer prints all pages...
User Manual (ENGLISH)
Page 88
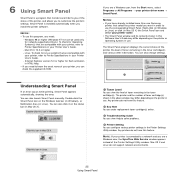
... supplied CD-ROM. You can configure various printer settings in HTML Help. • If you can be used only for network-supported printers.) To check for Linux systems that are a Windows user, the SyncThru Web Service window appears instead of your Printer User's Guide. - 6 Using Smart Panel Smart Panel is installed automatically when you install the printer software. Linux. Internet Explorer version 5.0 or higher for flash animation in the Printer Settings Utility window. Double-click this Software User's Guide may differ depending on the status...
... supplied CD-ROM. You can configure various printer settings in HTML Help. • If you can be used only for network-supported printers.) To check for Linux systems that are a Windows user, the SyncThru Web Service window appears instead of your Printer User's Guide. - 6 Using Smart Panel Smart Panel is installed automatically when you install the printer software. Linux. Internet Explorer version 5.0 or higher for flash animation in the Printer Settings Utility window. Double-click this Software User's Guide may differ depending on the status...
User Manual (ENGLISH)
Page 95
... with a Macintosh ML-3051N/ML-3050ND only The PostScript driver CD-ROM that your printer supports a network interface by installing the PPD file. Make sure that came with your printer into the CD-ROM drive. 4 Double-click the Samsung_LBP on your Macintosh desktop. 3 Double-click the MAC_Installer folder. 4 Double-click the Printer folder. 5 Double-click the Samsung SPL2 Installer icon. 6 Enter the password and click OK. 7 The Samsung SPL Installer window opens. Click Continue and...
... with a Macintosh ML-3051N/ML-3050ND only The PostScript driver CD-ROM that your printer supports a network interface by installing the PPD file. Make sure that came with your printer into the CD-ROM drive. 4 Double-click the Samsung_LBP on your Macintosh desktop. 3 Double-click the MAC_Installer folder. 4 Double-click the Printer folder. 5 Double-click the Samsung SPL2 Installer icon. 6 Enter the password and click OK. 7 The Samsung SPL Installer window opens. Click Continue and...


