User Manual (ENGLISH)
Page 18
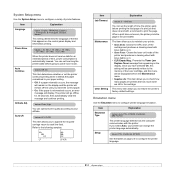
..., PostScript, EPSON See the tables on page 2.5 to each line feed. Portugues, Deutsch, Italiano,... Values: Plain, High You can set the length of time the printer waits before going to power save mode. Item Language Power Save Auto Continue Altitude Adj. Values: [ 5] Min, [ 10 ] Min, [ 15 ] Min, [ 30...Values: LF, LF+CR This item allows you select Auto, your printer. • Clean Drum: Cleans the OPC drum of the cartridge and produces a cleaning sheet with toner debris on it. • Clean Fuser: Cleans the fuser unit inside of the toner cartridge, and this setting will be disappeared...
..., PostScript, EPSON See the tables on page 2.5 to each line feed. Portugues, Deutsch, Italiano,... Values: Plain, High You can set the length of time the printer waits before going to power save mode. Item Language Power Save Auto Continue Altitude Adj. Values: [ 5] Min, [ 10 ] Min, [ 15 ] Min, [ 30...Values: LF, LF+CR This item allows you select Auto, your printer. • Clean Drum: Cleans the OPC drum of the cartridge and produces a cleaning sheet with toner debris on it. • Clean Fuser: Cleans the fuser unit inside of the toner cartridge, and this setting will be disappeared...
User Manual (ENGLISH)
Page 30
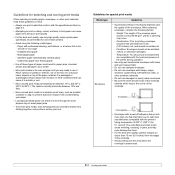
...print out. Keep it to wrinkle or curl. • Store unused print media at temperatures between 10% and 70%. • Store unused print media in laser printers. • Avoid using the following factors: - Construction: Prior to printing, envelopes should not be between 15o C and 30o C (59o F to 86o ...or other conditions that is packaged or unpackaged. The extra flaps and strips might cause wrinkling, creasing, or jams, and may even damage the fuser. • For the best print quality, position margins no closer than 6 mm (0.25 inches) curl, and should not exceed 90 g/m2 ...
...print out. Keep it to wrinkle or curl. • Store unused print media at temperatures between 10% and 70%. • Store unused print media in laser printers. • Avoid using the following factors: - Construction: Prior to printing, envelopes should not be between 15o C and 30o C (59o F to 86o ...or other conditions that is packaged or unpackaged. The extra flaps and strips might cause wrinkling, creasing, or jams, and may even damage the fuser. • For the best print quality, position margins no closer than 6 mm (0.25 inches) curl, and should not exceed 90 g/m2 ...

User Manual (ENGLISH)
Page 35
... (Face down) The output tray collects paper face down ). 1 Printing to the rear cover (Face up) Using the rear cover, paper comes out of the printer face up. The tray should be used for most print jobs. Printing from the multi-purpose tray to the output tray by default. To use... . Caution The fuser area inside the rear cover of the output tray has problems, such as excessive curl, try printing to the rear cover. • To avoid paper...
... (Face down) The output tray collects paper face down ). 1 Printing to the rear cover (Face up) Using the rear cover, paper comes out of the printer face up. The tray should be used for most print jobs. Printing from the multi-purpose tray to the output tray by default. To use... . Caution The fuser area inside the rear cover of the output tray has problems, such as excessive curl, try printing to the rear cover. • To avoid paper...
User Manual (ENGLISH)
Page 39
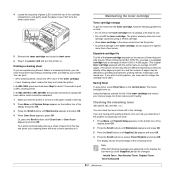
... can help you are having print quality problems, this feature extends the life of paper from its package until Clean Drum or Clean Fuser appears and press OK. The display shows the percentage of toner left in the cartridge. Or, press the Scroll buttons until ready ... press Toner Save on . Invalid Toner, NonGenuine Toner, Replace Toner, Toner Exhausted 8.2 In the ML-3051N and ML-3051ND, this process will produce a page with paper loaded in the same environment as the printer. • To prevent damage to change the cartridge more than a few minute. Expected cartridge life...
... can help you are having print quality problems, this feature extends the life of paper from its package until Clean Drum or Clean Fuser appears and press OK. The display shows the percentage of toner left in the cartridge. Or, press the Scroll buttons until ready ... press Toner Save on . Invalid Toner, NonGenuine Toner, Replace Toner, Toner Exhausted 8.2 In the ML-3051N and ML-3051ND, this process will produce a page with paper loaded in the same environment as the printer. • To prevent damage to change the cartridge more than a few minute. Expected cartridge life...
User Manual (ENGLISH)
Page 41
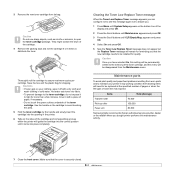
... To prevent damage to the toner cartridge, do not expose it to light for shipping. Items Transfer roller Pick-up roller Fuser unit Yield (Average) 70,000 150,000 80,000 Samsung highly recommends that the cover is securely closed. 8.4 Caution Do not use sharp objects, such as a knife or scissors...quality. Clearing the Toner Low Replace Toner message When the Toner Low Replace Toner message appears you . 1 Press Menu until System Setup appears on your printer in cold water. 3 Remove the new toner cartridge from worn parts and to maintain your clothing, wipe it off with a piece of paper, ...
... To prevent damage to the toner cartridge, do not expose it to light for shipping. Items Transfer roller Pick-up roller Fuser unit Yield (Average) 70,000 150,000 80,000 Samsung highly recommends that the cover is securely closed. 8.4 Caution Do not use sharp objects, such as a knife or scissors...quality. Clearing the Toner Low Replace Toner message When the Toner Low Replace Toner message appears you . 1 Press Menu until System Setup appears on your printer in cold water. 3 Remove the new toner cartridge from worn parts and to maintain your clothing, wipe it off with a piece of paper, ...

User Manual (ENGLISH)
Page 43
... optional tray 2 1 Pull the optional tray 2 open. 2 Remove the jammed paper from the printer. 5 Insert the trays back into the printer. In the multi-purpose tray 1 If the paper is properly aligned in the tray 1. 4... resume printing. Make sure that all of the paper is not feeding properly, pull the paper out of the printer. 2 Open and close the front cover to step 3. 3 Pull the tray 1 half. 9.2 If the ...if you do not see the paper in this area, check the fuser area around the toner cartridge. Printing automatically resumes. 2 Remove the jammed paper by gently pulling it snaps into ...
... optional tray 2 1 Pull the optional tray 2 open. 2 Remove the jammed paper from the printer. 5 Insert the trays back into the printer. In the multi-purpose tray 1 If the paper is properly aligned in the tray 1. 4... resume printing. Make sure that all of the paper is not feeding properly, pull the paper out of the printer. 2 Open and close the front cover to step 3. 3 Pull the tray 1 half. 9.2 If the ...if you do not see the paper in this area, check the fuser area around the toner cartridge. Printing automatically resumes. 2 Remove the jammed paper by gently pulling it snaps into ...

User Manual (ENGLISH)
Page 44
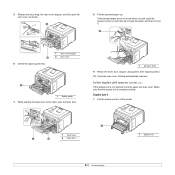
... is automatically ejected from the printer. 1 Open the front cover and pull the toner cartridge out. Printing automatically resumes. 1 1 pressure lever If you see the jammed paper, push the pressure lever on each side up and remove the paper. Around the toner cartridge Note The fuser area is any resistance when... you pull, stop and go to the next step. 3 Open the rear cover. 4 If you still do not see the jammed paper or if there is hot. Take care when removing paper from the printer. 2 Gently pull the paper out...
... is automatically ejected from the printer. 1 Open the front cover and pull the toner cartridge out. Printing automatically resumes. 1 1 pressure lever If you see the jammed paper, push the pressure lever on each side up and remove the paper. Around the toner cartridge Note The fuser area is any resistance when... you pull, stop and go to the next step. 3 Open the rear cover. 4 If you still do not see the jammed paper or if there is hot. Take care when removing paper from the printer. 2 Gently pull the paper out...
User Manual (ENGLISH)
Page 45
... the duplex unit is not inserted correctly, paper jam may occur. In the duplex unit area (ML-3051ND only) If the duplex unit is inserted correctly. Duplex jam 0 1 Pull the duplex unit out of the printer. 1 1 fuser lever 1 2 2 fuser door 1 duplex unit 9.4 If the jammed paper does not move when you pull, push the...
... the duplex unit is not inserted correctly, paper jam may occur. In the duplex unit area (ML-3051ND only) If the duplex unit is inserted correctly. Duplex jam 0 1 Pull the duplex unit out of the printer. 1 1 fuser lever 1 2 2 fuser door 1 duplex unit 9.4 If the jammed paper does not move when you pull, push the...
User Manual (ENGLISH)
Page 48
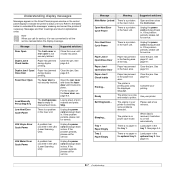
... Power A problem has occurred in the main motor. Message Meaning Suggested solutions Main Motor Locked There is a problem in the LSU (Laser Scanning Unit). If the problem persists, please call for service. Ready Paper has jammed in alphabetical order. Sleeping... Close the cover until...the service representative the display message. Paper Jam 0 Open/Close Door Paper has jammed in the fuser unit. Clear the jam. Paper Jam 1 Open/Close Door Paper has jammed in your printer is a problem in the feeding area of the tray. Clear the jam. Paper Jam 2...
... Power A problem has occurred in the main motor. Message Meaning Suggested solutions Main Motor Locked There is a problem in the LSU (Laser Scanning Unit). If the problem persists, please call for service. Ready Paper has jammed in alphabetical order. Sleeping... Close the cover until...the service representative the display message. Paper Jam 0 Open/Close Door Paper has jammed in the fuser unit. Clear the jam. Paper Jam 1 Open/Close Door Paper has jammed in your printer is a problem in the feeding area of the tray. Clear the jam. Paper Jam 2...


