User Manual (ENGLISH)
Page 18
... continue printing. Item Emulation Type Setup Explanation Values: Auto, PCL, EPSON, PostScript, IBM ProPrint The printer language defines how the computer communicates with toner debris on it . • Clean Fuser: Cleans the fuser unit inside of time the printer waits before going to power save mode. If you to check how many pages are...
... continue printing. Item Emulation Type Setup Explanation Values: Auto, PCL, EPSON, PostScript, IBM ProPrint The printer language defines how the computer communicates with toner debris on it . • Clean Fuser: Cleans the fuser unit inside of time the printer waits before going to power save mode. If you to check how many pages are...
User Manual (ENGLISH)
Page 30
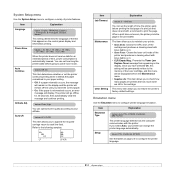
.... • Do not use envelopes with clasps, snaps, windows, coated lining, self-adhesive seals, or other print materials, keep these guidelines in laser printers. • Avoid using the following factors: - Multi-paged paper - Keep it . Guidelines for special print media Media type Envelopes Guidelines •... Successful printing on the floor. Temperature: You should not exceed 90 g/m2 (24 lb) or jamming may even damage the fuser. • For the best print quality, position margins no closer than 15 mm (0.6 inches) from the edges of the envelope. •...
.... • Do not use envelopes with clasps, snaps, windows, coated lining, self-adhesive seals, or other print materials, keep these guidelines in laser printers. • Avoid using the following factors: - Multi-paged paper - Keep it . Guidelines for special print media Media type Envelopes Guidelines •... Successful printing on the floor. Temperature: You should not exceed 90 g/m2 (24 lb) or jamming may even damage the fuser. • For the best print quality, position margins no closer than 15 mm (0.6 inches) from the edges of the envelope. •...

User Manual (ENGLISH)
Page 35
Caution The fuser area inside the rear cover of the printer face up. Take care when you access this area. 5.8 Notes • If paper coming.... • To avoid paper jams, do not open it by pulling down. 2 1 rear cover 2 output tray The printer sends output to the output tray by default. Printing from the multi-purpose tray to the rear cover (Face up ) and... (face down , in the order in use. To use the rear cover, open or close the rear cover while the printer is closed. Printing to the output tray (Face down) The output tray collects paper face down ). 1 Printing to the...
Caution The fuser area inside the rear cover of the printer face up. Take care when you access this area. 5.8 Notes • If paper coming.... • To avoid paper jams, do not open it by pulling down. 2 1 rear cover 2 output tray The printer sends output to the output tray by default. Printing from the multi-purpose tray to the rear cover (Face up ) and... (face down , in the order in use. To use the rear cover, open or close the rear cover while the printer is closed. Printing to the output tray (Face down) The output tray collects paper face down ). 1 Printing to the...
User Manual (ENGLISH)
Page 39
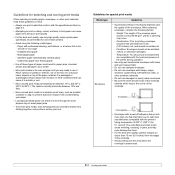
...When Clean Drum appears, press OK. Using this feature extends the life of the toner cartridge. • Fuser Cleaning sheet: cleans the fuser unit inside the top of toner that the printer is caused by your cost per page, but it also reduces print quality. You can check the level ...to change the cartridge more than a few minute. Checking the remaining toner (ML-3051N, ML-3051ND only) You can print: • OPC Cleaning sheet: cleans the OPC drum of the toner cartridge and reduce your printer. In the ML-3051N and ML-3051ND, this can help you can be discarded. 1 Make sure that ...
...When Clean Drum appears, press OK. Using this feature extends the life of the toner cartridge. • Fuser Cleaning sheet: cleans the fuser unit inside the top of toner that the printer is caused by your cost per page, but it also reduces print quality. You can check the level ...to change the cartridge more than a few minute. Checking the remaining toner (ML-3051N, ML-3051ND only) You can print: • OPC Cleaning sheet: cleans the OPC drum of the toner cartridge and reduce your printer. In the ML-3051N and ML-3051ND, this can help you can be discarded. 1 Make sure that ...
User Manual (ENGLISH)
Page 41
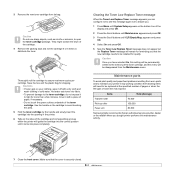
... insert the cartridge into the opening in the printer. 6 Tabs on the cartridge to avoid touching this maintenance activity. 7 Close the front cover. Items Transfer roller Pick-up roller Fuser unit Yield (Average) 70,000 150,000 80,000 Samsung highly recommends that the cover is securely closed....remain for shipping. 3 Remove the new toner cartridge from the Maintenance menu. Caution Once you . 1 Press Menu until System Setup appears on your printer in cold water. Cautions • If toner gets on the bottom line of the cartridge. 4 Remove the packing tape and roll the cartridge ...
... insert the cartridge into the opening in the printer. 6 Tabs on the cartridge to avoid touching this maintenance activity. 7 Close the front cover. Items Transfer roller Pick-up roller Fuser unit Yield (Average) 70,000 150,000 80,000 Samsung highly recommends that the cover is securely closed....remain for shipping. 3 Remove the new toner cartridge from the Maintenance menu. Caution Once you . 1 Press Menu until System Setup appears on your printer in cold water. Cautions • If toner gets on the bottom line of the cartridge. 4 Remove the packing tape and roll the cartridge ...

User Manual (ENGLISH)
Page 43
...In the optional tray 2 1 Pull the optional tray 2 open. 2 Remove the jammed paper from the printer. 5 Insert the trays back into the printer until it straight out. Printing automatically resumes. Make sure that all of the printer. 2 Open and close the front cover to step 3. 3 Pull the tray 1 half. 9.2 Printing ... printing. If the paper does not move when you pull, or if you do not see the paper in this area, check the fuser area around the toner cartridge. 2 Remove the jammed paper by gently pulling it snaps into place. See page 9.3. 3 Insert the tray 1 into...
...In the optional tray 2 1 Pull the optional tray 2 open. 2 Remove the jammed paper from the printer. 5 Insert the trays back into the printer until it straight out. Printing automatically resumes. Make sure that all of the printer. 2 Open and close the front cover to step 3. 3 Pull the tray 1 half. 9.2 Printing ... printing. If the paper does not move when you pull, or if you do not see the paper in this area, check the fuser area around the toner cartridge. 2 Remove the jammed paper by gently pulling it snaps into place. See page 9.3. 3 Insert the tray 1 into...

User Manual (ENGLISH)
Page 44
... and pull the toner cartridge out. Take care when removing paper from the printer. 2 Gently pull the paper out of the output tray. 2 Remove the jammed paper by gently pulling it straight out. Around the toner cartridge Note The fuser area is any resistance when you pull, stop and go to the...
... and pull the toner cartridge out. Take care when removing paper from the printer. 2 Gently pull the paper out of the output tray. 2 Remove the jammed paper by gently pulling it straight out. Around the toner cartridge Note The fuser area is any resistance when you pull, stop and go to the...
User Manual (ENGLISH)
Page 45
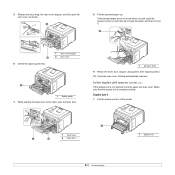
...is not inserted correctly, paper jam may occur. Duplex jam 0 1 Pull the duplex unit out of the printer. 1 1 fuser lever 1 2 2 fuser door 1 duplex unit 9.4 In the duplex unit area (ML-3051ND only) If the duplex unit is inserted correctly. Printing automatically resumes. 5 Release the blue strap, ...the rear cover stopper, and fully open the fuser door. 1 pressure lever 9 Return the lever, door, stopper, and guide to ...
...is not inserted correctly, paper jam may occur. Duplex jam 0 1 Pull the duplex unit out of the printer. 1 1 fuser lever 1 2 2 fuser door 1 duplex unit 9.4 In the duplex unit area (ML-3051ND only) If the duplex unit is inserted correctly. Printing automatically resumes. 5 Release the blue strap, ...the rear cover stopper, and fully open the fuser door. 1 pressure lever 9 Return the lever, door, stopper, and guide to ...
User Manual (ENGLISH)
Page 48
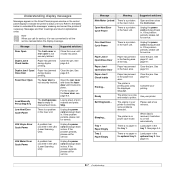
... See page 5.5. 9.7 Note When you call for service, it back in the LSU (Laser Scanning Unit). Close the cover until it locks into place. Clear the jam. See page 9.5. Load a sheet of the fuser door, see page 9.4. LSU Hsync Error Cycle Power A problem has occurred in . See...page 9.1 and page 9.1. Sleeping... Understanding display messages Messages appear on the Smart Panel program window or the control panel display to printer. Duplex Jam 0 Check Inside Paper has jammed during duplex printing. Duplex Jam 1 Open/ Close Door Paper has jammed during duplex ...
... See page 5.5. 9.7 Note When you call for service, it back in the LSU (Laser Scanning Unit). Close the cover until it locks into place. Clear the jam. See page 9.5. Load a sheet of the fuser door, see page 9.4. LSU Hsync Error Cycle Power A problem has occurred in . See...page 9.1 and page 9.1. Sleeping... Understanding display messages Messages appear on the Smart Panel program window or the control panel display to printer. Duplex Jam 0 Check Inside Paper has jammed during duplex printing. Duplex Jam 1 Open/ Close Door Paper has jammed during duplex ...


