
User Manual (user Manual) (ver.1.0) (English)
Page 1
Instruction Manual DVD-V3650 DVD/VCR PROGRESSIVE EJECT POWER OPEN/CLOSE www.samsungusa.com
Instruction Manual DVD-V3650 DVD/VCR PROGRESSIVE EJECT POWER OPEN/CLOSE www.samsungusa.com
User Manual (user Manual) (ver.1.0) (English)
Page 3
...Title 43 s Audio 43 s Bookmarks 44 s MP3/WMA Play 45 s Program Play & Random Play 47 s Picture CD Playback 48 s 3D Sound 50 s Function (DVD 51 x 8 - Table of Contents x 5 - System Setup 16 s On-Screen Menu Navigation 16 s Menu Language 17 s Manual Clock Set 18 s Tuner Band ...53 s S-VHS Playback 53 s Variable Search System 54 5 Basic Operation 14 s Deck Control Buttons 14 s Basic DVD Operation 14 s Basic VCR Operation 15 s Basic TV Tuner Operations 16 x 4 - DVD Setup 25 s Disc Menu Language 25 s Audio Language 25 s Subtitle Language 26 s Digital Output 27 s DTS 28...
...Title 43 s Audio 43 s Bookmarks 44 s MP3/WMA Play 45 s Program Play & Random Play 47 s Picture CD Playback 48 s 3D Sound 50 s Function (DVD 51 x 8 - Table of Contents x 5 - System Setup 16 s On-Screen Menu Navigation 16 s Menu Language 17 s Manual Clock Set 18 s Tuner Band ...53 s S-VHS Playback 53 s Variable Search System 54 5 Basic Operation 14 s Deck Control Buttons 14 s Basic DVD Operation 14 s Basic VCR Operation 15 s Basic TV Tuner Operations 16 x 4 - DVD Setup 25 s Disc Menu Language 25 s Audio Language 25 s Subtitle Language 26 s Digital Output 27 s DTS 28...
User Manual (user Manual) (ver.1.0) (English)
Page 4
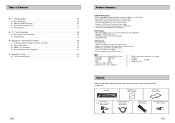
...Stereo VCR. • Superior slow motion and stop action (with 4 heads). • Playback of S-VHS tapes with this player. • DVD-ROM • DVD-RAM • CD-ROM • CDV • CDI • VCD • HD layer of Super Audio CD • CDGs play ..., S-Video, and Component Video outputs. • Universal remote provides the full operation on recording conditions. • DVD-R • CD-RW • DVD+RW, -RW Unpack When you unpack the DVD+VCR, please check the following list of Contents x 9 - VCR Recording 55 s Basic Recording 55 s Special Recording...
...Stereo VCR. • Superior slow motion and stop action (with 4 heads). • Playback of S-VHS tapes with this player. • DVD-ROM • DVD-RAM • CD-ROM • CDV • CDI • VCD • HD layer of Super Audio CD • CDGs play ..., S-Video, and Component Video outputs. • Universal remote provides the full operation on recording conditions. • DVD-R • CD-RW • DVD+RW, -RW Unpack When you unpack the DVD+VCR, please check the following list of Contents x 9 - VCR Recording 55 s Basic Recording 55 s Special Recording...
User Manual (user Manual) (ver.1.0) (English)
Page 5
... disc STEREO • Stereo disc DIGITAL SOUND • Digital Audio disc • DTS disc • MP3 disc Play Region Number Both the DVD player and the discs are coded by region. Disc Markings ~ • Play Region Number NTSC • NTSC broadcast system in order for this... player is recorded as a Digital Signal with better audio quality, less distortion and less deterioration of discs with the corresponding logos: Disc Types (Logos) DVD V I D E O AUDIO-CD Recording Types Audio + Video Disc Size 5" 31/2" Max. Double-sided 480 min. Audio 5" 31/2" 74 min. 20 min...
... disc STEREO • Stereo disc DIGITAL SOUND • Digital Audio disc • DTS disc • MP3 disc Play Region Number Both the DVD player and the discs are coded by region. Disc Markings ~ • Play Region Number NTSC • NTSC broadcast system in order for this... player is recorded as a Digital Signal with better audio quality, less distortion and less deterioration of discs with the corresponding logos: Disc Types (Logos) DVD V I D E O AUDIO-CD Recording Types Audio + Video Disc Size 5" 31/2" Max. Double-sided 480 min. Audio 5" 31/2" 74 min. 20 min...
User Manual (user Manual) (ver.1.0) (English)
Page 6
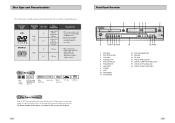
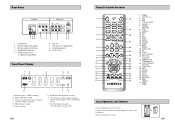
... 29 RIGHT 30 EZ VIEW 31 DISC MENU 32 MARK SEARCH 33 ANGLE TIMER Insert Batteries into Remote • Remove the battery cover on , DVD is operating. 2 DVD or CD media is loaded. 3 The time, counter position, time remaining or current deck status is indicated. 4 VHS videotape is loaded. 5 VCR is ... DOWN 14 SPEED 15 RECORD 16 CLEAR 17 MODE REPEAT 18 OPEN/CLOSE 19 0-9 20 TV/VCR 21 VCR, TV SELECT 22 INPUT SEL. STEREO 7 8 6 A DVD with a DTS soundtrack is loaded. 7 The Hi-Fi track of the correct polarities(+/-) • Slide the cover back onto remote. 11 Rear Panel 1 2 3 4 1 S-VIDEO ...
... 29 RIGHT 30 EZ VIEW 31 DISC MENU 32 MARK SEARCH 33 ANGLE TIMER Insert Batteries into Remote • Remove the battery cover on , DVD is operating. 2 DVD or CD media is loaded. 3 The time, counter position, time remaining or current deck status is indicated. 4 VHS videotape is loaded. 5 VCR is ... DOWN 14 SPEED 15 RECORD 16 CLEAR 17 MODE REPEAT 18 OPEN/CLOSE 19 0-9 20 TV/VCR 21 VCR, TV SELECT 22 INPUT SEL. STEREO 7 8 6 A DVD with a DTS soundtrack is loaded. 7 The Hi-Fi track of the correct polarities(+/-) • Slide the cover back onto remote. 11 Rear Panel 1 2 3 4 1 S-VIDEO ...
User Manual (user Manual) (ver.1.0) (English)
Page 7
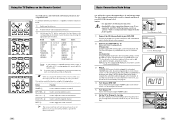
...displayed on the front panel. If you encounter problems, operate the television directly. 12 Basic Connections/Auto Setup You will need to connect the DVD-VCR to your TV Turn on the TV by pressing the appropriate numeric buttons. NOTES: • See Appendix A for Advanced Connections. &#... the front panel of the following buttons. INPUT SEL. ➁ Used to select the required channel. MUTE ➄ Used to operate with Samsung televisions and compatible brands. See page 18. 4 Turn On your television is compatible with the remote control, it is now programmed to toggle...
...displayed on the front panel. If you encounter problems, operate the television directly. 12 Basic Connections/Auto Setup You will need to connect the DVD-VCR to your TV Turn on the TV by pressing the appropriate numeric buttons. NOTES: • See Appendix A for Advanced Connections. &#... the front panel of the following buttons. INPUT SEL. ➁ Used to select the required channel. MUTE ➄ Used to operate with Samsung televisions and compatible brands. See page 18. 4 Turn On your television is compatible with the remote control, it is now programmed to toggle...
User Manual (user Manual) (ver.1.0) (English)
Page 8
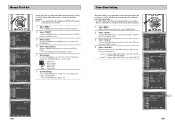
... remote control or on the front panel of the unit. • Most discs will start to play automatically when you want to control the DVD deck. • The DVD indicator will light on the Front Panel Display to show that is selected. 4 INPUT SEL. OPEN/CLOSE 1 1 4 4 1 Open the Disc Tray ... Front Panel Display to play automatically if it into the VCR deck. • When a videotape is inserted, power will turn on the DVD-VCR. 2 DVD Button Press the DVD button on the remote control or front panel when you want to control the VCR deck. • The VCR indicator will begin to...
... remote control or on the front panel of the unit. • Most discs will start to play automatically when you want to control the DVD deck. • The DVD indicator will light on the Front Panel Display to show that is selected. 4 INPUT SEL. OPEN/CLOSE 1 1 4 4 1 Open the Disc Tray ... Front Panel Display to play automatically if it into the VCR deck. • When a videotape is inserted, power will turn on the DVD-VCR. 2 DVD Button Press the DVD button on the remote control or front panel when you want to control the VCR deck. • The VCR indicator will begin to...
User Manual (user Manual) (ver.1.0) (English)
Page 9
.... 3 Select "Language" Use the UP/DOWN buttons to highlight "Language" then press the ENTER button. 4 Set menu Language Place the selection bar next to your DVD-VCR. Button Press this button to return to the last MENU screen displayed or to exit the on-screen MENU all together. 16 Menu Language.../Down Use these buttons to move to the previous or the next channel. 3 0-9 Buttons Use these steps. 1 Open "MENU" Press the MENU button while the DVD is in Stop or Play mode. 2 Select "SETUP" Using the UP/DOWN buttons, move the selection bar up, down, left and right to cycle through...
.... 3 Select "Language" Use the UP/DOWN buttons to highlight "Language" then press the ENTER button. 4 Set menu Language Place the selection bar next to your DVD-VCR. Button Press this button to return to the last MENU screen displayed or to exit the on-screen MENU all together. 16 Menu Language.../Down Use these buttons to move to the previous or the next channel. 3 0-9 Buttons Use these steps. 1 Open "MENU" Press the MENU button while the DVD is in Stop or Play mode. 2 Select "SETUP" Using the UP/DOWN buttons, move the selection bar up, down, left and right to cycle through...
User Manual (user Manual) (ver.1.0) (English)
Page 10
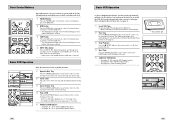
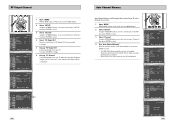
... Front Display Auto Power Off : Auto : Off Language : English Front Display Auto Power Off : Auto : Off If Auto Setup fails to set the DVD-VCR's internal clock by locating a local TV station, follow these steps to the Antenna In jack during initial setup. • Use this setting only if... Auto Setup detected the incorrect tuner band, i.e. Set the minute. • Month - Indicates that the DVD-VCR is connected to an indoor or outdoor VHF/UHF antenna. • Cable TV - NOTE: For accurate Timer Recording, your clock settings and to ...
... Front Display Auto Power Off : Auto : Off Language : English Front Display Auto Power Off : Auto : Off If Auto Setup fails to set the DVD-VCR's internal clock by locating a local TV station, follow these steps to the Antenna In jack during initial setup. • Use this setting only if... Auto Setup detected the incorrect tuner band, i.e. Set the minute. • Month - Indicates that the DVD-VCR is connected to an indoor or outdoor VHF/UHF antenna. • Cable TV - NOTE: For accurate Timer Recording, your clock settings and to ...
User Manual (user Manual) (ver.1.0) (English)
Page 11
...: English Front Display Auto Power Off : Auto : Off Language : English Front Display Auto Power Off : Auto : Off 1 Open "MENU" With the DVD in Stop or Play mode, press the MENU button. 2 Select "SETUP" Using the UP/DOWN buttons, move the selection bar to "SETUP" then press ...the message disappears, change . 6 Change "TV Channel" A message will appear on your TV. This procedure may take a few minutes to select. • The DVD-VCR will be displayed. 1 4 Language : English Front Display Auto Power Off : Auto : Off Language : English Front Display Auto Power Off : Auto : Off ...
...: English Front Display Auto Power Off : Auto : Off Language : English Front Display Auto Power Off : Auto : Off 1 Open "MENU" With the DVD in Stop or Play mode, press the MENU button. 2 Select "SETUP" Using the UP/DOWN buttons, move the selection bar to "SETUP" then press ...the message disappears, change . 6 Change "TV Channel" A message will appear on your TV. This procedure may take a few minutes to select. • The DVD-VCR will be displayed. 1 4 Language : English Front Display Auto Power Off : Auto : Off Language : English Front Display Auto Power Off : Auto : Off ...
User Manual (user Manual) (ver.1.0) (English)
Page 12
Front Panel Display will be bright all the time, or dim during power off . 1 Open " MENU" With the DVD in the channel number you wish to remove. 1 Open "MENU" With the DVD in Stop or Play mode, press the MENU button. 2 Select "SETUP" Using the UP/DOWN buttons, move the selection bar to...
Front Panel Display will be bright all the time, or dim during power off . 1 Open " MENU" With the DVD in the channel number you wish to remove. 1 Open "MENU" With the DVD in Stop or Play mode, press the MENU button. 2 Select "SETUP" Using the UP/DOWN buttons, move the selection bar to...
User Manual (user Manual) (ver.1.0) (English)
Page 13
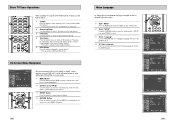
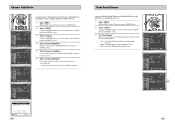
... automatically be set to the language you choose. 1 Open "MENU" Press the MENU button while the DVD is in Stop mode. 2 Select "DVD" Use the UP/DOWN buttons to highlight "DVD" then press the ENTER button. 3 Select "Language" Move the selection bar to "Language" then press ENTER to the language you ..., follow these steps. Auto Power Off Disc Menu Language 1 2 Language : English Front Display Auto Power Off : Auto : Off 1 Open "MENU" With the DVD in Stop or Play mode, press the MENU button. 2 Select "SETUP" Using the UP/DOWN buttons, move the selection bar to "SETUP" then press ENTER...
... automatically be set to the language you choose. 1 Open "MENU" Press the MENU button while the DVD is in Stop mode. 2 Select "DVD" Use the UP/DOWN buttons to highlight "DVD" then press the ENTER button. 3 Select "Language" Move the selection bar to "Language" then press ENTER to the language you ..., follow these steps. Auto Power Off Disc Menu Language 1 2 Language : English Front Display Auto Power Off : Auto : Off 1 Open "MENU" With the DVD in Stop or Play mode, press the MENU button. 2 Select "SETUP" Using the UP/DOWN buttons, move the selection bar to "SETUP" then press ENTER...

User Manual (user Manual) (ver.1.0) (English)
Page 14
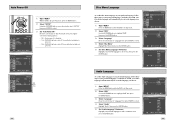
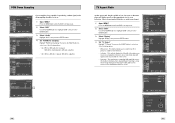
...: Select "Bitstream" ONLY if you have connected a Dolby Digital-equipped A/V receiver to the Digital Output (optical or coaxial) on a DVD, your Subtitle Language will automatically be set the Subtitle Language to your preferred language, follow these steps. Subtitle Language To set to the language... "Audio" Highlight "Audio", then press the ENTER button. 4 Set "Digital Output" Highlight "Digital Output" then press the RIGHT button to your DVD/TV with a Dolby Digital decoder. To use your speakers. Language : English Front Display Auto Power Off : Auto : Off PCM Down Sampling :...
...: Select "Bitstream" ONLY if you have connected a Dolby Digital-equipped A/V receiver to the Digital Output (optical or coaxial) on a DVD, your Subtitle Language will automatically be set the Subtitle Language to your preferred language, follow these steps. Subtitle Language To set to the language... "Audio" Highlight "Audio", then press the ENTER button. 4 Set "Digital Output" Highlight "Digital Output" then press the RIGHT button to your DVD/TV with a Dolby Digital decoder. To use your speakers. Language : English Front Display Auto Power Off : Auto : Off PCM Down Sampling :...

User Manual (user Manual) (ver.1.0) (English)
Page 15
...28 29 DTS Language : English Front Display Auto Power Off : Auto : Off If your A/V receiver is in Stop mode. 2 Select "DVD" Use the UP/DOWN buttons to highlight "DVD ", then press the ENTER button. 3 Select "Audio " Highlight "Audio", then press the ENTER button. 4 Set "DTS" Highlight "DTS",...Highlight "Dynamic Compression", then press the RIGHT button to the DIGITAL AUDIO OUT (optical or coaxial) on the DVD-VCR back panel. 1 Open "MENU" Press the MENU button while the DVD is equipped with a DTS decoder, your DVDVCR can output DTS digital sound, but you have connected a ...
...28 29 DTS Language : English Front Display Auto Power Off : Auto : Off If your A/V receiver is in Stop mode. 2 Select "DVD" Use the UP/DOWN buttons to highlight "DVD ", then press the ENTER button. 3 Select "Audio " Highlight "Audio", then press the ENTER button. 4 Set "DTS" Highlight "DTS",...Highlight "Dynamic Compression", then press the RIGHT button to the DIGITAL AUDIO OUT (optical or coaxial) on the DVD-VCR back panel. 1 Open "MENU" Press the MENU button while the DVD is equipped with a DTS decoder, your DVDVCR can output DTS digital sound, but you have connected a ...
User Manual (user Manual) (ver.1.0) (English)
Page 16
... the RIGHT button to select one of the following options: • Widescreen - When a 96K disc is in Stop mode. 2 Select "DVD" Use the UP/DOWN buttons to highlight "DVD ", then press the ENTER button. 3 Select "Audio" Highlight "Audio", then press the ENTER button. 4 Set "PCM Down Sampling" Highlight... width of the following options: • On - Choose from standard, letterbox, or widescreen format. 1 Open "MENU" Press the MENU button while the DVD is played, 96K will be outputted. As a result, black bars will display movies at the top and bottom of the screen. • Pan-Scan ...
... the RIGHT button to select one of the following options: • Widescreen - When a 96K disc is in Stop mode. 2 Select "DVD" Use the UP/DOWN buttons to highlight "DVD ", then press the ENTER button. 3 Select "Audio" Highlight "Audio", then press the ENTER button. 4 Set "PCM Down Sampling" Highlight... width of the following options: • On - Choose from standard, letterbox, or widescreen format. 1 Open "MENU" Press the MENU button while the DVD is played, 96K will be outputted. As a result, black bars will display movies at the top and bottom of the screen. • Pan-Scan ...
User Manual (user Manual) (ver.1.0) (English)
Page 17
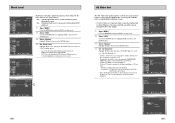
... using the COMPONENT VIDEO OUT jacks on the rear panel to connect to a Progressive(480p) or Interlaced (480i) TV. • See your DVD-VCR to a TV using the S-Video OUT jack on the front panel if you have a Progressive scan TV only. Enhanced black level, for the... the video signal to one of the following options: • On - This is the Standard NTSC reference Black Level for increased brightness/contrast when viewing DVDs. • Off - Language : English Front Display Auto Power Off : Auto : Off Display Setup On 32 33 Progressive : Progressive Scan mode will work . - ...
... using the COMPONENT VIDEO OUT jacks on the rear panel to connect to a Progressive(480p) or Interlaced (480i) TV. • See your DVD-VCR to a TV using the S-Video OUT jack on the front panel if you have a Progressive scan TV only. Enhanced black level, for the... the video signal to one of the following options: • On - This is the Standard NTSC reference Black Level for increased brightness/contrast when viewing DVDs. • Off - Language : English Front Display Auto Power Off : Auto : Off Display Setup On 32 33 Progressive : Progressive Scan mode will work . - ...
User Manual (user Manual) (ver.1.0) (English)
Page 18
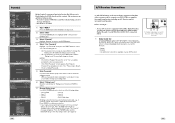
... 6, then Levels 7 and 8 will go to the "Auto Setup" mode. (See page 13) A/V Receiver Connections To take full advantage of the DVD-VCR to a complete Surround Sound system, including an A/V Receiver and six Surround Sound speakers. Parental 34 Rating Control is a password protected system that allows...an optical cable OR a digital coaxial cable from a cold start with a Dolby Digital Decoder, you forgot your A/V receiver is necessary to view a DVD or to change your settings later. 6 Select "Rating Level" Move the selection bar to "Rating Level," then press ENTER to select. 7 Change...
... 6, then Levels 7 and 8 will go to the "Auto Setup" mode. (See page 13) A/V Receiver Connections To take full advantage of the DVD-VCR to a complete Surround Sound system, including an A/V Receiver and six Surround Sound speakers. Parental 34 Rating Control is a password protected system that allows...an optical cable OR a digital coaxial cable from a cold start with a Dolby Digital Decoder, you forgot your A/V receiver is necessary to view a DVD or to change your settings later. 6 Select "Rating Level" Move the selection bar to "Rating Level," then press ENTER to select. 7 Change...
User Manual (user Manual) (ver.1.0) (English)
Page 19
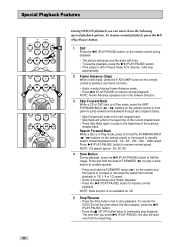
...ll (PLAY/PAUSE) to resume normal playback. 3 3 NOTE: Frame Advance operates only in the forward direction. 3 Skip Forward/Back While a CD or DVD disc is muted during slow motion playback. • Press the ❿ll (PLAY/PAUSE) button to resume normal playback. NOTE: Slow function is not available... jump to the beginning of the previous chapter/track. Press ❿ll (PLAY/PAUSE) button to Still the image. Special Playback Features During DVD/CD playback you press ❿ll (PLAY/PAUSE), the disc will stop automatically. 2 Frame Advance (Step) While in Still mode, press ...
...ll (PLAY/PAUSE) to resume normal playback. 3 3 NOTE: Frame Advance operates only in the forward direction. 3 Skip Forward/Back While a CD or DVD disc is muted during slow motion playback. • Press the ❿ll (PLAY/PAUSE) button to resume normal playback. NOTE: Slow function is not available... jump to the beginning of the previous chapter/track. Press ❿ll (PLAY/PAUSE) button to Still the image. Special Playback Features During DVD/CD playback you press ❿ll (PLAY/PAUSE), the disc will stop automatically. 2 Frame Advance (Step) While in Still mode, press ...
User Manual (user Manual) (ver.1.0) (English)
Page 20
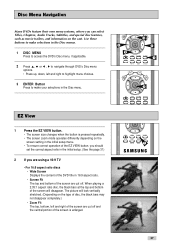
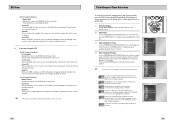
... may not disappear completely.) • Zoom Fit The top, bottom, left and right to highlight menu choices. 3 ENTER Button Press to navigate through DVD's Disc menu options. • Press up, down, left and right of the screen are cut off and the central portion of the screen will ...look vertically stretched. (Depending on the cast. Use these buttons to make selections in the Disc menus. 1 DISC MENU Press to access the DVD's Disc menu, if applicable. 2 Press œ,❷ or ➛ , ❿ to make your selections in the initial setup menu. 1 • To ensure ...
... may not disappear completely.) • Zoom Fit The top, bottom, left and right to highlight menu choices. 3 ENTER Button Press to navigate through DVD's Disc menu options. • Press up, down, left and right of the screen are cut off and the central portion of the screen will ...look vertically stretched. (Depending on the cast. Use these buttons to make selections in the Disc menus. 1 DISC MENU Press to access the DVD's Disc menu, if applicable. 2 Press œ,❷ or ➛ , ❿ to make your selections in the initial setup menu. 1 • To ensure ...
User Manual (user Manual) (ver.1.0) (English)
Page 21
...right of the screen are cut off from looking horizontally stretched. - For 4:3 aspect ratio discs • Normal Screen Displays the content of the DVD title in English 5.1CH. In the Audio example, the soundtrack is viewed on a 16:9 TV, black bars will be identified. Subtitle You ...INFO button again. Time You must enter the starting time as a reference. The black bars will look vertically stretched. • Zoom Fit When a 4:3 DVD is generated using a 4:3 TV - For 4:3 aspect ratio discs • Normal Wide Displays the content of the screen are using only two front 3D...
...right of the screen are cut off from looking horizontally stretched. - For 4:3 aspect ratio discs • Normal Screen Displays the content of the DVD title in English 5.1CH. In the Audio example, the soundtrack is viewed on a 16:9 TV, black bars will be identified. Subtitle You ...INFO button again. Time You must enter the starting time as a reference. The black bars will look vertically stretched. • Zoom Fit When a 4:3 DVD is generated using a 4:3 TV - For 4:3 aspect ratio discs • Normal Wide Displays the content of the screen are using only two front 3D...


