
User Manual (user Manual) (ver.1.0) (English)
Page 1
Instruction Manual DVD-V3650 DVD/VCR PROGRESSIVE EJECT POWER OPEN/CLOSE www.samsungusa.com
Instruction Manual DVD-V3650 DVD/VCR PROGRESSIVE EJECT POWER OPEN/CLOSE www.samsungusa.com
User Manual (user Manual) (ver.1.0) (English)
Page 2
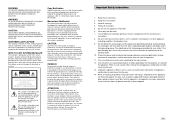
... exposición de los dientes. There are provided for your outlet, consult an electrician for proper grounding and, in any way, such as power-supply cord or plug is intended to alert the user to the presence of the National Electronic Code that produce heat. 9. Refer servicing to .... Do not block any heat sources such as practical. The wide blade or the third prong are no use only the recommended accessories. Protect the power cord from being from being walked on or pinched particularly at plugs, convenience receptacles, and the point where they exit from tip-over . 13....
... exposición de los dientes. There are provided for your outlet, consult an electrician for proper grounding and, in any way, such as power-supply cord or plug is intended to alert the user to the presence of the National Electronic Code that produce heat. 9. Refer servicing to .... Do not block any heat sources such as practical. The wide blade or the third prong are no use only the recommended accessories. Protect the power cord from being from being walked on or pinched particularly at plugs, convenience receptacles, and the point where they exit from tip-over . 13....
User Manual (user Manual) (ver.1.0) (English)
Page 3
...s Audio 43 s Bookmarks 44 s MP3/WMA Play 45 s Program Play & Random Play 47 s Picture CD Playback 48 s 3D Sound 50 s Function (DVD 51 x 8 - System Setup 16 s On-Screen Menu Navigation 16 s Menu Language 17 s Manual Clock Set 18 s Tuner Band Setting 19 s RF ...Output Channel 20 s Auto Channel Memory 21 s Channel Add/Delete 22 s Front Panel Dimmer 23 s Auto Power Off 24 4 Table of Contents x Safety 2 s Important Safety Instructions 2 x Welcome 7 s Feature Summary 7 s Unpack 7 s Disc Type and Characteristics 8 x 1 - ...
...s Audio 43 s Bookmarks 44 s MP3/WMA Play 45 s Program Play & Random Play 47 s Picture CD Playback 48 s 3D Sound 50 s Function (DVD 51 x 8 - System Setup 16 s On-Screen Menu Navigation 16 s Menu Language 17 s Manual Clock Set 18 s Tuner Band Setting 19 s RF ...Output Channel 20 s Auto Channel Memory 21 s Channel Add/Delete 22 s Front Panel Dimmer 23 s Auto Power Off 24 4 Table of Contents x Safety 2 s Important Safety Instructions 2 x Welcome 7 s Feature Summary 7 s Unpack 7 s Disc Type and Characteristics 8 x 1 - ...
User Manual (user Manual) (ver.1.0) (English)
Page 4
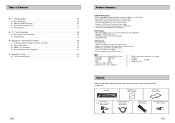
... (Radio Frequency) Antenna Cable (AC39-42001J) OPEN/CLOSE Remote Control (AK59-00008A) 1.5V "AAA" Batteries- 2EA (AC43-12002H) POWER 7 DVD Features • 10-bit video digital to play back DVDs, audio CDs, MP3 discs or VHS Tapes. • Enjoy a DVD movie while recording a TV show to Set a Timer Recording 58 s Function(VCR 59 x Appendix...
... (Radio Frequency) Antenna Cable (AC39-42001J) OPEN/CLOSE Remote Control (AK59-00008A) 1.5V "AAA" Batteries- 2EA (AC43-12002H) POWER 7 DVD Features • 10-bit video digital to play back DVDs, audio CDs, MP3 discs or VHS Tapes. • Enjoy a DVD movie while recording a TV show to Set a Timer Recording 58 s Function(VCR 59 x Appendix...
User Manual (user Manual) (ver.1.0) (English)
Page 5
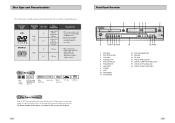
...Dolby Digital disc STEREO • Stereo disc DIGITAL SOUND • Digital Audio disc • DTS disc • MP3 disc Play Region Number Both the DVD player and the discs are coded by region. Double-sided 160 min. If the codes do not match, the disc will not play . The Region... on the rear panel of the player. 8 Front Panel Overview 1 2 3 4 56 7 DVD/VCR PROGRESSIVE EJECT 8 9 10 11 12 13 14 1 DVD DECK 2 DVD OPEN/CLOSE 3 VCR DECK 4 CHANNEL / 5 DVD-VCR SELECT 6 PROGRESSIVE 7 VCR EJECT 8 POWER 9 STOP 10 REWIND/REV 11 PLAY/PAUSE 15 16 17 18 12 FAST-FORWARD/FWD 13 RECORD...
...Dolby Digital disc STEREO • Stereo disc DIGITAL SOUND • Digital Audio disc • DTS disc • MP3 disc Play Region Number Both the DVD player and the discs are coded by region. Double-sided 160 min. If the codes do not match, the disc will not play . The Region... on the rear panel of the player. 8 Front Panel Overview 1 2 3 4 56 7 DVD/VCR PROGRESSIVE EJECT 8 9 10 11 12 13 14 1 DVD DECK 2 DVD OPEN/CLOSE 3 VCR DECK 4 CHANNEL / 5 DVD-VCR SELECT 6 PROGRESSIVE 7 VCR EJECT 8 POWER 9 STOP 10 REWIND/REV 11 PLAY/PAUSE 15 16 17 18 12 FAST-FORWARD/FWD 13 RECORD...
User Manual (user Manual) (ver.1.0) (English)
Page 6
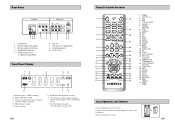
...MENU 32 MARK SEARCH 33 ANGLE TIMER Insert Batteries into Remote • Remove the battery cover on , DVD is operating. 2 DVD or CD media is loaded. 3 The time, counter position, time remaining or current deck status is ...20 TV/VCR 21 VCR, TV SELECT 22 INPUT SEL. It also blinks when you pause VCR. 10 Remote Control Overview POWER 1 2 3 4 5 6 7 8 9 10 11 12 13 14 15 16 17 OPEN/CLOSE 18 19 20... 21 22 23 24 25 26 27 28 29 30 31 32 33 1 POWER 2 SHUTTLE 3 100+ 4 DVD 5 TV MUTE. Rear Panel 1 2 3 4 1 S-VIDEO OUT 2 DIGITAL AUDIO OUT(COAXIAL) 3 DIGITAL AUDIO OUT...
...MENU 32 MARK SEARCH 33 ANGLE TIMER Insert Batteries into Remote • Remove the battery cover on , DVD is operating. 2 DVD or CD media is loaded. 3 The time, counter position, time remaining or current deck status is ...20 TV/VCR 21 VCR, TV SELECT 22 INPUT SEL. It also blinks when you pause VCR. 10 Remote Control Overview POWER 1 2 3 4 5 6 7 8 9 10 11 12 13 14 15 16 17 OPEN/CLOSE 18 19 20... 21 22 23 24 25 26 27 28 29 30 31 32 33 1 POWER 2 SHUTTLE 3 100+ 4 DVD 5 TV MUTE. Rear Panel 1 2 3 4 1 S-VIDEO OUT 2 DIGITAL AUDIO OUT(COAXIAL) 3 DIGITAL AUDIO OUT...
User Manual (user Manual) (ver.1.0) (English)
Page 7
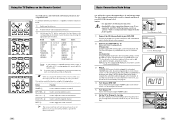
... the remote control or on the front panel of your DVD-VCR's internal clock. Using the TV Buttons on the Remote Control POWER 1 OPEN/CLOSE 3 2 3 4 4 5 Your VCR remote control will not necessarily work with Samsung televisions and compatible brands. Brand Codes Brand Codes SAMSUNG SHARP SONY RCA TOSHIBA PANASONIC HITACHI NEWSAN 01, 14, 15...
... the remote control or on the front panel of your DVD-VCR's internal clock. Using the TV Buttons on the Remote Control POWER 1 OPEN/CLOSE 3 2 3 4 4 5 Your VCR remote control will not necessarily work with Samsung televisions and compatible brands. Brand Codes Brand Codes SAMSUNG SHARP SONY RCA TOSHIBA PANASONIC HITACHI NEWSAN 01, 14, 15...
User Manual (user Manual) (ver.1.0) (English)
Page 8
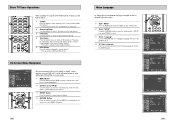
Deck Control Buttons POWER 1 2 OPEN/CLOSE 3 4 The DVD-VCR uses one set of the unit. 5 Additional VCR Options • See pages 52~54 for special VCR Playback features. • See pages 55~57 for VCR Recording features. • See page 58 for special DVD Playback features. 14 Basic VCR ... the INPUT SEL. button repeatedly to operate both decks. Basic DVD Operation Fllow the instructions below to play automatically when you want to play automatically if it into the VCR deck. • When a videotape is inserted, power will light on the Front Panel Display to turn on the...
Deck Control Buttons POWER 1 2 OPEN/CLOSE 3 4 The DVD-VCR uses one set of the unit. 5 Additional VCR Options • See pages 52~54 for special VCR Playback features. • See pages 55~57 for VCR Recording features. • See page 58 for special DVD Playback features. 14 Basic VCR ... the INPUT SEL. button repeatedly to operate both decks. Basic DVD Operation Fllow the instructions below to play automatically when you want to play automatically if it into the VCR deck. • When a videotape is inserted, power will light on the Front Panel Display to turn on the...
User Manual (user Manual) (ver.1.0) (English)
Page 9
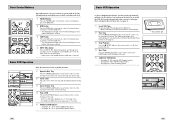
... : Off Language : English Front Display Auto Power Off : Auto : Off Language : English Front Display Auto Power Off : Auto : Off 17 Use the following buttons to open and navigate through the on-screen menus. 1 MENU Button Press this button while the DVD is in Stop or Play mode. 2 Select.... First, press the 100+ button, then use the buttons below. 1 TV/VCR 3 Press this button to switch between your DVD-VCR. On-Screen Menu Navigation Language : English Front Display Auto Power Off : Auto : Off 1 2 3 2 4 2 2 The on-screen menus allow you to enable or disable various functions...
... : Off Language : English Front Display Auto Power Off : Auto : Off Language : English Front Display Auto Power Off : Auto : Off 17 Use the following buttons to open and navigate through the on-screen menus. 1 MENU Button Press this button while the DVD is in Stop or Play mode. 2 Select.... First, press the 100+ button, then use the buttons below. 1 TV/VCR 3 Press this button to switch between your DVD-VCR. On-Screen Menu Navigation Language : English Front Display Auto Power Off : Auto : Off 1 2 3 2 4 2 2 The on-screen menus allow you to enable or disable various functions...
User Manual (user Manual) (ver.1.0) (English)
Page 10
.... • Cable TV - Indicates that the DVD-VCR is connected to Cable TV. 1 3 Language : English Front Display Auto Power Off : Auto : Off Language : English Front Display Auto Power Off : Auto : Off Language : English Front Display Auto Power Off : Auto : Off Ant./Cable : Antenna...Clock Set 1 4 Language : English Front Display Auto Power Off : Auto : Off Language : English Front Display Auto Power Off : Auto : Off Language : English Front Display Auto Power Off : Auto : Off If Auto Setup fails to set the DVD-VCR's internal clock by locating a local TV station, ...
.... • Cable TV - Indicates that the DVD-VCR is connected to Cable TV. 1 3 Language : English Front Display Auto Power Off : Auto : Off Language : English Front Display Auto Power Off : Auto : Off Language : English Front Display Auto Power Off : Auto : Off Ant./Cable : Antenna...Clock Set 1 4 Language : English Front Display Auto Power Off : Auto : Off Language : English Front Display Auto Power Off : Auto : Off Language : English Front Display Auto Power Off : Auto : Off If Auto Setup fails to set the DVD-VCR's internal clock by locating a local TV station, ...
User Manual (user Manual) (ver.1.0) (English)
Page 11
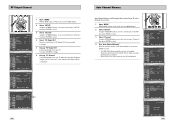
... minutes to match the RF output channel of the player. RF Output Channel 1 5 Language : English Front Display Auto Power Off : Auto : Off Language : English Front Display Auto Power Off : Auto : Off 1 Open "MENU" With the DVD in Stop or Play mode, press the MENU button. 2 Select "SETUP" Using the UP/DOWN buttons, move...
... minutes to match the RF output channel of the player. RF Output Channel 1 5 Language : English Front Display Auto Power Off : Auto : Off Language : English Front Display Auto Power Off : Auto : Off 1 Open "MENU" With the DVD in Stop or Play mode, press the MENU button. 2 Select "SETUP" Using the UP/DOWN buttons, move...
User Manual (user Manual) (ver.1.0) (English)
Page 12
Front Panel Display will be bright all the time, or dim during power off . 1 Open " MENU" With the DVD in the channel number you wish to add or remove. 6 Select "Channel Add/Delete" Press right to add or press left to remove the channel ... : Off Language : English Front Display Auto Power Off : Auto : Off Language : English Front Display Auto Power Off : Auto : Off Use this feature if Auto Channel Search missed a channel that you would like to add, or added a channel you wish to remove. 1 Open "MENU" With the DVD in Stop or Play mode, press the...
Front Panel Display will be bright all the time, or dim during power off . 1 Open " MENU" With the DVD in the channel number you wish to add or remove. 6 Select "Channel Add/Delete" Press right to add or press left to remove the channel ... : Off Language : English Front Display Auto Power Off : Auto : Off Language : English Front Display Auto Power Off : Auto : Off Use this feature if Auto Channel Search missed a channel that you would like to add, or added a channel you wish to remove. 1 Open "MENU" With the DVD in Stop or Play mode, press the...
User Manual (user Manual) (ver.1.0) (English)
Page 13
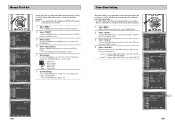
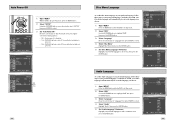
...to your preferred language, follow these steps. Auto Power Off Disc Menu Language 1 2 Language : English Front Display Auto Power Off : Auto : Off 1 Open "MENU" With the DVD in Stop mode. 2 Select "DVD" Use the UP/DOWN buttons to highlight "DVD" then press the ENTER button. 3 Select "Language... Language" Preference Highlight your preferred language for disc menus, then press the ENTER button. DVD-VCR will auto shut off is pressed. • 2Hr - Language : English Front Display : Off Off Auto Power Off : Off 1Hr 2Hr 24 Audio Language To set to the language you choose. ...
...to your preferred language, follow these steps. Auto Power Off Disc Menu Language 1 2 Language : English Front Display Auto Power Off : Auto : Off 1 Open "MENU" With the DVD in Stop mode. 2 Select "DVD" Use the UP/DOWN buttons to highlight "DVD" then press the ENTER button. 3 Select "Language... Language" Preference Highlight your preferred language for disc menus, then press the ENTER button. DVD-VCR will auto shut off is pressed. • 2Hr - Language : English Front Display : Off Off Auto Power Off : Off 1Hr 2Hr 24 Audio Language To set to the language you choose. ...

User Manual (user Manual) (ver.1.0) (English)
Page 14
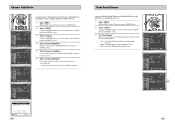
... options: • PCM - To use your preferred language, follow these steps. Language : English Front Display Auto Power Off : Auto : Off PCM Down Sampling : On PCM Bitstream 26 27 If your preferred language is available on a DVD, your Subtitle Language will automatically be set the Subtitle Language to your speakers. Subtitle Language To...
... options: • PCM - To use your preferred language, follow these steps. Language : English Front Display Auto Power Off : Auto : Off PCM Down Sampling : On PCM Bitstream 26 27 If your preferred language is available on a DVD, your Subtitle Language will automatically be set the Subtitle Language to your speakers. Subtitle Language To...

User Manual (user Manual) (ver.1.0) (English)
Page 15
...the original dynamic range. Language : English Front Display Auto Power Off : Auto : Off Off On PCM Down Sampling : On Off PCM Down Sampling : On On 28 29 Dynamic Compression Dynamic Compression restrains the dynamic range of the DVD audio, making quiet passages in the audio signal louder ...options: • On - NOTE: Select "On" ONLY if you MUST enable this feature in the menu system. DTS Language : English Front Display Auto Power Off : Auto : Off If your A/V receiver is equipped with a DTS decoder, your DVDVCR can output DTS digital sound, but you have connected a ...
...the original dynamic range. Language : English Front Display Auto Power Off : Auto : Off Off On PCM Down Sampling : On Off PCM Down Sampling : On On 28 29 Dynamic Compression Dynamic Compression restrains the dynamic range of the DVD audio, making quiet passages in the audio signal louder ...options: • On - NOTE: Select "On" ONLY if you MUST enable this feature in the menu system. DTS Language : English Front Display Auto Power Off : Auto : Off If your A/V receiver is equipped with a DTS decoder, your DVDVCR can output DTS digital sound, but you have connected a ...
User Manual (user Manual) (ver.1.0) (English)
Page 16
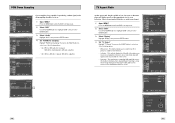
...you to 48K and outputted. • Off - Language : English Front Display Auto Power Off : Auto : Off Display Setup 30 31 When a 96K disc is in Stop mode. 2 Select "DVD" Use the UP/DOWN buttons to highlight "DVD ", then press the ENTER button. 3 Select "Audio" Highlight "Audio", then press...on. 1 Open "MENU" Press the MENU button while the DVD is played, 96K will be outputted. PCM Down Sampling Language : English Front Display Auto Power Off : Auto : Off If your television. The familiar way of watching DVD and VHS movies, this method selectively crops (by panning and ...
...you to 48K and outputted. • Off - Language : English Front Display Auto Power Off : Auto : Off Display Setup 30 31 When a 96K disc is in Stop mode. 2 Select "DVD" Use the UP/DOWN buttons to highlight "DVD ", then press the ENTER button. 3 Select "Audio" Highlight "Audio", then press...on. 1 Open "MENU" Press the MENU button while the DVD is played, 96K will be outputted. PCM Down Sampling Language : English Front Display Auto Power Off : Auto : Off If your television. The familiar way of watching DVD and VHS movies, this method selectively crops (by panning and ...
User Manual (user Manual) (ver.1.0) (English)
Page 17
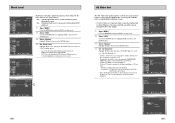
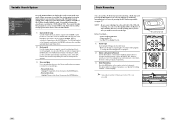
... "DVD ", then press the ENTER button. 3 Select "Display" Highlight "Display", then press the ENTER button. 4 Set "Black Level" Highlight "Black Level," then press the RIGHT button to one of two choices: • Off - Interlace : Interlaced Scan mode will not work . - Language : English Front Display Auto Power Off...Setup On On Off Alt Video Out The "Alt Video Out" option must be disturbed. Black Level Language : English Front Display Auto Power Off : Auto : Off The Black Level feature adjusts the reference level of black in the video signal to select one of the following...
... "DVD ", then press the ENTER button. 3 Select "Display" Highlight "Display", then press the ENTER button. 4 Set "Black Level" Highlight "Black Level," then press the RIGHT button to one of two choices: • Off - Interlace : Interlaced Scan mode will not work . - Language : English Front Display Auto Power Off...Setup On On Off Alt Video Out The "Alt Video Out" option must be disturbed. Black Level Language : English Front Display Auto Power Off : Auto : Off The Black Level feature adjusts the reference level of black in the video signal to select one of the following...
User Manual (user Manual) (ver.1.0) (English)
Page 18
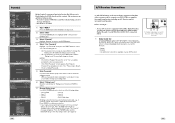
...No additional settings are rated. 1 Open "MENU" Press the MENU button while the DVD is available on your password, press power on from the DIGITAL AUDIO OUT jacks on the front panel for 5 seconds. Please... ENTER button. 4 Select "Use Password" Highlight "Use Password," then press the RIGHT button to bypass the DVD-VCR's built-in Dolby Digital Decoder. The "reset ok" message will change the Rating Level. No password... Audio Input of the following options: • Off - Press the POWER button and the DVD-VCR will go to the "Auto Setup" mode. (See page 13) A/V Receiver Connections To...
...No additional settings are rated. 1 Open "MENU" Press the MENU button while the DVD is available on your password, press power on from the DIGITAL AUDIO OUT jacks on the front panel for 5 seconds. Please... ENTER button. 4 Select "Use Password" Highlight "Use Password," then press the RIGHT button to bypass the DVD-VCR's built-in Dolby Digital Decoder. The "reset ok" message will change the Rating Level. No password... Audio Input of the following options: • Off - Press the POWER button and the DVD-VCR will go to the "Auto Setup" mode. (See page 13) A/V Receiver Connections To...
User Manual (user Manual) (ver.1.0) (English)
Page 27
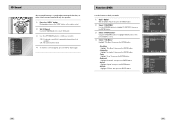
.... - Bookmark Highlight "Bookmark", then press the ENTER button. - Language : English Front Display Auto Power Off : Auto : Off Title Menu Disc Menu Information Zoom Bookmark Repeat EZ View DVD Function 50 51 button again. Zoom Highlight "Zoom", then press the ENTER button. - button on ...the "INFO." ENG 4 To make the screen disappear, press the "INFO." Repeat Highlight "Repeat", then press the ENTER button. - ENG Function (DVD) Use this feature to select. 4 Select "Title Menu" Highlight "Title Menu", then press the ENTER button. - EZ View Highlight "EZ View", ...
.... - Bookmark Highlight "Bookmark", then press the ENTER button. - Language : English Front Display Auto Power Off : Auto : Off Title Menu Disc Menu Information Zoom Bookmark Repeat EZ View DVD Function 50 51 button again. Zoom Highlight "Zoom", then press the ENTER button. - button on ...the "INFO." ENG 4 To make the screen disappear, press the "INFO." Repeat Highlight "Repeat", then press the ENTER button. - ENG Function (DVD) Use this feature to select. 4 Select "Title Menu" Highlight "Title Menu", then press the ENTER button. - EZ View Highlight "EZ View", ...
User Manual (user Manual) (ver.1.0) (English)
Page 29
... the 0-9 buttons or the Channel Up/Down arrow buttons to select the desired channel, or press the INPUT SEL. Before You Begin... • Power on the DVD-VCR • Power on the TV • Set the TV to channel 3 or 4 . 1 Insert Tape Insert a blank VHS tape into the VCR deck. • Make... sure the tape is not 1 possible. 3 2 DVD/VCR PROGRESSIVE 54 55 For options while recording is in progress, see "Special Recording Features" on the ...
... the 0-9 buttons or the Channel Up/Down arrow buttons to select the desired channel, or press the INPUT SEL. Before You Begin... • Power on the DVD-VCR • Power on the TV • Set the TV to channel 3 or 4 . 1 Insert Tape Insert a blank VHS tape into the VCR deck. • Make... sure the tape is not 1 possible. 3 2 DVD/VCR PROGRESSIVE 54 55 For options while recording is in progress, see "Special Recording Features" on the ...
