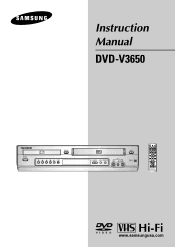
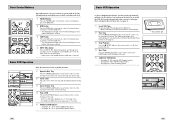
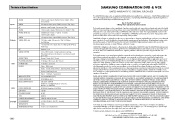
User Manual (user Manual) (ver.1.0) (English)
Page 1
Instruction Manual DVD-V3650 DVD/VCR PROGRESSIVE EJECT POWER OPEN/CLOSE www.samsungusa.com
User Manual (user Manual) (ver.1.0) (English)
Page 2
...use this copyright protection technology must be voided if you make changes or modifications not expressly approved by Macrovision Corporation. Keep these instructions. 2. Follow all servicing to the point of certain U.S. The wide blade or the third prong are no use attachments/... provided plug does not fit into the apparatus, the apparatus has been exposed to the presence of important operating and maintenance instructions in any ventilation openings. WARNING: TO AVOID HAZARDOUS EXPOSURE TO INVISIBLE LASER RADIATION, DO NOT OPEN OR REMOVE/DEFEAT LASER...
User Manual (user Manual) (ver.1.0) (English)
Page 3
... Panel Display 10 s Remote Control Overview 11 s Insert Batteries into Remote 11 s Using the TV Buttons on the Remote Control 12 x 2 - DVD Sound Setup 35 s A/V Receiver Connections 35 x 7 - System Setup 16 s On-Screen Menu Navigation 16 s Menu Language 17 s Manual Clock ...22 s Front Panel Dimmer 23 s Auto Power Off 24 4 Table of Contents x Safety 2 s Important Safety Instructions 2 x Welcome 7 s Feature Summary 7 s Unpack 7 s Disc Type and Characteristics 8 x 1 - DVD Operations 36 s Special Playback Features 36 s Disc Menu Navigation 37 s EZ View 37 s Title/Chapter/Time ...
User Manual (user Manual) (ver.1.0) (English)
Page 7
... Connection method, set the clock, you encounter problems, operate the television directly. 12 Basic Connections/Auto Setup You will not necessarily work with Samsung televisions and compatible brands. INPUT SEL. ➁ Used to select the required channel. Use the three cables as follows: red for right ...control or on the front panel. When Auto Setup is compatible, follow the instructions below. 1 Switch your television on the TV by pressing the appropriate numeric buttons. See page 18. 4 Turn On your DVD-VCR Turn on the power by pressing the POWER button on the remote ...
User Manual (user Manual) (ver.1.0) (English)
Page 8
.... • See pages 55~57 for VCR Recording features. • See page 58 for special DVD Playback features. 14 Basic VCR Operation To play automatically if it into the VCR deck. • When...insert a videotape that the VHS deck is selected. You can turn on the DVD-VCR. 2 DVD Button Press the DVD button on the remote control or front panel when you want to control the VCR... is only available when the VCR deck is selected. 4 INPUT SEL. DVD/VCR PROGRESSIVE 1 EJECT 3 2 DVD/VCR PROGRESSIVE EJECT 4 15 Basic DVD Operation Fllow the instructions below to operate both decks.
User Manual (user Manual) (ver.1.0) (English)
Page 30
... control to set the Record Speed to one of a button. 1 Start Recording Follow the instructions on page 55 to begin recording. 2 Activate OTR While in Record mode, press the REC button again to add recording time in the DVD deck and press Play. Super Long Play, for best quality. • SLP - SLP...
User Manual (user Manual) (ver.1.0) (English)
Page 32
...you use these Line Out jacks. • To activate your connection, see "Alt Video Out" on your stereo receiver. S-Video/Component Video Connections (for DVD) 1 To S-Video Input on Your TV 2 To Component Video Input on Your TV 3 To Left/Right Audio Inputs on Your TV Use the S-Video... Stereo to Auxiliary Mode Set your stereo receiver or TV. To activate your alternative (S-Video or Component) video selection, follow the "Alt Video Out" instructions on your stereo receiver or TV to a TV with the S-Video or Component Video Output, make sure that you have inserted a Hi-Fi stereo videotape...
User Manual (user Manual) (ver.1.0) (English)
Page 34
... system, 4 rotary head helical scanning; Hi-Fi: 2 track T-180 tape: SP 3 hours, SLP 9 hours T-120 tape: RESPONSE DISC COMPATIBILITY DVD SYSTEM FREQ. Technical Specifications AUDIO Inputs VIDEO RF AUDIO AUDIO (DVD only) Outputs VIDEO VIDEO (DVD only) RF VIDEO SYSTEM AUDIO TRACK PLAY/RECORD TIME VCR FF/REW TIME HEADS WOW & FLUTTER FREQ.