
User Manual (user Manual) (ver.1.0) (English)
Page 2
... of the National Electronic Code that provides guidelines for replacement of the polarized or grounding-type plug. Para prevenir electrochoque, no serviceable parts inside. Ne faire effectuer l'entretien que par un personnel qualifié. Do not block any way, such as practical. Do not install near water. 6. Only use este enchufe (polarizado) con un cordón de extensi...
... of the National Electronic Code that provides guidelines for replacement of the polarized or grounding-type plug. Para prevenir electrochoque, no serviceable parts inside. Ne faire effectuer l'entretien que par un personnel qualifié. Do not block any way, such as practical. Do not install near water. 6. Only use este enchufe (polarizado) con un cordón de extensi...
User Manual (user Manual) (ver.1.0) (English)
Page 3
... Panel Display 10 s Remote Control Overview 11 s Insert Batteries into Remote 11 s Using the TV Buttons on the Remote Control 12 x 2 - Table of Contents x 5 - DVD Operations 36 s Special Playback Features 36 s Disc Menu Navigation 37 s EZ View 37 s Title/Chapter/Time Selection 39 s Angle View 40 s Subtitle 41 s A to B Repeat 42 s Repeat Chapter/Title 43 s Audio 43 s Bookmarks 44 s MP3/WMA Play 45 s Program Play & Random Play 47 s Picture CD Playback 48 s 3D Sound 50 s Function (DVD 51 x 8 - Getting Started 13 s Basic Connections/Auto Setup...
... Panel Display 10 s Remote Control Overview 11 s Insert Batteries into Remote 11 s Using the TV Buttons on the Remote Control 12 x 2 - Table of Contents x 5 - DVD Operations 36 s Special Playback Features 36 s Disc Menu Navigation 37 s EZ View 37 s Title/Chapter/Time Selection 39 s Angle View 40 s Subtitle 41 s A to B Repeat 42 s Repeat Chapter/Title 43 s Audio 43 s Bookmarks 44 s MP3/WMA Play 45 s Program Play & Random Play 47 s Picture CD Playback 48 s 3D Sound 50 s Function (DVD 51 x 8 - Getting Started 13 s Basic Connections/Auto Setup...
User Manual (user Manual) (ver.1.0) (English)
Page 4
... Specifications 64 6 Feature Summary DVD+VCR Features • Perfect compatibility to analog converter and 27MHz advanced digital filter. • Playback of Super Audio CD • CDGs play audio only, not graphics. *Ability to play back DVDs, audio CDs, MP3 discs or VHS Tapes. • Enjoy a DVD movie while recording a TV show to Set a Timer Recording 58 s Function(VCR 59 x Appendix A - DVD-VCR DVD/VCR PROGRESSIVE EJECT Registration Card (AD68-00078A) User's Guide (AK68-00215A) RCA cable for DTS-enhanced DVDs. • Playback...
... Specifications 64 6 Feature Summary DVD+VCR Features • Perfect compatibility to analog converter and 27MHz advanced digital filter. • Playback of Super Audio CD • CDGs play audio only, not graphics. *Ability to play back DVDs, audio CDs, MP3 discs or VHS Tapes. • Enjoy a DVD movie while recording a TV show to Set a Timer Recording 58 s Function(VCR 59 x Appendix A - DVD-VCR DVD/VCR PROGRESSIVE EJECT Registration Card (AD68-00078A) User's Guide (AK68-00215A) RCA cable for DTS-enhanced DVDs. • Playback...
User Manual (user Manual) (ver.1.0) (English)
Page 5
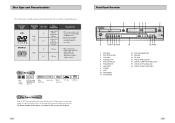
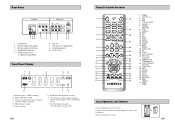
... not play . Disc Type and Characteristics This DVD player is capable of playing the following types of discs with better audio quality, less distortion and less deterioration of the player. 8 Front Panel Overview 1 2 3 4 56 7 DVD/VCR PROGRESSIVE EJECT 8 9 10 11 12 13 14 1 DVD DECK 2 DVD OPEN/CLOSE 3 VCR DECK 4 CHANNEL / 5 DVD-VCR SELECT 6 PROGRESSIVE 7 VCR EJECT 8 POWER 9 STOP 10 REWIND/REV 11 PLAY/PAUSE 15 16 17 18 12 FAST-FORWARD/FWD 13 RECORD 14 EZ VIEW 15 FRONT PANEL DISPLAY 16 LINE IN 2 COMPOSITE VIDEO...
... not play . Disc Type and Characteristics This DVD player is capable of playing the following types of discs with better audio quality, less distortion and less deterioration of the player. 8 Front Panel Overview 1 2 3 4 56 7 DVD/VCR PROGRESSIVE EJECT 8 9 10 11 12 13 14 1 DVD DECK 2 DVD OPEN/CLOSE 3 VCR DECK 4 CHANNEL / 5 DVD-VCR SELECT 6 PROGRESSIVE 7 VCR EJECT 8 POWER 9 STOP 10 REWIND/REV 11 PLAY/PAUSE 15 16 17 18 12 FAST-FORWARD/FWD 13 RECORD 14 EZ VIEW 15 FRONT PANEL DISPLAY 16 LINE IN 2 COMPOSITE VIDEO...
User Manual (user Manual) (ver.1.0) (English)
Page 6
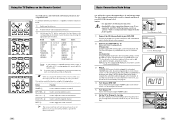
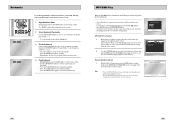
... Front Panel Display 1 2 3 4 5 6 1 When the light is on the remote • Insert two 1.5V "AAA" batteries as shown, making sure of a VHS videotape is playing (The current TV program or video is broadcast in Stereo.) 8 Timer Recording is in progress. AUDIO 6 VOLUME +/- 7 REWIND SKIP BACK 8 STOP 9 SUBTITLE 10 MENU 11 UP 12 LEFT 13 DOWN 14 SPEED 15 RECORD 16 CLEAR 17 MODE REPEAT 18 OPEN/CLOSE 19 0-9 20 TV/VCR 21 VCR, TV SELECT 22 INPUT...
... Front Panel Display 1 2 3 4 5 6 1 When the light is on the remote • Insert two 1.5V "AAA" batteries as shown, making sure of a VHS videotape is playing (The current TV program or video is broadcast in Stereo.) 8 Timer Recording is in progress. AUDIO 6 VOLUME +/- 7 REWIND SKIP BACK 8 STOP 9 SUBTITLE 10 MENU 11 UP 12 LEFT 13 DOWN 14 SPEED 15 RECORD 16 CLEAR 17 MODE REPEAT 18 OPEN/CLOSE 19 0-9 20 TV/VCR 21 VCR, TV SELECT 22 INPUT...
User Manual (user Manual) (ver.1.0) (English)
Page 7
... procedure. It is now programmed to operate with the remote control, it is better to adjust the volume of your TV's Antenna Input. INPUT SEL. ➁ Used to select the required channel. VOL + or - ➂ Used to use the Line Connection method. 3 Plug In Your DVD-VCR's power should set your DVD-VCR is compatible with the remote control. ➢ If several codes are indicated for channels and then set the clock manually. The Auto Setup will blink. You can...
... procedure. It is now programmed to operate with the remote control, it is better to adjust the volume of your TV's Antenna Input. INPUT SEL. ➁ Used to select the required channel. VOL + or - ➂ Used to use the Line Connection method. 3 Plug In Your DVD-VCR's power should set your DVD-VCR is compatible with the remote control. ➢ If several codes are indicated for channels and then set the clock manually. The Auto Setup will blink. You can...
User Manual (user Manual) (ver.1.0) (English)
Page 8
... can turn on the DVD-VCR. 2 DVD Button Press the DVD button on the remote control or front panel when you want to control the DVD deck. • The DVD indicator will light on the Front Panel Display to show that the DVD deck is selected. 3 VCR Button Press the VCR button on the remote control or front panel when you insert a videotape that the VHS deck is selected. 4 INPUT SEL. DVD/VCR PROGRESSIVE 1 EJECT 3 2 DVD/VCR PROGRESSIVE EJECT 4 15 Deck Control Buttons POWER 1 2 OPEN/CLOSE 3 4 The DVD-VCR uses one set of controls to play a standard VHS...
... can turn on the DVD-VCR. 2 DVD Button Press the DVD button on the remote control or front panel when you want to control the DVD deck. • The DVD indicator will light on the Front Panel Display to show that the DVD deck is selected. 3 VCR Button Press the VCR button on the remote control or front panel when you insert a videotape that the VHS deck is selected. 4 INPUT SEL. DVD/VCR PROGRESSIVE 1 EJECT 3 2 DVD/VCR PROGRESSIVE EJECT 4 15 Deck Control Buttons POWER 1 2 OPEN/CLOSE 3 4 The DVD-VCR uses one set of controls to play a standard VHS...
User Manual (user Manual) (ver.1.0) (English)
Page 9
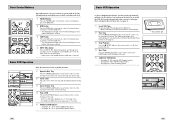
... using the DVD-VCR's built-in TV tuner, use the numeric buttons (0-9) to enter the 2 remaining digits of the channel number desired. • This button is activated only in Cable TV Mode. 5 INFO. On-Screen Menu Navigation Language : English Front Display Auto Power Off : Auto : Off 1 2 3 2 4 2 2 The on-screen menus allow you to enable or disable various functions on -screen MENU language to English, French or Spanish, follow these steps. 1 Open "MENU" Press the MENU button while the DVD is in Stop or Play mode. 2 Select "SETUP" Using...
... using the DVD-VCR's built-in TV tuner, use the numeric buttons (0-9) to enter the 2 remaining digits of the channel number desired. • This button is activated only in Cable TV Mode. 5 INFO. On-Screen Menu Navigation Language : English Front Display Auto Power Off : Auto : Off 1 2 3 2 4 2 2 The on-screen menus allow you to enable or disable various functions on -screen MENU language to English, French or Spanish, follow these steps. 1 Open "MENU" Press the MENU button while the DVD is in Stop or Play mode. 2 Select "SETUP" Using...
User Manual (user Manual) (ver.1.0) (English)
Page 10
... channel numbers. 1 Open "MENU" With the DVD in Stop or Play mode. 2 Select "SETUP" Using the UP/DOWN buttons, move the selection bar to "Channel", then press ENTER to select. 4 Select "Ant/Cable" Move the selection arrow to "Ant/Cable" then press right to Cable TV. 1 3 Language : English Front Display Auto Power Off : Auto : Off Language : English Front Display Auto Power Off : Auto : Off Language : English Front Display Auto Power Off : Auto : Off Ant./Cable : Antenna RF Output CH : 3CH Auto Channel Memory Channel Add/Delete Antenna Cable TV 18 19 Manual Clock Set...
... channel numbers. 1 Open "MENU" With the DVD in Stop or Play mode. 2 Select "SETUP" Using the UP/DOWN buttons, move the selection bar to "Channel", then press ENTER to select. 4 Select "Ant/Cable" Move the selection arrow to "Ant/Cable" then press right to Cable TV. 1 3 Language : English Front Display Auto Power Off : Auto : Off Language : English Front Display Auto Power Off : Auto : Off Language : English Front Display Auto Power Off : Auto : Off Ant./Cable : Antenna RF Output CH : 3CH Auto Channel Memory Channel Add/Delete Antenna Cable TV 18 19 Manual Clock Set...
User Manual (user Manual) (ver.1.0) (English)
Page 16
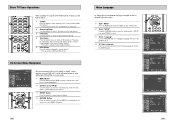
... button. 3 Select "Display" Highlight "Display", then press the ENTER button. 4 Set "TV Aspect" Highlight "TV Aspect", then press the RIGHT button to select one of the following options: • Widescreen - This method displays the full width of the screen. • Pan-Scan - PCM Down Sampling Language : English Front Display Auto Power Off : Auto : Off If your television. When a 96K disc is in Stop mode. 2 Select "DVD" Use the UP/DOWN buttons to highlight "DVD ", then press the ENTER button. 3 Select "Audio...
... button. 3 Select "Display" Highlight "Display", then press the ENTER button. 4 Set "TV Aspect" Highlight "TV Aspect", then press the RIGHT button to select one of the following options: • Widescreen - This method displays the full width of the screen. • Pan-Scan - PCM Down Sampling Language : English Front Display Auto Power Off : Auto : Off If your television. When a 96K disc is in Stop mode. 2 Select "DVD" Use the UP/DOWN buttons to highlight "DVD ", then press the ENTER button. 3 Select "Audio...
User Manual (user Manual) (ver.1.0) (English)
Page 17
... - Black Level Language : English Front Display Auto Power Off : Auto : Off The Black Level feature adjusts the reference level of black in the video signal to determine what type of TV you have. - Select this if you are using the COMPONENT VIDEO OUT jacks on the front panel if you have a Progressive scan TV only. Yields consistent contrast through the RF or line outputs. 1 Open "MENU" Press the MENU button while the DVD is in Stop mode. 2 Select "DVD" Use the...
... - Black Level Language : English Front Display Auto Power Off : Auto : Off The Black Level feature adjusts the reference level of black in the video signal to determine what type of TV you have. - Select this if you are using the COMPONENT VIDEO OUT jacks on the front panel if you have a Progressive scan TV only. Yields consistent contrast through the RF or line outputs. 1 Open "MENU" Press the MENU button while the DVD is in Stop mode. 2 Select "DVD" Use the...
User Manual (user Manual) (ver.1.0) (English)
Page 18
... all discs are necessary. • On - No password is in Dolby Digital Decoder. Use the DIGITAL AUDIO OUT connection below. 1 Digital Audio Out Connect EITHER an optical cable OR a digital coaxial cable from a cold start with no Default Password. 5 Enter Password Use the numeric buttons (0-9) on your DVD-VCR to connect your A/V Receiver. The system uses an eight level rating system. • If you try to play a DVD that DVD offers, you need it to change your settings later. 6 Select "Rating...
... all discs are necessary. • On - No password is in Dolby Digital Decoder. Use the DIGITAL AUDIO OUT connection below. 1 Digital Audio Out Connect EITHER an optical cable OR a digital coaxial cable from a cold start with no Default Password. 5 Enter Password Use the numeric buttons (0-9) on your DVD-VCR to connect your A/V Receiver. The system uses an eight level rating system. • If you try to play a DVD that DVD offers, you need it to change your settings later. 6 Select "Rating...
User Manual (user Manual) (ver.1.0) (English)
Page 21
... 16:9 screen. • Screen Fit The top and bottom of the DVD title in order to the subtitle languages available in English 5.1CH. The picture will be used to quickly choose a title, chapter/track, or playing time. 1 1 View the Display During DVD/CD playback, press the INFO button on the remote control. 4 2 Select title Use the UP/DOWN and LEFT/RIGHT buttons to select Title, then press the ENTER button to change among...
... 16:9 screen. • Screen Fit The top and bottom of the DVD title in order to the subtitle languages available in English 5.1CH. The picture will be used to quickly choose a title, chapter/track, or playing time. 1 1 View the Display During DVD/CD playback, press the INFO button on the remote control. 4 2 Select title Use the UP/DOWN and LEFT/RIGHT buttons to select Title, then press the ENTER button to change among...
User Manual (user Manual) (ver.1.0) (English)
Page 24
... MODE button to exit the Bookmark menu. CLEAR 4 Play Bookmark • During playback, press the MARK button on the remote control. • Use the LEFT/RIGHT buttons to move to one of file extensions. MP3/WMA Play Function 1. If you have more than two types of the three bookmark placeholders (- - -). • The selected placeholder will be highlighted. = - - 3 Set the Bookmark Keep on playing the DVD up on the screen. 1 2 Select...
... MODE button to exit the Bookmark menu. CLEAR 4 Play Bookmark • During playback, press the MARK button on the remote control. • Use the LEFT/RIGHT buttons to move to one of file extensions. MP3/WMA Play Function 1. If you have more than two types of the three bookmark placeholders (- - -). • The selected placeholder will be highlighted. = - - 3 Set the Bookmark Keep on playing the DVD up on the screen. 1 2 Select...
User Manual (user Manual) (ver.1.0) (English)
Page 25
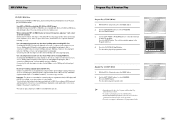
... support a maximum of 99 programmed order. Sound quality with decompression rates below 64Kbps or over 192Kbps will be used . • When naming your DVD player (degraded sound quality and in programmed order. Conversely, files with MP3 files basically depends on the disc, the Program and Random Play functions may not work. • To resume normal play, press the CLEAR button. • PROGRAM/RANDOM playback cannot be played in Stop mode, press the MODE button. 2. Use...
... support a maximum of 99 programmed order. Sound quality with decompression rates below 64Kbps or over 192Kbps will be used . • When naming your DVD player (degraded sound quality and in programmed order. Conversely, files with MP3 files basically depends on the disc, the Program and Random Play functions may not work. • To resume normal play, press the CLEAR button. • PROGRAM/RANDOM playback cannot be played in Stop mode, press the MODE button. 2. Use...
User Manual (user Manual) (ver.1.0) (English)
Page 29
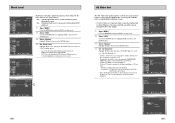
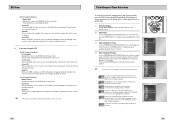
... progress, see "Special Recording Features" on the remote control or front panel. For options while recording is missing, you want to 4 hours by old VCRs. see page 57. 2 Select a Channel to Record Use the 0-9 buttons or the Channel Up/Down arrow buttons to the VCR is long enough to display the search screen in the stop Use this feature when you can even add time in a row, set the counter to record a program...
... progress, see "Special Recording Features" on the remote control or front panel. For options while recording is missing, you want to 4 hours by old VCRs. see page 57. 2 Select a Channel to Record Use the 0-9 buttons or the Channel Up/Down arrow buttons to the VCR is long enough to display the search screen in the stop Use this feature when you can even add time in a row, set the counter to record a program...

User Manual (user Manual) (ver.1.0) (English)
Page 31
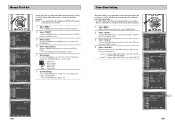
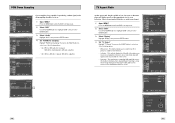
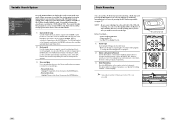
... channel. If the length is in Stop or Play mode, press the MENU button. 2 Select "FUNCTION" Use the Up/Down buttons to highlight "FUNCTION", then press the ENTER button. 3 Select "VCR Function" Using the UP/DOWN buttons to highlight "VCR Function", then press ENTER to select. 4 Select "Go to ( 0: 00: 00)" Highlight "Go to ( 0:00:00)", then press the ENTER button. - How to Set a Timer Recording Language : English Front Display Auto Power Off : Auto : Off Timer Program If you set. To stop the timer recording, press the POWER button...
... channel. If the length is in Stop or Play mode, press the MENU button. 2 Select "FUNCTION" Use the Up/Down buttons to highlight "FUNCTION", then press the ENTER button. 3 Select "VCR Function" Using the UP/DOWN buttons to highlight "VCR Function", then press ENTER to select. 4 Select "Go to ( 0: 00: 00)" Highlight "Go to ( 0:00:00)", then press the ENTER button. - How to Set a Timer Recording Language : English Front Display Auto Power Off : Auto : Off Timer Program If you set. To stop the timer recording, press the POWER button...

User Manual (user Manual) (ver.1.0) (English)
Page 32
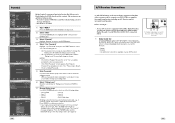
... your DVD-VCR to the Component Video Input on your TV. 3 Connect Audio Out (DVD only) Using RCA audio cables, connect the Left/Right Line Out jacks on the back panel of your DVD/VCR to the Left/Right Audio Line In jacks on your TV. • When connecting your DVD-VCR to adjust the volume on your alternative (S-Video or Component) video selection, follow the "Alt Video Out" instructions on page 33. The tuner and VCR can connect your DVD-VCR...
... your DVD-VCR to the Component Video Input on your TV. 3 Connect Audio Out (DVD only) Using RCA audio cables, connect the Left/Right Line Out jacks on the back panel of your DVD/VCR to the Left/Right Audio Line In jacks on your TV. • When connecting your DVD-VCR to adjust the volume on your alternative (S-Video or Component) video selection, follow the "Alt Video Out" instructions on page 33. The tuner and VCR can connect your DVD-VCR...
User Manual (user Manual) (ver.1.0) (English)
Page 33
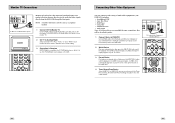
... television owner's manual for the correct setting. 3 Connection is not the same as a computer monitor. 1 Connect VCR to Monitor TV Connect RCA cables from the Audio/Video Line Out jacks on the VCR deck. 4 Timer Record From Device Select LINE1 (L1) or LINE2 (L2) as if the TV/VCR button were always set in the Timer Record menu. button until the playback from LINE1 (rear panel inputs) or LINE2 (front panel inputs) appears on your TV screen. All other Timer Record settings...
... television owner's manual for the correct setting. 3 Connection is not the same as a computer monitor. 1 Connect VCR to Monitor TV Connect RCA cables from the Audio/Video Line Out jacks on the VCR deck. 4 Timer Record From Device Select LINE1 (L1) or LINE2 (L2) as if the TV/VCR button were always set in the Timer Record menu. button until the playback from LINE1 (rear panel inputs) or LINE2 (front panel inputs) appears on your TV screen. All other Timer Record settings...
User Manual (user Manual) (ver.1.0) (English)
Page 34
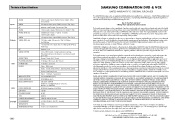
...1 Stereo audio outputs 1 Composite video output, RCA Connector, 75Ω, 1Vp-p 1 S-Video output, S-Connector, 75Ω, Y=1.0Vp-p, C=0.286Vp-p 1 Component video output, 75Ω, Y=1.0Vp-p, Pb=0.7Vp-p, Pr=0.7Vp-p Channel 3 or 4 1/2-inch VHS system, 4 rotary head helical scanning; RESPONSE DISC COMPATIBILITY DVD SYSTEM FREQ. FM azimuth luminance;chrominance: converted sub system phase shift Normal: 1 track; Technical Specifications AUDIO Inputs VIDEO RF AUDIO AUDIO (DVD only) Outputs VIDEO VIDEO (DVD only) RF VIDEO SYSTEM AUDIO TRACK PLAY/RECORD TIME VCR FF/REW TIME HEADS...
...1 Stereo audio outputs 1 Composite video output, RCA Connector, 75Ω, 1Vp-p 1 S-Video output, S-Connector, 75Ω, Y=1.0Vp-p, C=0.286Vp-p 1 Component video output, 75Ω, Y=1.0Vp-p, Pb=0.7Vp-p, Pr=0.7Vp-p Channel 3 or 4 1/2-inch VHS system, 4 rotary head helical scanning; RESPONSE DISC COMPATIBILITY DVD SYSTEM FREQ. FM azimuth luminance;chrominance: converted sub system phase shift Normal: 1 track; Technical Specifications AUDIO Inputs VIDEO RF AUDIO AUDIO (DVD only) Outputs VIDEO VIDEO (DVD only) RF VIDEO SYSTEM AUDIO TRACK PLAY/RECORD TIME VCR FF/REW TIME HEADS...


