
User Manual (user Manual) (ver.1.0) (English)
Page 3
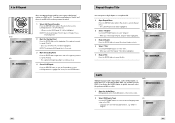
... s Black Level 32 s Alt Video Out 33 s Parental 34 x 6 - System Overview 9 s Front Panel Overview 9 s Rear Panel 10 s Front Panel Display 10 s Remote Control Overview 11 s Insert Batteries into Remote 11 s Using the TV Buttons on the Remote Control 12 x 2 - DVD Sound Setup 35 s A/V Receiver Connections 35 x 7 - Getting Started 13 s Basic Connections/Auto Setup 13 x 3 -
... s Black Level 32 s Alt Video Out 33 s Parental 34 x 6 - System Overview 9 s Front Panel Overview 9 s Rear Panel 10 s Front Panel Display 10 s Remote Control Overview 11 s Insert Batteries into Remote 11 s Using the TV Buttons on the Remote Control 12 x 2 - DVD Sound Setup 35 s A/V Receiver Connections 35 x 7 - Getting Started 13 s Basic Connections/Auto Setup 13 x 3 -
User Manual (user Manual) (ver.1.0) (English)
Page 4
...Connections (for Audio/Video connection (AC97-01746A) RF (Radio Frequency) Antenna Cable (AC39-42001J) OPEN/CLOSE Remote Control (AK59-00008A) 1.5V "AAA" Batteries- 2EA (AC43-12002H) POWER 7 DVD Features • 10-bit video digital to Set a Timer Recording 58 s Function(VCR 59 x Appendix... of TVs available. • Composite, S-Video, and Component Video outputs. • Universal remote provides the full operation on recording conditions. • DVD-R • CD-RW • DVD+RW, -RW Unpack When you unpack the DVD+VCR, please check the following list of Contents x 9 -
...Connections (for Audio/Video connection (AC97-01746A) RF (Radio Frequency) Antenna Cable (AC39-42001J) OPEN/CLOSE Remote Control (AK59-00008A) 1.5V "AAA" Batteries- 2EA (AC43-12002H) POWER 7 DVD Features • 10-bit video digital to Set a Timer Recording 58 s Function(VCR 59 x Appendix... of TVs available. • Composite, S-Video, and Component Video outputs. • Universal remote provides the full operation on recording conditions. • DVD-R • CD-RW • DVD+RW, -RW Unpack When you unpack the DVD+VCR, please check the following list of Contents x 9 -
User Manual (user Manual) (ver.1.0) (English)
Page 6
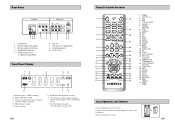
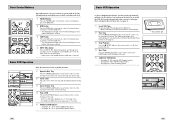
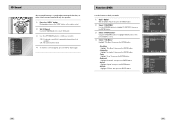
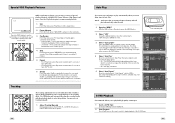
...RETURN 28 ENTER 29 RIGHT 30 EZ VIEW 31 DISC MENU 32 MARK SEARCH 33 ANGLE TIMER Insert Batteries into Remote • Remove the battery cover on , DVD is operating. 2 DVD or CD media is loaded. 3 The time, counter position, time remaining or current deck status is indicated... VHS videotape is loaded. 5 VCR is in Stereo.) 8 Timer Recording is activated. STEREO 7 8 6 A DVD with a DTS soundtrack is loaded. 7 The Hi-Fi track of the correct polarities(+/-) • Slide the cover back onto remote. 11 Rear Panel 1 2 3 4 1 S-VIDEO OUT 2 DIGITAL AUDIO OUT(COAXIAL) 3 DIGITAL AUDIO OUT(OPTICAL...
...RETURN 28 ENTER 29 RIGHT 30 EZ VIEW 31 DISC MENU 32 MARK SEARCH 33 ANGLE TIMER Insert Batteries into Remote • Remove the battery cover on , DVD is operating. 2 DVD or CD media is loaded. 3 The time, counter position, time remaining or current deck status is indicated... VHS videotape is loaded. 5 VCR is in Stereo.) 8 Timer Recording is activated. STEREO 7 8 6 A DVD with a DTS soundtrack is loaded. 7 The Hi-Fi track of the correct polarities(+/-) • Slide the cover back onto remote. 11 Rear Panel 1 2 3 4 1 S-VIDEO OUT 2 DIGITAL AUDIO OUT(COAXIAL) 3 DIGITAL AUDIO OUT(OPTICAL...
User Manual (user Manual) (ver.1.0) (English)
Page 7
...outdoor antenna or wall outlet antenna cable to the Ant-In jack on the rear panel. 2 Connect your DVD-VCR to a TV Choose one that works. ☛ When you change the batteries in the remote control, you must be plugged into a standard 120V/60Hz wall outlet. Button Function POWER ➀ Used...the current time will work on the back panel of your DVD-VCR to your TV's Line In jacks. The Auto Setup will blink. NOTE: If your TV is equipped with the remote control, it is now programmed to operate with Samsung televisions and compatible brands. If you selected in turn until you...
...outdoor antenna or wall outlet antenna cable to the Ant-In jack on the rear panel. 2 Connect your DVD-VCR to a TV Choose one that works. ☛ When you change the batteries in the remote control, you must be plugged into a standard 120V/60Hz wall outlet. Button Function POWER ➀ Used...the current time will work on the back panel of your DVD-VCR to your TV's Line In jacks. The Auto Setup will blink. NOTE: If your TV is equipped with the remote control, it is now programmed to operate with Samsung televisions and compatible brands. If you selected in turn until you...
User Manual (user Manual) (ver.1.0) (English)
Page 8
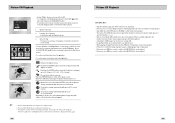
... the VCR deck to play automatically when you want to control the DVD deck. • The DVD indicator will light on the Front Panel Display to show that the DVD deck is selected. 3 VCR Button Press the VCR button on the remote control or front panel when you insert a videotape that the VHS...VCR Operation To play automatically if it into the VCR deck. • When a videotape is inserted, power will turn on the DVD-VCR. 2 DVD Button Press the DVD button on the remote control or front panel when you want to control the VCR deck. • The VCR indicator will start to play a standard ...
... the VCR deck to play automatically when you want to control the DVD deck. • The DVD indicator will light on the Front Panel Display to show that the DVD deck is selected. 3 VCR Button Press the VCR button on the remote control or front panel when you insert a videotape that the VHS...VCR Operation To play automatically if it into the VCR deck. • When a videotape is inserted, power will turn on the DVD-VCR. 2 DVD Button Press the DVD button on the remote control or front panel when you want to control the VCR deck. • The VCR indicator will start to play a standard ...
User Manual (user Manual) (ver.1.0) (English)
Page 18
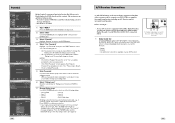
.... Press the REW and F.F buttons simultaneously on your A/V Receiver: • Optical • Coaxial • Use whichever connection is necessary to view a DVD or to "Yes," you forgot your A/V Receiver. The "reset ok" message will be blocked. Before You Begin... • If your selection. •... Sound speakers. OR To Digital Audio Input of an A/V Receiver with no Default Password. 5 Enter Password Use the numeric buttons (0-9) on the remote control to enter the 4-digit password. • Write your password down, and keep it to change your settings later. 6 Select "Rating Level...
.... Press the REW and F.F buttons simultaneously on your A/V Receiver: • Optical • Coaxial • Use whichever connection is necessary to view a DVD or to "Yes," you forgot your A/V Receiver. The "reset ok" message will be blocked. Before You Begin... • If your selection. •... Sound speakers. OR To Digital Audio Input of an A/V Receiver with no Default Password. 5 Enter Password Use the numeric buttons (0-9) on the remote control to enter the 4-digit password. • Write your password down, and keep it to change your settings later. 6 Select "Rating Level...
User Manual (user Manual) (ver.1.0) (English)
Page 19
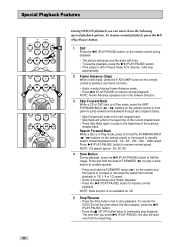
...36 To resume normal playback, press the ❿ll (Play/Pause) button. 2 1 1 Still Press the ❿ll (PLAY/PAUSE) button on the remote control during playback. • The picture will pause and the audio will stop automatically. 2 Frame Advance (Step) While in Play mode, press the SKIP ...❿ll (PLAY/PAUSE) to resume normal playback. 3 3 NOTE: Frame Advance operates only in the forward direction. 3 Skip Forward/Back While a CD or DVD disc is not available for 5 minutes, it will mute. • To resume playback, press the ❿ll (PLAY/PAUSE) button. • If the player...
...36 To resume normal playback, press the ❿ll (Play/Pause) button. 2 1 1 Still Press the ❿ll (PLAY/PAUSE) button on the remote control during playback. • The picture will pause and the audio will stop automatically. 2 Frame Advance (Step) While in Play mode, press the SKIP ...❿ll (PLAY/PAUSE) to resume normal playback. 3 3 NOTE: Frame Advance operates only in the forward direction. 3 Skip Forward/Back While a CD or DVD disc is not available for 5 minutes, it will mute. • To resume playback, press the ❿ll (PLAY/PAUSE) button. • If the player...
User Manual (user Manual) (ver.1.0) (English)
Page 21
... movie will be used to quickly choose a title, chapter/track, or playing time. 1 1 View the Display During DVD/CD playback, press the INFO button on the remote control. 4 2 Select title Use the UP/DOWN and LEFT/RIGHT buttons to select Title, then press the ENTER button to change ...among all ENG available Chapters/Tracks on a 16:9 TV, black bars will look vertically stretched. • Zoom Fit When a 4:3 DVD is generated using a ...
... movie will be used to quickly choose a title, chapter/track, or playing time. 1 1 View the Display During DVD/CD playback, press the INFO button on the remote control. 4 2 Select title Use the UP/DOWN and LEFT/RIGHT buttons to select Title, then press the ENTER button to change ...among all ENG available Chapters/Tracks on a 16:9 TV, black bars will look vertically stretched. • Zoom Fit When a 4:3 DVD is generated using a ...
User Manual (user Manual) (ver.1.0) (English)
Page 23
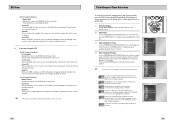
...Title Press the ENTER button to repeat the title. 5 1 DVD Off Chapter Title A - B CD Off Track Disc A - DVD ENG DOLBY DIGITAL 5.1CH 1 Open the Audio Menu During playback, press the AUDIO button on the remote control. 2 Select DVD Audio Track CD Use the LEFT/RIGHT buttons to select "Title...1 Open Repeat Menu Press the REPEAT button while in Play mode, then use the AUDIO button to B Repeat 4 1 DVD Off Chapter Title A - B The A to repeat a designated section on some DVDs. B CD Off Track Disc A - B Audio Multiple language/audio setup options, such as Dolby Digital 5.1, Dolby Pro ...
...Title Press the ENTER button to repeat the title. 5 1 DVD Off Chapter Title A - B CD Off Track Disc A - DVD ENG DOLBY DIGITAL 5.1CH 1 Open the Audio Menu During playback, press the AUDIO button on the remote control. 2 Select DVD Audio Track CD Use the LEFT/RIGHT buttons to select "Title...1 Open Repeat Menu Press the REPEAT button while in Play mode, then use the AUDIO button to B Repeat 4 1 DVD Off Chapter Title A - B The A to repeat a designated section on some DVDs. B CD Off Track Disc A - B Audio Multiple language/audio setup options, such as Dolby Digital 5.1, Dolby Pro ...
User Manual (user Manual) (ver.1.0) (English)
Page 24
... Up to three Bookmarks can be displayed at a time. CLEAR 4 Play Bookmark • During playback, press the MARK button on playing the DVD up on a disc, press the LEFT/RIGHT buttons to switch between the RANDOM and PROGRAM modes. Use the UP/DOWN buttons again to three ...only music continuously and press it once again to release. • PROGRAM/RANDOM playback cannot be highlighted. = - - 3 Set the Bookmark Keep on the remote control. • Use the LEFT/RIGHT buttons to move to one of the three bookmark placeholders (- - -). • The selected placeholder will appear on the...
... Up to three Bookmarks can be displayed at a time. CLEAR 4 Play Bookmark • During playback, press the MARK button on playing the DVD up on a disc, press the LEFT/RIGHT buttons to switch between the RANDOM and PROGRAM modes. Use the UP/DOWN buttons again to three ...only music continuously and press it once again to release. • PROGRAM/RANDOM playback cannot be highlighted. = - - 3 Set the Bookmark Keep on the remote control. • Use the LEFT/RIGHT buttons to move to one of the three bookmark placeholders (- - -). • The selected placeholder will appear on the...
User Manual (user Manual) (ver.1.0) (English)
Page 26
... looks like the one to the left. • Use the Up/Down or Left/Right buttons on the remote controller to select the picture you want to view and then press the ENTER button. (Press the PLAY/PAUSE... images can be stored on a single CD. • Kodak Picture CDs are over 300 files on the remote controller pressed for 10 seconds, the menu will take longer to start playing and not all . • ... • If no button on the tray. - Press the Up/Down or Left/Right buttons on the remote controller to display the menu again. 48 Picture CD Playback CD-R JPEG Discs • Only files with the...
... looks like the one to the left. • Use the Up/Down or Left/Right buttons on the remote controller to select the picture you want to view and then press the ENTER button. (Press the PLAY/PAUSE... images can be stored on a single CD. • Kodak Picture CDs are over 300 files on the remote controller pressed for 10 seconds, the menu will take longer to start playing and not all . • ... • If no button on the tray. - Press the Up/Down or Left/Right buttons on the remote controller to display the menu again. 48 Picture CD Playback CD-R JPEG Discs • Only files with the...
User Manual (user Manual) (ver.1.0) (English)
Page 27
...ENTER button. - Language : English Front Display Auto Power Off : Auto : Off Title Menu Disc Menu Information Zoom Bookmark Repeat EZ View DVD Function 50 51 ENG Function (DVD) Use this feature to select. 4 Select "Title Menu" Highlight "Title Menu", then press the ENTER button. - Disc Menu Highlight " ... then press the ENTER button. - button During playback, press the "INFO." Information Highlight "Information", then press the ENTER button. - button on the remote control. 2 Set 3D Sound Use the UP/DOWN buttons to select "3D Sound". 3 Use the LEFT/RIGHT buttons to confirm your...
...ENTER button. - Language : English Front Display Auto Power Off : Auto : Off Title Menu Disc Menu Information Zoom Bookmark Repeat EZ View DVD Function 50 51 ENG Function (DVD) Use this feature to select. 4 Select "Title Menu" Highlight "Title Menu", then press the ENTER button. - Disc Menu Highlight " ... then press the ENTER button. - button During playback, press the "INFO." Information Highlight "Information", then press the ENTER button. - button on the remote control. 2 Set 3D Sound Use the UP/DOWN buttons to select "3D Sound". 3 Use the LEFT/RIGHT buttons to confirm your...
User Manual (user Manual) (ver.1.0) (English)
Page 28
Shuttle Press Skip repeatedly up to 4 times to cue ahead 2 minutes. 5 Repeat • From Play mode, press Repeat to review the last 5 seconds of tape (SP mode). • From Play mode, press Repeat to review the last 15 seconds of tape (SLP mode). 6 Shuttle From Play mode, Shuttle >> gradually increases the cue speed from Double-Speed playback to Picture Search to resume normal playback. Press the Play button again to Jet Search. Press and hold to advance the tape forward or backward at 7 times normal speed. 4 Skip 3 3 From Play mode, press F.ADV/SKIP to advance the tape ...
Shuttle Press Skip repeatedly up to 4 times to cue ahead 2 minutes. 5 Repeat • From Play mode, press Repeat to review the last 5 seconds of tape (SP mode). • From Play mode, press Repeat to review the last 15 seconds of tape (SLP mode). 6 Shuttle From Play mode, Shuttle >> gradually increases the cue speed from Double-Speed playback to Picture Search to resume normal playback. Press the Play button again to Jet Search. Press and hold to advance the tape forward or backward at 7 times normal speed. 4 Skip 3 3 From Play mode, press F.ADV/SKIP to advance the tape ...
User Manual (user Manual) (ver.1.0) (English)
Page 29
... next page. ➢ Recording from an external device connected to the front or rear Line inputs, respectively. 3 Start Recording 3 Press the REC button on the remote control or front panel. Basic Recording You can even add time in 30-minute increments up to 4 hours by old VCRs. If you can cover... 0-9 buttons or the Channel Up/Down arrow buttons to select the desired channel, or press the INPUT SEL. Before You Begin... • Power on the DVD-VCR • Power on the TV • Set the TV to channel 3 or 4 . 1 Insert Tape Insert a blank VHS tape into the VCR deck. • Make...
... next page. ➢ Recording from an external device connected to the front or rear Line inputs, respectively. 3 Start Recording 3 Press the REC button on the remote control or front panel. Basic Recording You can even add time in 30-minute increments up to 4 hours by old VCRs. If you can cover... 0-9 buttons or the Channel Up/Down arrow buttons to select the desired channel, or press the INPUT SEL. Before You Begin... • Power on the DVD-VCR • Power on the TV • Set the TV to channel 3 or 4 . 1 Insert Tape Insert a blank VHS tape into the VCR deck. • Make...

User Manual (user Manual) (ver.1.0) (English)
Page 30
... recording time in 30 minute increments up to 4 hours. • The DVD-VCR stops recording automatically when the time has elapsed. The output will appear on the front panel display and on the remote control to set the Record Speed to fit six hours of the following options.... 2 Press REC again to resume. 2 Stop Recording Press the STOP button. 3 Watch a Different Channel 3 Press the TV/VCR button on the remote to switch to your TV tuner, then select a different channel on your television. 4 To Watch a DVD Insert a DVD in the DVD deck and press Play. Maximum Recording Time -
... recording time in 30 minute increments up to 4 hours. • The DVD-VCR stops recording automatically when the time has elapsed. The output will appear on the front panel display and on the remote control to set the Record Speed to fit six hours of the following options.... 2 Press REC again to resume. 2 Stop Recording Press the STOP button. 3 Watch a Different Channel 3 Press the TV/VCR button on the remote to switch to your TV tuner, then select a different channel on your television. 4 To Watch a DVD Insert a DVD in the DVD deck and press Play. Maximum Recording Time -


