
User Manual (user Manual) (ver.1.0) (English)
Page 1
Instruction Manual DVD-V3650 DVD/VCR PROGRESSIVE EJECT POWER OPEN/CLOSE www.samsungusa.com
Instruction Manual DVD-V3650 DVD/VCR PROGRESSIVE EJECT POWER OPEN/CLOSE www.samsungusa.com
User Manual (user Manual) (ver.1.0) (English)
Page 2
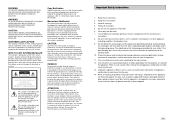
...the provided plug does not fit into the apparatus, the apparatus has been exposed to the presence of cable entry as practical. Protect the power cord from being from being walked on or pinched particularly at plugs, convenience receptacles, and the point where they exit from tip-over ...are provided for your outlet, consult an electrician for proper grounding and, in the literature accompanying this apparatus near any heat sources such as power-supply cord or plug is used , caution when moving the cart/apparatus combination to avoid injury from the apparatus. 11. Pour éviter...
...the provided plug does not fit into the apparatus, the apparatus has been exposed to the presence of cable entry as practical. Protect the power cord from being from being walked on or pinched particularly at plugs, convenience receptacles, and the point where they exit from tip-over ...are provided for your outlet, consult an electrician for proper grounding and, in the literature accompanying this apparatus near any heat sources such as power-supply cord or plug is used , caution when moving the cart/apparatus combination to avoid injury from the apparatus. 11. Pour éviter...
User Manual (user Manual) (ver.1.0) (English)
Page 3
... s Manual Clock Set 18 s Tuner Band Setting 19 s RF Output Channel 20 s Auto Channel Memory 21 s Channel Add/Delete 22 s Front Panel Dimmer 23 s Auto Power Off 24 4 Table of Contents x Safety 2 s Important Safety Instructions 2 x Welcome 7 s Feature Summary 7 s Unpack 7 s Disc Type and Characteristics 8 x 1...Bookmarks 44 s MP3/WMA Play 45 s Program Play & Random Play 47 s Picture CD Playback 48 s 3D Sound 50 s Function (DVD 51 x 8 - DVD Setup 25 s Disc Menu Language 25 s Audio Language 25 s Subtitle Language 26 s Digital Output 27 s DTS 28 s Dynamic Compression 29...
... s Manual Clock Set 18 s Tuner Band Setting 19 s RF Output Channel 20 s Auto Channel Memory 21 s Channel Add/Delete 22 s Front Panel Dimmer 23 s Auto Power Off 24 4 Table of Contents x Safety 2 s Important Safety Instructions 2 x Welcome 7 s Feature Summary 7 s Unpack 7 s Disc Type and Characteristics 8 x 1...Bookmarks 44 s MP3/WMA Play 45 s Program Play & Random Play 47 s Picture CD Playback 48 s 3D Sound 50 s Function (DVD 51 x 8 - DVD Setup 25 s Disc Menu Language 25 s Audio Language 25 s Subtitle Language 26 s Digital Output 27 s DTS 28 s Dynamic Compression 29...
User Manual (user Manual) (ver.1.0) (English)
Page 4
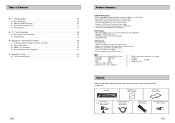
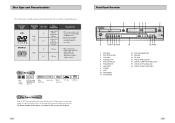
...8226; Hi-Fi Stereo VCR. • Superior slow motion and stop action (with 4 heads). • Playback of S-VHS tapes with this player. • DVD-ROM • DVD-RAM • CD-ROM • CDV • CDI • VCD • HD layer of Super Audio CD • CDGs play audio only, not .../Video connection (AC97-01746A) RF (Radio Frequency) Antenna Cable (AC39-42001J) OPEN/CLOSE Remote Control (AK59-00008A) 1.5V "AAA" Batteries- 2EA (AC43-12002H) POWER 7 DVD-VCR DVD/VCR PROGRESSIVE EJECT Registration Card (AD68-00078A) User's Guide (AK68-00215A) RCA cable for DTS-enhanced...
...8226; Hi-Fi Stereo VCR. • Superior slow motion and stop action (with 4 heads). • Playback of S-VHS tapes with this player. • DVD-ROM • DVD-RAM • CD-ROM • CDV • CDI • VCD • HD layer of Super Audio CD • CDGs play audio only, not .../Video connection (AC97-01746A) RF (Radio Frequency) Antenna Cable (AC39-42001J) OPEN/CLOSE Remote Control (AK59-00008A) 1.5V "AAA" Batteries- 2EA (AC43-12002H) POWER 7 DVD-VCR DVD/VCR PROGRESSIVE EJECT Registration Card (AD68-00078A) User's Guide (AK68-00215A) RCA cable for DTS-enhanced...
User Manual (user Manual) (ver.1.0) (English)
Page 5
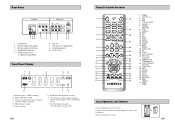
...distortion and less deterioration of the player. 8 Front Panel Overview 1 2 3 4 56 7 DVD/VCR PROGRESSIVE EJECT 8 9 10 11 12 13 14 1 DVD DECK 2 DVD OPEN/CLOSE 3 VCR DECK 4 CHANNEL / 5 DVD-VCR SELECT 6 PROGRESSIVE 7 VCR EJECT 8 POWER 9 STOP 10 REWIND/REV 11 PLAY/PAUSE 15 16 17 18 12 FAST-FORWARD/FWD 13... disc STEREO • Stereo disc DIGITAL SOUND • Digital Audio disc • DTS disc • MP3 disc Play Region Number Both the DVD player and the discs are coded by region. The Region Number for the disc to Dolby Digital and MPEG-2 system. • Various screen and...
...distortion and less deterioration of the player. 8 Front Panel Overview 1 2 3 4 56 7 DVD/VCR PROGRESSIVE EJECT 8 9 10 11 12 13 14 1 DVD DECK 2 DVD OPEN/CLOSE 3 VCR DECK 4 CHANNEL / 5 DVD-VCR SELECT 6 PROGRESSIVE 7 VCR EJECT 8 POWER 9 STOP 10 REWIND/REV 11 PLAY/PAUSE 15 16 17 18 12 FAST-FORWARD/FWD 13... disc STEREO • Stereo disc DIGITAL SOUND • Digital Audio disc • DTS disc • MP3 disc Play Region Number Both the DVD player and the discs are coded by region. The Region Number for the disc to Dolby Digital and MPEG-2 system. • Various screen and...
User Manual (user Manual) (ver.1.0) (English)
Page 6
... 29 RIGHT 30 EZ VIEW 31 DISC MENU 32 MARK SEARCH 33 ANGLE TIMER Insert Batteries into Remote • Remove the battery cover on , DVD is operating. 2 DVD or CD media is loaded. 3 The time, counter position, time remaining or current deck status is indicated. 4 VHS videotape is loaded. 5 VCR is loaded...-Fi track of the correct polarities(+/-) • Slide the cover back onto remote. 11 It also blinks when you pause VCR. 10 Remote Control Overview POWER 1 2 3 4 5 6 7 8 9 10 11 12 13 14 15 16 17 OPEN/CLOSE 18 19 20 21 22 23 24 25 26 27 28 29 30 31 32...
... 29 RIGHT 30 EZ VIEW 31 DISC MENU 32 MARK SEARCH 33 ANGLE TIMER Insert Batteries into Remote • Remove the battery cover on , DVD is operating. 2 DVD or CD media is loaded. 3 The time, counter position, time remaining or current deck status is indicated. 4 VHS videotape is loaded. 5 VCR is loaded...-Fi track of the correct polarities(+/-) • Slide the cover back onto remote. 11 It also blinks when you pause VCR. 10 Remote Control Overview POWER 1 2 3 4 5 6 7 8 9 10 11 12 13 14 15 16 17 OPEN/CLOSE 18 19 20 21 22 23 24 25 26 27 28 29 30 31 32...
User Manual (user Manual) (ver.1.0) (English)
Page 7
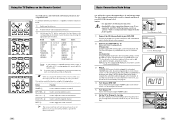
... RF Connection Using the supplied RF antenna cable, connect the OUT jack (TO TV) on the back panel of your DVD-VCR to your TV is equipped with Samsung televisions and compatible brands. INPUT SEL. ➁ Used to select the required channel. Avoid pressing any buttons on the ...05, 20 DAEWOO 19 NOBLEX 25 TELEFUNKEN 26 Result: If your TV's Antenna Input. The Auto Setup will automatically search for video. Button Function POWER ➀ Used to switch the television on and off . ➢ The various functions will be displayed on the front panel. If you encounter...
... RF Connection Using the supplied RF antenna cable, connect the OUT jack (TO TV) on the back panel of your DVD-VCR to your TV is equipped with Samsung televisions and compatible brands. INPUT SEL. ➁ Used to select the required channel. Avoid pressing any buttons on the ...05, 20 DAEWOO 19 NOBLEX 25 TELEFUNKEN 26 Result: If your TV's Antenna Input. The Auto Setup will automatically search for video. Button Function POWER ➀ Used to switch the television on and off . ➢ The various functions will be displayed on the front panel. If you encounter...
User Manual (user Manual) (ver.1.0) (English)
Page 8
...selected. You can turn on the DVD-VCR. 2 DVD Button Press the DVD button on the remote control or front panel when you want to control the DVD deck. • The DVD indicator will light on the Front Panel Display to show that is inserted, power will turn on the power and open the disc tray. ... it into the VCR deck. • When a videotape is missing the Record Safety Tab.. Deck Control Buttons POWER 1 2 OPEN/CLOSE 3 4 The DVD-VCR uses one set of controls to playback a DVD. button repeatedly to cycle through all of your remote control or on the front panel of the unit to show...
...selected. You can turn on the DVD-VCR. 2 DVD Button Press the DVD button on the remote control or front panel when you want to control the DVD deck. • The DVD indicator will light on the Front Panel Display to show that is inserted, power will turn on the power and open the disc tray. ... it into the VCR deck. • When a videotape is missing the Record Safety Tab.. Deck Control Buttons POWER 1 2 OPEN/CLOSE 3 4 The DVD-VCR uses one set of controls to playback a DVD. button repeatedly to cycle through all of your remote control or on the front panel of the unit to show...
User Manual (user Manual) (ver.1.0) (English)
Page 9
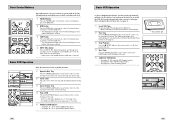
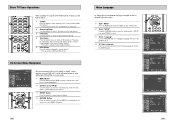
...left and right to cycle through the on-screen menus. 1 MENU Button Press this button while the DVD is activated only in Cable TV Mode. 5 INFO. On-Screen Menu Navigation Language : English Front Display Auto Power Off : Auto : Off 1 2 3 2 4 2 2 The on -screen MENU language to ...button. 1 4 Language : English Front Display Auto Power Off : Auto : Off Language : English Front Display Auto Power Off : Auto : Off Language : English Front Display Auto Power Off : Auto : Off 17 Basic TV Tuner Operations When watching TV using the DVD-VCR's built-in TV tuner, use the numeric ...
...left and right to cycle through the on-screen menus. 1 MENU Button Press this button while the DVD is activated only in Cable TV Mode. 5 INFO. On-Screen Menu Navigation Language : English Front Display Auto Power Off : Auto : Off 1 2 3 2 4 2 2 The on -screen MENU language to ...button. 1 4 Language : English Front Display Auto Power Off : Auto : Off Language : English Front Display Auto Power Off : Auto : Off Language : English Front Display Auto Power Off : Auto : Off 17 Basic TV Tuner Operations When watching TV using the DVD-VCR's built-in TV tuner, use the numeric ...
User Manual (user Manual) (ver.1.0) (English)
Page 10
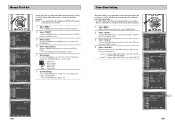
...Set 1 4 Language : English Front Display Auto Power Off : Auto : Off Language : English Front Display Auto Power Off : Auto : Off Language : English Front Display Auto Power Off : Auto : Off If Auto Setup fails to set the DVD-VCR's internal clock by locating a local TV ... the hour. • Minute - Indicates that the DVD-VCR is connected to Cable TV. 1 3 Language : English Front Display Auto Power Off : Auto : Off Language : English Front Display Auto Power Off : Auto : Off Language : English Front Display Auto Power Off : Auto : Off Ant./Cable : Antenna RF...
...Set 1 4 Language : English Front Display Auto Power Off : Auto : Off Language : English Front Display Auto Power Off : Auto : Off Language : English Front Display Auto Power Off : Auto : Off If Auto Setup fails to set the DVD-VCR's internal clock by locating a local TV ... the hour. • Minute - Indicates that the DVD-VCR is connected to Cable TV. 1 3 Language : English Front Display Auto Power Off : Auto : Off Language : English Front Display Auto Power Off : Auto : Off Language : English Front Display Auto Power Off : Auto : Off Ant./Cable : Antenna RF...
User Manual (user Manual) (ver.1.0) (English)
Page 11
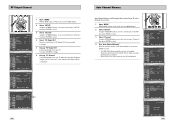
... Memory Channel Add/Delete 20 21 RF Output Channel 1 5 Language : English Front Display Auto Power Off : Auto : Off Language : English Front Display Auto Power Off : Auto : Off 1 Open "MENU" With the DVD in the selected Tuner Band. Then press ENTER to change . 6 Change "TV Channel" A... message will appear on your TV. Language : English Front Display Auto Power Off : Auto : Off Ant./Cable : ...
... Memory Channel Add/Delete 20 21 RF Output Channel 1 5 Language : English Front Display Auto Power Off : Auto : Off Language : English Front Display Auto Power Off : Auto : Off 1 Open "MENU" With the DVD in the selected Tuner Band. Then press ENTER to change . 6 Change "TV Channel" A... message will appear on your TV. Language : English Front Display Auto Power Off : Auto : Off Ant./Cable : ...
User Manual (user Manual) (ver.1.0) (English)
Page 12
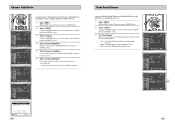
... Front Panel Display to be bright all the time, dim all the time, or dim during power off . 1 Open " MENU" With the DVD in the channel number you wish to remove. 1 Open "MENU" With the DVD in Stop or Play mode, press the MENU button. 2 Select "SETUP" Using the UP... dim all the time. • Dim - Channel Add/Delete 1 4 Language : English Front Display Auto Power Off : Auto : Off Language : English Front Display Auto Power Off : Auto : Off Language : English Front Display Auto Power Off : Auto : Off Use this feature if Auto Channel Search missed a channel that you would like to...
... Front Panel Display to be bright all the time, dim all the time, or dim during power off . 1 Open " MENU" With the DVD in the channel number you wish to remove. 1 Open "MENU" With the DVD in Stop or Play mode, press the MENU button. 2 Select "SETUP" Using the UP... dim all the time. • Dim - Channel Add/Delete 1 4 Language : English Front Display Auto Power Off : Auto : Off Language : English Front Display Auto Power Off : Auto : Off Language : English Front Display Auto Power Off : Auto : Off Use this feature if Auto Channel Search missed a channel that you would like to...
User Manual (user Manual) (ver.1.0) (English)
Page 13
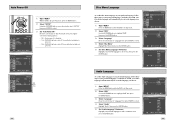
... hour after the last button is pressed. Auto Power Off Disc Menu Language 1 2 Language : English Front Display Auto Power Off : Auto : Off 1 Open "MENU" With the DVD in Stop mode. 2 Select "DVD" Use the UP/DOWN buttons to highlight "DVD" then press the ENTER button. 3 Select "...the ENTER button. 5 Set "Audio Language" Preference Highlight your preferred language for disc menus, then press the ENTER button. DVD-VCR will auto shut off is pressed. • 2Hr - Auto power off 2 hours after the last button is disabled. • 1Hr - Language : English Front Display Auto...
... hour after the last button is pressed. Auto Power Off Disc Menu Language 1 2 Language : English Front Display Auto Power Off : Auto : Off 1 Open "MENU" With the DVD in Stop mode. 2 Select "DVD" Use the UP/DOWN buttons to highlight "DVD" then press the ENTER button. 3 Select "...the ENTER button. 5 Set "Audio Language" Preference Highlight your preferred language for disc menus, then press the ENTER button. DVD-VCR will auto shut off is pressed. • 2Hr - Auto power off 2 hours after the last button is disabled. • 1Hr - Language : English Front Display Auto...

User Manual (user Manual) (ver.1.0) (English)
Page 14
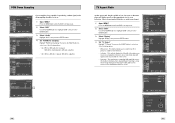
... can output Dolby Digital 5.1 sound, but you choose. 1 Open "MENU" Press the MENU button while the DVD is in Stop mode. 2 Select "DVD" Use the UP/DOWN buttons to highlight "DVD ", then press the ENTER button. 3 Select "Audio" Highlight "Audio", then press the ENTER button. 4 Set ... receiver with a Dolby Digital decoder, your preferred language, follow these steps. To use your DVD/TV with an A/V receiver without a Dolby Digital decoder. • Bitstream - Language : English Front Display Auto Power Off : Auto : Off PCM Down Sampling : On PCM Bitstream 26 27 Subtitle Language To...
... can output Dolby Digital 5.1 sound, but you choose. 1 Open "MENU" Press the MENU button while the DVD is in Stop mode. 2 Select "DVD" Use the UP/DOWN buttons to highlight "DVD ", then press the ENTER button. 3 Select "Audio" Highlight "Audio", then press the ENTER button. 4 Set ... receiver with a Dolby Digital decoder, your preferred language, follow these steps. To use your DVD/TV with an A/V receiver without a Dolby Digital decoder. • Bitstream - Language : English Front Display Auto Power Off : Auto : Off PCM Down Sampling : On PCM Bitstream 26 27 Subtitle Language To...

User Manual (user Manual) (ver.1.0) (English)
Page 15
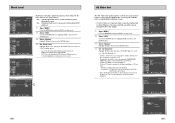
... a DTS decoder. the difference between the loud and quiet passages of a DVD audio track. 1 Open "MENU" Press the MENU button while the DVD is equipped with a DTS decoder. • On - Language : English Front Display Auto Power Off : Auto : Off Off On PCM Down Sampling : On Off PCM... Down Sampling : On On 28 29 DTS Language : English Front Display Auto Power Off : Auto : Off If your A/V receiver is in Stop mode. 2 Select "DVD" Use the UP/DOWN buttons to highlight "DVD ", then press the ENTER button. 3 Select "Audio" Highlight "Audio", then press the ENTER...
... a DTS decoder. the difference between the loud and quiet passages of a DVD audio track. 1 Open "MENU" Press the MENU button while the DVD is equipped with a DTS decoder. • On - Language : English Front Display Auto Power Off : Auto : Off Off On PCM Down Sampling : On Off PCM... Down Sampling : On On 28 29 DTS Language : English Front Display Auto Power Off : Auto : Off If your A/V receiver is in Stop mode. 2 Select "DVD" Use the UP/DOWN buttons to highlight "DVD ", then press the ENTER button. 3 Select "Audio" Highlight "Audio", then press the ENTER...
User Manual (user Manual) (ver.1.0) (English)
Page 16
... bars will display movies at the top and bottom of the screen. • Pan-Scan - PCM Down Sampling Language : English Front Display Auto Power Off : Auto : Off If your amplifier is not capable of reproducing a 96kHz signal, PCM downsampling should be set to on. 1 Open "...buttons to highlight "DVD ", then press the ENTER button. 3 Select "Display" Highlight "Display", then press the ENTER button. 4 Set "TV Aspect" Highlight "TV Aspect", then press the RIGHT button to select one of the following options: • On - Language : English Front Display Auto Power Off : Auto ...
... bars will display movies at the top and bottom of the screen. • Pan-Scan - PCM Down Sampling Language : English Front Display Auto Power Off : Auto : Off If your amplifier is not capable of reproducing a 96kHz signal, PCM downsampling should be set to on. 1 Open "...buttons to highlight "DVD ", then press the ENTER button. 3 Select "Display" Highlight "Display", then press the ENTER button. 4 Set "TV Aspect" Highlight "TV Aspect", then press the RIGHT button to select one of the following options: • On - Language : English Front Display Auto Power Off : Auto ...
User Manual (user Manual) (ver.1.0) (English)
Page 17
... the DVD player. Select this if you are using the S-VIDEO OUT or COMPONENT VIDEO OUT jacks. • Use the S-Video or Component Video connection method only for consistent brightness/contrast across all sources. • On - Black Level Language : English Front Display Auto Power Off...Component - Progressive : Progressive Scan mode will work, and Video and S-Video will be viewed through all sources. Language : English Front Display Auto Power Off : Auto : Off Display Setup On 32 33 Standard NTSC black level. This will work . • Press the Progressive button on -...
... the DVD player. Select this if you are using the S-VIDEO OUT or COMPONENT VIDEO OUT jacks. • Use the S-Video or Component Video connection method only for consistent brightness/contrast across all sources. • On - Black Level Language : English Front Display Auto Power Off...Component - Progressive : Progressive Scan mode will work, and Video and S-Video will be viewed through all sources. Language : English Front Display Auto Power Off : Auto : Off Display Setup On 32 33 Standard NTSC black level. This will work . • Press the Progressive button on -...
User Manual (user Manual) (ver.1.0) (English)
Page 18
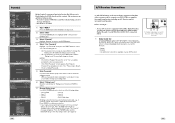
... Connections To take full advantage of the movie theater experience that DVD offers, you may want to connect your DVD-VCR to a complete Surround Sound system, including an A/V Receiver and six Surround Sound speakers. Press the POWER button and the DVD-VCR will appear. Press ENTER to confirm your selection. •...; If you forgot your password, press power on from the DIGITAL AUDIO OUT jacks on the back panel of the DVD-VCR to their content. Before You Begin... • If your password down, and keep it to change your ...
... Connections To take full advantage of the movie theater experience that DVD offers, you may want to connect your DVD-VCR to a complete Surround Sound system, including an A/V Receiver and six Surround Sound speakers. Press the POWER button and the DVD-VCR will appear. Press ENTER to confirm your selection. •...; If you forgot your password, press power on from the DIGITAL AUDIO OUT jacks on the back panel of the DVD-VCR to their content. Before You Begin... • If your password down, and keep it to change your ...
User Manual (user Manual) (ver.1.0) (English)
Page 27
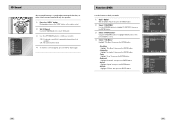
... surround sound effect is a sound enhancement mode that lets you enjoy virtual surround sound with only two speakers. 1 1 Press the "INFO." ENG Function (DVD) Use this feature to select. 4 Select "Title Menu" Highlight "Title Menu", then press the ENTER button. - ENG 4 To make the screen disappear,... Menu", then press the ENTER button. - Zoom Highlight "Zoom", then press the ENTER button. - Language : English Front Display Auto Power Off : Auto : Off Title Menu Disc Menu Information Zoom Bookmark Repeat EZ View DVD Function 50 51 button During playback, press the "INFO."
... surround sound effect is a sound enhancement mode that lets you enjoy virtual surround sound with only two speakers. 1 1 Press the "INFO." ENG Function (DVD) Use this feature to select. 4 Select "Title Menu" Highlight "Title Menu", then press the ENTER button. - ENG 4 To make the screen disappear,... Menu", then press the ENTER button. - Zoom Highlight "Zoom", then press the ENTER button. - Language : English Front Display Auto Power Off : Auto : Off Title Menu Disc Menu Information Zoom Bookmark Repeat EZ View DVD Function 50 51 button During playback, press the "INFO."
User Manual (user Manual) (ver.1.0) (English)
Page 29
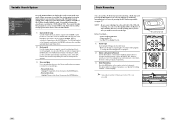
... "Reverse Intro Scan", then press the ENTER button. If the tab is missing, you don't know exactly where a program is not 1 possible. 3 2 DVD/VCR PROGRESSIVE 54 55 If you want to index two programs in a row, set the counter to record a program on a cassette. The VCR will rewind... a Channel to Record Use the 0-9 buttons or the Channel Up/Down arrow buttons to record the entire program. Before You Begin... • Power on the DVD-VCR • Power on the tape where you want to set your videotape has a Record Safety Tab. To change the Recording Speed, see page 57. For...
... "Reverse Intro Scan", then press the ENTER button. If the tab is missing, you don't know exactly where a program is not 1 possible. 3 2 DVD/VCR PROGRESSIVE 54 55 If you want to index two programs in a row, set the counter to record a program on a cassette. The VCR will rewind... a Channel to Record Use the 0-9 buttons or the Channel Up/Down arrow buttons to record the entire program. Before You Begin... • Power on the DVD-VCR • Power on the tape where you want to set your videotape has a Record Safety Tab. To change the Recording Speed, see page 57. For...
