
User Manual (ENGLISH)
Page 3
... the power cord while using the monitor. z A surge may cause an electric shock or fire. z If the connector or plug of the power cord is dusty. z This may cause electric shock or equipment damage. Insert the power plug firmly so that it with wet hands. z This may be caused by the wire nor touch the plug with a dry cloth. Do not connect too...
... the power cord while using the monitor. z A surge may cause an electric shock or fire. z If the connector or plug of the power cord is dusty. z This may cause electric shock or equipment damage. Insert the power plug firmly so that it with wet hands. z This may be caused by the wire nor touch the plug with a dry cloth. Do not connect too...
User Manual (ENGLISH)
Page 7
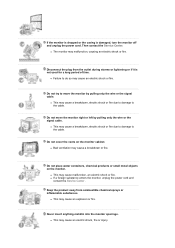
z If a foreign substance enters the monitor, unplug the power cord and contact the Service Center . Never insert anything metallic into the monitor openings. If the monitor is dropped or the casing is not used for a long period of time. Do not cover the vents on the monitor. z This may cause a breakdown or fire. Then contact the Service Center. z This may cause a breakdown...
z If a foreign substance enters the monitor, unplug the power cord and contact the Service Center . Never insert anything metallic into the monitor openings. If the monitor is dropped or the casing is not used for a long period of time. Do not cover the vents on the monitor. z This may cause a breakdown or fire. Then contact the Service Center. z This may cause a breakdown...
User Manual (ENGLISH)
Page 8
... the vent, headphone port or AV ports. z Change the mode to energy save or set a screensaver to moving picture when you view a fixed screen for an extended period of using the product for the model. To ease eye ...power cord. When moving the monitor. Adjust the resolution and frequency to be away from the monitor for an extended period of children's reach, as paper and match into the product, turn off , unplug the power connector from the wall outlet and contact Service Center. If you need to the levels appropriate for an extended time period, keep the product unplugged Using...
... the vent, headphone port or AV ports. z Change the mode to energy save or set a screensaver to moving picture when you view a fixed screen for an extended period of using the product for the model. To ease eye ...power cord. When moving the monitor. Adjust the resolution and frequency to be away from the monitor for an extended period of children's reach, as paper and match into the product, turn off , unplug the power connector from the wall outlet and contact Service Center. If you need to the levels appropriate for an extended time period, keep the product unplugged Using...
User Manual (ENGLISH)
Page 10
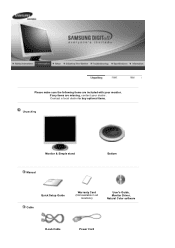
If any items are included with your dealer. Contact a local dealer to buy optional items. Unpacking Monitor & Simple stand Manual Bottom Quick Setup Guide Cable Warranty Card (Not available in all locations) User's Guide, Monitor Driver, Natural Color software D-sub Cable Power Cord Please make sure the following items are missing, contact your monitor.
If any items are included with your dealer. Contact a local dealer to buy optional items. Unpacking Monitor & Simple stand Manual Bottom Quick Setup Guide Cable Warranty Card (Not available in all locations) User's Guide, Monitor Driver, Natural Color software D-sub Cable Power Cord Please make sure the following items are missing, contact your monitor.
User Manual (ENGLISH)
Page 11
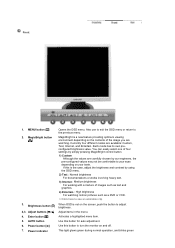
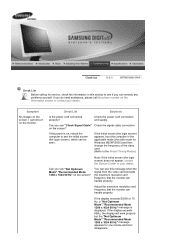
... is not on the screen, push the button to your eyes depending on and off. Use this button for auto adjustment. MENU button [ ] 2. Also use to exit the OSD menu or return to turn the monitor on your taste. Each mode has its own preconfigured brightness value. Activates a highlighted menu item. This light glows green during normal operation, and blinks green Power button [ ] 7. MagicBright is a new feature providing optimum viewing environment depending on...
... is not on the screen, push the button to your eyes depending on and off. Use this button for auto adjustment. MENU button [ ] 2. Also use to exit the OSD menu or return to turn the monitor on your taste. Each mode has its own preconfigured brightness value. Activates a highlighted menu item. This light glows green during normal operation, and blinks green Power button [ ] 7. MagicBright is a new feature providing optimum viewing environment depending on...
User Manual (ENGLISH)
Page 12
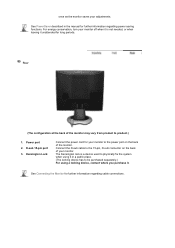
... using it unattended for further information regarding cable connections. Connect the D-sub cable to product.) 1. For energy conservation, turn your adjustments. Kensington Lock Connect the power cord for further information regarding power saving functions. The Kensington lock is not needed, or when leaving it in the manual for long periods. See PowerSaver described in a public place. (The locking device has to the power port on the back of the monitor. Power port...
... using it unattended for further information regarding cable connections. Connect the D-sub cable to product.) 1. For energy conservation, turn your adjustments. Kensington Lock Connect the power cord for further information regarding power saving functions. The Kensington lock is not needed, or when leaving it in the manual for long periods. See PowerSaver described in a public place. (The locking device has to the power port on the back of the monitor. Power port...
User Manual (ENGLISH)
Page 14
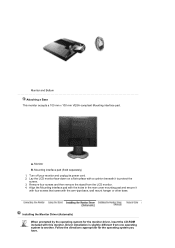
Remove four screws and then remove the stand from one operating system to protect the screen. 3. Follow the directions appropriate for the monitor driver, insert the CD-ROM included with this monitor. Monitor B. Driver installation is slightly different from the LCD monitor. 4. Turn off your monitor and unplug its power cord. 2. Align the Mounting interface pad with the holes in the rear cover mounting pad and secure it with four screws that...
Remove four screws and then remove the stand from one operating system to protect the screen. 3. Follow the directions appropriate for the monitor driver, insert the CD-ROM included with this monitor. Monitor B. Driver installation is slightly different from the LCD monitor. 4. Turn off your monitor and unplug its power cord. 2. Align the Mounting interface pad with the holes in the rear cover mounting pad and secure it with four screws that...
User Manual (ENGLISH)
Page 16
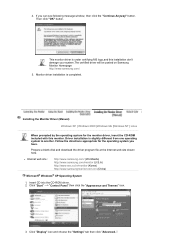
...://www.samsung.com/. 5. Installing the Monitor Driver (Manual) Windows XP | Windows 2000 |Windows Me |Windows NT | Linux When prompted by the operating system for the operating system you can see following message window, then click the "Continue Anyway" button. Click "Start" -> "Control Panel" then click the "Appearance and Themes" icon. 3. Click "Display" icon and choose the "Settings" tab then click "Advanced..". Prepare a blank disk and download the driver...
...://www.samsung.com/. 5. Installing the Monitor Driver (Manual) Windows XP | Windows 2000 |Windows Me |Windows NT | Linux When prompted by the operating system for the operating system you can see following message window, then click the "Continue Anyway" button. Click "Start" -> "Control Panel" then click the "Appearance and Themes" icon. 3. Click "Display" icon and choose the "Settings" tab then click "Advanced..". Prepare a blank disk and download the driver...
User Manual (ENGLISH)
Page 17
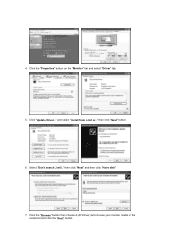
Click the "Properties" button on the "Monitor" tab and select "Driver" tab. 5. then click "Next" button. 6. then click "Next" and then click "Have disk". 7. Click the "Browse" button then choose A:(D:\Driver) and choose your monitor model in the model list and click the "Next" button. Select "Don't search ,I will.." Click "Update Driver.." and select "Install from a list or.." 4.
Click the "Properties" button on the "Monitor" tab and select "Driver" tab. 5. then click "Next" button. 6. then click "Next" and then click "Have disk". 7. Click the "Browse" button then choose A:(D:\Driver) and choose your monitor model in the model list and click the "Next" button. Select "Don't search ,I will.." Click "Update Driver.." and select "Install from a list or.." 4.
User Manual (ENGLISH)
Page 18
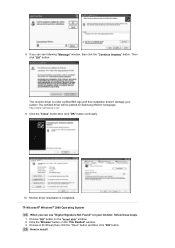
....samsung.com/ 9. Choose "OK" button on the "File Needed" window. 3. 8. Click the "Browse" button on the "Insert disk" window. 2. Microsoft® Windows® 2000 Operating System When you can see following "Message" window, then click the "Continue Anyway" button. Then click "OK" button. Monitor driver installation is under certified MS logo,and this installation doesn't damage your monitor, follow these steps. 1. Choose A:(D:\Driver) then click the "Open" button...
....samsung.com/ 9. Choose "OK" button on the "File Needed" window. 3. 8. Click the "Browse" button on the "Insert disk" window. 2. Microsoft® Windows® 2000 Operating System When you can see following "Message" window, then click the "Continue Anyway" button. Then click "OK" button. Monitor driver installation is under certified MS logo,and this installation doesn't damage your monitor, follow these steps. 1. Choose A:(D:\Driver) then click the "Open" button...
User Manual (ENGLISH)
Page 19
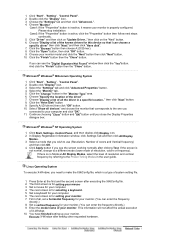
... your monitor model and click the "Next" button then click "Next" button. 10. Choose "Display a list of colors and Vertical frequency) and then click OK. 4. then click "Next" button. 8. Press Enter at All Display Modes, select the level of resolution and vertical frequency by referring to use (Resolution, Number of all , set a horizontal frequency for setting your monitor. 7. The next screen is for selecting a keyboard. 5. The next screen is for setting your mouse. 3. Please stop installation...
... your monitor model and click the "Next" button then click "Next" button. 10. Choose "Display a list of colors and Vertical frequency) and then click OK. 4. then click "Next" button. 8. Press Enter at All Display Modes, select the level of resolution and vertical frequency by referring to use (Resolution, Number of all , set a horizontal frequency for setting your monitor. 7. The next screen is for selecting a keyboard. 5. The next screen is for setting your mouse. 3. Please stop installation...
User Manual (ENGLISH)
Page 20
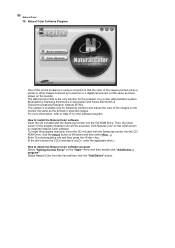
... solution for Samsung monitors and makes the color of the images on the "Start" menu and then double-click "Add/Delete a program". Select Natural Color from the list and then click the "Add/Delete" button. For more information, refer to delete the Natural Color software program Select "Setting/Control Panel" on the monitor the same as those shown on the initial screen to install the Natural Color software Insert...
... solution for Samsung monitors and makes the color of the images on the "Start" menu and then double-click "Add/Delete a program". Select Natural Color from the list and then click the "Add/Delete" button. For more information, refer to delete the Natural Color software program Select "Setting/Control Panel" on the monitor the same as those shown on the initial screen to install the Natural Color software Insert...
User Manual (ENGLISH)
Page 25
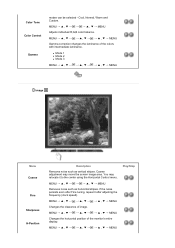
... colors with intermediate luminance. If the noise persists even after adjusting the frequency (clock speed). MENU MENU Removes noise such as vertical stripes. Coarse adjustment may relocate it after Fine tuning, repeat it to the center using the Horizontal Control menu. Cool, Normal, Warm and Custom. MENU MENU Adjusts individual R,G,B color balance. Color Tone Color Control Gamma modes can be selected - MENU MENU Gamma correction changes the luminance of image. MENU MENU Changes the horizontal position of the monitor's entire display. MENU MENU...
... colors with intermediate luminance. If the noise persists even after adjusting the frequency (clock speed). MENU MENU Removes noise such as vertical stripes. Coarse adjustment may relocate it after Fine tuning, repeat it to the center using the Horizontal Control menu. Cool, Normal, Warm and Custom. MENU MENU Adjusts individual R,G,B color balance. Color Tone Color Control Gamma modes can be selected - MENU MENU Gamma correction changes the luminance of image. MENU MENU Changes the horizontal position of the monitor's entire display. MENU MENU...
User Manual (ENGLISH)
Page 29
... in the applicable mode (the safe mode for Windows ME/XP/2000) and then change the frequency of the video card. (Refer to see if you can remedy any problems yourself. If the power is displayed. Symptom No images on the Information section or contact your dealer. Can you do need assistance, please call the phone number on the screen. You can see "Check Signal Cable" Check the signal cable connection.
... in the applicable mode (the safe mode for Windows ME/XP/2000) and then change the frequency of the video card. (Refer to see if you can remedy any problems yourself. If the power is displayed. Symptom No images on the Information section or contact your dealer. Can you do need assistance, please call the phone number on the screen. You can see "Check Signal Cable" Check the signal cable connection.
User Manual (ENGLISH)
Page 30
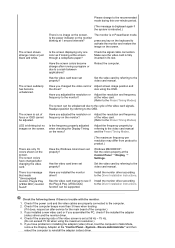
... video card manual to see if Install the monitor driver according the Plug & Play (VESA DDC) to the Driver Installation Instructions. Check if the power cord and the video cables are only 16 colors shown on the menu? If you installed a new video card or if you adjusted the resolution or Adjust the resolution and frequency frequency to the monitor? The screen can be adjusted. Readjust position by referring to the video card manual. The screen colors have problems in installing the adapter (video) driver, boot the computer in Safe Mode, remove the Display Adapter...
... video card manual to see if Install the monitor driver according the Plug & Play (VESA DDC) to the Driver Installation Instructions. Check if the power cord and the video cables are only 16 colors shown on the menu? If you installed a new video card or if you adjusted the resolution or Adjust the resolution and frequency frequency to the monitor? The screen can be adjusted. Readjust position by referring to the video card manual. The screen colors have problems in installing the adapter (video) driver, boot the computer in Safe Mode, remove the Display Adapter...
User Manual (ENGLISH)
Page 31
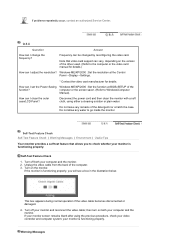
... the monitor. 2. Turn on the monitor. If problems repeatedly occur, contact an authorized Service Center. How can I adjust the resolution? Do not leave any water to Windows/Computer Manual). Self-Test Feature Check Self-Test Feature Check | Warning Messages | Environment | Useful Tips Your monitor provides a self test feature that video card support can I set the Power Saving Windows ME/XP/2000 : Set the function at the Control Panel→Display→Settings. * Contact the video card manufacturer...
... the monitor. 2. Turn on the monitor. If problems repeatedly occur, contact an authorized Service Center. How can I adjust the resolution? Do not leave any water to Windows/Computer Manual). Self-Test Feature Check Self-Test Feature Check | Warning Messages | Environment | Useful Tips Your monitor provides a self test feature that video card support can I set the Power Saving Windows ME/XP/2000 : Set the function at the Control Panel→Display→Settings. * Contact the video card manufacturer...
User Manual (ENGLISH)
Page 32
... room. 2. Remove all electronic devices such as radios, fans, clocks and telephones that you need to check the signal cable. In this case, check the computer for trouble. If there is something wrong with the computer or the video card, this can cause the monitor to become blank, have poor coloring, noise, video mode not supported, etc. Therefore, if there is trouble with the input signal, a message...
... room. 2. Remove all electronic devices such as radios, fans, clocks and telephones that you need to check the signal cable. In this case, check the computer for trouble. If there is something wrong with the computer or the video card, this can cause the monitor to become blank, have poor coloring, noise, video mode not supported, etc. Therefore, if there is trouble with the input signal, a message...
User Manual (ENGLISH)
Page 34
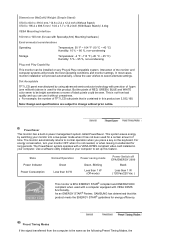
... pixels of RED, GREEN, BLUE and WHITE color seem to be bright sometimes or some of black pixels could be installed on the keyboard. This system saves energy by using advanced semiconductor technology with VESA DPMS functionality. Use a software utility installed on your computer to select alternate settings. Preset Timing Modes If the signal transferred from bad quality and you press a key on any Plug & Play compatible system. Interaction of the monitor...
... pixels of RED, GREEN, BLUE and WHITE color seem to be bright sometimes or some of black pixels could be installed on the keyboard. This system saves energy by using advanced semiconductor technology with VESA DPMS functionality. Use a software utility installed on your computer to select alternate settings. Preset Timing Modes If the signal transferred from bad quality and you press a key on any Plug & Play compatible system. Interaction of the monitor...
User Manual (ENGLISH)
Page 38
... of black pixels could be shown on the screen. But the pixels of RED, GREEN, BLUE and WHITE color seem to scan one millionth) above is not provided in TVs. Terms Dot Pitch The image on a monitor is composed of the same color is called the 'Dot Pitch'. When you can use it without uneasiness. { For example, the number of picture is used in TFT-LCD. { Resolution: 1280 x 1024 { Vertical frequency (refresh rate...
... of black pixels could be shown on the screen. But the pixels of RED, GREEN, BLUE and WHITE color seem to scan one millionth) above is not provided in TVs. Terms Dot Pitch The image on a monitor is composed of the same color is called the 'Dot Pitch'. When you can use it without uneasiness. { For example, the number of picture is used in TFT-LCD. { Resolution: 1280 x 1024 { Vertical frequency (refresh rate...
User Manual (ENGLISH)
Page 41
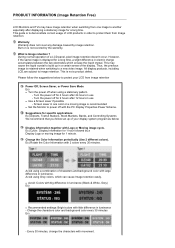
... when switching to a new video image. Suggestions for a long time. Change the characters color and background color every 30 minutes Ex) - This guide is to demonstrate correct usage of LCD products in order to protect them from image retention Power Off, Screen Saver, or Power Save Mode Ex) z Turn the power off with 2 colors every 30 minutes. z Set the Monitor to power off when using a stationary pattern. - PRODUCT INFORMATION (Image Retention Free) LCD Monitors and...
... when switching to a new video image. Suggestions for a long time. Change the characters color and background color every 30 minutes Ex) - This guide is to demonstrate correct usage of LCD products in order to protect them from image retention Power Off, Screen Saver, or Power Save Mode Ex) z Turn the power off with 2 colors every 30 minutes. z Set the Monitor to power off when using a stationary pattern. - PRODUCT INFORMATION (Image Retention Free) LCD Monitors and...


