
User Manual (ENGLISH)
Page 2
Main Page Safety Instructions Notational Power Installation Cleaning Other Introduction Unpacking Front Rear Setup Connecting Your Monitor Installing the Monitor Driver Automatic Manual On-Screen Display Troubleshooting Check List Q & A Self-Test Feature Check Specifications General Specifications PowerSaver Preset Display Modes Information Service Terms Regulatory Natural Color For Better Display Authority
Main Page Safety Instructions Notational Power Installation Cleaning Other Introduction Unpacking Front Rear Setup Connecting Your Monitor Installing the Monitor Driver Automatic Manual On-Screen Display Troubleshooting Check List Q & A Self-Test Feature Check Specifications General Specifications PowerSaver Preset Display Modes Information Service Terms Regulatory Natural Color For Better Display Authority
User Manual (ENGLISH)
Page 5
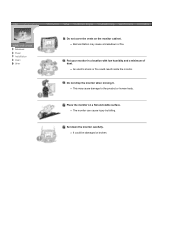
Do not drop the monitor when moving it. z This may cause a breakdown or fire. z It could result inside the monitor. Put your monitor in a location with low humidity and a minimum of dust. Place the monitor on the monitor cabinet. z The monitor can cause injury by falling. Set down the monitor carefully. z Bad ventilation may cause damage to the product or human body. Notational Power Installation Clean Other Do not cover the vents on a flat and stable surface. z An electric shock or fire could be damaged or broken.
Do not drop the monitor when moving it. z This may cause a breakdown or fire. z It could result inside the monitor. Put your monitor in a location with low humidity and a minimum of dust. Place the monitor on the monitor cabinet. z The monitor can cause injury by falling. Set down the monitor carefully. z Bad ventilation may cause damage to the product or human body. Notational Power Installation Clean Other Do not cover the vents on a flat and stable surface. z An electric shock or fire could be damaged or broken.
User Manual (ENGLISH)
Page 6
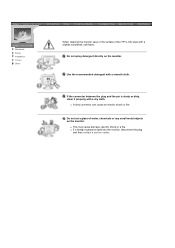
...the connector between the plug and the pin is dusty or dirty, clean it properly with a smooth cloth. Do not set a glass of the TFT-LCD, wipe with a slightly moistened, soft fabric. Use the recommended detergent with a dry cloth. z A dirty connector can cause an electric shock or fire.... z If a foreign substance gets into the monitor, disconnect the plug and then contact a service center. z This may cause damage, electric shock or a fire. Do not spray detergent directly on the...
...the connector between the plug and the pin is dusty or dirty, clean it properly with a smooth cloth. Do not set a glass of the TFT-LCD, wipe with a slightly moistened, soft fabric. Use the recommended detergent with a dry cloth. z A dirty connector can cause an electric shock or fire.... z If a foreign substance gets into the monitor, disconnect the plug and then contact a service center. z This may cause damage, electric shock or a fire. Do not spray detergent directly on the...
User Manual (ENGLISH)
Page 7
...wire or the signal cable. z This may cause a breakdown, electric shock or a fire due to damage to move the monitor right or left by pulling on the monitor. z This may cause an explosion or fire. Do not place any unusual sounds or smells coming from it immediately and contact...cause an electric shock, fire or injury. z This may cause an electric shock or a fire. For each hour of looking at the monitor, you should let your monitor does not operate normally - z This may cause a breakdown, electric shock or a fire due to damage to qualified service personnel. Notational Power...
...wire or the signal cable. z This may cause a breakdown, electric shock or a fire due to damage to move the monitor right or left by pulling on the monitor. z This may cause an explosion or fire. Do not place any unusual sounds or smells coming from it immediately and contact...cause an electric shock, fire or injury. z This may cause an electric shock or a fire. For each hour of looking at the monitor, you should let your monitor does not operate normally - z This may cause a breakdown, electric shock or a fire due to damage to qualified service personnel. Notational Power...
User Manual (ENGLISH)
Page 8
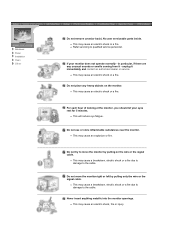
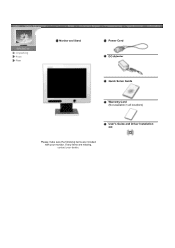
Unparking Front Rear Monitor and Stand Power Cord DC-Adapter Quick Setup Guide Warranty Card (Not available in all locations) User's Guide and Driver Installation CD Please make sure the following items are missing, contact your monitor. If any items are included with your dealer.
Unparking Front Rear Monitor and Stand Power Cord DC-Adapter Quick Setup Guide Warranty Card (Not available in all locations) User's Guide and Driver Installation CD Please make sure the following items are missing, contact your monitor. If any items are included with your dealer.
User Manual (ENGLISH)
Page 9
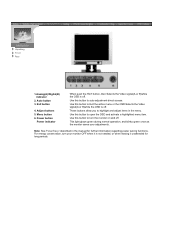
...to turn your adjustments. Auto button 3. Power button 8. This light glows green during normal operation, and blinks green once as the monitor saves your monitor OFF when it is not needed, or when leaving it unattended for further information regarding power saving functions. Power indicator When push the... the Video signal(A or B)while the OSD is off . Note: See PowerSaver described in the menu. For energy conservation, turn the monitor on and off. Use this button to highlight and adjust items in the manual for long periods. These buttons allow you to auto adjustment...
...to turn your adjustments. Auto button 3. Power button 8. This light glows green during normal operation, and blinks green once as the monitor saves your monitor OFF when it is not needed, or when leaving it unattended for further information regarding power saving functions. Power indicator When push the... the Video signal(A or B)while the OSD is off . Note: See PowerSaver described in the menu. For energy conservation, turn the monitor on and off. Use this button to highlight and adjust items in the manual for long periods. These buttons allow you to auto adjustment...

User Manual (ENGLISH)
Page 10
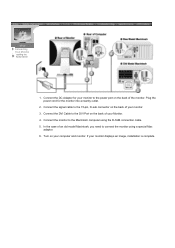
Connect the D-sub Cable to the 15-pin, D-sub connector on the back of your Comupter. Note: See Connecting Your Monitor for your monitor to product.) 1. DVI Cable 2. Power Port Connect the DVI Cable to the DVI Cable on the back of the monitor may vary from product to the power port on the back of the monitor. D-sub Cable 3. Unparking Front Rear (The configuration at the back of your Computer. Connect the DC Adapter for further information regarding cable connections.
Connect the D-sub Cable to the 15-pin, D-sub connector on the back of your Comupter. Note: See Connecting Your Monitor for your monitor to product.) 1. DVI Cable 2. Power Port Connect the DVI Cable to the DVI Cable on the back of the monitor may vary from product to the power port on the back of the monitor. D-sub Cable 3. Unparking Front Rear (The configuration at the back of your Computer. Connect the DC Adapter for further information regarding cable connections.
User Manual (ENGLISH)
Page 11
... power port on the back of the monitor. Turn on the back of an old model Macintosh, you need to the DVI Port on your monitor. 3. Connecting Your Monitor Installing the Monitor Driver 1. Connect the DVI Cable to connect the monitor using the D-SUB connection cable. 5. ...Plug the power cord for your monitor displays an image, installation is complete. In the case ...
... power port on the back of the monitor. Turn on the back of an old model Macintosh, you need to the DVI Port on your monitor. 3. Connecting Your Monitor Installing the Monitor Driver 1. Connect the DVI Cable to connect the monitor using the D-SUB connection cable. 5. ...Plug the power cord for your monitor displays an image, installation is complete. In the case ...

User Manual (ENGLISH)
Page 12
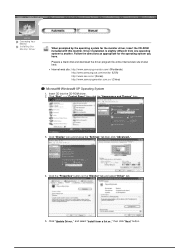
... model list, then click the "OK" button. Windows XP/2000 1. Click "Windows XP/2000 Driver". 3. Choose your monitor model in the "Warning" window. 5. Internet web site : http://www.samsung-monitor.com/ (Worldwide) http://www.samsungusa.com/monitor (USA) http://www.sec.co.kr/ (Korea) http://www.samsungmonitor.com.cn/ (China) Windows ME 1. Insert CD...
... model list, then click the "OK" button. Windows XP/2000 1. Click "Windows XP/2000 Driver". 3. Choose your monitor model in the "Warning" window. 5. Internet web site : http://www.samsung-monitor.com/ (Worldwide) http://www.samsungusa.com/monitor (USA) http://www.sec.co.kr/ (Korea) http://www.samsungmonitor.com.cn/ (China) Windows ME 1. Insert CD...

User Manual (ENGLISH)
Page 13
If you can see following "Message" window, then click the "Continue Anyway" button. Monitor driver installation is under certifying MS logo,and this installation don't damage your system.The certified driver will be posted on Samsung Monitor Homepage http://www.samsung-monitor.com/. 6. This monitor driver is completed. Click the "Install" button in the "Warning" window. 5. 4. Then click "OK" button.
If you can see following "Message" window, then click the "Continue Anyway" button. Monitor driver installation is under certifying MS logo,and this installation don't damage your system.The certified driver will be posted on Samsung Monitor Homepage http://www.samsung-monitor.com/. 6. This monitor driver is completed. Click the "Install" button in the "Warning" window. 5. 4. Then click "OK" button.
User Manual (ENGLISH)
Page 14
...the CD-ROM driver. 2. Click the "Properties" button on the "Monitor" tab and select "Driver" tab. 5. then click "Next" button. Follow the directions as appropriate for the monitor driver, insert the CD-ROM included with this monitor. Click "Display" icon and choose the "Settings" tab then click... blank disk and download the driver program file at the Internet web site shown here. z Internet web site : http://www.samsung-monitor.com/ (Worldwide) http://www.samsungusa.com/monitor (USA) http://www.sec.co.kr/ (Korea) http://www.samsungmonitor.com.cn/ (China) Microsoft® Windows® XP ...
...the CD-ROM driver. 2. Click the "Properties" button on the "Monitor" tab and select "Driver" tab. 5. then click "Next" button. Follow the directions as appropriate for the monitor driver, insert the CD-ROM included with this monitor. Click "Display" icon and choose the "Settings" tab then click... blank disk and download the driver program file at the Internet web site shown here. z Internet web site : http://www.samsung-monitor.com/ (Worldwide) http://www.samsungusa.com/monitor (USA) http://www.sec.co.kr/ (Korea) http://www.samsungmonitor.com.cn/ (China) Microsoft® Windows® XP ...

User Manual (ENGLISH)
Page 15
Click the "Close" button then click "OK" button continually. Click the "Browse" button then choose A:(D:\Driver) and choose your system.The certified driver will .." Select "Don't search ,I will be posted on Samsung Monitor Homepage http://www.samsung-monitor.com/. 9. If you can see following "Message" window, then click the "Continue Anyway" button. This monitor driver is under certifying MS logo,and this installation don't damage your monitor model in the model list and click the "Next" button. 8. then click "Next" and then click "Have disk". 7. 6. Then click "OK" button.
Click the "Close" button then click "OK" button continually. Click the "Browse" button then choose A:(D:\Driver) and choose your system.The certified driver will .." Select "Don't search ,I will be posted on Samsung Monitor Homepage http://www.samsung-monitor.com/. 9. If you can see following "Message" window, then click the "Continue Anyway" button. This monitor driver is under certifying MS logo,and this installation don't damage your monitor model in the model list and click the "Next" button. 8. then click "Next" and then click "Have disk". 7. 6. Then click "OK" button.

User Manual (ENGLISH)
Page 16
..." button. 9. And click the "Finish" button then the "Close" button. Choose "Specify the location of all devices" and choose the monitor that I can see the "Digital Signature Not Found" window then click the "Yes"button. Please stop installation Case2: If the "Properties" ...Display a list of the driver". 7. 10. Click "Driver" and then click on the "File Needed" window. 3. then click "Next" button. 8. How to your monitor, follow next steps continually. 5. Click "Start" , "Setting" , "Control Panel". 2. then click on the "Next" button. 6. Click the "Browse" button then ...
..." button. 9. And click the "Finish" button then the "Close" button. Choose "Specify the location of all devices" and choose the monitor that I can see the "Digital Signature Not Found" window then click the "Yes"button. Please stop installation Case2: If the "Properties" ...Display a list of the driver". 7. 10. Click "Driver" and then click on the "File Needed" window. 3. then click "Next" button. 8. How to your monitor, follow next steps continually. 5. Click "Start" , "Setting" , "Control Panel". 2. then click on the "Next" button. 6. Click the "Browse" button then ...
User Manual (ENGLISH)
Page 17
... 4. The next screen is no Mode at the first and the second screen after executing the X86Config file. 2. Set a vertical frequency for your monitor. Enter the model name of system setting file. 1. Execute X-Window after clicking Test. Click Start, Settings, Control Panel, and then double-click Display... other requested hardware. Click Apply button if you wish to a different mode (lower mode of all, set a horizontal frequency for your monitor. 7. Press Enter at All Display Modes, select the level of resolution and vertical frequency by referring to make the X86Config file, which ...
... 4. The next screen is no Mode at the first and the second screen after executing the X86Config file. 2. Set a vertical frequency for your monitor. Enter the model name of system setting file. 1. Execute X-Window after clicking Test. Click Start, Settings, Control Panel, and then double-click Display... other requested hardware. Click Apply button if you wish to a different mode (lower mode of all, set a horizontal frequency for your monitor. 7. Press Enter at All Display Modes, select the level of resolution and vertical frequency by referring to make the X86Config file, which ...
User Manual (ENGLISH)
Page 21
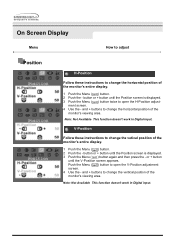
...open the V-Position adjustment screen. 4 Use the - and + buttons to change the vetical position of the monitor's viewing area. Push the Menu ( ) button to change the vertical position of the monitor's entire display. 1 Push the Menu ( ) button. 2 Push the - and + buttons to change... the horizontal position of the monitor's viewing area. ment screen. 4 Use the - V-Position Follow these instructions to change the horizontal position of the monitor's entire display. 1 Push the Menu ( ) button. 2 Push the - Note: Not Available...
...open the V-Position adjustment screen. 4 Use the - and + buttons to change the vetical position of the monitor's viewing area. Push the Menu ( ) button to change the vertical position of the monitor's entire display. 1 Push the Menu ( ) button. 2 Push the - and + buttons to change... the horizontal position of the monitor's viewing area. ment screen. 4 Use the - V-Position Follow these instructions to change the horizontal position of the monitor's entire display. 1 Push the Menu ( ) button. 2 Push the - Note: Not Available...
User Manual (ENGLISH)
Page 22
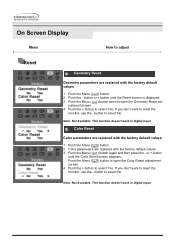
...parameters are replaced with the factory default values. 3 Push the Menu ( ) button again and then press the - If you don't want to reset the monitor, use the - justment screen. 4 Push the + button to adjust Reset Geometry Reset Geometry parameters are replaced with the factory default values. 1 Push the... Menu ( ) button. 2 Push the - If you don't want to reset the monitor, use the - or + button until the Reset screen is displayed. 3 Push the Menu ( ) button twice to select Yes. On Screen Display ...
...parameters are replaced with the factory default values. 3 Push the Menu ( ) button again and then press the - If you don't want to reset the monitor, use the - justment screen. 4 Push the + button to adjust Reset Geometry Reset Geometry parameters are replaced with the factory default values. 1 Push the... Menu ( ) button. 2 Push the - If you don't want to reset the monitor, use the - or + button until the Reset screen is displayed. 3 Push the Menu ( ) button twice to select Yes. On Screen Display ...
User Manual (ENGLISH)
Page 24
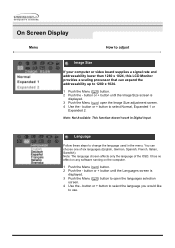
.... On Screen Display Menu How to adjust Image Size If your computer or video board supplies a signal rate and addressability lower than 1280 x 1024, this LCD Monitor provides a scaling processor that can choose one of six languages.(English, German, Spanish, French, Italian, Swedish) Note: The language chosen affects only the language of...
.... On Screen Display Menu How to adjust Image Size If your computer or video board supplies a signal rate and addressability lower than 1280 x 1024, this LCD Monitor provides a scaling processor that can choose one of six languages.(English, German, Spanish, French, Italian, Swedish) Note: The language chosen affects only the language of...
User Manual (ENGLISH)
Page 26
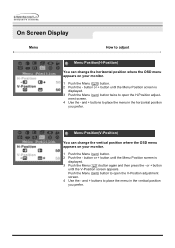
Menu Position(V-Position) You can change the vertical position where the OSD menu appears on your monitor. 1 Push the Menu ( ) button. 2 Push the - and + buttons to place the menu in the horizontal position you prefer. or + button until the Menu Position screen.... 4 Use the - On Screen Display Menu How to adjust Menu Position(H-Position) You can change the horizontal position where the OSD menu appears on your monitor. 1 Push the Menu ( ) button. 2 Push the - button or + button until the Menu Position screen is displayed. 3 Push the Menu ( ) button again and then press the...
Menu Position(V-Position) You can change the vertical position where the OSD menu appears on your monitor. 1 Push the Menu ( ) button. 2 Push the - and + buttons to place the menu in the horizontal position you prefer. or + button until the Menu Position screen.... 4 Use the - On Screen Display Menu How to adjust Menu Position(H-Position) You can change the horizontal position where the OSD menu appears on your monitor. 1 Push the Menu ( ) button. 2 Push the - button or + button until the Menu Position screen is displayed. 3 Push the Menu ( ) button again and then press the...

User Manual (ENGLISH)
Page 28
On Screen Display Menu How to adjust Auto Adjustment Auto adjustment allows the monitor to self-adjust to Unlock the The values of fine, coarse and position are adjusted automatically. 1 Push the Auto button. OSD Lock/Unlock 1 Push the Menu ( OSD. 2 Push the Menu ( OSD. ) button for 5 seconds or more to Lock the ) button for 5 seconds or more to the incoming video signal. Note:To make the automatic adjustment function sharper, execute the 'AUTO' function while the AUTO PATTERN is on. Note: Not Available This function doesn't work in Digital input.
On Screen Display Menu How to adjust Auto Adjustment Auto adjustment allows the monitor to self-adjust to Unlock the The values of fine, coarse and position are adjusted automatically. 1 Push the Auto button. OSD Lock/Unlock 1 Push the Menu ( OSD. 2 Push the Menu ( OSD. ) button for 5 seconds or more to Lock the ) button for 5 seconds or more to the incoming video signal. Note:To make the automatic adjustment function sharper, execute the 'AUTO' function while the AUTO PATTERN is on. Note: Not Available This function doesn't work in Digital input.

User Manual (ENGLISH)
Page 29
...Before calling for service, check the information in this message when the signal from the video card exceeds the maximum resolution and frequency that the monitor can properly handle. I cannot see "Video mode not supported" on the Information section or contact your dealer. Is the power indicator on..., please call the phone number on the warranty card, the phone number on the screen? Adjust the maximum resolution and frequency that the monitor can properly handle. You can see this section to the Preset Display Modes) Note: If the initial screen (the login screen) does not...
...Before calling for service, check the information in this message when the signal from the video card exceeds the maximum resolution and frequency that the monitor can properly handle. I cannot see "Video mode not supported" on the Information section or contact your dealer. Is the power indicator on..., please call the phone number on the warranty card, the phone number on the screen? Adjust the maximum resolution and frequency that the monitor can properly handle. You can see this section to the Preset Display Modes) Note: If the initial screen (the login screen) does not...


