Manuals
Page 6
... 1...213 4 Removing Misfed Paper When Paper is Not Functioning Properly 206 Additional Troubleshooting...208 10. Maintaining the Printer Replacing the Print Cartridge...155 Replacing the Maintenance Kit...161 Before Replacing...161 Replacing the Friction Pad...162 Replacing the Transfer Roller...164 Replacing the Paper Feed Roller...168 Replacing the Fusing Unit...171...
... 1...213 4 Removing Misfed Paper When Paper is Not Functioning Properly 206 Additional Troubleshooting...208 10. Maintaining the Printer Replacing the Print Cartridge...155 Replacing the Maintenance Kit...161 Before Replacing...161 Replacing the Friction Pad...162 Replacing the Transfer Roller...164 Replacing the Paper Feed Roller...168 Replacing the Fusing Unit...171...
Manuals
Page 7
Appendix Moving and Transporting the Printer...231 Moving the Printer in a Short Distance...231 Consumables...233 Print Cartridge...233 Maintenance Kit...233 Specifications...235 Mainframe...235 Options...237 Trademarks...241 INDEX...243 5 Removing Misfed Bypass Tray...215 Paper Misfeed Message (B)...218 Paper Misfeed Message (C)...220 Paper Misfeed Message (Y1)(Y2)...225 Paper Misfeed Message (Z)...227 Removing Misfed Paper Inside the Cover 227 Removing Misfed Paper Inside the Duplex Unit 229 11.
Appendix Moving and Transporting the Printer...231 Moving the Printer in a Short Distance...231 Consumables...233 Print Cartridge...233 Maintenance Kit...233 Specifications...235 Mainframe...235 Options...237 Trademarks...241 INDEX...243 5 Removing Misfed Bypass Tray...215 Paper Misfeed Message (B)...218 Paper Misfeed Message (C)...220 Paper Misfeed Message (Y1)(Y2)...225 Paper Misfeed Message (Z)...227 Removing Misfed Paper Inside the Cover 227 Removing Misfed Paper Inside the Duplex Unit 229 11.
Manuals
Page 163
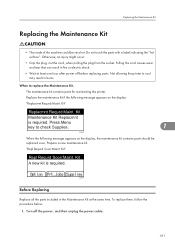
... allowing the printer to check Supplies. 7 CEE120 When the following message appears on the display, the maintenance kit contains parts should be very hot. When to replace the Maintenance Kit. Kit Maintenance Kit Replacmnt is required. Kit" Repl Requrd Soon:Maint. Kit" Replacmnt Requrd:Maint. Kit A new kit is required. CEE119 Before Replacing Replace all the parts included in burns. The...
... allowing the printer to check Supplies. 7 CEE120 When the following message appears on the display, the maintenance kit contains parts should be very hot. When to replace the Maintenance Kit. Kit Maintenance Kit Replacmnt is required. Kit" Repl Requrd Soon:Maint. Kit" Replacmnt Requrd:Maint. Kit A new kit is required. CEE119 Before Replacing Replace all the parts included in burns. The...
Manuals
Page 165
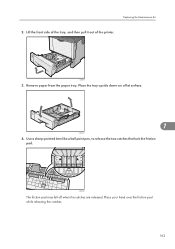
Replacing the Maintenance Kit 2. CEE011 3. Remove paper from the paper tray. CEE082 The friction pad may fall off when the catches are released. Lift the front side of the tray, and then pull it out of the printer. Place your hand over the friction pad while releasing the catches. 163 Place the tray upside down on a flat surface. 7 CEE027 4. Use a sharp-pointed item like a ball point pen, to release the two catches that lock the friction pad.
Replacing the Maintenance Kit 2. CEE011 3. Remove paper from the paper tray. CEE082 The friction pad may fall off when the catches are released. Lift the front side of the tray, and then pull it out of the printer. Place your hand over the friction pad while releasing the catches. 163 Place the tray upside down on a flat surface. 7 CEE027 4. Use a sharp-pointed item like a ball point pen, to release the two catches that lock the friction pad.
Manuals
Page 167
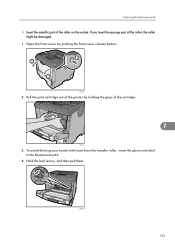
If you insert the sponge part of the roller on the socket. Hold the lock levers, and then pull them. Pull the print cartridge out of the cartridge. 7 CEE017 3. CEE008 2. To avoid dirtying your hands with toner from the transfer roller, wear the gloves included in the Maintenance Kit. 4. CEE064 165 Open the front cover by holding the grips of the printer by pushing the front cover release button. Replacing the Maintenance Kit • Insert the metallic part of the roller, the roller might be damaged. 1.
If you insert the sponge part of the roller on the socket. Hold the lock levers, and then pull them. Pull the print cartridge out of the cartridge. 7 CEE017 3. CEE008 2. To avoid dirtying your hands with toner from the transfer roller, wear the gloves included in the Maintenance Kit. 4. CEE064 165 Open the front cover by holding the grips of the printer by pushing the front cover release button. Replacing the Maintenance Kit • Insert the metallic part of the roller, the roller might be damaged. 1.
Manuals
Page 169
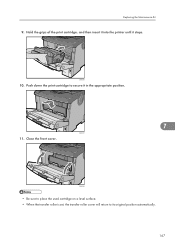
Close the front cover. Replacing the Maintenance Kit 9. CEE009 10. CEE005 • Be sure to place the used cartridge on a level surface. • When the transfer roller is set, the transfer roller cover will return to secure it stops. Push down the print cartridge to its original position automatically. 167 Hold the grips of the print cartridge, and then insert it into the printer until it in the appropriate position. 7 CEE007 11.
Close the front cover. Replacing the Maintenance Kit 9. CEE009 10. CEE005 • Be sure to place the used cartridge on a level surface. • When the transfer roller is set, the transfer roller cover will return to secure it stops. Push down the print cartridge to its original position automatically. 167 Hold the grips of the print cartridge, and then insert it into the printer until it in the appropriate position. 7 CEE007 11.

Manuals
Page 171
Move the printer to the edge of the printer ( ). 1 2 7 CEE083 5. CEE022 169 Push the under board levers ( ), and then pull the duplex unit out of a sturdy and stable table or desk. If the optional duplex unit is attached, push down the lever on the right side of the duplex unit ( ), and then pull it out until it stops ( ). 2 1 CEE056 4. Replacing the Maintenance Kit 3.
Move the printer to the edge of the printer ( ). 1 2 7 CEE083 5. CEE022 169 Push the under board levers ( ), and then pull the duplex unit out of a sturdy and stable table or desk. If the optional duplex unit is attached, push down the lever on the right side of the duplex unit ( ), and then pull it out until it stops ( ). 2 1 CEE056 4. Replacing the Maintenance Kit 3.

Manuals
Page 173
Replacing the Maintenance Kit 10. Push the duplex unit securely into the printer. 7 CEE050 • If the printer is equipped with the optional paper feed unit, do not move ...
Replacing the Maintenance Kit 10. Push the duplex unit securely into the printer. 7 CEE050 • If the printer is equipped with the optional paper feed unit, do not move ...
Manuals
Page 175
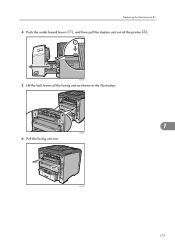
Push the under board levers ( ), and then pull the duplex unit out of the fusing unit as shown in the illustration. 7 CEE046 6. Pull the fusing unit out. Replacing the Maintenance Kit 4. Lift the lock levers of the printer ( ). 1 2 CEE083 5. CEE048 173
Push the under board levers ( ), and then pull the duplex unit out of the fusing unit as shown in the illustration. 7 CEE046 6. Pull the fusing unit out. Replacing the Maintenance Kit 4. Lift the lock levers of the printer ( ). 1 2 CEE083 5. CEE048 173

Manuals
Page 177
Close the rear cover. 7 CEE045 12. Position the rear cover horizontally and align it with the grooves in the printer by pushing it in the printer's interior. If the optional duplex unit was removed, re-install it along the rails on the inside of the printer. CEE044 11. Replacing the Maintenance Kit 10. CEE057 175
Close the rear cover. 7 CEE045 12. Position the rear cover horizontally and align it with the grooves in the printer by pushing it in the printer's interior. If the optional duplex unit was removed, re-install it along the rails on the inside of the printer. CEE044 11. Replacing the Maintenance Kit 10. CEE057 175

Manuals
Page 197
.... Replace print cartridge. /Print Cartridge replacement is installed properly or contact your local vendor. Replace the print cartridge. Kit /Maintenance Kit Replacmnt is almost empty. For details, see p.155 "Replacing the Print Cartridge". Replace print cartrdg soon./ Toner is... required. Contact your sales or service representative. Contact your sales or service representative to obtain a new maintenance kit. Prepare a new print cartridge. It may be incorrectly installed. Problem:Wireless card Please call service. Contact your sales ...
.... Replace print cartridge. /Print Cartridge replacement is installed properly or contact your local vendor. Replace the print cartridge. Kit /Maintenance Kit Replacmnt is almost empty. For details, see p.155 "Replacing the Print Cartridge". Replace print cartrdg soon./ Toner is... required. Contact your sales or service representative. Contact your sales or service representative to obtain a new maintenance kit. Prepare a new print cartridge. It may be incorrectly installed. Problem:Wireless card Please call service. Contact your sales ...
Manuals
Page 198
... not be installed correctly. Turn the printer off and re-install the print cartridge. If the message is invalid. For details, see p.161 "Replacing the Maintenance Kit" for IPv6/Gateway addresses are invalid.(110/210) The IPv6 address or gateway address is still displayed after re-installation, contact your 9 network administrator. The...
... not be installed correctly. Turn the printer off and re-install the print cartridge. If the message is invalid. For details, see p.161 "Replacing the Maintenance Kit" for IPv6/Gateway addresses are invalid.(110/210) The IPv6 address or gateway address is still displayed after re-installation, contact your 9 network administrator. The...
Manuals
Page 205
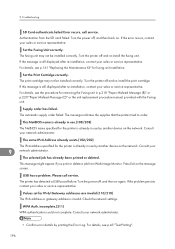
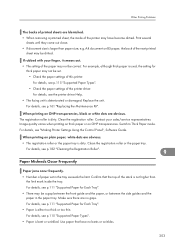
... the paper settings of the paper may have no gaps. Make sure there are no bents or wrinkles. 203 For details, see p.161 "Replacing the Maintenance Kit". For details, see p.111 "Supported Paper for Each Tray". • There may be dirtied. Clean the registration roller or the paper tray. For details, see...
... the paper settings of the paper may have no gaps. Make sure there are no bents or wrinkles. 203 For details, see p.161 "Replacing the Maintenance Kit". For details, see p.111 "Supported Paper for Each Tray". • There may be dirtied. Clean the registration roller or the paper tray. For details, see...
Manuals
Page 207
... "Supported Paper Types". • There may be printed using PDF Direct Print. For details, see the printer driver Help. For details, see p.161 "Replacing the Maintenance Kit". Open the relevant application and print the PDF file using the printer driver.
... "Supported Paper Types". • There may be printed using PDF Direct Print. For details, see the printer driver Help. For details, see p.161 "Replacing the Maintenance Kit". Open the relevant application and print the PDF file using the printer driver.
Manuals
Page 235
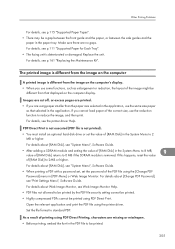
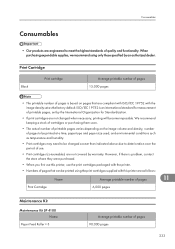
... where they were purchased. • When you first use this printer are as follows: Name Average printable number of pages 11 Print Cartridge 6,000 pages Maintenance Kit Maintenance Kit SP 4100 Name Paper Feed Roller × 3 Average printable number of printable pages, set as temperature and humidity. • Print cartridges may need to be printed...
... where they were purchased. • When you first use this printer are as follows: Name Average printable number of pages 11 Print Cartridge 6,000 pages Maintenance Kit Maintenance Kit SP 4100 Name Paper Feed Roller × 3 Average printable number of printable pages, set as temperature and humidity. • Print cartridges may need to be printed...

Manuals
Page 236
However, if there is problem, contact the store where they were purchased. 11 234 Appendix Fusing Unit Transfer Roller Friction Pad × 3 Name Average printable number of pages 90,000 pages 90,000 pages 90,000 pages • The actual number of printable pages varies depending on the image volume and density, number of pages to be printed at a time, paper type and paper size used, and environmental conditions such as temperature and humidity. • The maintenance kit (consumables) are not covered by warranty. 11.
However, if there is problem, contact the store where they were purchased. 11 234 Appendix Fusing Unit Transfer Roller Friction Pad × 3 Name Average printable number of pages 90,000 pages 90,000 pages 90,000 pages • The actual number of printable pages varies depending on the image volume and density, number of pages to be printed at a time, paper type and paper size used, and environmental conditions such as temperature and humidity. • The maintenance kit (consumables) are not covered by warranty. 11.
Manuals
Page 245
... LED lamps 80 Letterhead 116 Light sensor 22 List of options 12 Loading envelopes 140 Loading envelopes into the envelope feeder 146 Loading paper 124 M Maintenance kit 161, 233 Manuals 10, 13 Menu key 21 Model-specific information 7 Moving and transporting 231 Moving the printer a short distance 231 N NetWare 89 243
... LED lamps 80 Letterhead 116 Light sensor 22 List of options 12 Loading envelopes 140 Loading envelopes into the envelope feeder 146 Loading paper 124 M Maintenance kit 161, 233 Manuals 10, 13 Menu key 21 Model-specific information 7 Moving and transporting 231 Moving the printer a short distance 231 N NetWare 89 243
Manuals
Page 246
... curl 190 Registration roller 182 Removing misfed bypass tray 215 Removing misfed tray 1 213 Removing the packaging materials 34 Replace 161 Replacing the maintenance kit..........164, 168, 171 Replacing the Maintenance Kit 162 S Saving energy 43 Scroll keys 22, 24 SD card 71 SDRAM module 60 Security 99 Selection keys 21, 24 Shutdown 40...
... curl 190 Registration roller 182 Removing misfed bypass tray 215 Removing misfed tray 1 213 Removing the packaging materials 34 Replace 161 Replacing the maintenance kit..........164, 168, 171 Replacing the Maintenance Kit 162 S Saving energy 43 Scroll keys 22, 24 SD card 71 SDRAM module 60 Security 99 Selection keys 21, 24 Shutdown 40...


