Manuals
Page 1
Operating Instructions Hardware Guide 1 Guide to read "Safety Information" before you use this manual carefully before using the machine. For safe and correct use, be sure to the Printer 2 Setting Up the Printer 3 Installing Options 4 Connecting the Printer 5 Configuration 6 Loading Paper 7 Maintaining the Printer 8 Adjusting the Printer 9 Troubleshooting 10 Removing Misfed Paper 11 Appendix Read this machine and keep it handy for future reference.
Operating Instructions Hardware Guide 1 Guide to read "Safety Information" before you use this manual carefully before using the machine. For safe and correct use, be sure to the Printer 2 Setting Up the Printer 3 Installing Options 4 Connecting the Printer 5 Configuration 6 Loading Paper 7 Maintaining the Printer 8 Adjusting the Printer 9 Troubleshooting 10 Removing Misfed Paper 11 Appendix Read this machine and keep it handy for future reference.
Manuals
Page 3
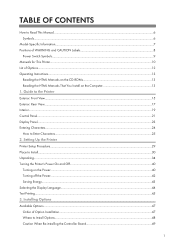
... to Read This Manual...6 Symbols...6 Model-Specific Information...7 Positions of WARNING and CAUTION Labels 8 Power Switch Symbols...9 Manuals for This Printer...10 List of Option Installation...47 Where to Install Options...48 Caution When Re-installing the Controller Board 49 1 Guide to the... Printer Exterior: Front View...15 Exterior: Rear View...17 Interior...19 Control Panel...21 Display Panel...23 Entering Characters...24 How to Install...30 Unpacking...34 Turning the Printer's Power On and Off...40 Turning on the Computer ...
... to Read This Manual...6 Symbols...6 Model-Specific Information...7 Positions of WARNING and CAUTION Labels 8 Power Switch Symbols...9 Manuals for This Printer...10 List of Option Installation...47 Where to Install Options...48 Caution When Re-installing the Controller Board 49 1 Guide to the... Printer Exterior: Front View...15 Exterior: Rear View...17 Interior...19 Control Panel...21 Display Panel...23 Entering Characters...24 How to Install...30 Unpacking...34 Turning the Printer's Power On and Off...40 Turning on the Computer ...
Manuals
Page 4
Connecting the Printer Ethernet Cable Connection...77 Reading the LED Lamps...80 USB Cable Connection...81 Parallel Cable Connection...83 5. Attaching the Paper Feed Unit...51 Attaching the ...
Connecting the Printer Ethernet Cable Connection...77 Reading the LED Lamps...80 USB Cable Connection...81 Parallel Cable Connection...83 5. Attaching the Paper Feed Unit...51 Attaching the ...
Manuals
Page 6
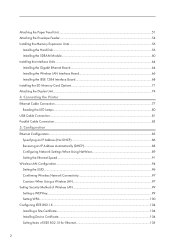
...Cannot Print Properly...201 Paper Misfeeds Occur Frequently...203 The printed image is different from the image on the computer 205 When Printer is Jammed...211 Paper Misfeed Message (A)...213 Removing Misfed Tray 1...213 4 Removing Misfed Paper When Paper is Not Functioning ...Properly 206 Additional Troubleshooting...208 10. Maintaining the Printer Replacing the Print Cartridge...155 Replacing the Maintenance Kit...161 Before Replacing...161 Replacing the Friction Pad...162 Replacing the Transfer Roller......
...Cannot Print Properly...201 Paper Misfeeds Occur Frequently...203 The printed image is different from the image on the computer 205 When Printer is Jammed...211 Paper Misfeed Message (A)...213 Removing Misfed Tray 1...213 4 Removing Misfed Paper When Paper is Not Functioning ...Properly 206 Additional Troubleshooting...208 10. Maintaining the Printer Replacing the Print Cartridge...155 Replacing the Maintenance Kit...161 Before Replacing...161 Replacing the Friction Pad...162 Replacing the Transfer Roller......
Manuals
Page 7
Appendix Moving and Transporting the Printer...231 Moving the Printer in a Short Distance...231 Consumables...233 Print Cartridge...233 Maintenance Kit...233 Specifications...235 Mainframe...235 Options...237 Trademarks...241 INDEX...243 5 Removing Misfed Bypass Tray...215 Paper Misfeed Message (B)...218 Paper Misfeed Message (C)...220 Paper Misfeed Message (Y1)(Y2)...225 Paper Misfeed Message (Z)...227 Removing Misfed Paper Inside the Cover 227 Removing Misfed Paper Inside the Duplex Unit 229 11.
Appendix Moving and Transporting the Printer...231 Moving the Printer in a Short Distance...231 Consumables...233 Print Cartridge...233 Maintenance Kit...233 Specifications...235 Mainframe...235 Options...237 Trademarks...241 INDEX...243 5 Removing Misfed Bypass Tray...215 Paper Misfeed Message (B)...218 Paper Misfeed Message (C)...220 Paper Misfeed Message (Y1)(Y2)...225 Paper Misfeed Message (Z)...227 Removing Misfed Paper Inside the Cover 227 Removing Misfed Paper Inside the Duplex Unit 229 11.
Manuals
Page 9
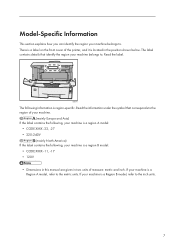
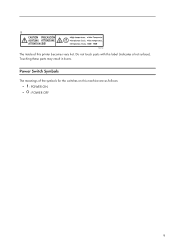
... . If your machine is a region B model: • CODE XXXX -11, -17 • 120V • Dimensions in this manual are given in two units of the printer, and it is region-specific. Read the label. CEE070 The following , your machine is a label on the front cover of measure: metric and inch. The...
... . If your machine is a region B model: • CODE XXXX -11, -17 • 120V • Dimensions in this manual are given in two units of the printer, and it is region-specific. Read the label. CEE070 The following , your machine is a label on the front cover of measure: metric and inch. The...
Manuals
Page 10
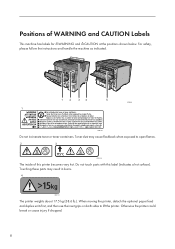
... the machine as indicated. 12 34 5 CEE060 CEE129 Do not incinerate toner or toner containers. Positions of this label (indicates a hot surface). When moving the printer, detach the optional paper feed and duplex units first, and then use the inset grips on both sides to open flames. CEE130 The inside of... WARNING and CAUTION Labels This machine has labels for WARNING and CAUTION at the positions shown below. Otherwise the printer could break or cause injury if dropped. 8 Touching these parts may cause flashback when exposed to lift the...
... the machine as indicated. 12 34 5 CEE060 CEE129 Do not incinerate toner or toner containers. Positions of this label (indicates a hot surface). When moving the printer, detach the optional paper feed and duplex units first, and then use the inset grips on both sides to open flames. CEE130 The inside of... WARNING and CAUTION Labels This machine has labels for WARNING and CAUTION at the positions shown below. Otherwise the printer could break or cause injury if dropped. 8 Touching these parts may cause flashback when exposed to lift the...
Manuals
Page 11
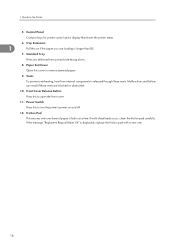
CEE132 The inside of the symbols for the switches on this machine are as follows: • : POWER ON • : POWER OFF 9 Touching these parts may result in burns. Power Switch Symbols The meanings of this label (indicates a hot surface). Do not touch parts with this printer becomes very hot.
CEE132 The inside of the symbols for the switches on this machine are as follows: • : POWER ON • : POWER OFF 9 Touching these parts may result in burns. Power Switch Symbols The meanings of this label (indicates a hot surface). Do not touch parts with this printer becomes very hot.
Manuals
Page 12
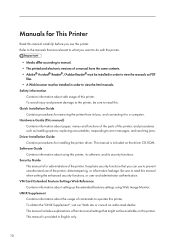
...• The printed and electronic versions of the printer. Manuals for This Printer Read this manual carefully before you use this printer; UNIX Supplement Contains information about the usage of this printer. This manual is included on this printer. Software Guide Contains information about safe usage of ... Web site or consult an authorized dealer. To avoid injury and prevent damage to the printer, be available on the driver CD-ROM. This manual includes explanations of the printer, data tampering, or information leakage. Refer to the manuals that you can use of ...
...• The printed and electronic versions of the printer. Manuals for This Printer Read this manual carefully before you use this printer; UNIX Supplement Contains information about the usage of this printer. This manual is included on this printer. Software Guide Contains information about safe usage of ... Web site or consult an authorized dealer. To avoid injury and prevent damage to the printer, be available on the driver CD-ROM. This manual includes explanations of the printer, data tampering, or information leakage. Refer to the manuals that you can use of ...

Manuals
Page 13
• In this manual, "Enhanced Locked Print NX" is abbreviated as "ELP-NX". • Manuals provided are specific to printer types. 11
• In this manual, "Enhanced Locked Print NX" is abbreviated as "ELP-NX". • Manuals provided are specific to printer types. 11

Manuals
Page 14
... IEEE 802.11a/g Interface Unit Type L Wireless LAN interface unit IEEE 802.11a/g Interface Unit Type M IEEE 1284 Interface Board Type A SD card for this printer, and how they are referred to as in this manual.
... IEEE 802.11a/g Interface Unit Type L Wireless LAN interface unit IEEE 802.11a/g Interface Unit Type M IEEE 1284 Interface Board Type A SD card for this printer, and how they are referred to as in this manual.
Manuals
Page 17
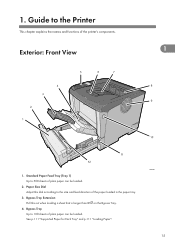
Exterior: Front View 1 1. Bypass Tray Extension Pull this dial according to 100 sheets of the paper loaded in the paper tray. 3. Bypass Tray Up to the size and feed direction of plain paper can be loaded. Paper Size Dial Adjust this out when loading a sheet that is longer than B5 on the Bypass Tray. 4. Guide to 500 sheets of the printer's components. Standard Paper Feed Tray (Tray 1) Up to the Printer This chapter explains the names and functions of plain paper can be loaded. 2. See p.111 "Supported Paper for Each Tray" and p.111 "Loading Paper". CEE001 15 1.
Exterior: Front View 1 1. Bypass Tray Extension Pull this dial according to 100 sheets of the paper loaded in the paper tray. 3. Bypass Tray Up to the size and feed direction of plain paper can be loaded. Paper Size Dial Adjust this out when loading a sheet that is longer than B5 on the Bypass Tray. 4. Guide to 500 sheets of the printer's components. Standard Paper Feed Tray (Tray 1) Up to the Printer This chapter explains the names and functions of plain paper can be loaded. 2. See p.111 "Supported Paper for Each Tray" and p.111 "Loading Paper". CEE001 15 1.
Manuals
Page 18
If the message "Replacmnt Requrd:Maint. Guide to open the front cover. 11. Front Cover Release Button Press this cover to turn the printer's power on and off. 12. Kit" is displayed, replace the friction pad with a new one sheet of paper is fed in at a time. Tray .... Malfunctions and failure can result if these vents. If multi-sheet feeds occur, clean the friction pad carefully. Paper Exit Cover Open this to the Printer 5. Power Switch Press this out if the paper you are delivered here printed side facing down. 8. 1. Friction Pad This ensures only one . 16...
If the message "Replacmnt Requrd:Maint. Guide to open the front cover. 11. Front Cover Release Button Press this cover to turn the printer's power on and off. 12. Kit" is displayed, replace the friction pad with a new one sheet of paper is fed in at a time. Tray .... Malfunctions and failure can result if these vents. If multi-sheet feeds occur, clean the friction pad carefully. Paper Exit Cover Open this to the Printer 5. Power Switch Press this out if the paper you are delivered here printed side facing down. 8. 1. Friction Pad This ensures only one . 16...
Manuals
Page 19
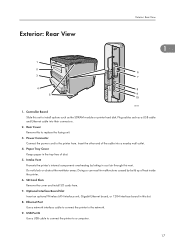
...this to a computer. 17 SD Card Slots Remove the cover and install SD cards here. 7. USB Port B Use a USB cable to connect the printer to replace the fusing unit. 3. Rear Cover Remove this vent. Power Connector Connect the power cord to the network. 9. Insert the other end of ...disk. Controller Board Slide this slot. 8. Do not block or obstruct the ventilator areas. Ethernet Port Use a network interface cable to connect the printer to the printer here. Paper Tray Cover Keeps paper in this out to install options such as a USB cable and Ethernet cable into a nearby wall outlet. 4....
...this to a computer. 17 SD Card Slots Remove the cover and install SD cards here. 7. USB Port B Use a USB cable to connect the printer to replace the fusing unit. 3. Rear Cover Remove this vent. Power Connector Connect the power cord to the network. 9. Insert the other end of ...disk. Controller Board Slide this slot. 8. Do not block or obstruct the ventilator areas. Ethernet Port Use a network interface cable to connect the printer to the printer here. Paper Tray Cover Keeps paper in this out to install options such as a USB cable and Ethernet cable into a nearby wall outlet. 4....

Manuals
Page 20
USB Port A Use a USB cable to the Printer 10. Guide to connect the optional USB devices such as the authentication card reader. 1 18 1.
USB Port A Use a USB cable to the Printer 10. Guide to connect the optional USB devices such as the authentication card reader. 1 18 1.
Manuals
Page 21
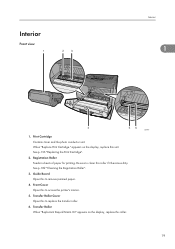
... to remove jammed paper. 4. Interior Front view Interior 1 CEE004 1. Registration Roller Feeds in sheets of paper for printing. Guide Board Open this to access the printer's interior. 5. Transfer Roller When "Replacmnt Requrd:Maint. Print Cartridge Contains toner and the photo conductor unit. appears on the display, replace this unit. Be sure...
... to remove jammed paper. 4. Interior Front view Interior 1 CEE004 1. Registration Roller Feeds in sheets of paper for printing. Guide Board Open this to access the printer's interior. 5. Transfer Roller When "Replacmnt Requrd:Maint. Print Cartridge Contains toner and the photo conductor unit. appears on the display, replace this unit. Be sure...
Manuals
Page 22
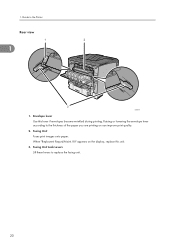
Fusing Unit Fuses print images onto paper. Fusing Unit Lock Levers Lift these levers to the Printer Rear view 1 CEE100 1. Envelope lever Use this unit. 3. Kit" appears on can improve print quality. 2. Raising or lowering the envelope lever according to the thickness of the paper you are printing on the display, replace this lever if envelopes become wrinkled during printing. Guide to replace the fusing unit. 20 When "Replacmnt Requrd:Maint. 1.
Fusing Unit Fuses print images onto paper. Fusing Unit Lock Levers Lift these levers to the Printer Rear view 1 CEE100 1. Envelope lever Use this unit. 3. Kit" appears on can improve print quality. 2. Raising or lowering the envelope lever according to the thickness of the paper you are printing on the display, replace this lever if envelopes become wrinkled during printing. Guide to replace the fusing unit. 20 When "Replacmnt Requrd:Maint. 1.
Manuals
Page 23
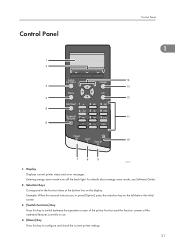
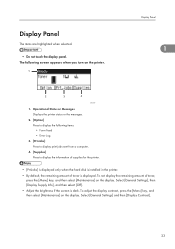
... at the bottom line on the left below the initial screen. 3. [Switch Functions] Key Press this key to switch between the operation screen of the printer function and the function screens of the extended features currently in use. 4. [Menu] Key Press this key to press [Option], press the selection key on... the display. Control Panel Control Panel 1 CEE121 1. Display Displays current printer status and error messages. Example: When this manual instructs you to configure and check the current...
... at the bottom line on the left below the initial screen. 3. [Switch Functions] Key Press this key to switch between the operation screen of the printer function and the function screens of the extended features currently in use. 4. [Menu] Key Press this key to press [Option], press the selection key on... the display. Control Panel Control Panel 1 CEE121 1. Display Displays current printer status and error messages. Example: When this manual instructs you to configure and check the current...
Manuals
Page 24
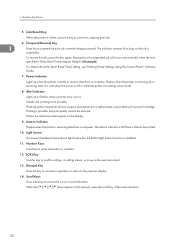
...this key again. Follow the instructions that detects the ambient light level when the ECO Night Sensor function is ready to the Printer 5. [Job Reset] Key When the printer is not possible. Number Keys Use these keys to the previous display. 14. Guide to receive data from a computer. ...Power Indicator Lights up when the printer is enabled. 11. Light Sensor The sensor that appear on the display. 9. The indicator remains lit as long as a print cartridge. For ...
...this key again. Follow the instructions that detects the ambient light level when the ECO Night Sensor function is ready to the Printer 5. [Job Reset] Key When the printer is not possible. Number Keys Use these keys to the previous display. 14. Guide to receive data from a computer. ...Power Indicator Lights up when the printer is enabled. 11. Light Sensor The sensor that appear on the display. 9. The indicator remains lit as long as a print cartridge. For ...
Manuals
Page 25
...Select [General Settings], then [Display Supply Info], and then select [Off]. • Adjust the brightness if the screen is installed in the printer. • By default, the remaining amount of toner, press the [Menu] key, and then select [Maintenance] on the display. To adjust... the display contrast, press the [Menu] key, and then select [Maintenance] on the printer. Select [General Settings] and then [Display Contrast]. 23 To not display the remaining amount of toner is displayed. The following items: • Form Feed...
...Select [General Settings], then [Display Supply Info], and then select [Off]. • Adjust the brightness if the screen is installed in the printer. • By default, the remaining amount of toner, press the [Menu] key, and then select [Maintenance] on the display. To adjust... the display contrast, press the [Menu] key, and then select [Maintenance] on the printer. Select [General Settings] and then [Display Contrast]. 23 To not display the remaining amount of toner is displayed. The following items: • Form Feed...


