Manuals
Page 6
... the image on the computer 205 When Printer is Jammed...211 Paper Misfeed Message (A)...213 Removing Misfed Tray 1...213 4 Maintaining the Printer Replacing the Print Cartridge...155 Replacing the Maintenance Kit...161 Before Replacing...161 Replacing the Friction Pad...162 Replacing the Transfer Roller...164 Replacing the Paper Feed Roller...168...
... the image on the computer 205 When Printer is Jammed...211 Paper Misfeed Message (A)...213 Removing Misfed Tray 1...213 4 Maintaining the Printer Replacing the Print Cartridge...155 Replacing the Maintenance Kit...161 Before Replacing...161 Replacing the Friction Pad...162 Replacing the Transfer Roller...164 Replacing the Paper Feed Roller...168...
Manuals
Page 7
Removing Misfed Bypass Tray...215 Paper Misfeed Message (B)...218 Paper Misfeed Message (C)...220 Paper Misfeed Message (Y1)(Y2)...225 Paper Misfeed Message (Z)...227 Removing Misfed Paper Inside the Cover 227 Removing Misfed Paper Inside the Duplex Unit 229 11. Appendix Moving and Transporting the Printer...231 Moving the Printer in a Short Distance...231 Consumables...233 Print Cartridge...233 Maintenance Kit...233 Specifications...235 Mainframe...235 Options...237 Trademarks...241 INDEX...243 5
Removing Misfed Bypass Tray...215 Paper Misfeed Message (B)...218 Paper Misfeed Message (C)...220 Paper Misfeed Message (Y1)(Y2)...225 Paper Misfeed Message (Z)...227 Removing Misfed Paper Inside the Cover 227 Removing Misfed Paper Inside the Duplex Unit 229 11. Appendix Moving and Transporting the Printer...231 Moving the Printer in a Short Distance...231 Consumables...233 Print Cartridge...233 Maintenance Kit...233 Specifications...235 Mainframe...235 Options...237 Trademarks...241 INDEX...243 5
Manuals
Page 21
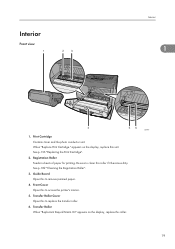
...sure to replace the transfer roller. 6. Kit" appears on the display, replace this roller if it becomes dirty. See p.155 "Replacing the Print Cartridge". 2. Print Cartridge Contains toner and the photo conductor unit. Registration Roller Feeds in sheets of paper for printing. Transfer Roller Cover Open this roller. 19 See p.182... Roller". 3. Guide Board Open this to remove jammed paper. 4. Transfer Roller When "Replacmnt Requrd:Maint. Interior Front view Interior 1 CEE004 1. When "Replace Print Cartridge." Front Cover Open this to access the printer's interior. 5.
...sure to replace the transfer roller. 6. Kit" appears on the display, replace this roller if it becomes dirty. See p.155 "Replacing the Print Cartridge". 2. Print Cartridge Contains toner and the photo conductor unit. Registration Roller Feeds in sheets of paper for printing. Transfer Roller Cover Open this roller. 19 See p.182... Roller". 3. Guide Board Open this to remove jammed paper. 4. Transfer Roller When "Replacmnt Requrd:Maint. Interior Front view Interior 1 CEE004 1. When "Replace Print Cartridge." Front Cover Open this to access the printer's interior. 5.
Manuals
Page 24
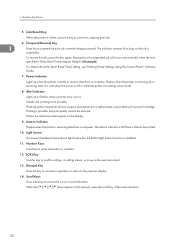
... possible. Data In Indicator Flashes when the printer is possible, but print quality cannot be printed. 10. The indicator remains lit as long as a print cartridge. Flashing yellow: the printer will occur automatically when the time specified in each direction. Number Keys Use these keys to receive data from a computer. Resumption...
... possible. Data In Indicator Flashes when the printer is possible, but print quality cannot be printed. 10. The indicator remains lit as long as a print cartridge. Flashing yellow: the printer will occur automatically when the time specified in each direction. Number Keys Use these keys to receive data from a computer. Resumption...
Manuals
Page 37
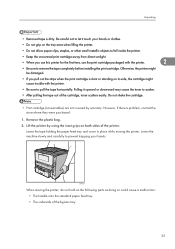
... let it upward or downward may cause the toner to scatter. • After pulling the tape out of the cartridge, toner scatters easily. Do not shake the cartridge. • Print cartridge (consumables) are not covered by using the inset grips on both sides of the bypass tray. 35 Lift the ... tape horizontally. Otherwise, the printer might cause trouble with the printer. 2 • Be sure to remove the tape completely before installing the print cartridge. Leave the tape holding the paper feed tray and cover in place while moving the printer, do not hold on the tray area when lifting...
... let it upward or downward may cause the toner to scatter. • After pulling the tape out of the cartridge, toner scatters easily. Do not shake the cartridge. • Print cartridge (consumables) are not covered by using the inset grips on both sides of the bypass tray. 35 Lift the ... tape horizontally. Otherwise, the printer might cause trouble with the printer. 2 • Be sure to remove the tape completely before installing the print cartridge. Leave the tape holding the paper feed tray and cover in place while moving the printer, do not hold on the tray area when lifting...
Manuals
Page 39
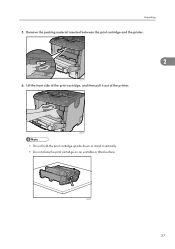
CEE118 37 Unpacking 5. Lift the front side of the printer. Remove the packing material inserted between the print cartridge and the printer. 2 CEC114 6. CEE021 • Do not hold the print cartridge upside down or stand it out of the print cartridge, and then pull it vertically. • Do not place the print cartridge on an unstable or tilted surface.
CEE118 37 Unpacking 5. Lift the front side of the printer. Remove the packing material inserted between the print cartridge and the printer. 2 CEC114 6. CEE021 • Do not hold the print cartridge upside down or stand it out of the print cartridge, and then pull it vertically. • Do not place the print cartridge on an unstable or tilted surface.
Manuals
Page 40
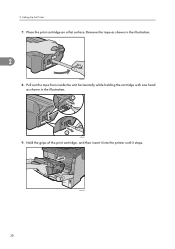
Place the print cartridge on a flat surface. CEE115 9. Pull out the tape from inside the unit horizontally while holding the cartridge with one hand as shown in the illustration. Hold the grips of the print cartridge, and then insert it into the printer until it stops. 38 CEE009 Remove the tape as shown in the illustration. 2 CEE072 8. Setting Up the Printer 7. 2.
Place the print cartridge on a flat surface. CEE115 9. Pull out the tape from inside the unit horizontally while holding the cartridge with one hand as shown in the illustration. Hold the grips of the print cartridge, and then insert it into the printer until it stops. 38 CEE009 Remove the tape as shown in the illustration. 2 CEE072 8. Setting Up the Printer 7. 2.
Manuals
Page 41
Unpacking 2 CEE007 11. CEE005 • Do not close the cover easily, pull out the print cartridge from the printer and insert it in the same manner as ordinary plastic waste. 39 If you cannot close the front cover with force. Close the front cover. After that, close the front cover again. • Dispose of removed fixing material and tape in the appropriate position. 10. Push down the print cartridge to secure it again.
Unpacking 2 CEE007 11. CEE005 • Do not close the cover easily, pull out the print cartridge from the printer and insert it in the same manner as ordinary plastic waste. 39 If you cannot close the front cover with force. Close the front cover. After that, close the front cover again. • Dispose of removed fixing material and tape in the appropriate position. 10. Push down the print cartridge to secure it again.

Manuals
Page 157
... chapter explains how to replace consumables, and clean the printer. Consult a doctor if necessary. • If toner or used ) or toner containers. Replacing the Print Cartridge • Do not incinerate toner (new or used toner gets into the fabric and make removing the stain impossible. 155 Toner will set the toner...
... chapter explains how to replace consumables, and clean the printer. Consult a doctor if necessary. • If toner or used ) or toner containers. Replacing the Print Cartridge • Do not incinerate toner (new or used toner gets into the fabric and make removing the stain impossible. 155 Toner will set the toner...
Manuals
Page 158
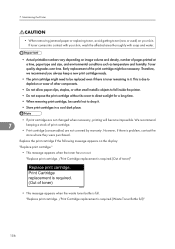
...small metallic objects to fall inside the printer. • Do not expose the print cartridge without its cover to direct sunlight for a long time. • When removing print cartridge, be careful not to be necessary. This is due to depletion or wear of ...appears when the waste toner bottle is problem, contact the store where they were purchased. "Replace print cartridge. /Print Cartridge replacement is required.(Out of print cartridge. • Print cartridge (consumables) are not changed when necessary, printing will become impossible. We recommend 7 keeping a stock of...
...small metallic objects to fall inside the printer. • Do not expose the print cartridge without its cover to direct sunlight for a long time. • When removing print cartridge, be careful not to be necessary. This is due to depletion or wear of ...appears when the waste toner bottle is problem, contact the store where they were purchased. "Replace print cartridge. /Print Cartridge replacement is required.(Out of print cartridge. • Print cartridge (consumables) are not changed when necessary, printing will become impossible. We recommend 7 keeping a stock of...
Manuals
Page 159
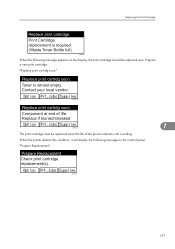
... is ending. CEE134 157 "Replace print cartrdg soon." "Prepare Replacement" Prepare Replacement Check print cartridge replacement(s). Replace if blurred/streaked CEE133 7 The print cartridge must be replaced soon. Replace print cartrdg soon. Replacing the Print Cartridge Replace print cartridge. Print Cartridge replacement is almost empty. When the printer detects this condition, it will display the...
... is ending. CEE134 157 "Replace print cartrdg soon." "Prepare Replacement" Prepare Replacement Check print cartridge replacement(s). Replace if blurred/streaked CEE133 7 The print cartridge must be replaced soon. Replace print cartrdg soon. Replacing the Print Cartridge Replace print cartridge. Print Cartridge replacement is almost empty. When the printer detects this condition, it will display the...
Manuals
Page 160
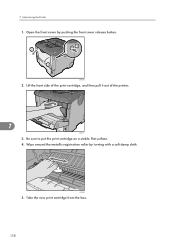
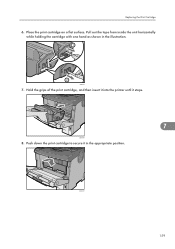
Lift the front side of the print cartridge, and then pull it out of the printer. 7 CEE017 3. Be sure to put the print cartridge on a stable, flat surface. 4. Take the new print cartridge from the box. 158 7. Maintaining the Printer 1. CEE008 2. Wipe around the metallic registration roller by pushing the front cover release button. Open the front cover by turning with a soft damp cloth. CEC040 5.
Lift the front side of the print cartridge, and then pull it out of the printer. 7 CEE017 3. Be sure to put the print cartridge on a stable, flat surface. 4. Take the new print cartridge from the box. 158 7. Maintaining the Printer 1. CEE008 2. Wipe around the metallic registration roller by pushing the front cover release button. Open the front cover by turning with a soft damp cloth. CEC040 5.
Manuals
Page 161
Pull out the tape from inside the unit horizontally while holding the cartridge with one hand as shown in the appropriate position. Push down the print cartridge to secure it stops. 7 CEE009 8. CEE115 7. Place the print cartridge on a flat surface. CEE007 159 Hold the grips of the print cartridge, and then insert it into the printer until it in the illustration. Replacing the Print Cartridge 6.
Pull out the tape from inside the unit horizontally while holding the cartridge with one hand as shown in the appropriate position. Push down the print cartridge to secure it stops. 7 CEE009 8. CEE115 7. Place the print cartridge on a flat surface. CEE007 159 Hold the grips of the print cartridge, and then insert it into the printer until it in the illustration. Replacing the Print Cartridge 6.
Manuals
Page 162
...To avoid malfunction, do not turn off the power until "Ready" appears on the display. • Do not shake or shock the print cartridge after pulling out the toner seal to avoid soiling paper surfaces, toner spillage, or printer failure. • Comply with excessive force. Maintaining the ...Printer 9. After that, close the cover easily, pull out the print cartridge from the printer and reinsert it again. For details, ask your sales or service representative. 7 • Do not close the front cover with ...
...To avoid malfunction, do not turn off the power until "Ready" appears on the display. • Do not shake or shock the print cartridge after pulling out the toner seal to avoid soiling paper surfaces, toner spillage, or printer failure. • Comply with excessive force. Maintaining the ...Printer 9. After that, close the cover easily, pull out the print cartridge from the printer and reinsert it again. For details, ask your sales or service representative. 7 • Do not close the front cover with ...
Manuals
Page 167
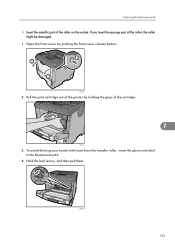
Pull the print cartridge out of the cartridge. 7 CEE017 3. If you insert the sponge part of the roller on the socket. Hold the lock levers, and then pull them. CEE008 2. CEE064 165 To avoid dirtying your hands with toner from the transfer roller, wear the gloves included in the Maintenance Kit. 4. Replacing the Maintenance Kit • Insert the metallic part of the roller, the roller might be damaged. 1. Open the front cover by holding the grips of the printer by pushing the front cover release button.
Pull the print cartridge out of the cartridge. 7 CEE017 3. If you insert the sponge part of the roller on the socket. Hold the lock levers, and then pull them. CEE008 2. CEE064 165 To avoid dirtying your hands with toner from the transfer roller, wear the gloves included in the Maintenance Kit. 4. Replacing the Maintenance Kit • Insert the metallic part of the roller, the roller might be damaged. 1. Open the front cover by holding the grips of the printer by pushing the front cover release button.
Manuals
Page 169
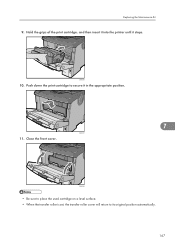
CEE009 10. Hold the grips of the print cartridge, and then insert it into the printer until it in the appropriate position. 7 CEE007 11. Replacing the Maintenance Kit 9. Close the front cover. Push down the print cartridge to its original position automatically. 167 CEE005 • Be sure to place the used cartridge on a level surface. • When the transfer roller is set, the transfer roller cover will return to secure it stops.
CEE009 10. Hold the grips of the print cartridge, and then insert it into the printer until it in the appropriate position. 7 CEE007 11. Replacing the Maintenance Kit 9. Close the front cover. Push down the print cartridge to its original position automatically. 167 CEE005 • Be sure to place the used cartridge on a level surface. • When the transfer roller is set, the transfer roller cover will return to secure it stops.
Manuals
Page 184
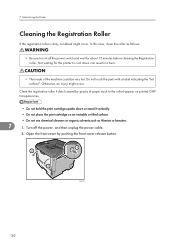
... button. 7. Turn off the power switch and wait for the printer to cool down or stand it vertically. • Do not place the print cartridge on an unstable or tilted surface. • Do not use chemical cleaners or organic solvents such as thinners or benzine. 7 1. Do not touch ... case, clean the roller as follows: • Be sure to the roller) appear on printed OHP transparencies. • Do not hold the print cartridge upside down can result in a burn. • The inside of the machine could be very hot. Maintaining the Printer Cleaning the Registration Roller If ...
... button. 7. Turn off the power switch and wait for the printer to cool down or stand it vertically. • Do not place the print cartridge on an unstable or tilted surface. • Do not use chemical cleaners or organic solvents such as thinners or benzine. 7 1. Do not touch ... case, clean the roller as follows: • Be sure to the roller) appear on printed OHP transparencies. • Do not hold the print cartridge upside down can result in a burn. • The inside of the machine could be very hot. Maintaining the Printer Cleaning the Registration Roller If ...
Manuals
Page 185
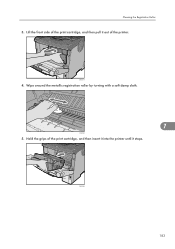
Wipe around the metallic registration roller by turning with a soft damp cloth. 7 CEC040 5. Lift the front side of the print cartridge, and then pull it out of the print cartridge, and then insert it into the printer until it stops. Hold the grips of the printer. CEE009 183 CEE017 4. Cleaning the Registration Roller 3.
Wipe around the metallic registration roller by turning with a soft damp cloth. 7 CEC040 5. Lift the front side of the print cartridge, and then pull it out of the print cartridge, and then insert it into the printer until it stops. Hold the grips of the printer. CEE009 183 CEE017 4. Cleaning the Registration Roller 3.
Manuals
Page 186
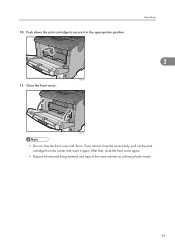
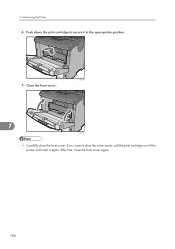
Close the front cover. 7 CEE005 • Carefully close the front cover again. 184 7. Maintaining the Printer 6. If you cannot close the cover easily, pull the print cartridge out of the printer and insert it in the appropriate position. CEE007 7. After that, close the front cover. Push down the print cartridge to secure it again.
Close the front cover. 7 CEE005 • Carefully close the front cover again. 184 7. Maintaining the Printer 6. If you cannot close the cover easily, pull the print cartridge out of the printer and insert it in the appropriate position. CEE007 7. After that, close the front cover. Push down the print cartridge to secure it again.
Manuals
Page 196
... Units". 194 Parallel I/F Error The printer's self diagnostic test failed due to cancel printing. print size. Prepare Replacement/ Check print cartridge replacement(s). The printer cannot communicate with Remote Communication Gate. Perform the shutdown procedure, and then turn off then on the power again..., and then execute [Reset IPDS Fonts]. IPv6 Address already exists Manual Config. Check if it is full. The printer cartridge is set. Consult your network administrator. The output trays are full. For details, see p.56 "Installing the Memory Expansion Units". 9....
... Units". 194 Parallel I/F Error The printer's self diagnostic test failed due to cancel printing. print size. Prepare Replacement/ Check print cartridge replacement(s). The printer cannot communicate with Remote Communication Gate. Perform the shutdown procedure, and then turn off then on the power again..., and then execute [Reset IPDS Fonts]. IPv6 Address already exists Manual Config. Check if it is full. The printer cartridge is set. Consult your network administrator. The output trays are full. For details, see p.56 "Installing the Memory Expansion Units". 9....


