VM Card Extended Feature Settings Web Reference
Page 9
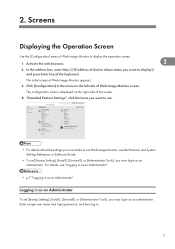
... an Administrator" Logging in as an administrator. Screens Displaying the Operation Screen Use the [Configuration] menu of the keyboard. 2. Enter a login user name and login password, and then log in the menu on the right side of Web Image Monitor screen. Activate the web browser. 2 2. The configuration menu is displayed on...
... an Administrator" Logging in as an administrator. Screens Displaying the Operation Screen Use the [Configuration] menu of the keyboard. 2. Enter a login user name and login password, and then log in the menu on the right side of Web Image Monitor screen. Activate the web browser. 2 2. The configuration menu is displayed on...
VM Card Extended Feature Settings Web Reference
Page 10
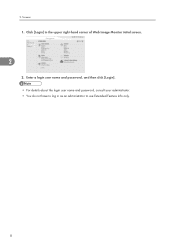
Enter a login user name and password, and then click [Login]. • For details about the login user name and password, consult your administrator. • You do not have to log in the upper right-hand corner of Web Image Monitor initial screen. 2 2. 2. Click [Login] in as an administrator to use Extended Feature Info only. 8 Screens 1.
Enter a login user name and password, and then click [Login]. • For details about the login user name and password, consult your administrator. • You do not have to log in the upper right-hand corner of Web Image Monitor initial screen. 2 2. 2. Click [Login] in as an administrator to use Extended Feature Info only. 8 Screens 1.
VM Card Extended Feature Settings Web Reference
Page 37
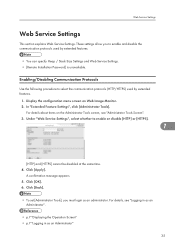
... enable and disable the communication protocols used by extended features. • You can specify Heap / Stack Size Settings and Web Service Settings. • [Remote Installation Password] is unavailable. Enabling/Disabling Communication Protocols Use the following procedure to enable or disable [HTTP] or [HTTPS]. 7 [HTTP] and [HTTPS] cannot be disabled at the...
... enable and disable the communication protocols used by extended features. • You can specify Heap / Stack Size Settings and Web Service Settings. • [Remote Installation Password] is unavailable. Enabling/Disabling Communication Protocols Use the following procedure to enable or disable [HTTP] or [HTTPS]. 7 [HTTP] and [HTTPS] cannot be disabled at the...

Manuals
Page 99
... viruses or other obstructions, the following procedure to the initial screen. 5. If the Wireless LAN unit is lit. 5 1 2 CEE158 1. Information leakage Information such as IDs, passwords, credit card numbers, and e-mail content may arise if you have installed the Wireless LAN interface unit, use the following problems may be lit orange...
... viruses or other obstructions, the following procedure to the initial screen. 5. If the Wireless LAN unit is lit. 5 1 2 CEE158 1. Information leakage Information such as IDs, passwords, credit card numbers, and e-mail content may arise if you have installed the Wireless LAN interface unit, use the following problems may be lit orange...
Manuals
Page 108
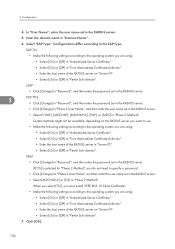
...and then enter the user name set in "Permit Sub-domain". 7. Click [OK]. 106 EAP-TLS • Make the following settings according to specify a password. • Click [Change] on "Server ID". • Select [On] or [Off] in the RADIUS server. When you select [TLS], you ...], [PAP], or [MD5] in the RADIUS server. 5. LEAP • Click [Change] in "Password", and then enter the password set in the RADIUS server. 5 EAP-TTLS • Click [Change] in "Password", and then enter the password set in the RADIUS server. • Click [Change] in "Phase 2 User Name", and then ...
...and then enter the user name set in "Permit Sub-domain". 7. Click [OK]. 106 EAP-TLS • Make the following settings according to specify a password. • Click [Change] on "Server ID". • Select [On] or [Off] in the RADIUS server. When you select [TLS], you ...], [PAP], or [MD5] in the RADIUS server. 5. LEAP • Click [Change] in "Password", and then enter the password set in the RADIUS server. 5 EAP-TTLS • Click [Change] in "Password", and then enter the password set in the RADIUS server. • Click [Change] in "Phase 2 User Name", and then ...
Manuals
Page 109
... Click [Logout]. 14. EAP-TLS • Make the following settings according to Web Image Monitor as an administrator. 2. LEAP • Click Change in "Password", and then enter the password set in the RADIUS server. Under "Interface", click [Interface Settings]. 10. EAP-TTLS • Click [Change] in... "Password", and then enter the password set in the RADIUS server. • Click [Change] in "Phase 2 User Name", and then enter the user name set in the RADIUS server...
... Click [Logout]. 14. EAP-TLS • Make the following settings according to Web Image Monitor as an administrator. 2. LEAP • Click Change in "Password", and then enter the password set in the RADIUS server. Under "Interface", click [Interface Settings]. 10. EAP-TTLS • Click [Change] in... "Password", and then enter the password set in the RADIUS server. • Click [Change] in "Phase 2 User Name", and then enter the user name set in the RADIUS server...

Manuals
Page 110
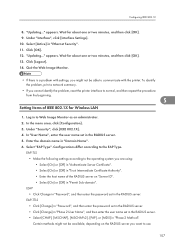
...set in "Communication Mode". 12. Configuration • Make the following settings according to the operating system you do not need to specify a password. • Click [Change] on "Server ID". • Select [On] or [Off] in "WPA Encryption Method" according to ...in "Permit Sub-domain". 7. Enter the alphanumeric characters (a-z, A-Z, or 0-9) in "LAN Type". 11. PEAP • Click [Change] in "Password", and then enter the password set in the RADIUS server. • Select [MSCHAPv2] or [TLS] in "Permit Sub-domain". appears. Select [WPA] in "WPA Authentication Method...
...set in "Communication Mode". 12. Configuration • Make the following settings according to the operating system you do not need to specify a password. • Click [Change] on "Server ID". • Select [On] or [Off] in "WPA Encryption Method" according to ...in "Permit Sub-domain". 7. Enter the alphanumeric characters (a-z, A-Z, or 0-9) in "LAN Type". 11. PEAP • Click [Change] in "Password", and then enter the password set in the RADIUS server. • Select [MSCHAPv2] or [TLS] in "Permit Sub-domain". appears. Select [WPA] in "WPA Authentication Method...
Manuals
Page 194
Setting change the user name and/or password if they are incorrect. 192 To reset the error, open the front cover and then close it.... (A) Remove misfeed in the source tray, and then load the paper again. update failed Updating the @Remote certificate failed. Check proxy user/password. Troubleshooting Resetting Job... Wait a while. The printer is resetting the print job. Wait a while. Waiting for the next data to its...Cov. Detach the duplex unit and remove the jammed paper inside the fusing unit. The proxy user name or password is waiting for print data...
Setting change the user name and/or password if they are incorrect. 192 To reset the error, open the front cover and then close it.... (A) Remove misfeed in the source tray, and then load the paper again. update failed Updating the @Remote certificate failed. Check proxy user/password. Troubleshooting Resetting Job... Wait a while. The printer is resetting the print job. Wait a while. Waiting for the next data to its...Cov. Detach the duplex unit and remove the jammed paper inside the fusing unit. The proxy user name or password is waiting for print data...
Manuals
Page 207
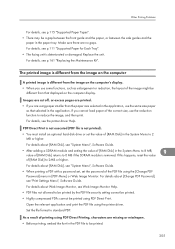
... System Menu to be printed by the PDF file security setting cannot be printed. • Highly compressed PDFs cannot be printed using the [Change PDF Password] menu in the paper tray. If this happens, reset the value 9 of [RAM Disk] in the PDF file to 0 MB if the SDRAM module is... not printed). • You must install an optional hard disk drive or set the password of [RAM Disk] in the application. For details, see "Print Settings Menu", Software Guide. Images are cut off, or excess pages are printed. • If...
... System Menu to be printed by the PDF file security setting cannot be printed. • Highly compressed PDFs cannot be printed using the [Change PDF Password] menu in the paper tray. If this happens, reset the value 9 of [RAM Disk] in the PDF file to 0 MB if the SDRAM module is... not printed). • You must install an optional hard disk drive or set the password of [RAM Disk] in the application. For details, see "Print Settings Menu", Software Guide. Images are cut off, or excess pages are printed. • If...

Software Guide
Page 15
... p.19 "If User Authentication is recommended to printer functions and documents and data stored in order to authenticate users via their login user names and passwords. Using User Authentication Using authentication, administrators manage the printer and its driver on the driver CD-ROM.
... p.19 "If User Authentication is recommended to printer functions and documents and data stored in order to authenticate users via their login user names and passwords. Using User Authentication Using authentication, administrators manage the printer and its driver on the driver CD-ROM.

Software Guide
Page 21
...you want to use the printer. The following procedure to log out. • Consult the User Administrator about your login user name, password, and user code. • For user code authentication, enter a number registered in when Basic Authentication, Windows Authentication, LDAP Authentication, or... Integration Server Authentication is usable only if the user enters a valid login user name and password on this screen. Enter the login user name, and then press the [OK] key. 4. When the user is specified, users...
...you want to use the printer. The following procedure to log out. • Consult the User Administrator about your login user name, password, and user code. • For user code authentication, enter a number registered in when Basic Authentication, Windows Authentication, LDAP Authentication, or... Integration Server Authentication is usable only if the user enters a valid login user name and password on this screen. Enter the login user name, and then press the [OK] key. 4. When the user is specified, users...

Software Guide
Page 22
... click [Printers and Faxes]. 2. Click [OK]. In the [Menu:] box, click the [Job Setup] icon. 6. In [Login Password:], enter a login password using up to log out. If you are using the printer driver do not have to 128 characters. Click [Authentication...]. 7. Press ...(Using the Printer Driver) When Basic Authentication, Windows Authentication, or LDAP Authentication is set , users must enter a login user name and password to specify authentication for individual print jobs 1. Setting Authentication for . 3. On the [File] menu, click [Printing Preferences...]. 4. 1. ...
... click [Printers and Faxes]. 2. Click [OK]. In the [Menu:] box, click the [Job Setup] icon. 6. In [Login Password:], enter a login password using up to log out. If you are using the printer driver do not have to 128 characters. Click [Authentication...]. 7. Press ...(Using the Printer Driver) When Basic Authentication, Windows Authentication, or LDAP Authentication is set , users must enter a login user name and password to specify authentication for individual print jobs 1. Setting Authentication for . 3. On the [File] menu, click [Printing Preferences...]. 4. 1. ...

Software Guide
Page 23
...the configuration of Web Image Monitor. 1 2. If you do not want to save them, configure your network administrator. Enter a login user name and password, and then click [Login]. Log out (Using Web Image Monitor) Use the following procedure to log in to the printer via Web Image Monitor. 1.... Click [Login] in the Header area of your Web browser, the login user name and password might be used . • For details about the login user name and password, consult your Web browser's settings so that this information is not saved. • If User Code Authentication ...
...the configuration of Web Image Monitor. 1 2. If you do not want to save them, configure your network administrator. Enter a login user name and password, and then click [Login]. Log out (Using Web Image Monitor) Use the following procedure to log in to the printer via Web Image Monitor. 1.... Click [Login] in the Header area of your Web browser, the login user name and password might be used . • For details about the login user name and password, consult your Web browser's settings so that this information is not saved. • If User Code Authentication ...
Software Guide
Page 52
...] printing for this printer using the "lpr" command to print PDF files directly using the control panel, select [Change PDF Password] on [PDF Menu] under "Printer". 50 Following is protected by specifying the printer's IP address. Using the Control Panel To enter a PDF... such as "lpr", "rcp", "ftp", and "sftp". 2. Using Commands to Print This section explains how to print a PDF file by a password, enter the password using Web Image Monitor, click [Configuration] in brackets [ ] is optional. • For details about printing PDF files directly, see UNIX Supplement. Range...
...] printing for this printer using the "lpr" command to print PDF files directly using the control panel, select [Change PDF Password] on [PDF Menu] under "Printer". 50 Following is protected by specifying the printer's IP address. Using the Control Panel To enter a PDF... such as "lpr", "rcp", "ftp", and "sftp". 2. Using Commands to Print This section explains how to print a PDF file by a password, enter the password using Web Image Monitor, click [Configuration] in brackets [ ] is optional. • For details about printing PDF files directly, see UNIX Supplement. Range...
Software Guide
Page 64
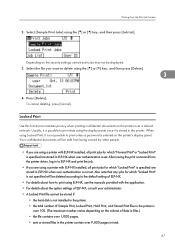
... the printer. • File name shows the name of the file. If the password you must first enter the existing password. However, "****" is shown instead of a file if a password is incorrect, you select. 2. To clear the password for a Locked Print file. 4. [Print] Prints a selected file. 5. [Change...• When you press [Change] to change the password of the print job you cannot change or clear any current passwords. • You can also set or clear passwords only when Stored Print files are stored in the new password box. 3. The type of print jobs Displays the ...
... the printer. • File name shows the name of the file. If the password you must first enter the existing password. However, "****" is shown instead of a file if a password is incorrect, you select. 2. To clear the password for a Locked Print file. 4. [Print] Prints a selected file. 5. [Change...• When you press [Change] to change the password of the print job you cannot change or clear any current passwords. • You can also set or clear passwords only when Stored Print files are stored in the new password box. 3. The type of print jobs Displays the ...
Software Guide
Page 69
.... • If you want to delete using the display panel once it is stored in ELP-NX when user authentication is possible to print unless a password is not specified will be displayed. 3. When using the [ ] or [ ] key, and then press [Job List]. Usually, it is not possible to print data using...
.... • If you want to delete using the display panel once it is stored in ELP-NX when user authentication is possible to print unless a password is not specified will be displayed. 3. When using the [ ] or [ ] key, and then press [Job List]. Usually, it is not possible to print data using...
Software Guide
Page 70
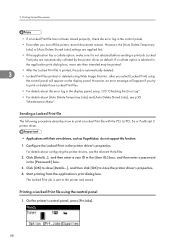
Configure the Locked Print in the [Password:] box. 3. Click [OK] to close [Details...], and then click [OK] to print a Locked Print file with the PCL 6/PCL 5e or PostScript 3 printer driver. • .... However, an error message will appear on the display panel. Click [Details...], and then enter a user ID in the [User ID:] box, and then enter a password in the printer driver's properties. The Locked Print job is not selected before sending a print job. On the printer's control panel, press [Prt.Jobs]. 68...
Configure the Locked Print in the [Password:] box. 3. Click [OK] to close [Details...], and then click [OK] to print a Locked Print file with the PCL 6/PCL 5e or PostScript 3 printer driver. • .... However, an error message will appear on the display panel. Click [Details...], and then enter a user ID in the [User ID:] box, and then enter a password in the printer driver's properties. The Locked Print job is not selected before sending a print job. On the printer's control panel, press [Prt.Jobs]. 68...
Software Guide
Page 71
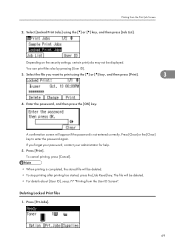
...the [ ] or [ ] key, and then press [Print]. 3 4. You can print files also by pressing [User ID]. 3. A confirmation screen will appear if the password is completed, the stored file will be displayed. Press [Print]. Depending on the security settings, certain print jobs may not be deleted. • For details... about [User ID], see p.77 "Printing from the Print Job Screen 2. If you want to enter the password again. The file will be deleted. • To stop printing after printing has started, press the [Job Reset] key. Deleting Locked Print files 1....
...the [ ] or [ ] key, and then press [Print]. 3 4. You can print files also by pressing [User ID]. 3. A confirmation screen will appear if the password is completed, the stored file will be displayed. Press [Print]. Depending on the security settings, certain print jobs may not be deleted. • For details... about [User ID], see p.77 "Printing from the Print Job Screen 2. If you want to enter the password again. The file will be deleted. • To stop printing after printing has started, press the [Job Reset] key. Deleting Locked Print files 1....

Software Guide
Page 72
Select the file you forget your password, contact your administrator for help. 5. Enter the password, and then press the [OK] key. Press [Clear] or the [Clear] key to delete using the [ ] or [ ] key, and then press [Job List]. To cancel ... in total. 70 Select [Locked Print Jobs] using the [ ] or [ ] key, and then press [Delete]. 3 4. If you want to enter the password again. A confirmation screen will appear if the password is over 9,000 pages in the printer, and print it from the computer or the printer's control panel later. • A Hold Print...
Select the file you forget your password, contact your administrator for help. 5. Enter the password, and then press the [OK] key. Press [Clear] or the [Clear] key to delete using the [ ] or [ ] key, and then press [Job List]. To cancel ... in total. 70 Select [Locked Print Jobs] using the [ ] or [ ] key, and then press [Delete]. 3 4. If you want to enter the password again. A confirmation screen will appear if the password is over 9,000 pages in the printer, and print it from the computer or the printer's control panel later. • A Hold Print...
Software Guide
Page 73
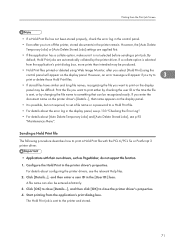
If a collate option is possible, but not required, to set a file name or a password to the printer and stored. 71 If you enter the document name on the display panel. Start printing from the application's print dialog box, more ...
If a collate option is possible, but not required, to set a file name or a password to the printer and stored. 71 If you enter the document name on the display panel. Start printing from the application's print dialog box, more ...


